<Report name> tab
This topic describes the <Report name> tab on the Case management view, which by default is located at the left of the ESPA analysis center screen.
This feature requires option E9 Analysis report. If you do not have this option this tab is not available.
The <Report name> tab allows you to edit the content of the named advanced analysis report. This tab is opened by right-clicking a report folder on the Analysis reports tab then selecting Edit.
The structure of the report is defined by the template you selected when you created the report using the New report dialog box. If you selected no document template then the report will have no structure until you add some.
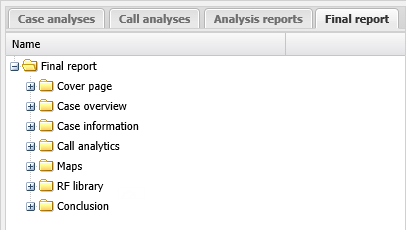
You can change the ordering of the report contents by left-clicking an item then dragging it to the new position.
You can only have one <Report name> tab open at a time, therefore if you select to open a new one the current one will automatically save any changes you've made and close.
The following graphics display a few of the menus available on this tab:
-
Right-click the top level folder to display this menu, which allows you to close the report tab, apply and manage a document styles template, add sections, and add narrative sections to your report:

-
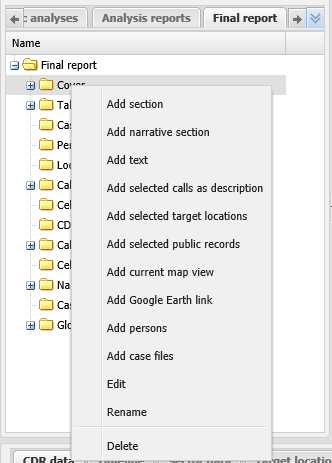
Right-click a section to add different types of content to your report. You can also rename, delete or edit the section style using this menu:
-
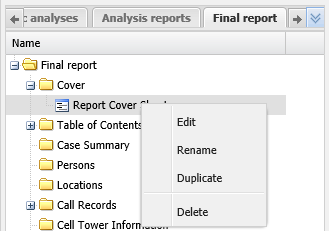
Right-click an item within a section, what is displayed on this menu depends on the type of item you clicked but the most common menu allows you to edit, rename, duplicate or delete the item:
For further information on getting started using this tab refer to To create a new report.
This feature requires option E9 Analysis report. If you do not have this option this tab is not available.

Click to open or close the view. You can also click and drag the view border to change the view size.


Click to expand the view of the Case management view so that it displays the total width of the contents of the currently selected tab. If the view is expanded click to restore it to its previous size.

Click to display a list of all the tabs that are currently open on the Case management view. This is useful if you have a lot of tabs open as it provides an alternative method to select that tabs rather than locating them by scrolling along them.
Right-click any folder to display a menu which contains Add section. Click to add a new report section. The Add section dialog box opens which allows you to name and select the format for your new section. For further information refer to To add a section to a report.
This menu item is only available if the Narrative dialog box is currently open. Right-click any folder to display a menu which contains Add narrative section. Click to add a new narrative section. For further information refer to To add a narrative to a report.
Right-click the top level folder to display a menu which contains Upload template. Click to open the Upload template dialog box which allows you to upload a Microsoft Word and PowerPoint template into OSS-ESPA. This type of template defines the Microsoft Word text styles, for example the color and size of a Heading 1, and the Microsoft PowerPoint master slides that are available for you to use in your advanced analysis report. These templates can be uploaded in either: *.doc, *.docx, *.dot, or *.dotx Microsoft Word file formats, or *.ppt, *.pptx, *.pot* or .potx Microsoft Power Point file formats, however the recommended formats are *.docx and *.potx. For further information refer to To upload a report template that defines the document styles and master slide layouts.
Right-click the top level folder to display a menu which contains Delete template. This allows you to delete the Microsoft Word or Microsoft PowerPoint template that is currently applied to the report. This type of template defines the Microsoft Word text styles, for example the color and size of a Heading 1, and the Microsoft PowerPoint master slide layouts that are available for you to use in your advanced analysis report.
Right-click the top level folder to display a menu which contains Download template. This allows you to download the Microsoft Word or Microsoft PowerPoint template that is currently applied to the report. This type of template defines the Microsoft Word text styles, for example the color and size of a Heading 1, and the Microsoft PowerPoint master slide layouts that are available for you to use in your advanced analysis report.
Right-click the top level folder to display a menu which contains Close report. Click to close the <Report name> tab. Your report is automatically saved.
Right-click a section folder to display a menu which contains Add text. Click to add text to the selected report section. The Add text dialog box opens which allows you to add text, graphics and keywords to the selected section. For further information refer to To add text to a report.
Right-click a section folder to display a menu which contains Add selected calls as description. Click to add a description of all the calls you currently have selected on the CDR data tab into the selected report section.
The call events are listed in the report in chronological order and detail:
- the type of person, either; suspect, victim, witness or other.
- the person's name.
- the type of service, either; data service (for Web browsing), SMS (for texting) , voice call or phone. phone is only used for CDRs that are not specific in identifying the type of service.
- the initiating phone number.
- the date and time.
- the length of the call. This is only applicable to data service or voice calls.
- whether the call was inbound or outbound. This is only applicable to SMS or voice calls. This information is only displayed if the CDR contains this information.
- the phone number that the call was made to or from. This information is only displayed if the CDR contains this information.
For the target location conditions you selected using the Add call description into report dialog box the call description then also includes for the nearest target location to the call the:
- the location name.
- the location type, either; crime scene, frequented area, meeting place or other.
-
the distance the starting (originating) cell was from the location.
- the distance the ending (terminating) cell was from the location.
- the time of the call in relation to either the Event start or Event end times. If the call was made between these two times it is highlighted in the report as being [during] the event.
For further information refer to To add details of the selected calls to a report.
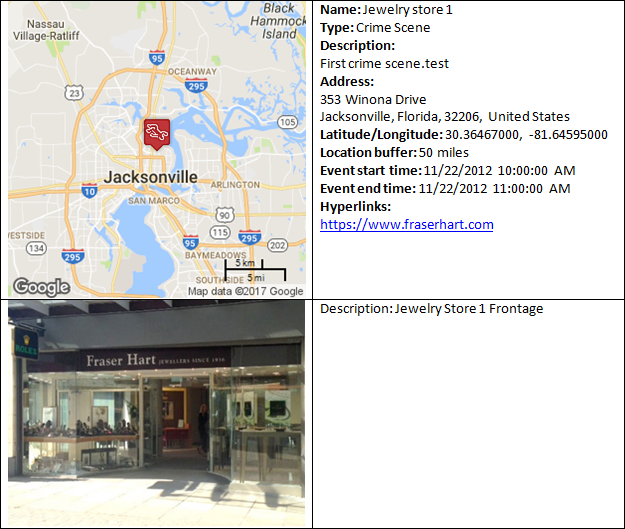
Right-click a section folder to display a menu which contains Add selected target locations. All the target locations you have the check box selected for on the Target locations tab are added to the report. A graphic of the map along with the details of the location are included as shown in the following graphic. If you have uploaded any files associated with the target location to your case then these are also included in the report. Note, the only graphics file that is included in the report is either the first one you uploaded or the one you selected as the default. For information on setting the default graphic refer to Default picture.
For further information refer to To add target location information to a report.
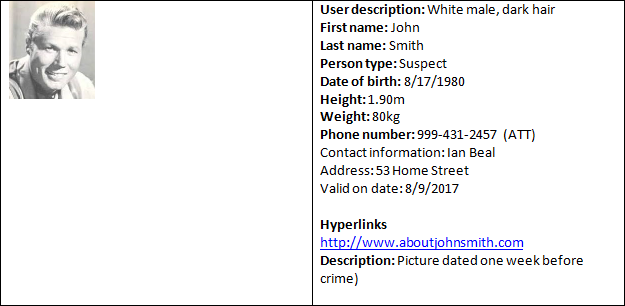
Right-click a section folder to display a menu which contains Add persons. The Add persons dialog box opens which allows you to select which persons you want to include in the report. The details of the person are included as shown in the following graphic. If you have uploaded any files associated with the person to your case then these are also included in the report. Note, the only graphics file that is included in the report by default is either the first one you uploaded or the one you selected as the default, however you can include them all by selecting Include additional images on the Add persons dialog box. For information on setting the default graphic refer to Default picture.
For further information refer to To add person information to a report.
Right-click a section folder to display a menu which contains Add selected public records. All the public records you have the check box selected for on the Public records tab are included in the report as an embedded object. This means that the public record data retains its original .csv format. You can then click on the object in the report to open it if your report is output to Microsoft Word or Microsoft PowerPoint. For further information refer to To add public record information to a report.
Right-click a section folder to display a menu which contains Add current map view. Click to add the current map view into the selected report section. You can also select using the Add map view into report dialog box to include or embed the selected CDR data into the report.
The complete list of map details saved is:
- The case file number, phone user details, CDR data, sector data, target locations, timeline, contact data, TA data, HO data, public records and maps.
- The map zoom.
- Any filters, column selections and column ordering applied to any tabs.
- The calls and call locations that are selected on the CDR data tab.
- The sectors that are selected on the Sector data tab.
- The target locations that are selected on the Target locations tab or the Legend/Filter view.
- The address locations and the record usage that are selected on the Public records tab.
- The TA arcs that are selected on the TA data tab.
- The handovers that are selected on the HO tab.
- The geo-locations that are selected on the Geo-loc data tab.
- Any annotation you have added to the map using the map drawing tools.
- Any sector, target location and tower reference pop-ups you have open on the map.
- The cell coverage map.
At a later date, if you decide you want to edit the map you can display the map again using Load on map.
For further information refer to To add a map view to a report.
Right-click a section folder to display a menu which contains Add Google Earth Link. Click to add a Google Earth link for the current map location to your report. The link appears in your report along with a password. If you click the link and enter the password Google Earth opens and displays the location of the map. For further information refer to To add a Google Earth link to a report.
Right-click a section folder to display a menu which contains Add case files. Click to add case files to your report. The Add case files dialog box opens which allows you to select which files to include in your report and how you want them to appear. For further information refer to To add case files to a report.
Right-click a section folder, text item or case file then click to display a menu which contains Edit.
For a:
- section folder, click to edit the name and format of the report section. The Edit section dialog box opens.
- text item, click to edit the text in the report section. The Edit text dialog box opens.
- case file, click to edit which case files you want included and how you want them included. The Edit case files dialog box opens.
If you have previously added a map view or Google Earth link to your report using Add current map view or Add Google Earth Link then right-click the item to display Load on map. Click to load the saved map configuration. This removes all the map configuration currently displayed on the map and in the Data view and then displays the information you selected. If there is also cell coverage configuration displayed on the map from the Cell coverage tab it remains on the map. If you also need to remove the cell coverage use Remove from map on the Cell coverage tab.
If you have previously added a map view or Google Earth link to your report using Add current map view or Add Google Earth Link then right-click the item to display Update with current map view. Click to overwrite the map view that is currently in your report.
If you have previously added a map view to your report using Add current map view then right-click the Map view item to display Edit notes. Click to edit notes associated with your map. The Edit notes dialog box opens which allows you to edit text, graphics and keywords.
Select either a section folder or an individual item, then click to display a menu which contains Rename. Click to rename the selected section folder or item. The Rename section dialog box opens allowing you to enter a new name. When you click OK the section folder or item is renamed on your tab.
If you have previously added any type of item, then click to display a menu which contains Duplicate. Click to duplicate the selected item. The Duplicate item dialog box opens allowing you to enter a new name for the item. When you click OK the new item is added to the tab.
Right-click either a folder or an individual item to display a menu which contains Delete. Click to delete the selected section. A Delete section message opens to confirm that you want to delete the selected section folder or item. When you click OK the item is removed from the tab.
Right-click the top level folder to display a menu which contains Close report. Click to close the <Reports name> tab.