Managing advanced analysis reports
This topic describes how to manage advanced analysis reports on the ESPA analysis center screen. It also describes how to manage sections and text items, and how to rename, duplicate and delete all types of items you can add to reports.
This feature requires option E9 Analysis report. If you do not have this option this feature is not available.
This procedure details all the steps required to create a new report, add content to a report, run a report and then download the report to view.
-
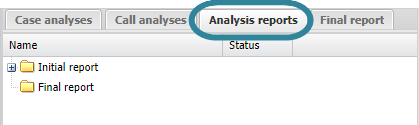
On the ESPA analysis center screen's Case management view select the Analysis reports tab.
-
Click
 to add a new report folder.
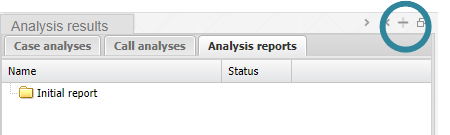
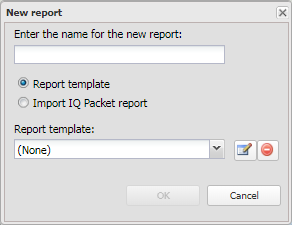
The New report dialog box opens.
-
Enter the name for your report then either:
- select the template you want to use then click OK. For information on templates refer to To create a new Microsoft Word report template that defines the report structure.
- select Import IQ packet report then select the IQ packet you want to import. This is only applicable if your account has the IQ packet feature.
The new report is now displayed on the Analysis reports tab.
NOTE: If you are creating a Microsoft PowerPoint report it is recommended that you use the "Default-PowerPoint (ESPA template)" report template. However, if you do want to create your own template then download the "Default-PowerPoint (ESPA template)" as described in Managing advanced analysis reports, modify it's master slide layouts using Microsoft PowerPoint, then upload it as described in Managing advanced analysis reports. To edit the master slide layouts within Microsoft PowerPoint select the View tab then click Slide Master.
-
Right-click the report folder then click Edit on the displayed menu.
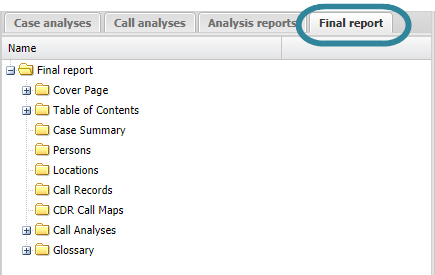
A new tab opens which is titled with the report's name.
-
On the <Report name> tab, if required apply a document styles template as detailed in To upload a report template that defines the document styles and master slide layouts.
-
On the <Report name> tab you can manage the content of your report. You can add:
- Sections as detailed in To add a section to a report.
- Narrative sections as detailed in To add a narrative to a report.
- Text as detailed in To add text to a report.
- Target locations as detailed in To add target location information to a report.
- Persons as detailed in To add person information to a report.
- Public records as detailed in To add public record information to a report.
- Map views as detailed in To add a map view to a report.
- Google Earth links as detailed in To add a Google Earth link to a report.
- Case files as detailed in To add case files to a report.
- Call analysis results as detailed in To add call analysis results in tabular format to a report and To add call analysis results in graphical format to a report.
- Tower analysis results as detailed in To add tower analysis results to a report.
- Once you have added all the required content to your report, select the Analysis reports tab.
-
Right-click the report folder then click Run on the displayed menu.
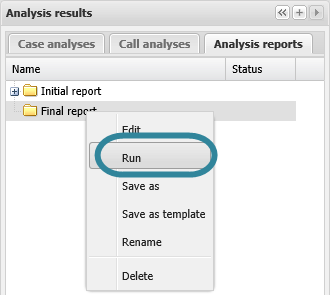
The Run report dialog box opens. Click OK. Note, the file format that is available to select is dependent on the template that is applied to the report..
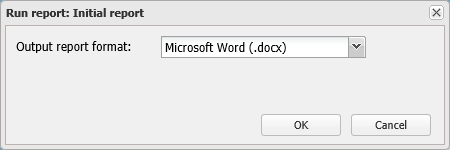
A revision of the report is displayed along with the date and time it was generated. Once the Status of the report is "Success" then it is ready to view, this should only take a few minutes but depends on the size of your report and other analyses that are running at the same time. For further information on any other status messages refer to Status.
-
Right-click the revision of the report then click Download report on the displayed menu.
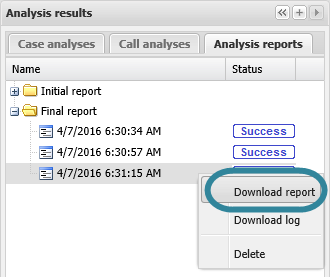
The report revision is downloaded in the file format you selected when you run the report.
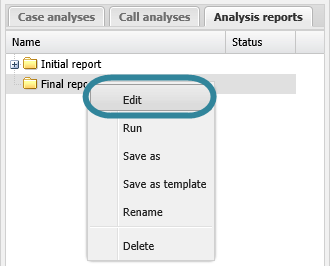
This procedure assumes you have created a report and added details to is as detailed in To create a new report.
-
On the ESPA analysis center screen's Case management view select the Analysis reports tab.
-
Right-click the report folder for the report you want to edit then click Edit on the displayed menu.
A new tab opens which is titled with the report's name.
-
On the <Report name> tab you can edit the content of your report. Right-click any item you have added and select Edit or Edit notes. Note, not all items can be edited, for example call analyses. If you want to change them you must delete them and then add new results.
- Once you have edited all the required content, select the Analysis reports tab.
-
Right-click the report folder then click Run on the displayed menu.
The Run report dialog box opens. Click OK. Note, the file format that is available to select is dependent on the template that is applied to the report.
A revision of the report is displayed along with the date and time it was generated. Once the Status of the report is "Success" then it is ready to view, this should only take a few minutes but depends on the size of your report and other analyses that are running at the same time. For further information on any other status messages refer to Status.
-
Right-click the revision of the report then click Download report on the displayed menu.
The report version is downloaded in the file format you selected when you run the report.
This procedure assumes you have created a report as detailed in the first three steps of To create a new report.
-
On the ESPA analysis center screen's Case management view select the Analysis reports tab.
-
Right-click the report folder then click Rename on the displayed menu.
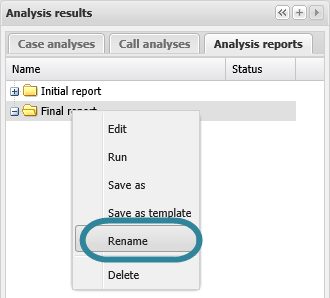
The Rename dialog box opens.
- Enter your new report name then click OK. The new name is now displayed on the Analysis reports tab.
This procedure describes how to save an additional copy of a report so that you can edit it independently of the original report.
-
On the ESPA analysis center screen's Case management view select the Analysis reports tab.
-
Right-click the report folder then click Save as on the displayed menu.
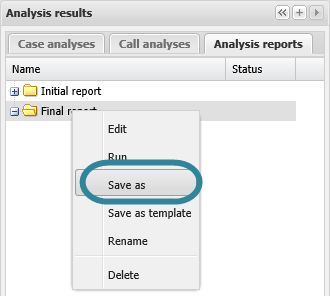
The Save report as dialog box opens.
- Enter your new report name then click OK. The new report is now displayed on the Analysis reports tab
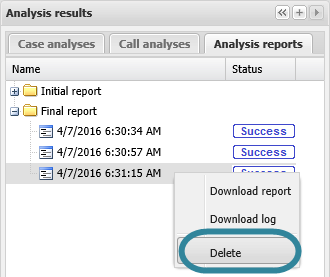
This procedure describes how to delete both a complete report and an individual revision of the report.
-
On the ESPA analysis center screen's Case management view select the Analysis reports tab.
-
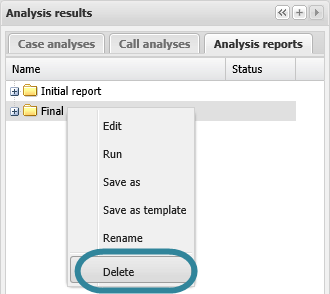
You can chose to delete a complete report or just to delete a specific revision of a report. To delete:
-
A complete report, right-click the report folder then click Delete on the displayed menu. Click OK on the Delete report dialog box to remove the report from the Analysis reports tab.
-
A specific revision of the report, expand the report folder to display all the revisions then right-click the revision you want to delete and click Delete on the displayed menu. Click OK on the Delete report dialog box to remove the report revision from the Analysis reports tab.
-
This procedure assumes you have created a report as detailed in the first three steps of To create a new report.
If you currently have the <Report name> tab open then go directly to step 3.
-
On the ESPA analysis center screen's Case management view select the Analysis reports tab.
-
Right-click the report folder then click Edit on the displayed menu.
A new tab opens which is titled with the report's name.
-
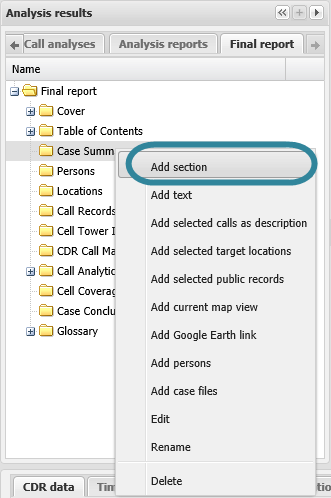
On the <Report name> tab, right-click the folder in the report to which you want to add a section under, then click Add section.
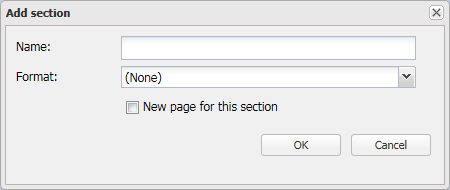
The Add section dialog box opens.
-
Enter a name and select the format for the section. In Format use the different levels of headings to create sections and subsections within your report, this will also create structure within your table of contents. If you want the section to start on a new page then select New page for this section.
Click OK. The new section is displayed in the report structure. If you want to move it's position then left-click it and drag it to a new position.
This procedure assumes you have created a report as detailed in the first three steps of To create a new report.
If you currently have the <Report name> tab open then go directly to step 3.
-
On the ESPA analysis center screen's Case management view select the Analysis reports tab.
-
Right-click the report folder then click Edit on the displayed menu.
A new tab opens which is titled with the report's name.
-
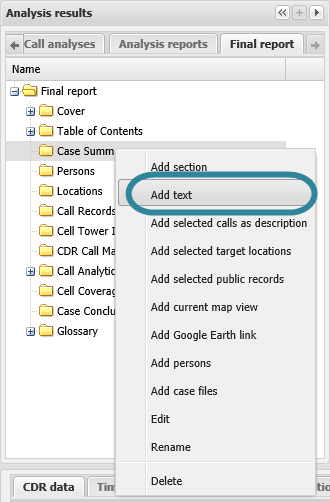
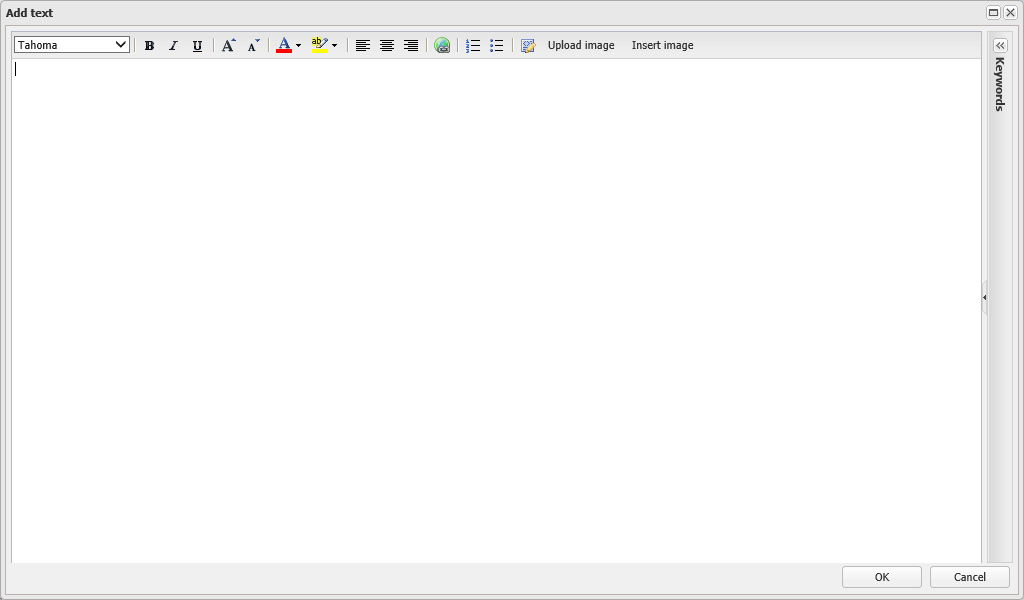
On the <Report name> tab, right-click the folder in the report to which you want to add text to, then click Add text.
The Add text dialog box opens.
-
Enter and format your required text.
You can also include images in text items. Click Insert image to select images that you uploaded to your case. If you want to add an image directly to the report that you have not previously uploaded to your case then click Upload image. However, note that this image will only be available in this report and will not be available to include in other reports for this case.
To include keywords into your text, double-click an item listed in Keywords. For further information refer to Keywords.
Click OK when you are complete. The new text is displayed in the report structure.
- If you want to move it's position then left-click it and drag it to a new position.
-
By default the item is named "Text", you may want to rename it by right-clicking it and selecting Rename.
This procedure assumes you have created a report as detailed in the first three steps of To create a new report.
If you currently have the <Report name> tab open then go directly to step 3.
-
On the ESPA analysis center screen's Case management view select the Analysis reports tab.
-
Right-click the report folder then click Edit on the displayed menu.
A new tab opens which is titled with the report's name.
-
On the <Report name> tab, right-click the folder in the report to which you want to add a table of contents to, then click Add text.
The Add text dialog box opens.
-
In Keywords double-click "Table of contents" so that it appears as [Table of contents] in your text item then click OK.

When you run the report the table of contents is automatically generated. If the indentation of the items in your table of contents isn't how you want then you must change the heading levels you have applied to the sections in the report. For further information refer to Format.
This procedure assumes you have created a report as detailed in To create a new report and that you have previously added any type of section or item, for example a text item as detailed in To add text to a report.
If you currently have the <Report name> tab open then go directly to step 3.
-
On the ESPA analysis center screen's Case management view select the Analysis reports tab.
-
Right-click the report folder for the report you want to edit then click Edit on the displayed menu.
A new tab opens which is titled with the report's name.
-
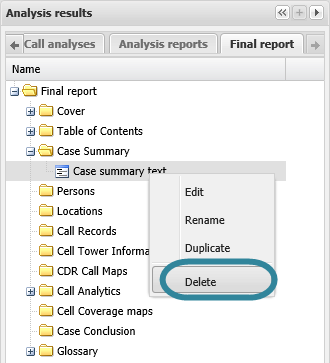
On the <Report name> tab, locate the position in your report of the section or item you want to rename, then right-click and select Rename.
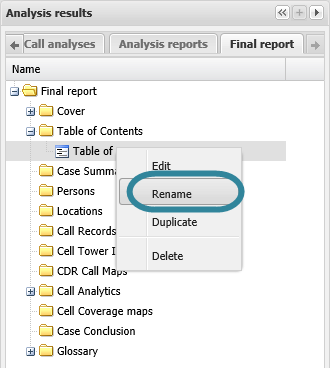
The Rename section dialog box opens.
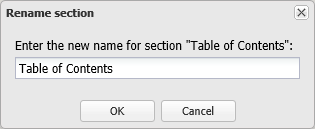
- Enter the new name for your section or item then click OK. The name is updated on the <Reports name> tab and in addition, for all sections other than those you specified with a style of (none), the section header in the report is also updated when you run a new version of your report.
This procedure assumes you have created a report as detailed in the first three steps of To create a new report and that you have previously added any type of item, for example a text item as detailed in To add text to a report.
If you currently have the <Report name> tab open then go directly to step 3.
-
On the ESPA analysis center screen's Case management view select the Analysis reports tab.
-
Right-click the report folder then click Edit on the displayed menu.
A new tab opens which is titled with the report's name.
-
On the <Report name> tab, locate the position in your report of the item then right-click and select Duplicate.
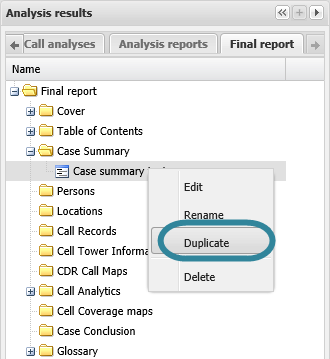
The Duplicate item dialog box opens.
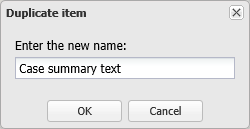
-
Enter a name for your new item then click OK. The duplicated item is displayed in the report structure. If you want to move it's position then left-click it and drag it to a new position.
This procedure assumes you have created a report as detailed in To create a new report and added a section or item, for example a text item as detailed in To add text to a report.
If you currently have the <Report name> tab open then go directly to step 3.
-
On the ESPA analysis center screen's Case management view select the Analysis reports tab.
-
Right-click the report folder then click Edit on the displayed menu.
A new tab opens which is titled with the report's name.
-
On the <Report name> tab, locate the position in your report of the section or item you want to delete then right-click and select Delete. Click OK on the Delete section dialog box to remove the section or text item from the <Reports name> tab and as a section or item within your report when you run a new version of your report.