The Sentinel solution is a Lawful Intercept CALEA compliant Pen Register Trap and Trace/Title III collection system. Sentinel collects both cellular communication and social media intercepts in real-time and combines the intercepted data with geo-location information. The collected data provides you with a detailed view of a target's communication activities and location information.
This section of the Help describes how to use OSS-ESPA's Sentinel solution.
report: UE reporting information messaging (for example, location reporting, session failed, network/subject signaling)
notify: LI standard surveillance messaging
test: LI standard connection test messages
Other messaging types
ims-sms-ack: SMS acknowledgement; (obsolete) ack is grouped with ims-sms
sms-notify: SMS notification (not used)
sms-report: SMS report messaging
wap-sms: WAP protocol encapsulated in SMS PDU; other signaling over SMS protocol that is not messaging, for example mms notification, voicemail, carrier signaling
mms-notify: multimedia notification; message waiting for retrieval
How do I add a new target location on the Sentinel screen?
How to add target locations from the Sentinel screen
You can also click here for a short video showing how to add target locations from the map.
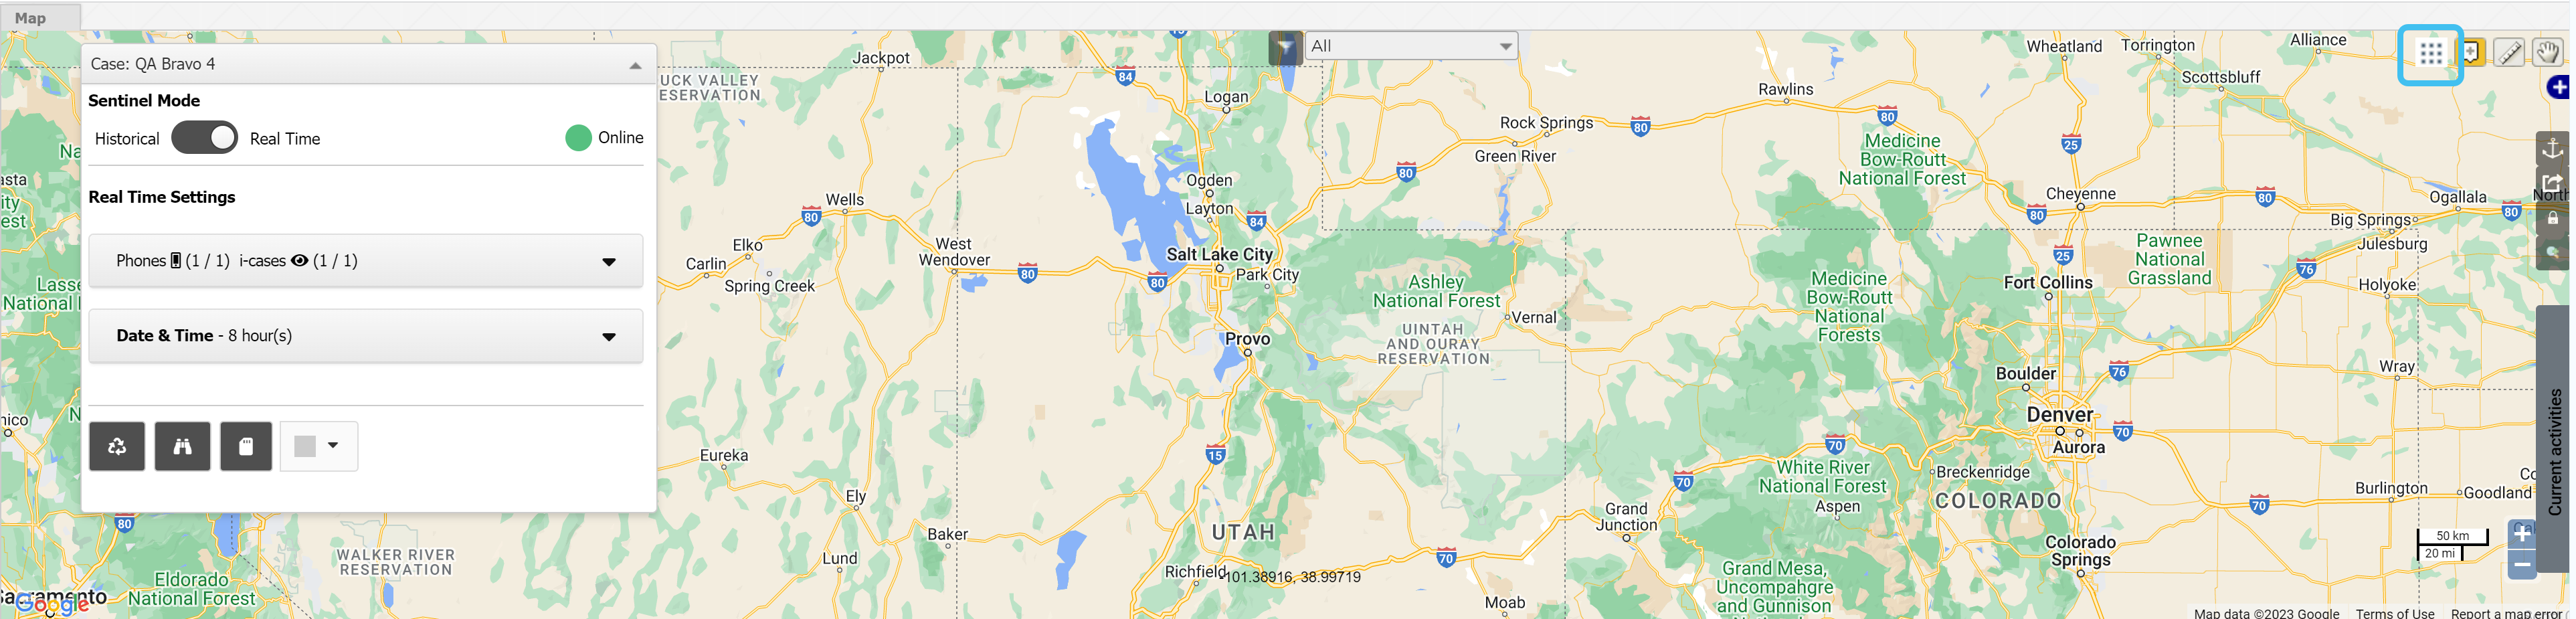
On the map of the Sentinel screen click and ensure the icon is orange .
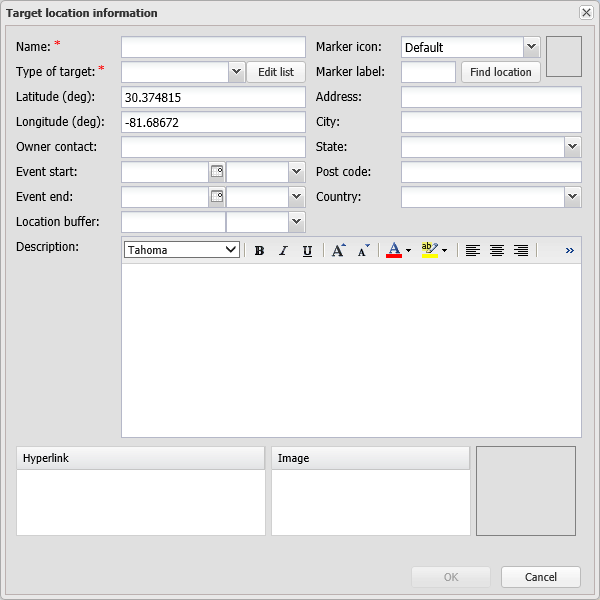
Left-click the map on the location you want to add a target location to. The Target location information dialog box opens with the latitude and longitude of the location you clicked completed.
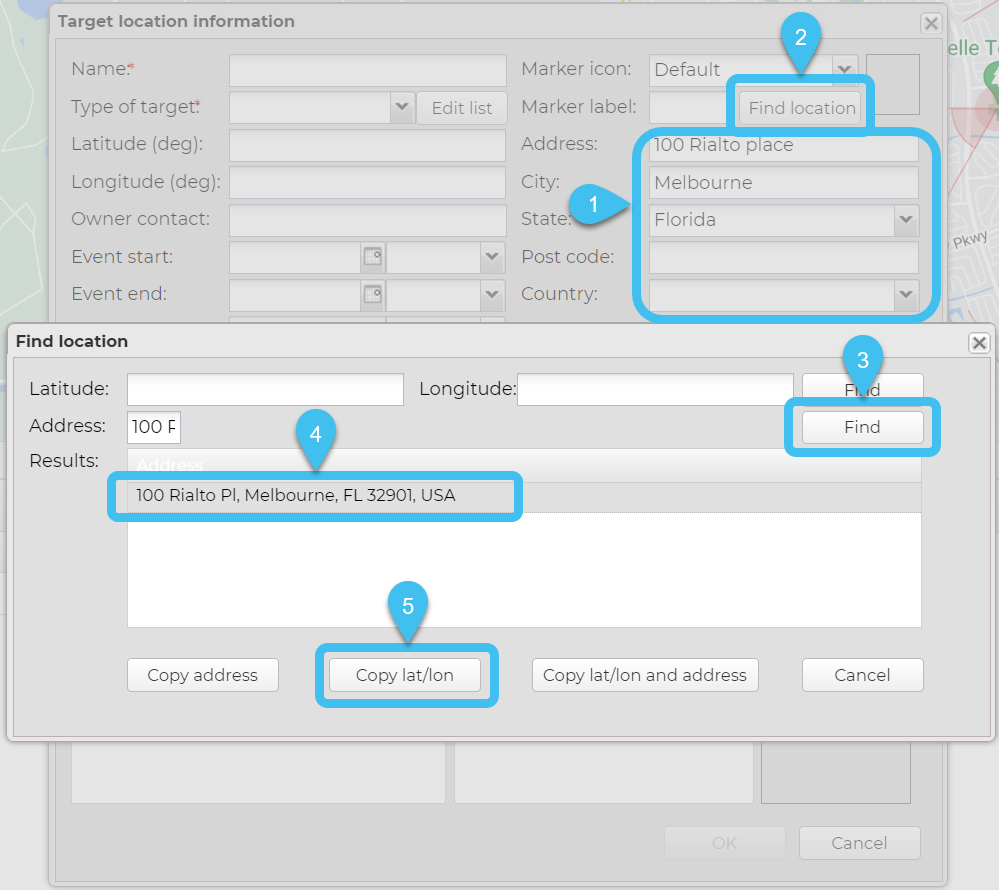
Complete the rest of the information on the dialog box as required. If you require a description of any settings refer to Target location information dialog box. Note, you must enter a Name and Type of target.
If you want to enter an address for the selected latitude/longitude the quickest method to do this is to click Find location, then click Find alongside the Latitude/Longitude and in Results select the address.
Alternatively, if you know the address and want to update the latitude/longitude, enter it in the Target location dialog box, click Find location, then click Find alongside the address and in Results select the address then click Copy lat/lon which automatically enters the latitude/longitude in the Target location dialog box.
To run an IQ packet using this location you must also include the Latitude, Longitude, Event Start, Event end and Location buffer.
How do I add and edit person details from the Sentinel screen?
Managing person details on Sentinel
This topic explains how to edit a person's details when you are on the Sentinel screen.
Viewing the Sentinel screen on a secondary monitor is an efficient method of visualizing location information while monitoring PRTT data. If you need to edit a person's details, then use the following procedure.
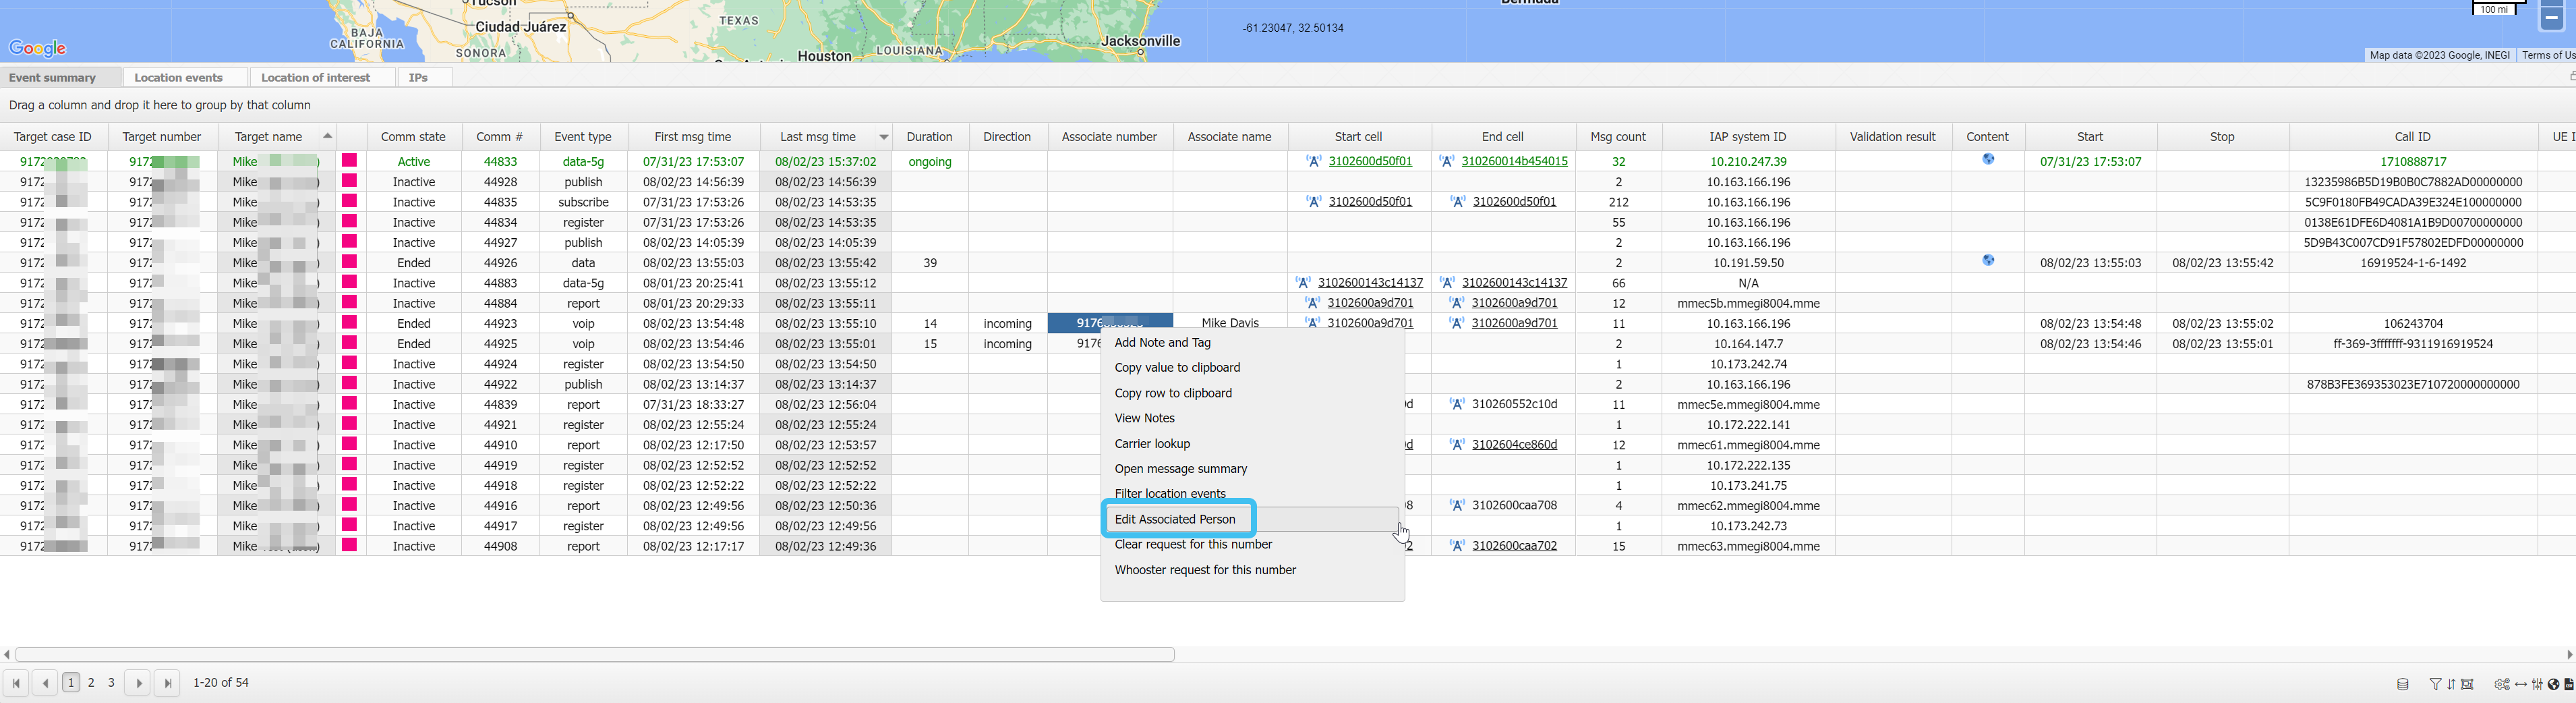
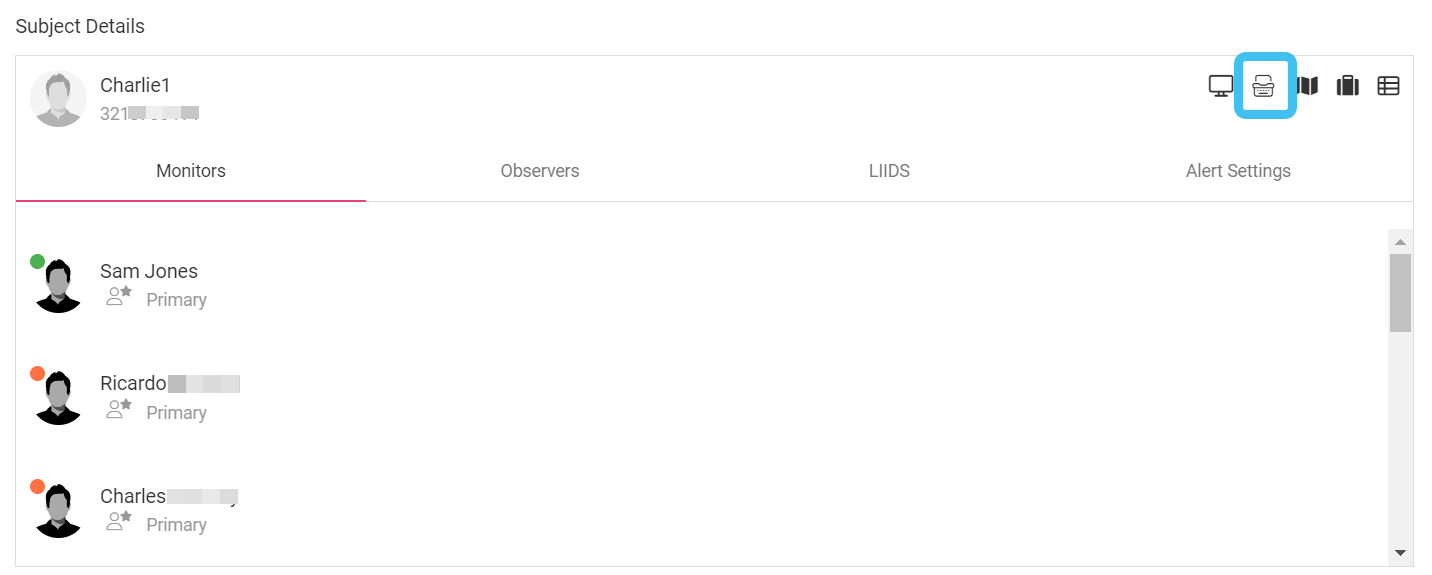
On the Event summary tab, in either the Target number, Target name, Associate number or Associate name column, click their number or name and select Edit person or Edit associated person.
The Edit person screen opens.
To edit the person's details either click then from the menu select Edit person or click alongside their phone number.
The person's details are displayed.
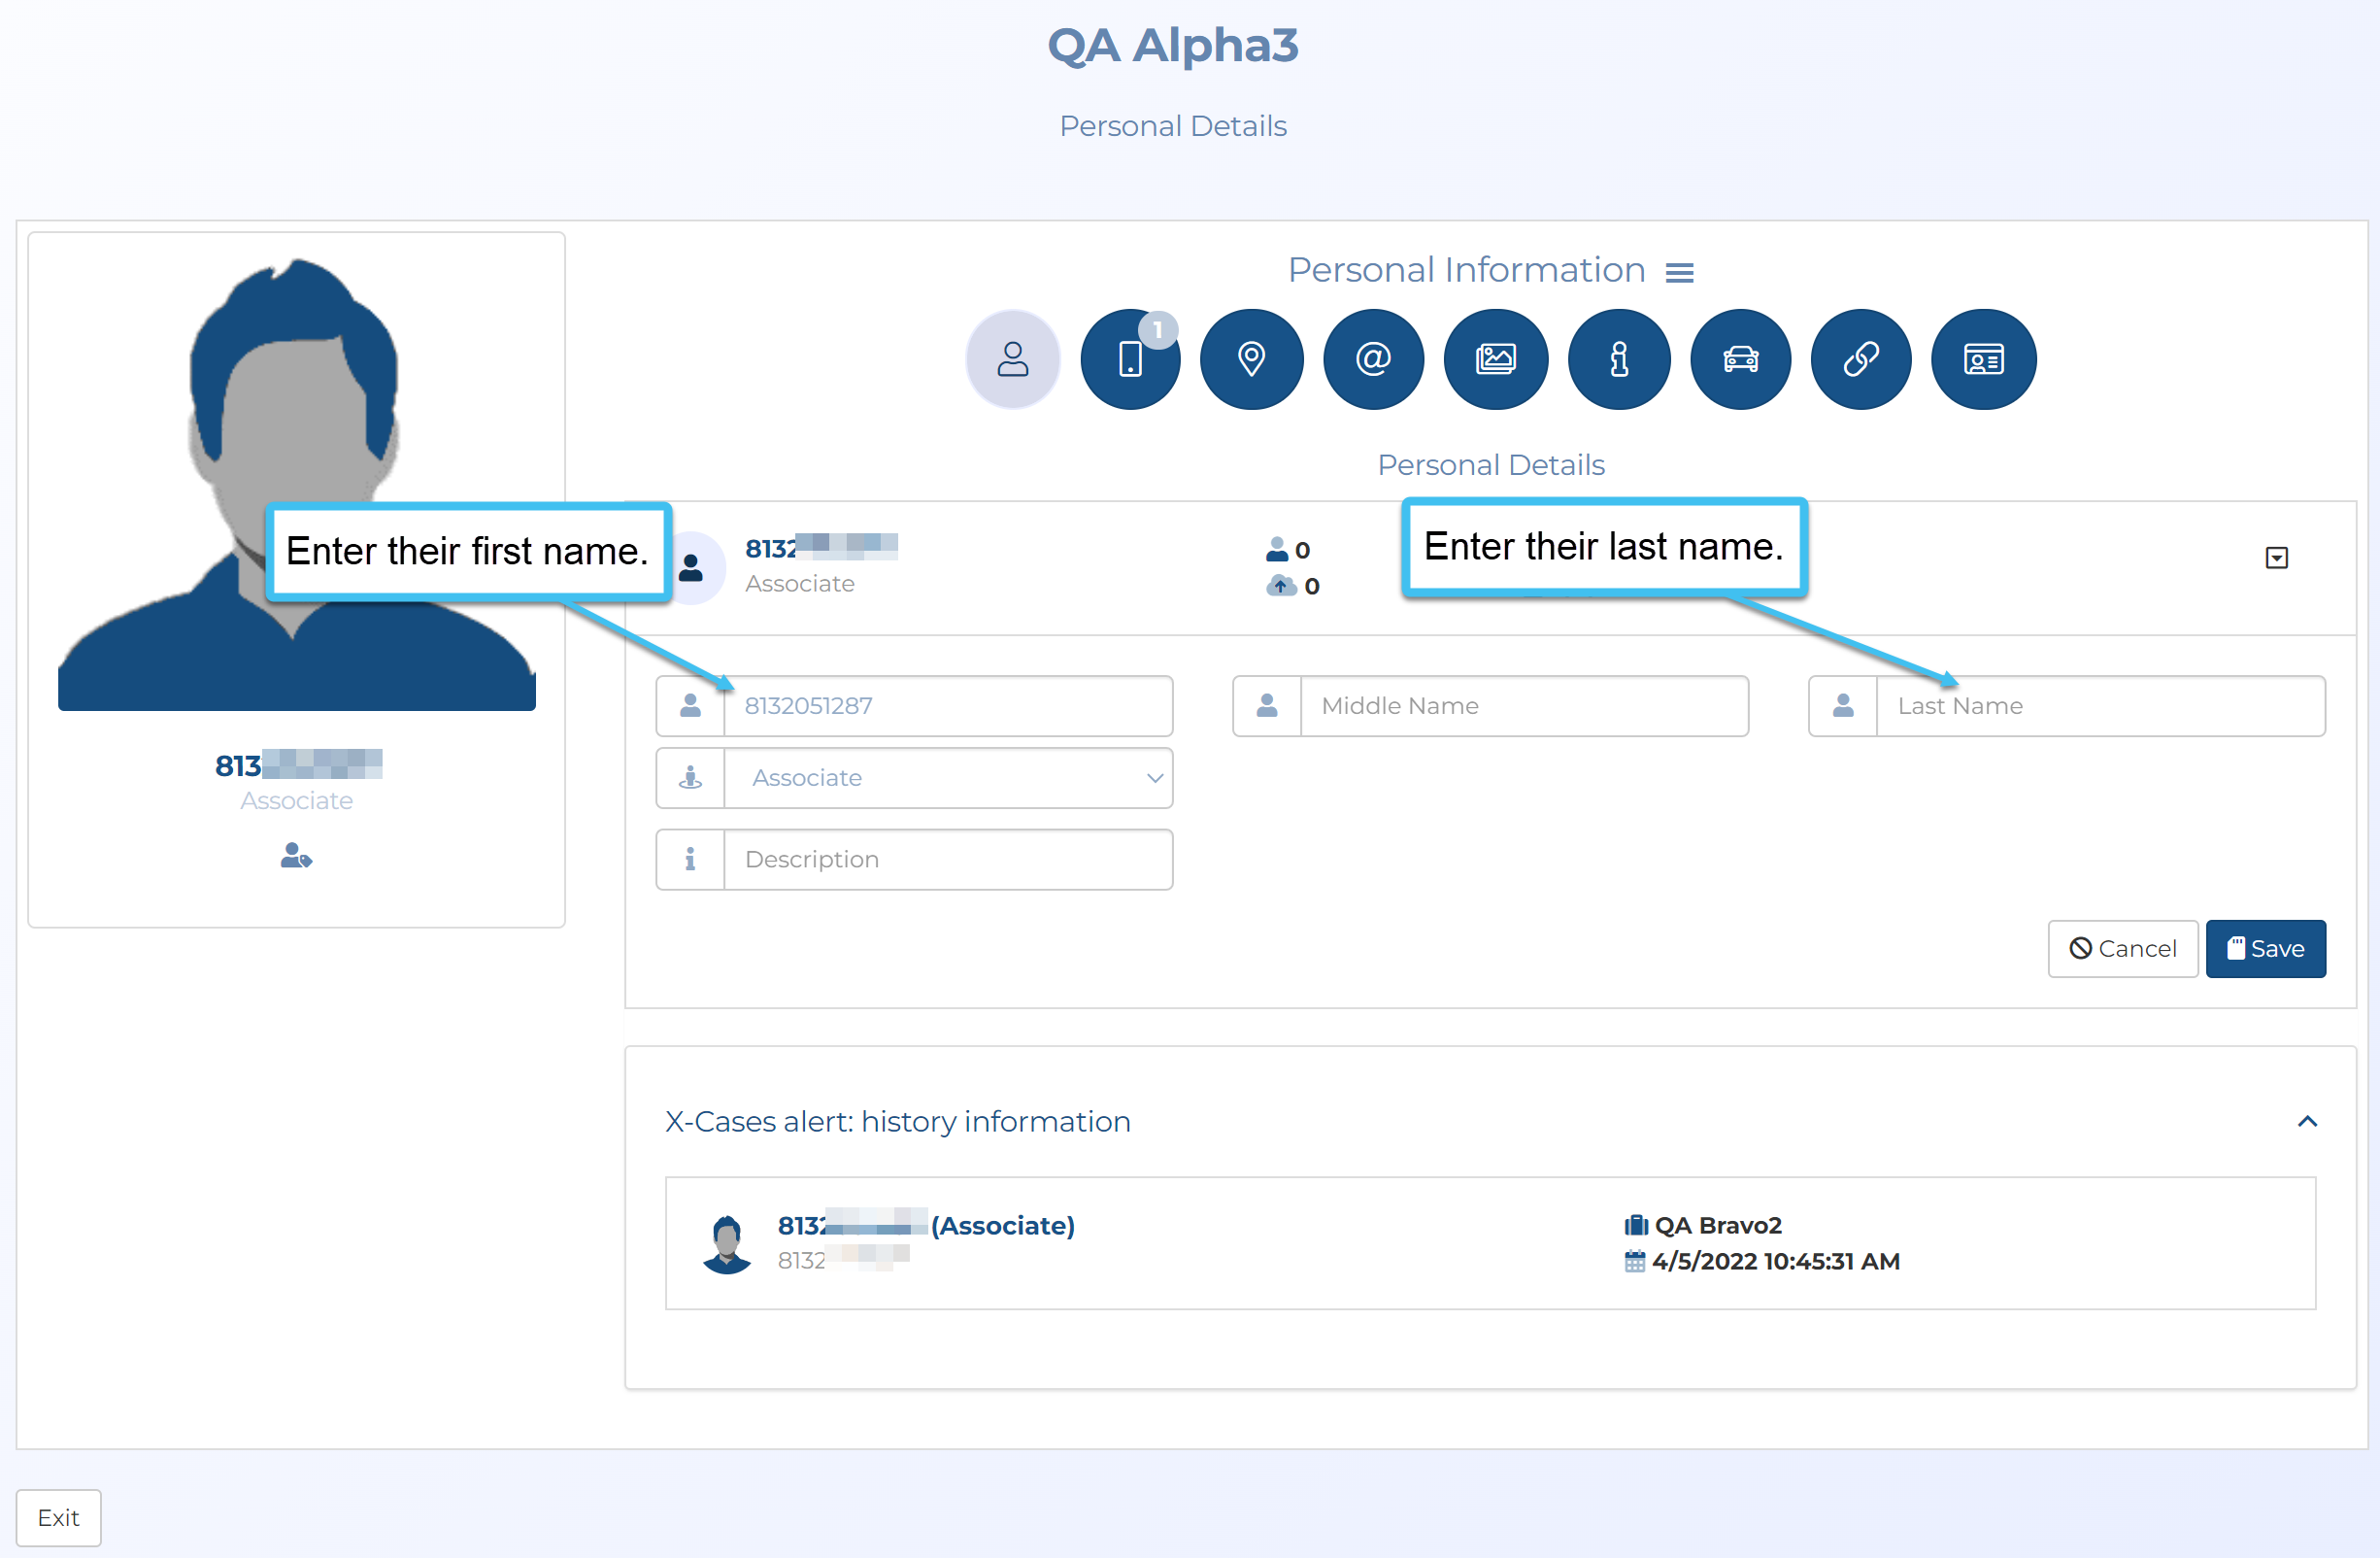
You can replace their phone number with their first name and enter their last name.
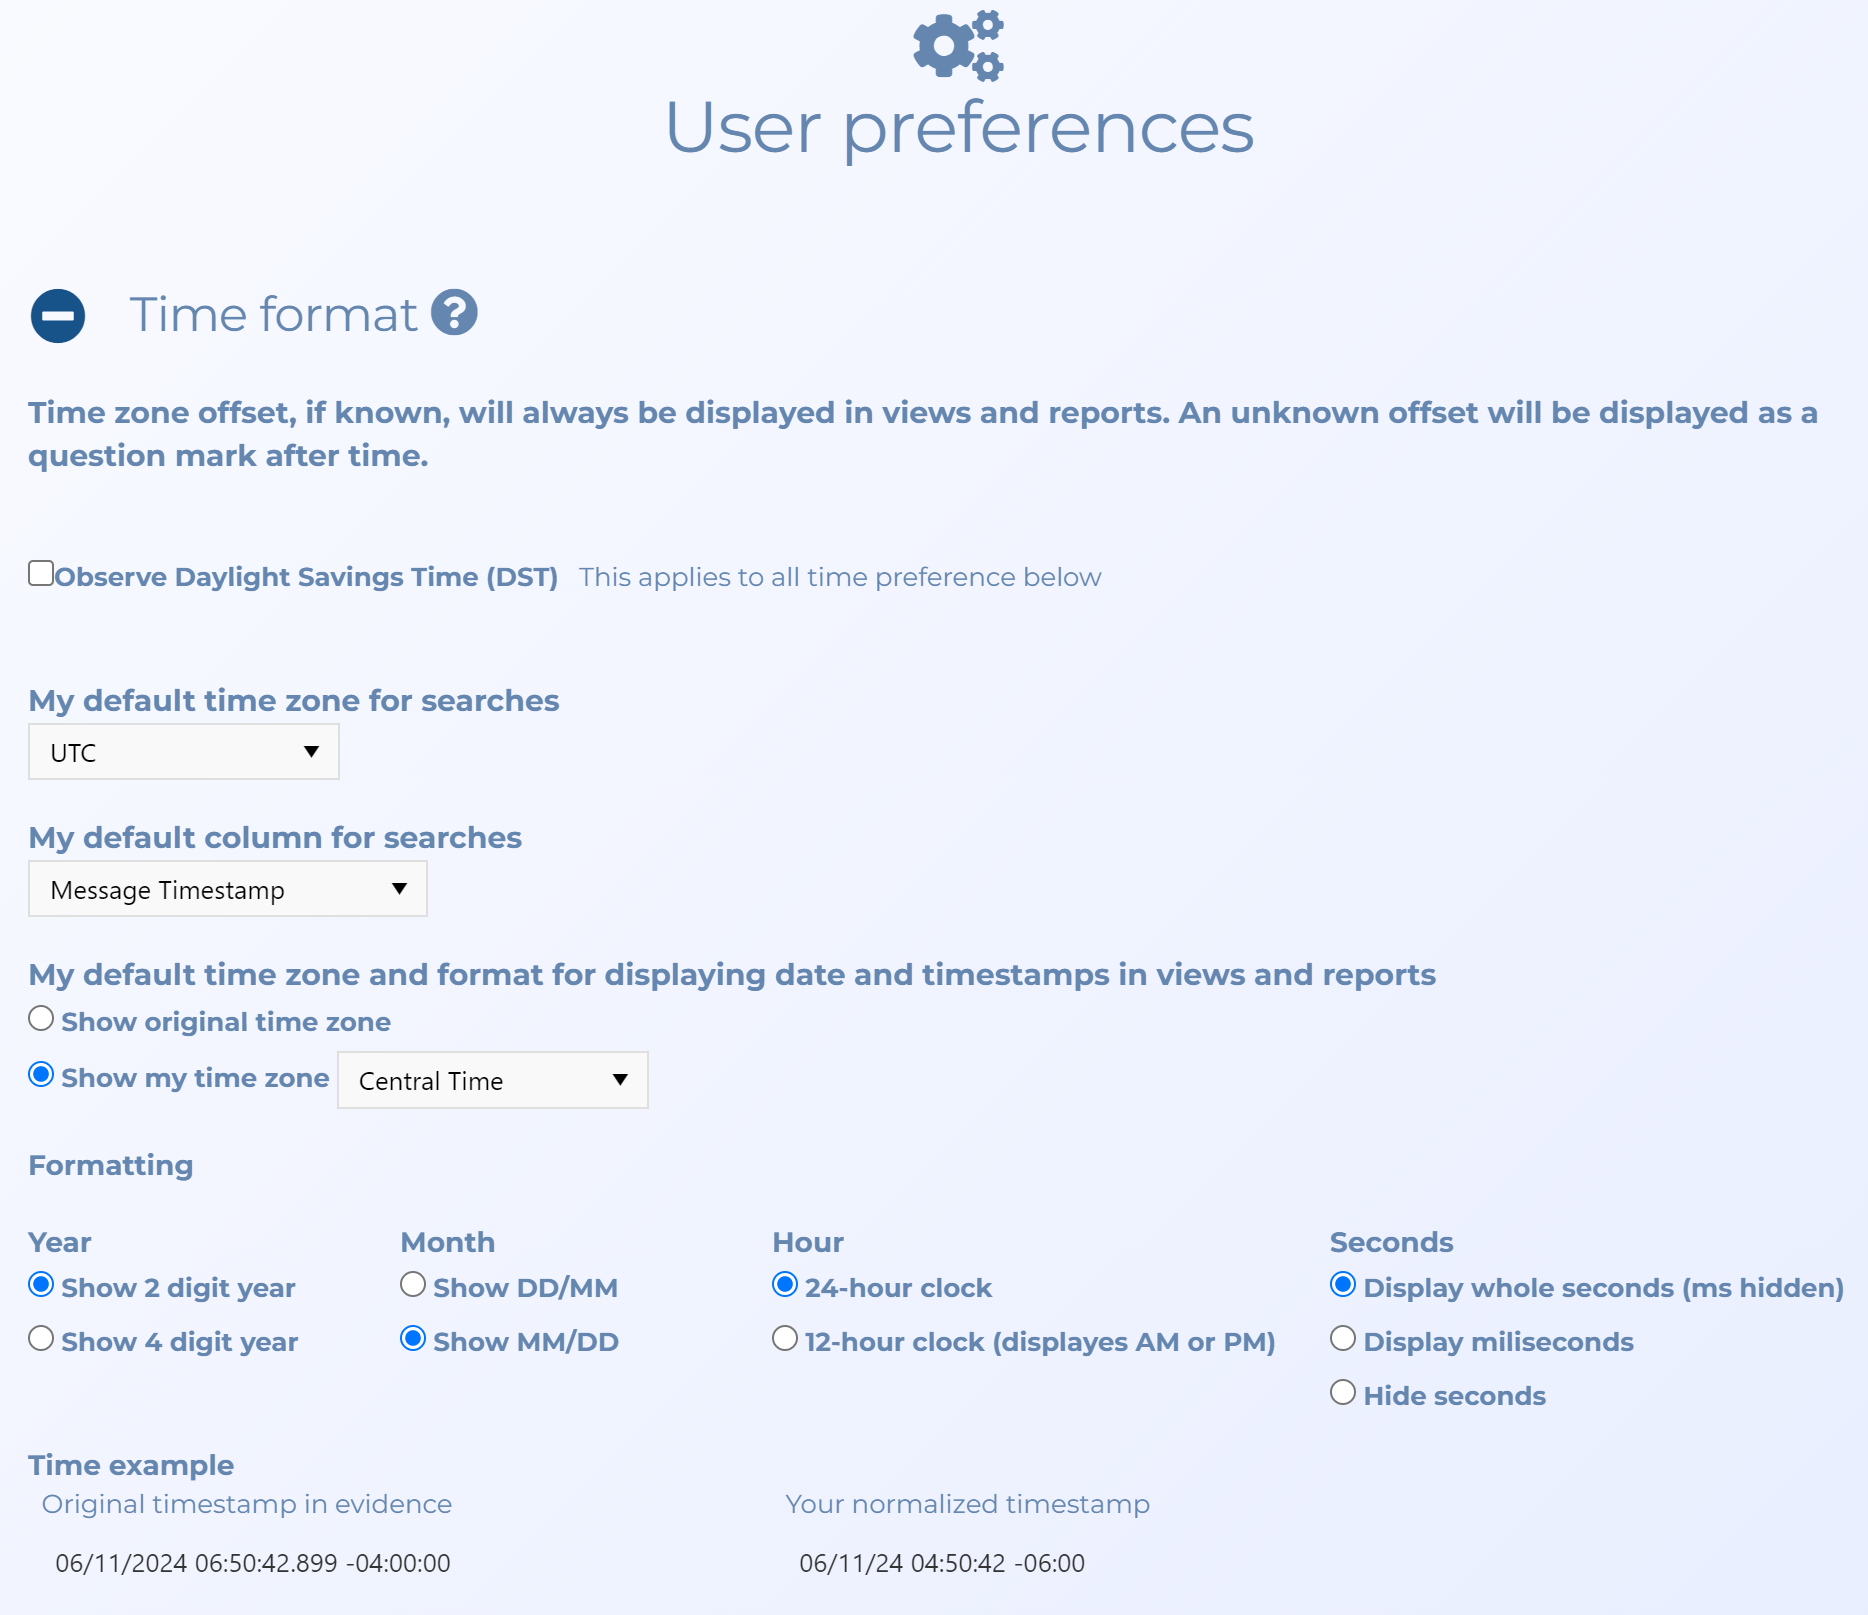
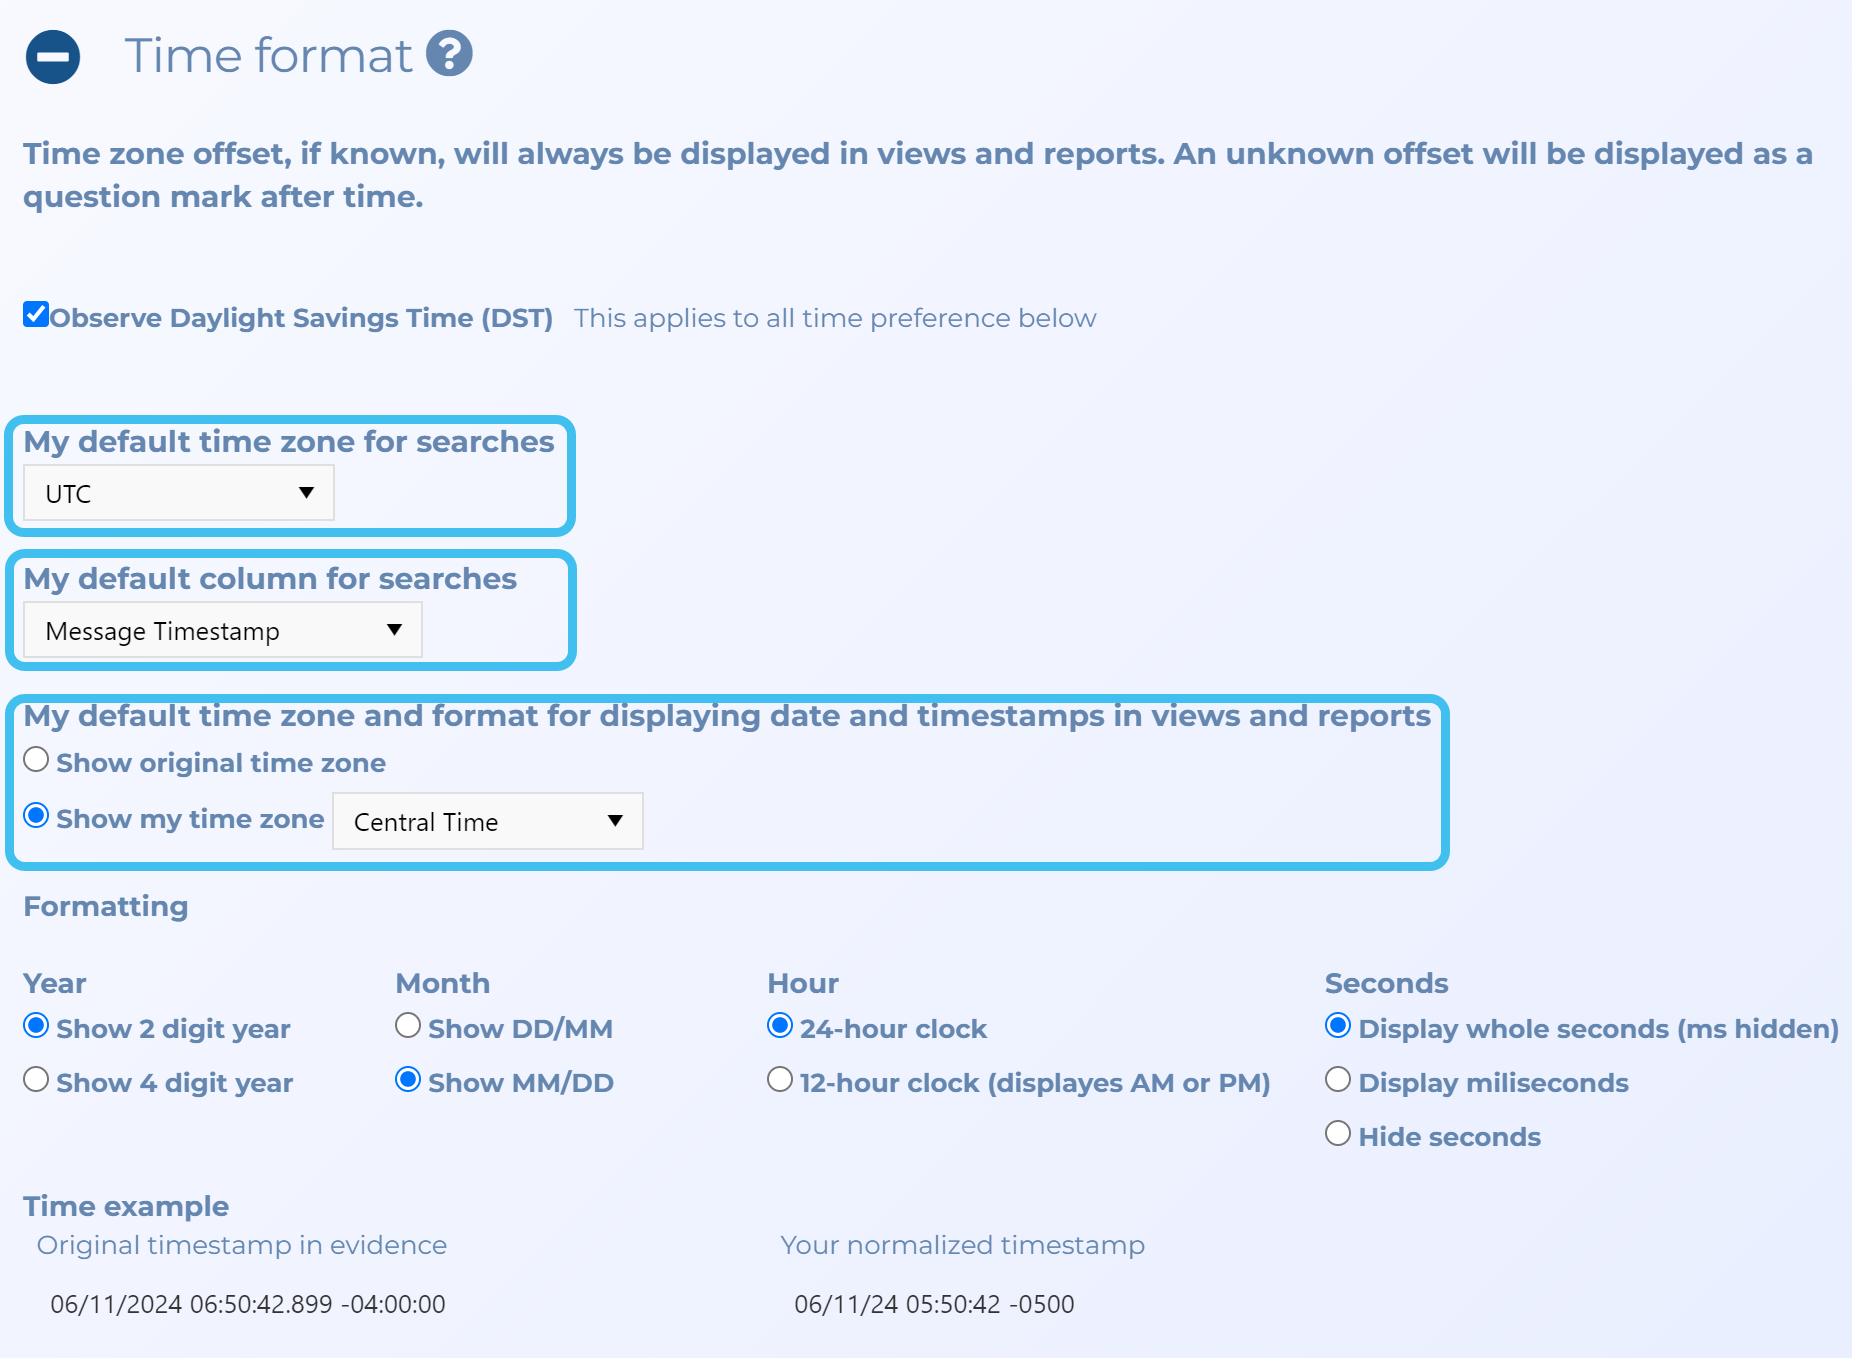
In most instances you will want Observe Daylight Savings Time (DST) selected. You should also verify that you have your preferred settings for My default time zone for searches, My default column for searches and My default time zone and format for displaying date and timestamps in views and reports.
To set the time format you want displayed, select from the available options for the year, month, hour and seconds. The example displayed in Your normalized timestamp displays the current option timestamp you have selected.
How do I change between open and closed sectors and set the sector beamwidth?
Setting how your sectors display
This topic describes how to set how your sectors display on the Sentinel screen.
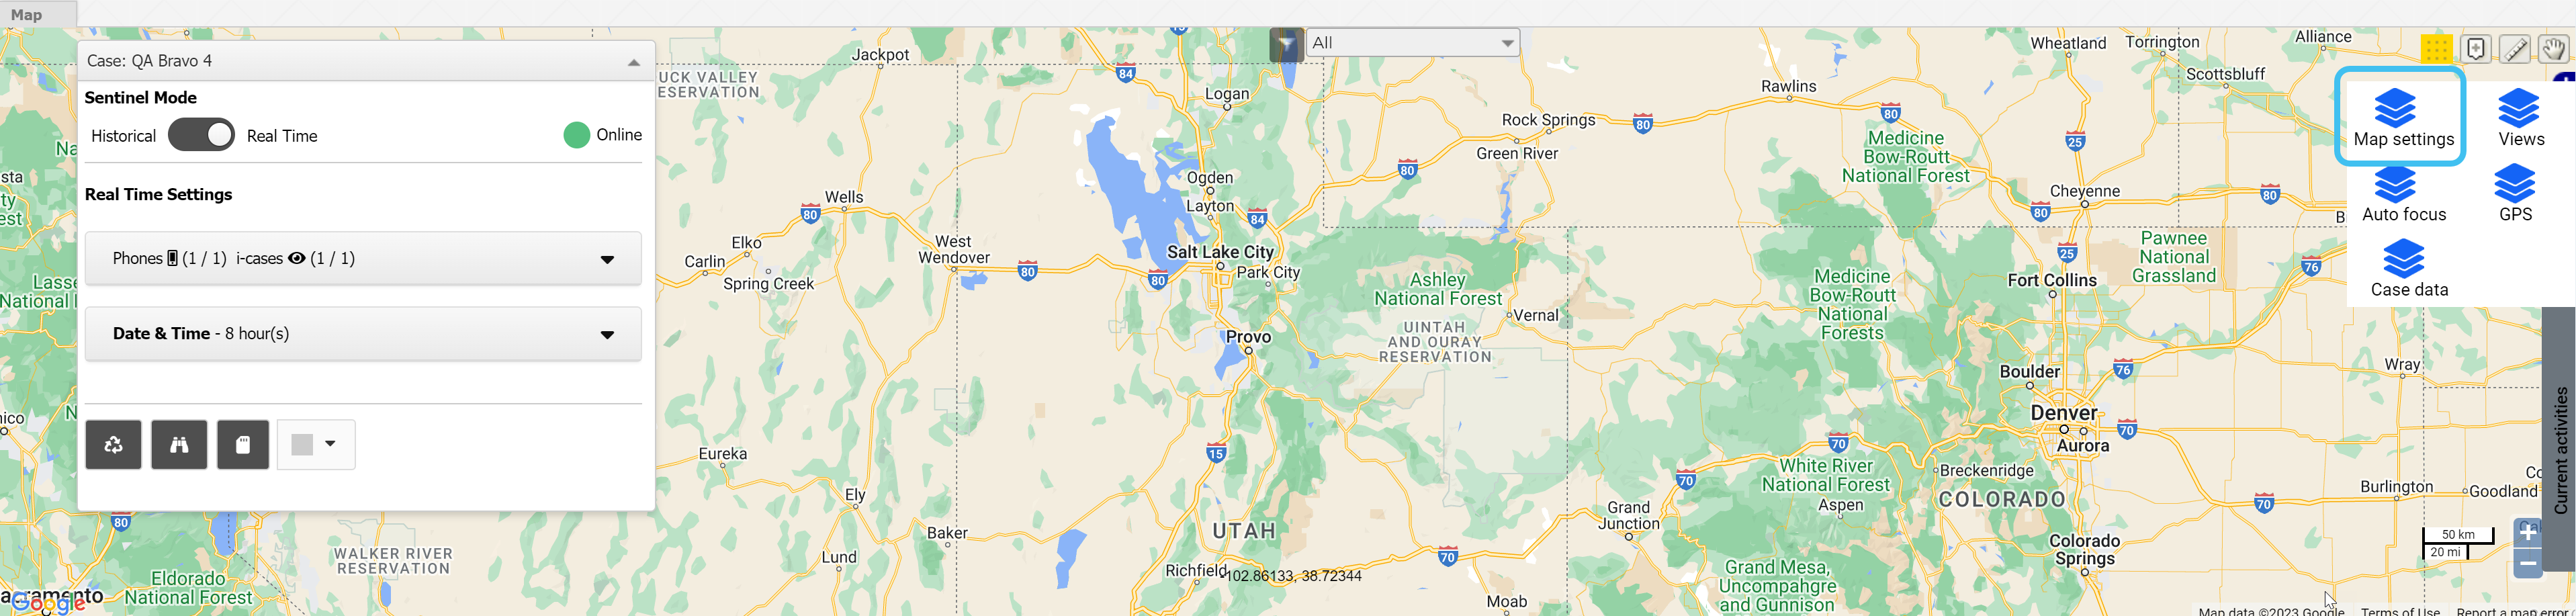
On the Sentinel screen click .
Click Map settings.
The Map settings dialog box opens.
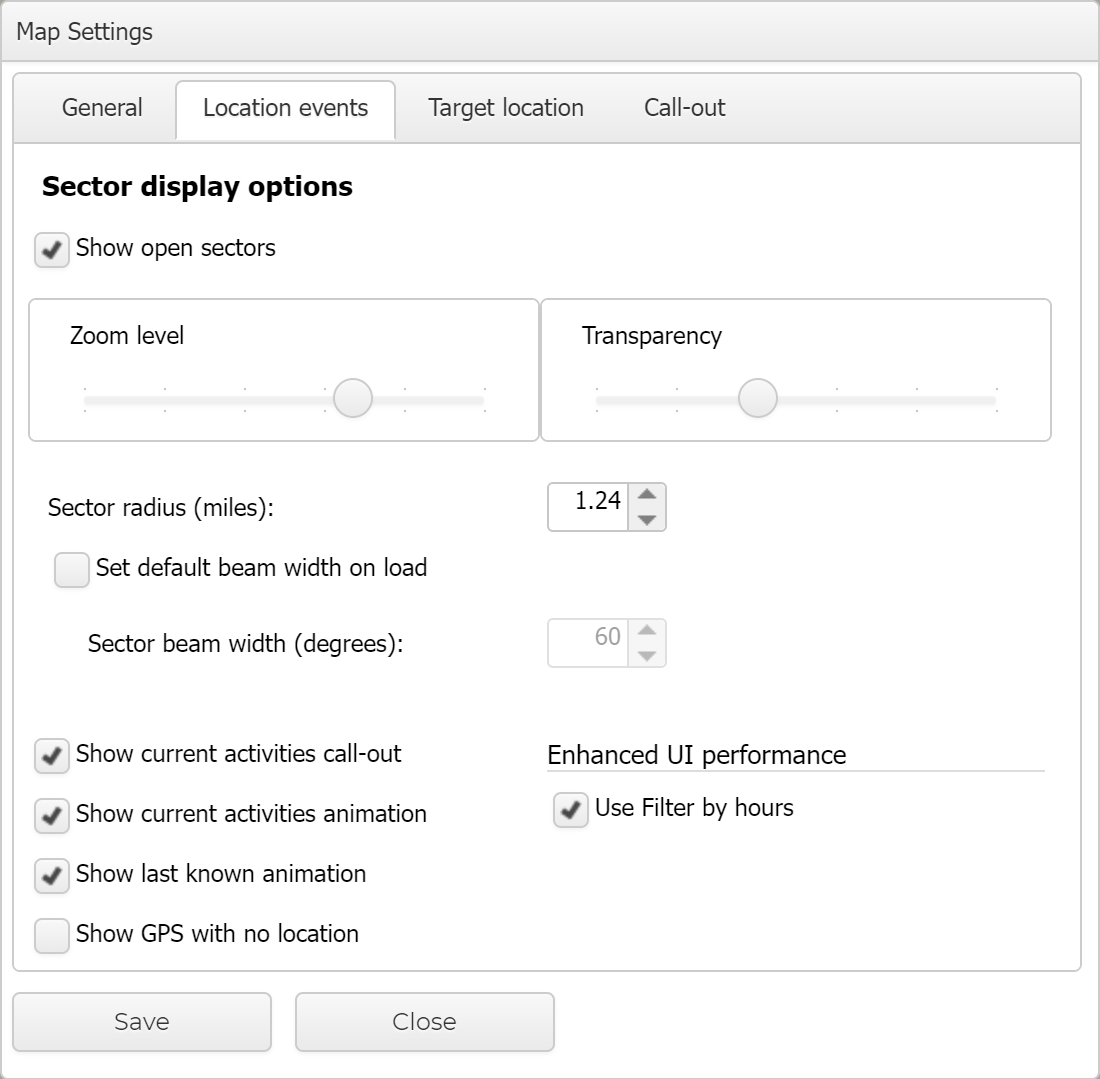
Click the Location events tab.
Use the settings to configure how you want your sectors displayed, including whether or not you prefer open sectors, the sector transparency, and the sector radius and beamwidth.
On the main menu click View cases. The screen that opens depends on your setting of View cases. If it is set to:
Advanced view, then the Advanced view cases screen opens.
If your case is listed on the Favorite & recent cases tab, click the case name to open the Manage case screen.
If it is not listed on the Favorite & recent cases tab, then click the Cases tab. Use the search filters to help locate your case. You can also click to open the FILTERS group which allows you to set your own default filter defining what is displayed on this tab, for example you may wish to set it to cases that you created which are currently open.
If your case is listed under My recent cases click it to open the Manage case screen.
If it is not listed under My recent cases then select your case from the table, using the search filters to help locate it if required. Note, by default the search is set to only display cases that you created; if you are not the original creator but an assignee then ensure you set Case filter to Assigned cases before clicking Search.
Tree view, then the View i-cases screen opens.
Click at the top-right of the screen to open either the View Cases or Advanced view cases screen and follow the above description.
On the Manage case screen click Evidence management and reporting above the Sentinel i-cases group.
The Evidence management and reporting screen opens.
In Court authorization information, select Discovery.
In Start date and End date, select the dates of interest. OSS-ESPA automatically populates these dates with the first and last time it received messages.
In Report options, select the data you want to include.
Include HI2 (IRI) Information, is referred to as the Intercept Related Information (IRI) and is the pen register data.
Include HI3 (CC) information, is referred to as the Contents of Communications (CC) and is the wiretap content.
Optionally, you may also want to select Include Google Earth files, as this produces an easy to view Google Earth output of the location information.
Click View working copy.
Click Generate report.
A link to the completed report is emailed to you, and is also available to download directly from the IQ packets (reports) section of the Manage case screen.
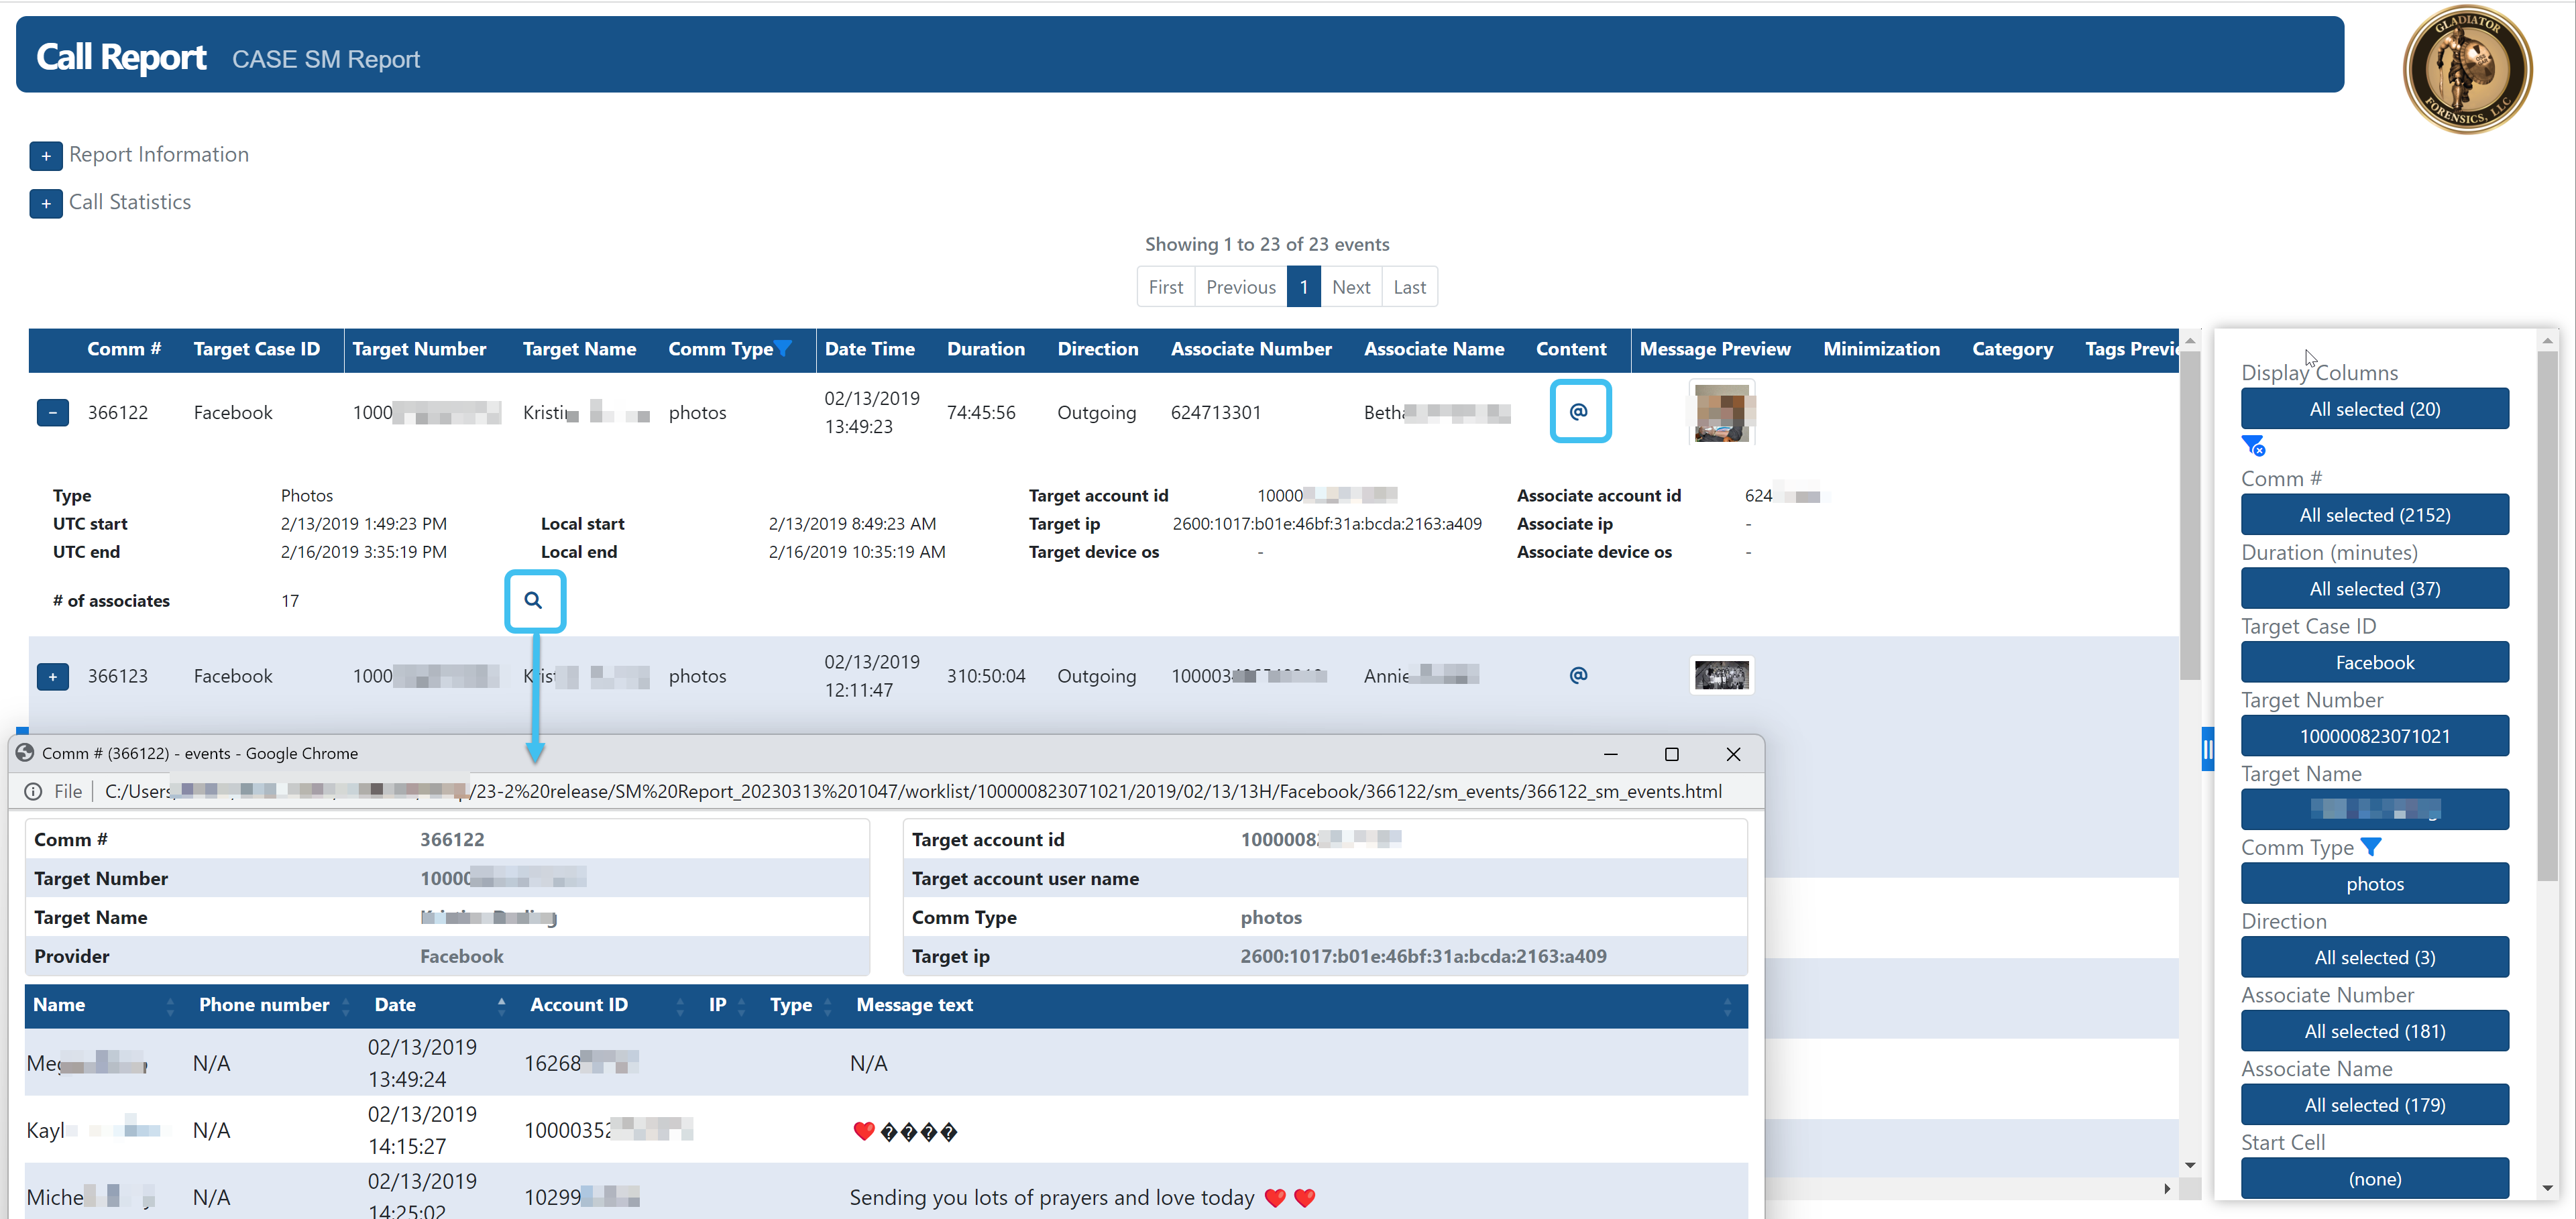
The report is output as an interactive easy-to-use html file. A summary of information about the case and the call statistics are provided at the start of the report followed by a list itemizing each event that you selected to include. For each event, links to the location, synopsis, transcript and notes histories are included. You can also view SMS and MMS content, replay voice calls and view social media data.
NOTE: The content of events with the categories of: Blocked, Privileged, Uncategorized and Not Monitored is not included in the report.
To view social media content, such as picture, click @ in the Content column. To open the communication in a separate window, click .
Filters are available on the right of the report, allowing you to search on a variety of columns such as the comm # and communication type.
How do I create evidence management and reporting?
How to create evidence management reports
For the case you want to create a monitoring report for, open the Evidence management and reporting screen. You can do this either from the Live monitoring screen or the Manage case screen.
On the main menu click View cases. The screen that opens depends on your setting of View cases. If it is set to:
Advanced view, then the Advanced view cases screen opens.
If your case is listed on the Favorite & recent cases tab, click the case name to open the Manage case screen.
If it is not listed on the Favorite & recent cases tab, then click the Cases tab. Use the search filters to help locate your case. You can also click to open the FILTERS group which allows you to set your own default filter defining what is displayed on this tab, for example you may wish to set it to cases that you created which are currently open.
If your case is listed under My recent cases click it to open the Manage case screen.
If it is not listed under My recent cases then select your case from the table, using the search filters to help locate it if required. Note, by default the search is set to only display cases that you created; if you are not the original creator but an assignee then ensure you set Case filter to Assigned cases before clicking Search.
Tree view, then the View i-cases screen opens.
Click at the top-right of the screen to open either the View Cases or Advanced view cases screen and follow the above description.
On the Manage case screen click Evidence management and reporting above the Sentinel i-cases group.
The Evidence management and reporting screen opens.
In Court authorization information, either select a specific court authorization id or select Discovery.
If you selected Discovery, then in Start date and End date, select the dates of interest.
If you selected a court authorization id then the dates are automatically populated but you must select either a 10 Day, 30 Day or Court authorization period.
By default all the target phone numbers in the case are included but if you only want certain target numbers then select them in Case target numbers.
In Report options, select the information that you want included in the report for the selected events.
For Court authorization period you typically want to include all the events. For others, you may want to include the:
HI2 information, this is referred to as the Intercept Related Information (IRI) and is the pen register data.
HI3 information, this is referred to as the Contents of Communications (CC) and is the wiretap content.
GPS ping information, sent by the operator.
Social media information, sent by the operator.
Google Earth files, this produces an easy to view Google Earth output of the location information.
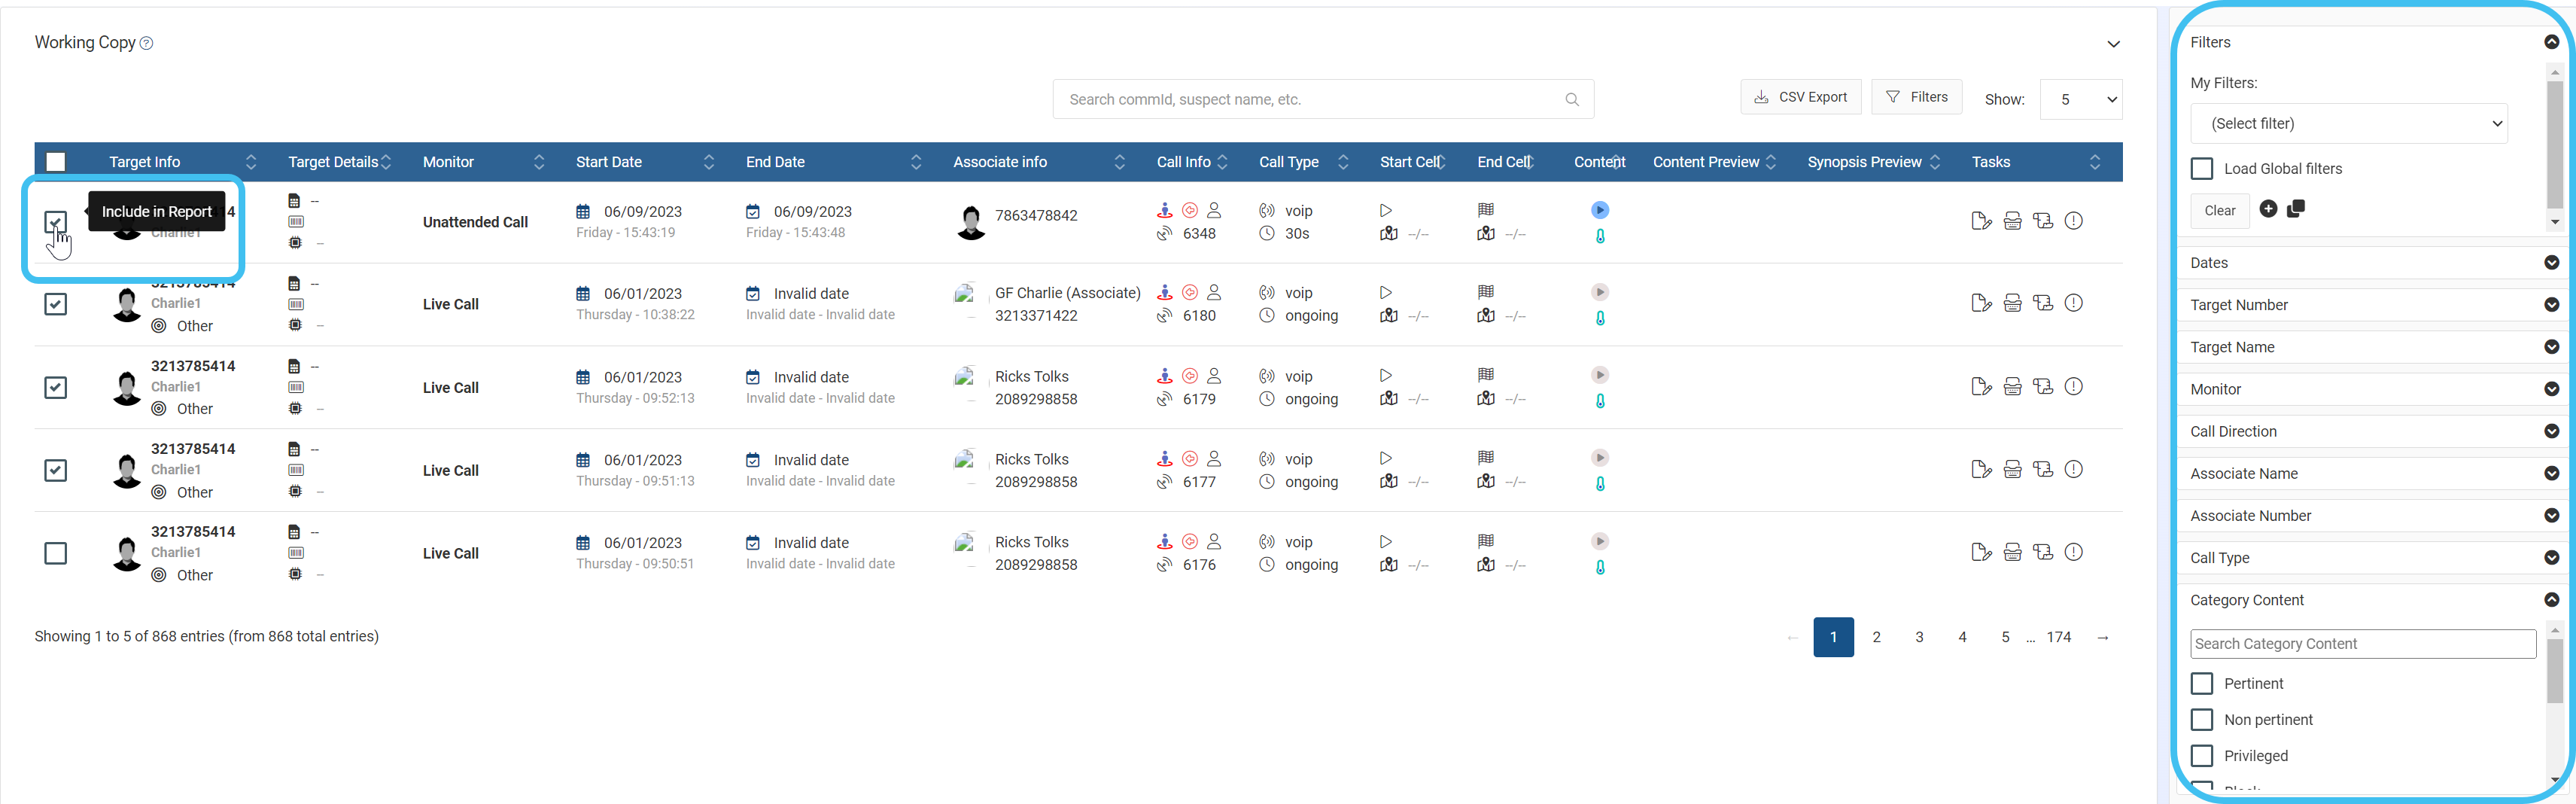
Click View working copy.
In Working copy, OSS-ESPA displays all the monitoring evidence data that matches your selected criteria.
Use the check-boxes to select which events you want to include. If required, you can use the filters to quickly locate the events you want to include, for example you may want to set the Category Content filter to only display Pertinent events.
Click Generate report.
A link to the completed report is emailed to you, and is also available to download directly from the IQ packets (reports) section of the Manage case screen.
The report is output as an interactive easy-to-use html file. A summary of information about the case and the call statistics are provided at the start of the report followed by a list itemizing each event that you selected to include. For each event, links to the location, synopsis, transcript and notes histories are included. You can also view SMS and MMS content, replay voice calls and view social media data.
NOTE: The content of events with the categories of: Blocked, Privileged, Uncategorized and Not Monitored is not included in the report.
To view social media content, such as picture, click @ in the Content column. To open the communication in a separate window, click .
Filters are available on the right of the report, allowing you to search on a variety of columns such as the comm # and communication type.
How do I display GPS units on the Sentinel screen?
How to display GPS Tracker and field units on the Sentinel screen
Open the Sentinel screen. This screen can be opened in a number of ways, for example:
If you are on the Advanced view cases screen, in the Actions column click to open the Sentinel screen.
If you are on the View i-cases screen right click either a case, person, phone number or i-case and select Open Sentinel view.
If you are on the Manage case screen for a case click which is at the top-right of every screen to open the Sentinel screen.
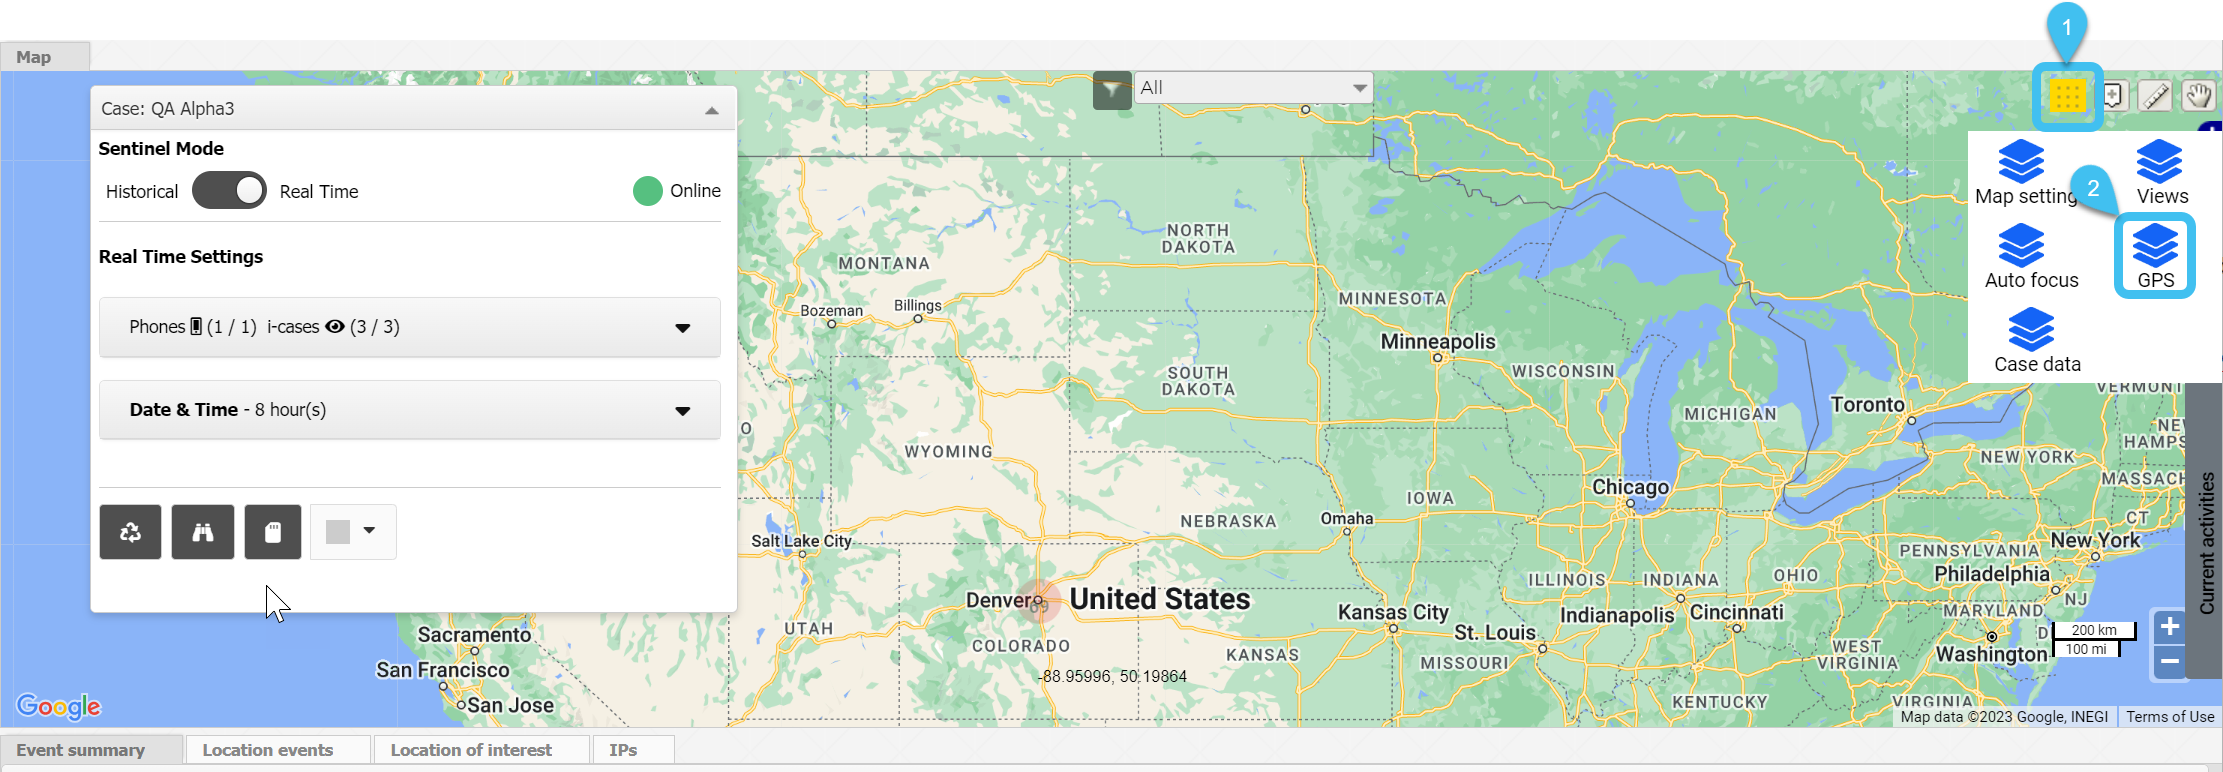
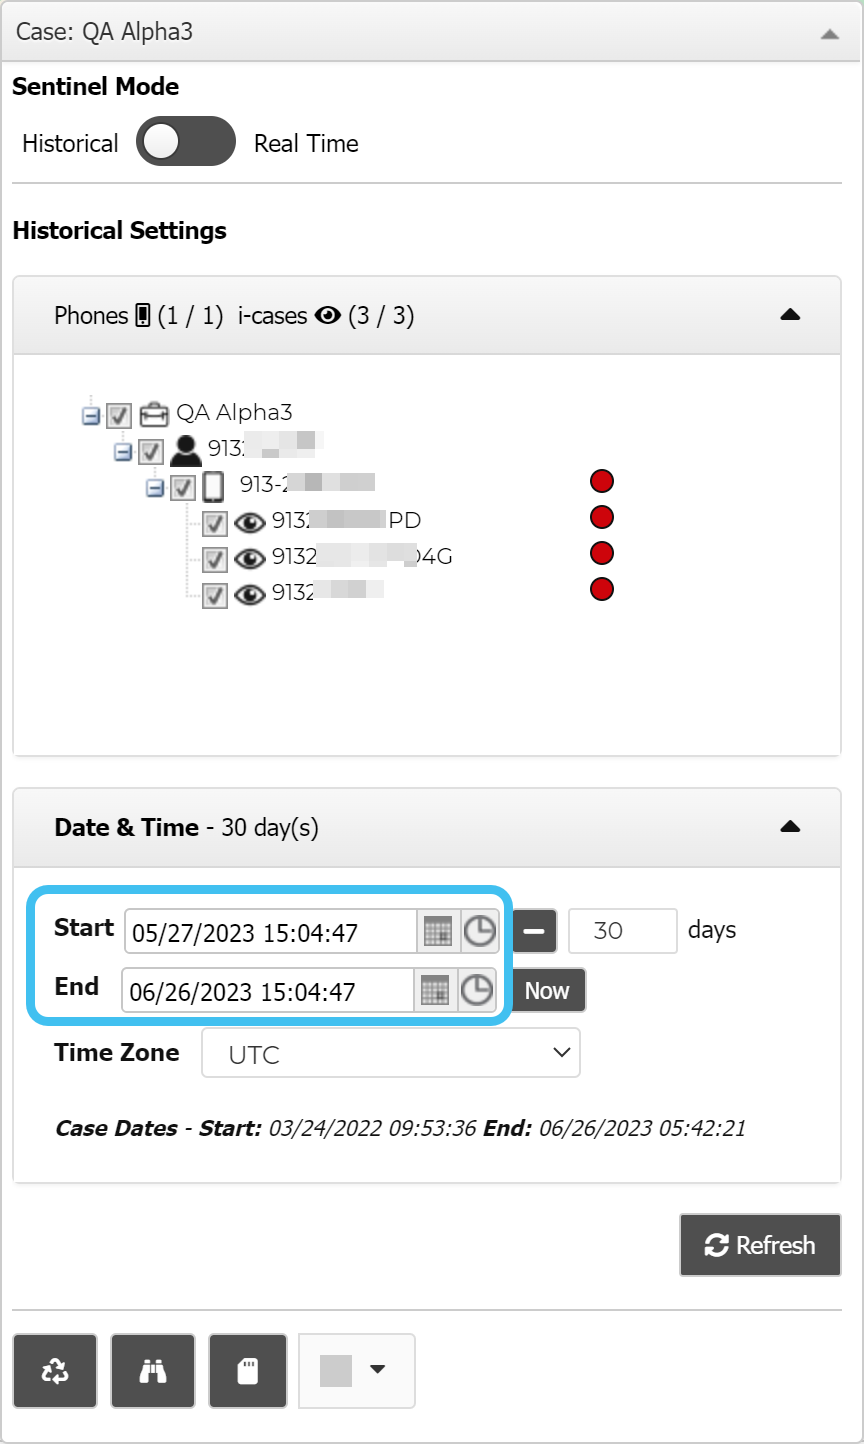
On the Input and Settings view, set Sentinel Mode to Real time.
On the Map view select then .
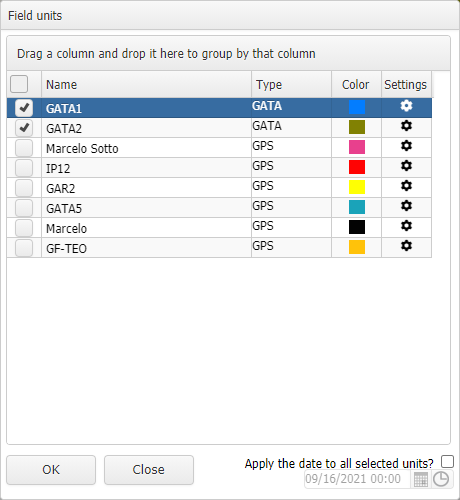
The Field units dialog box opens.
Using the check-boxes, select which units you want to view.
Optionally, if you want to:
change the color used to display the field unit click the colored square and select a new color.
enter a campaign date and change the display icon click .
Click Close.
Click the GPS tracker view.
All the field units which you selected to view that are currently active, are displayed on the GPS tracker view. You can then use the check-boxes on this view to select which field units you want displayed on the map and what details you want displayed, such as its breadcrumb trail.
Click Zoom to center a unit on the map; displaying its current location, and its previous locations.
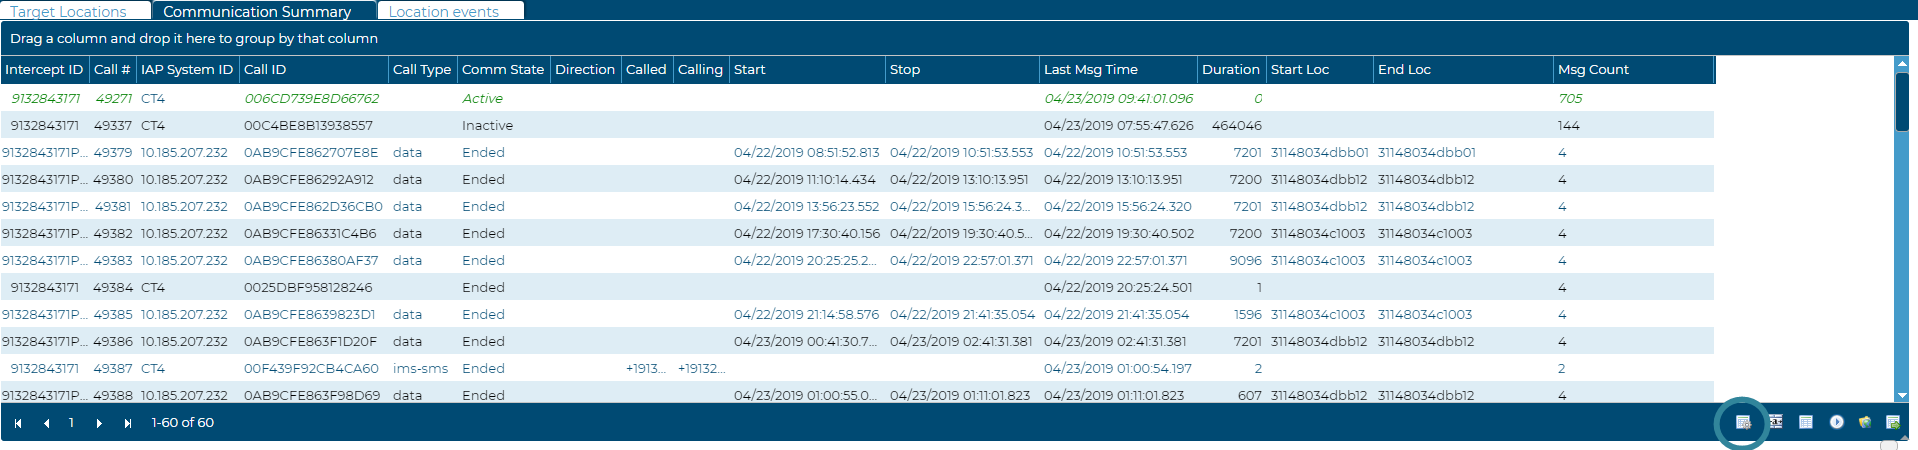
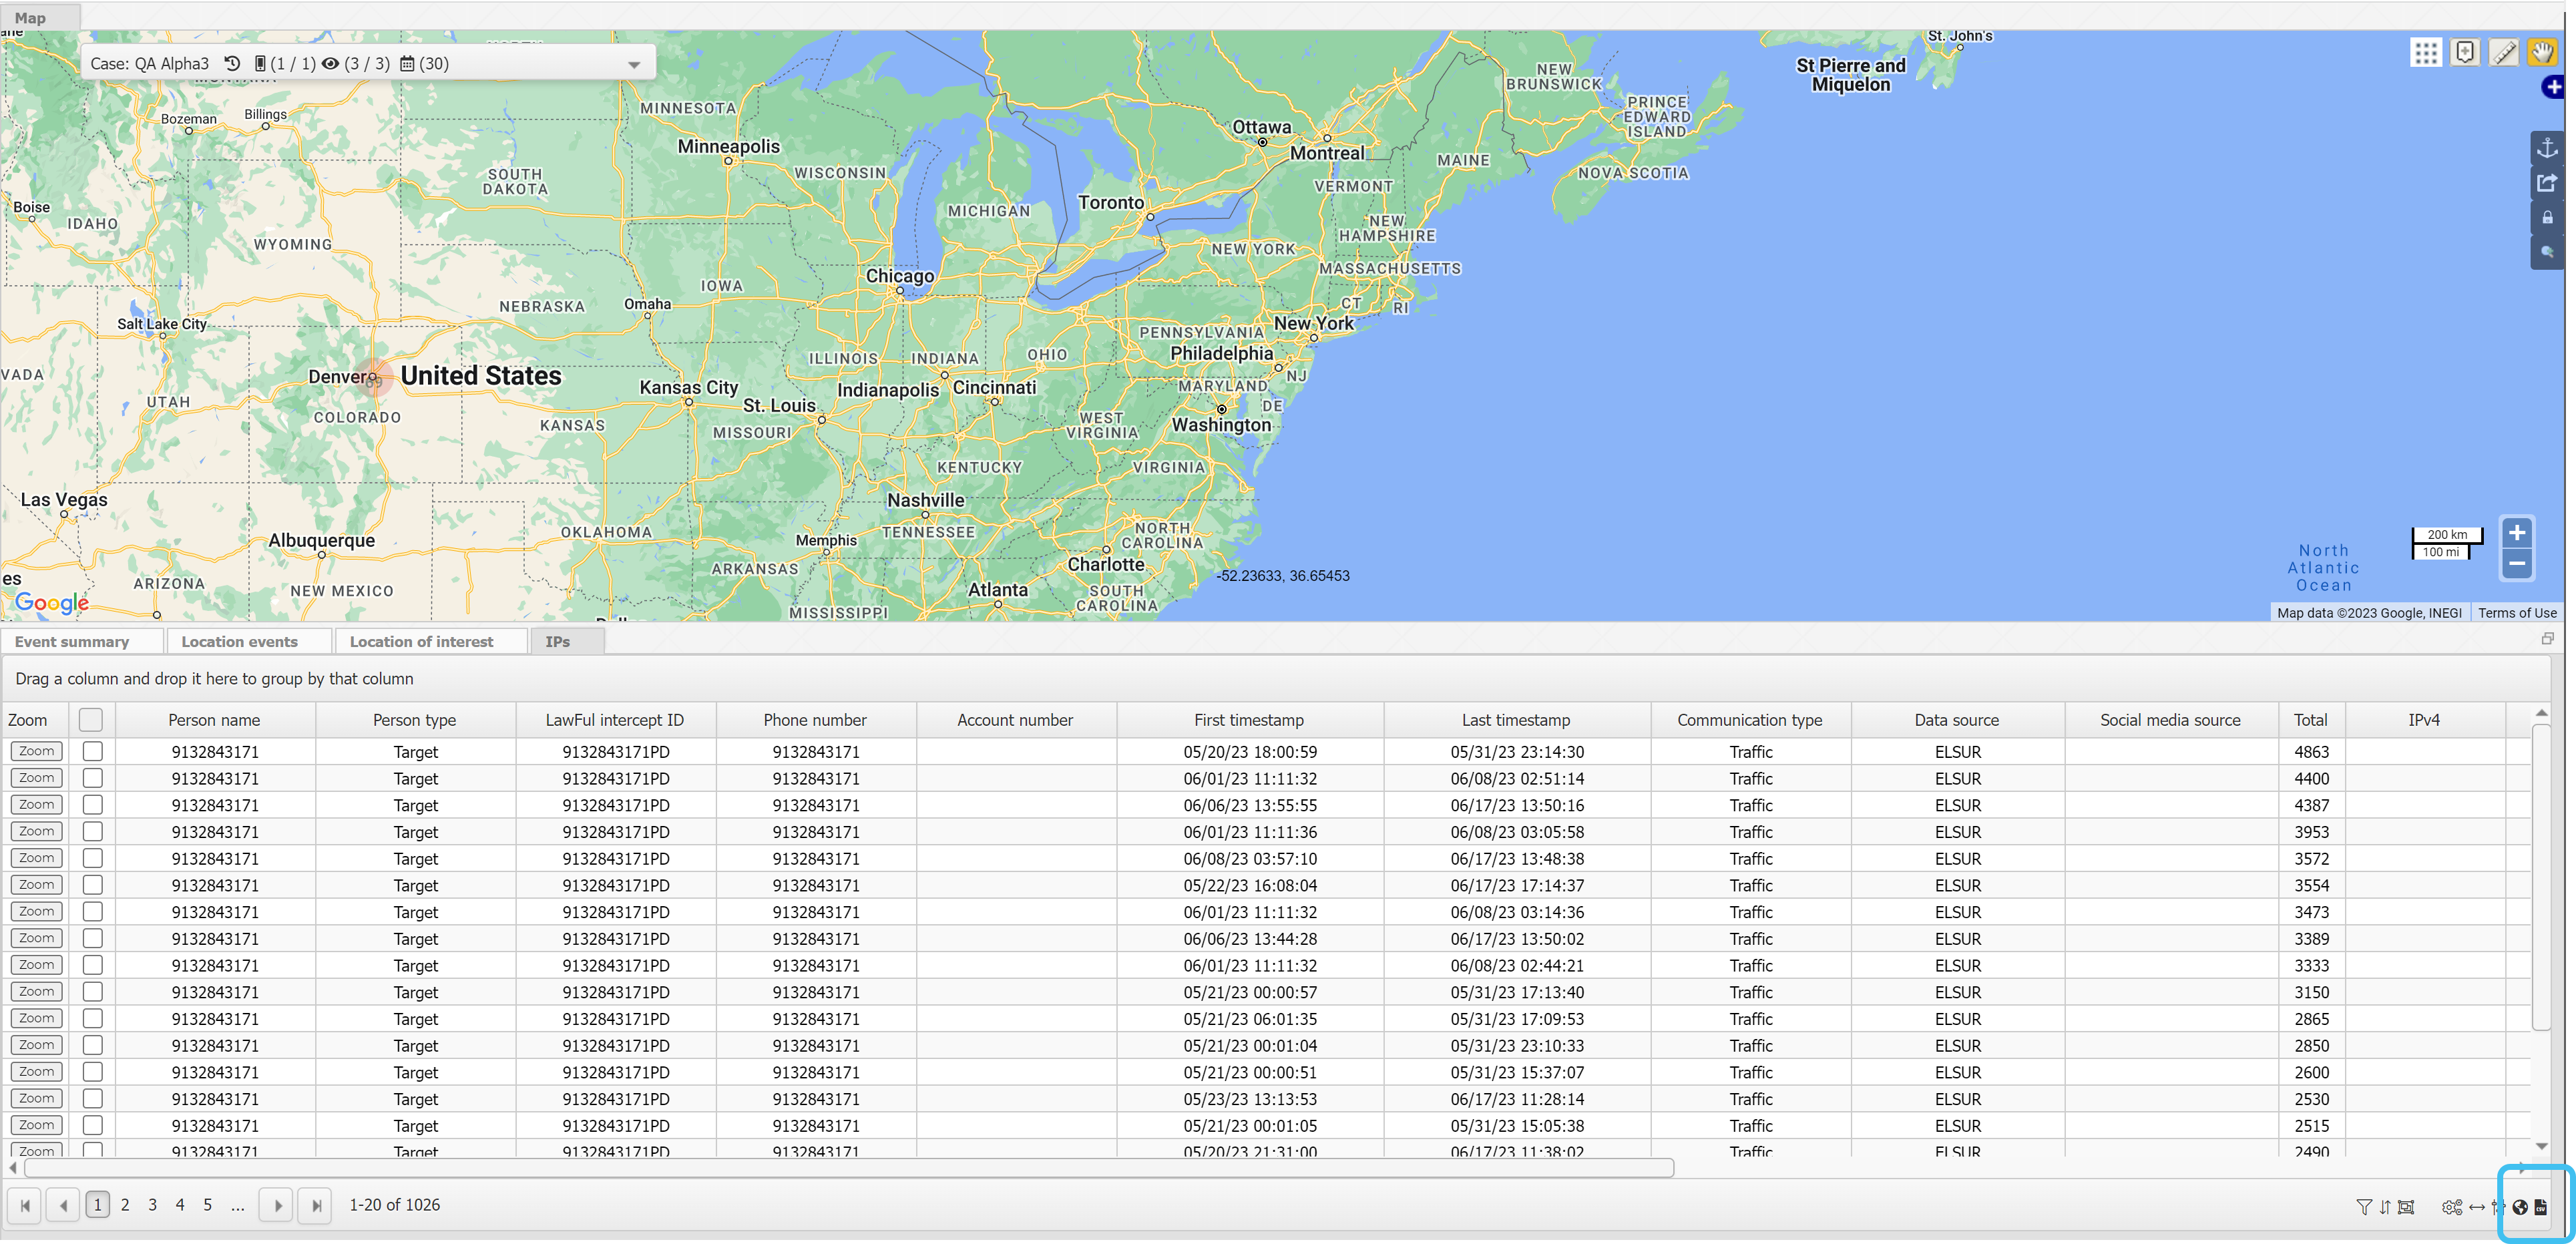
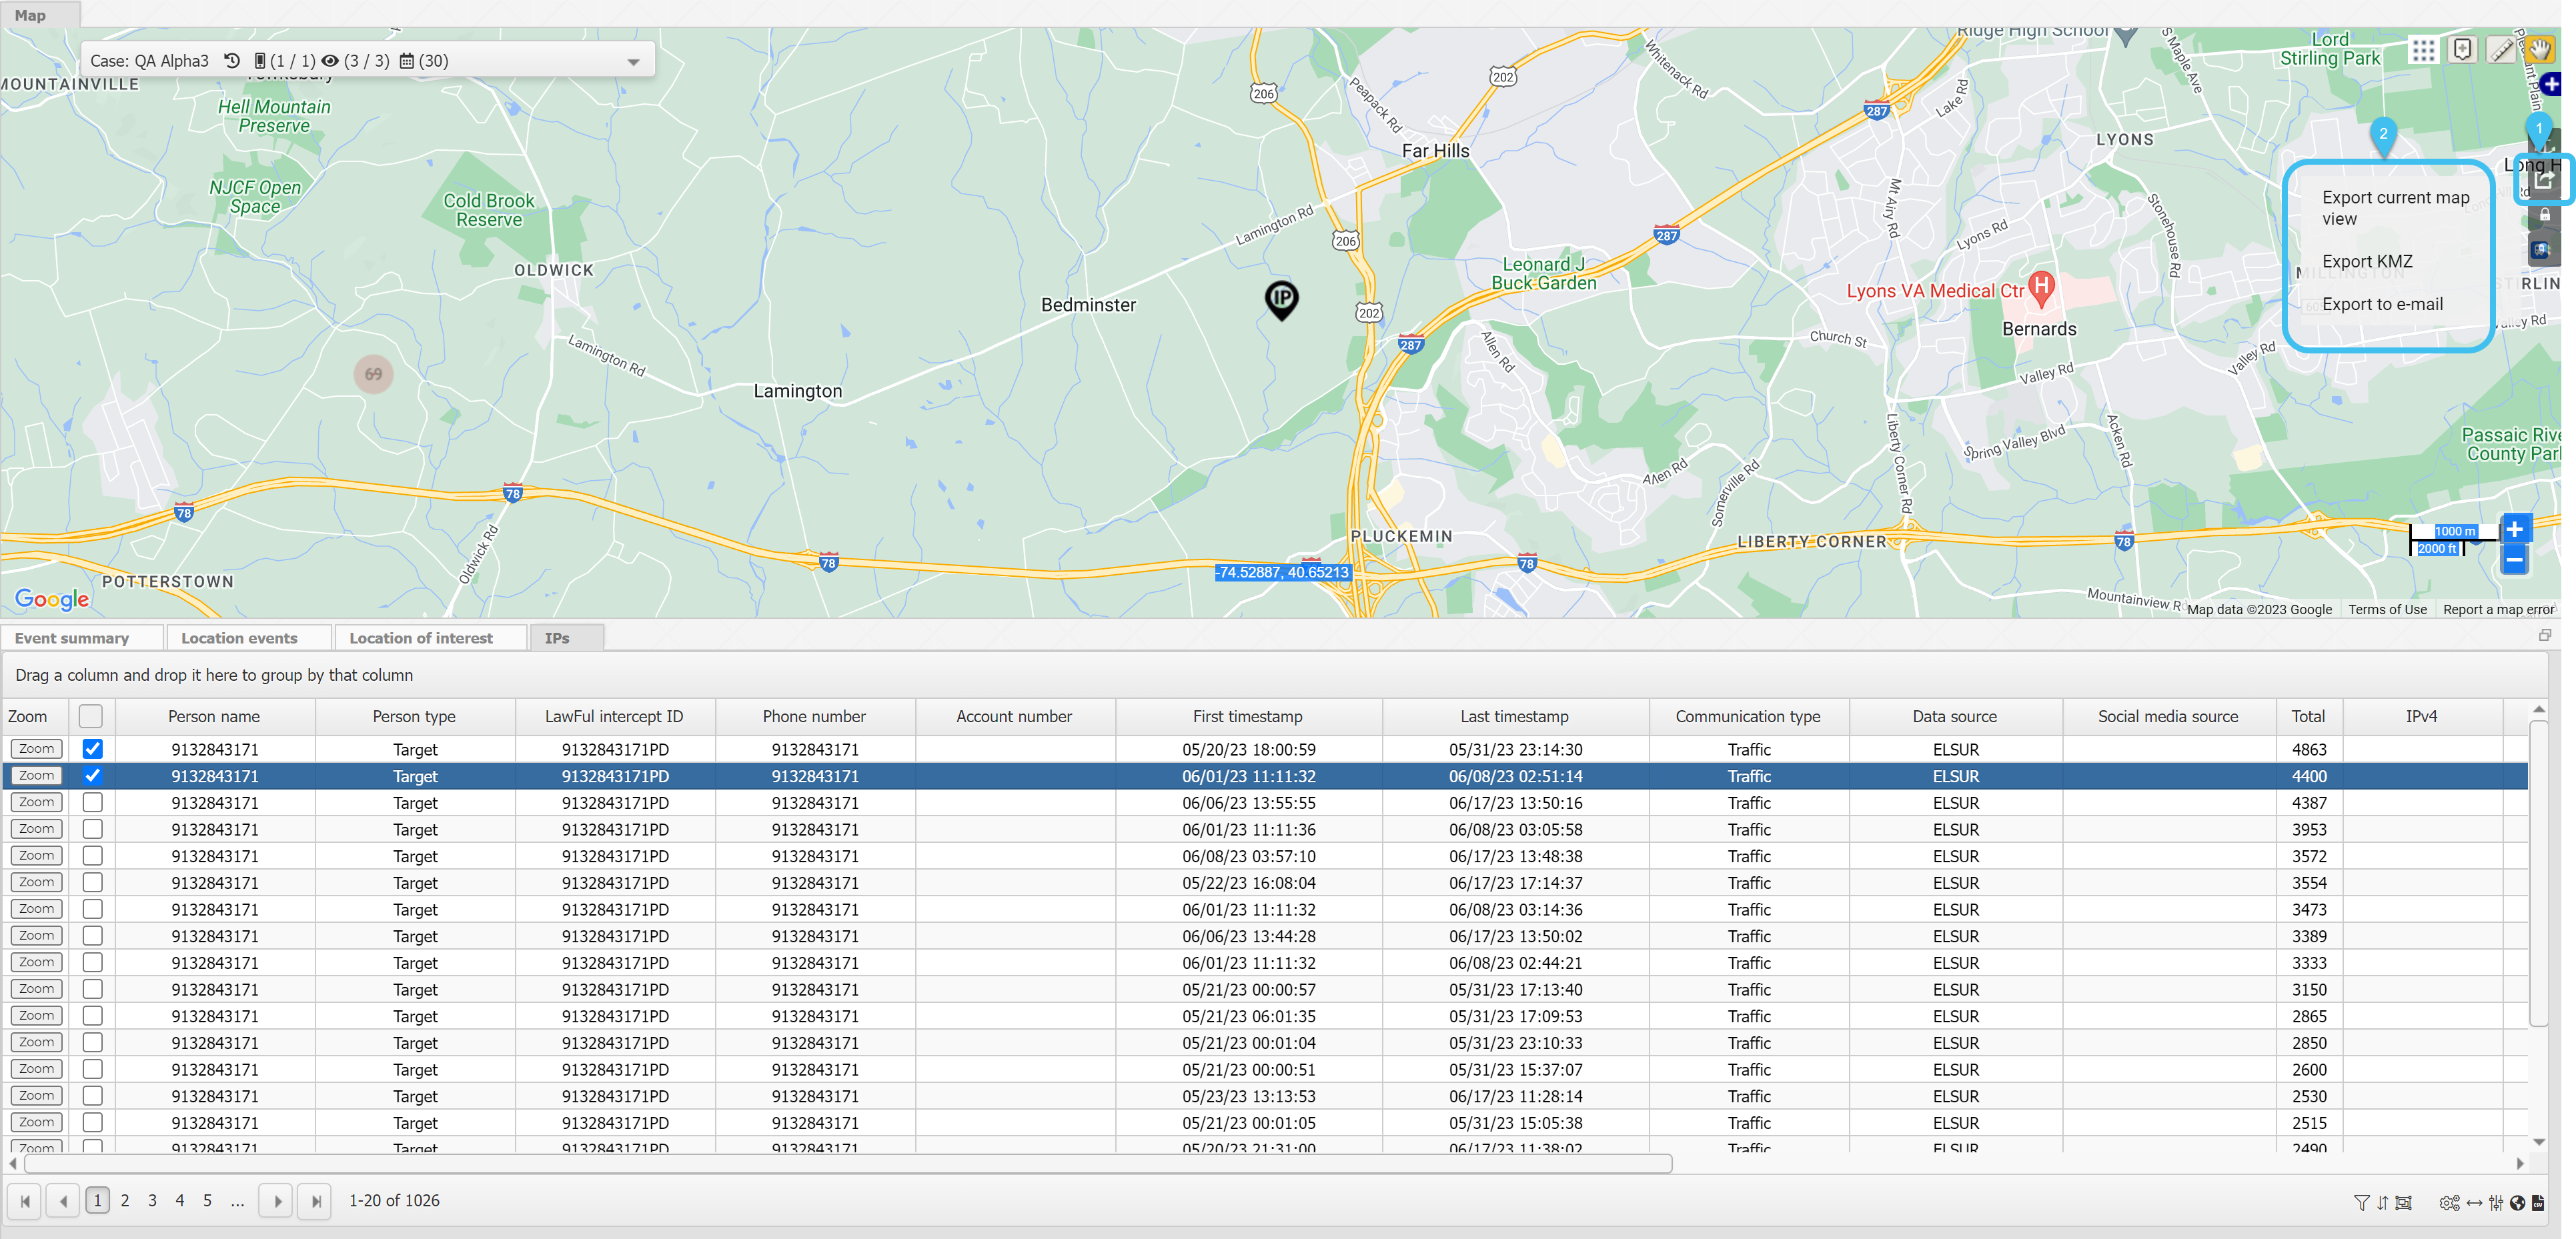
Exporting Sentinel data from the Event summary and IPs views
You can export data from the Sentinel screen's Event summary and IPs views in both html and csv formats. This is useful if you wish to save the contents of these views to include as part of your case notes, and share with other investigators, units, and agencies.
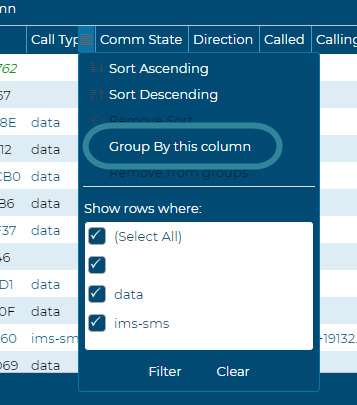
Click here for a short video showing how to group the view listings.
To group the listings on the view either:
select the column title you want to group by, then select Group by this column, or
click and drag the column title you want to use to group your listings to the row above the column header and release when the green tick appears.
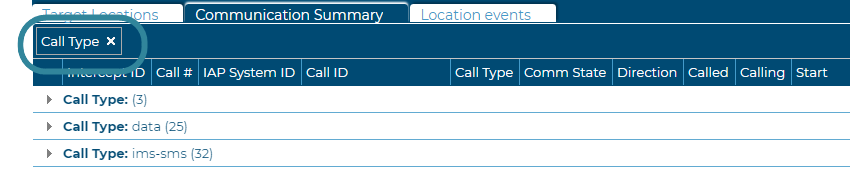
The display is updated; the column title you selected appears as shown in the following diagram and the listings are grouped according to the column title you selected.
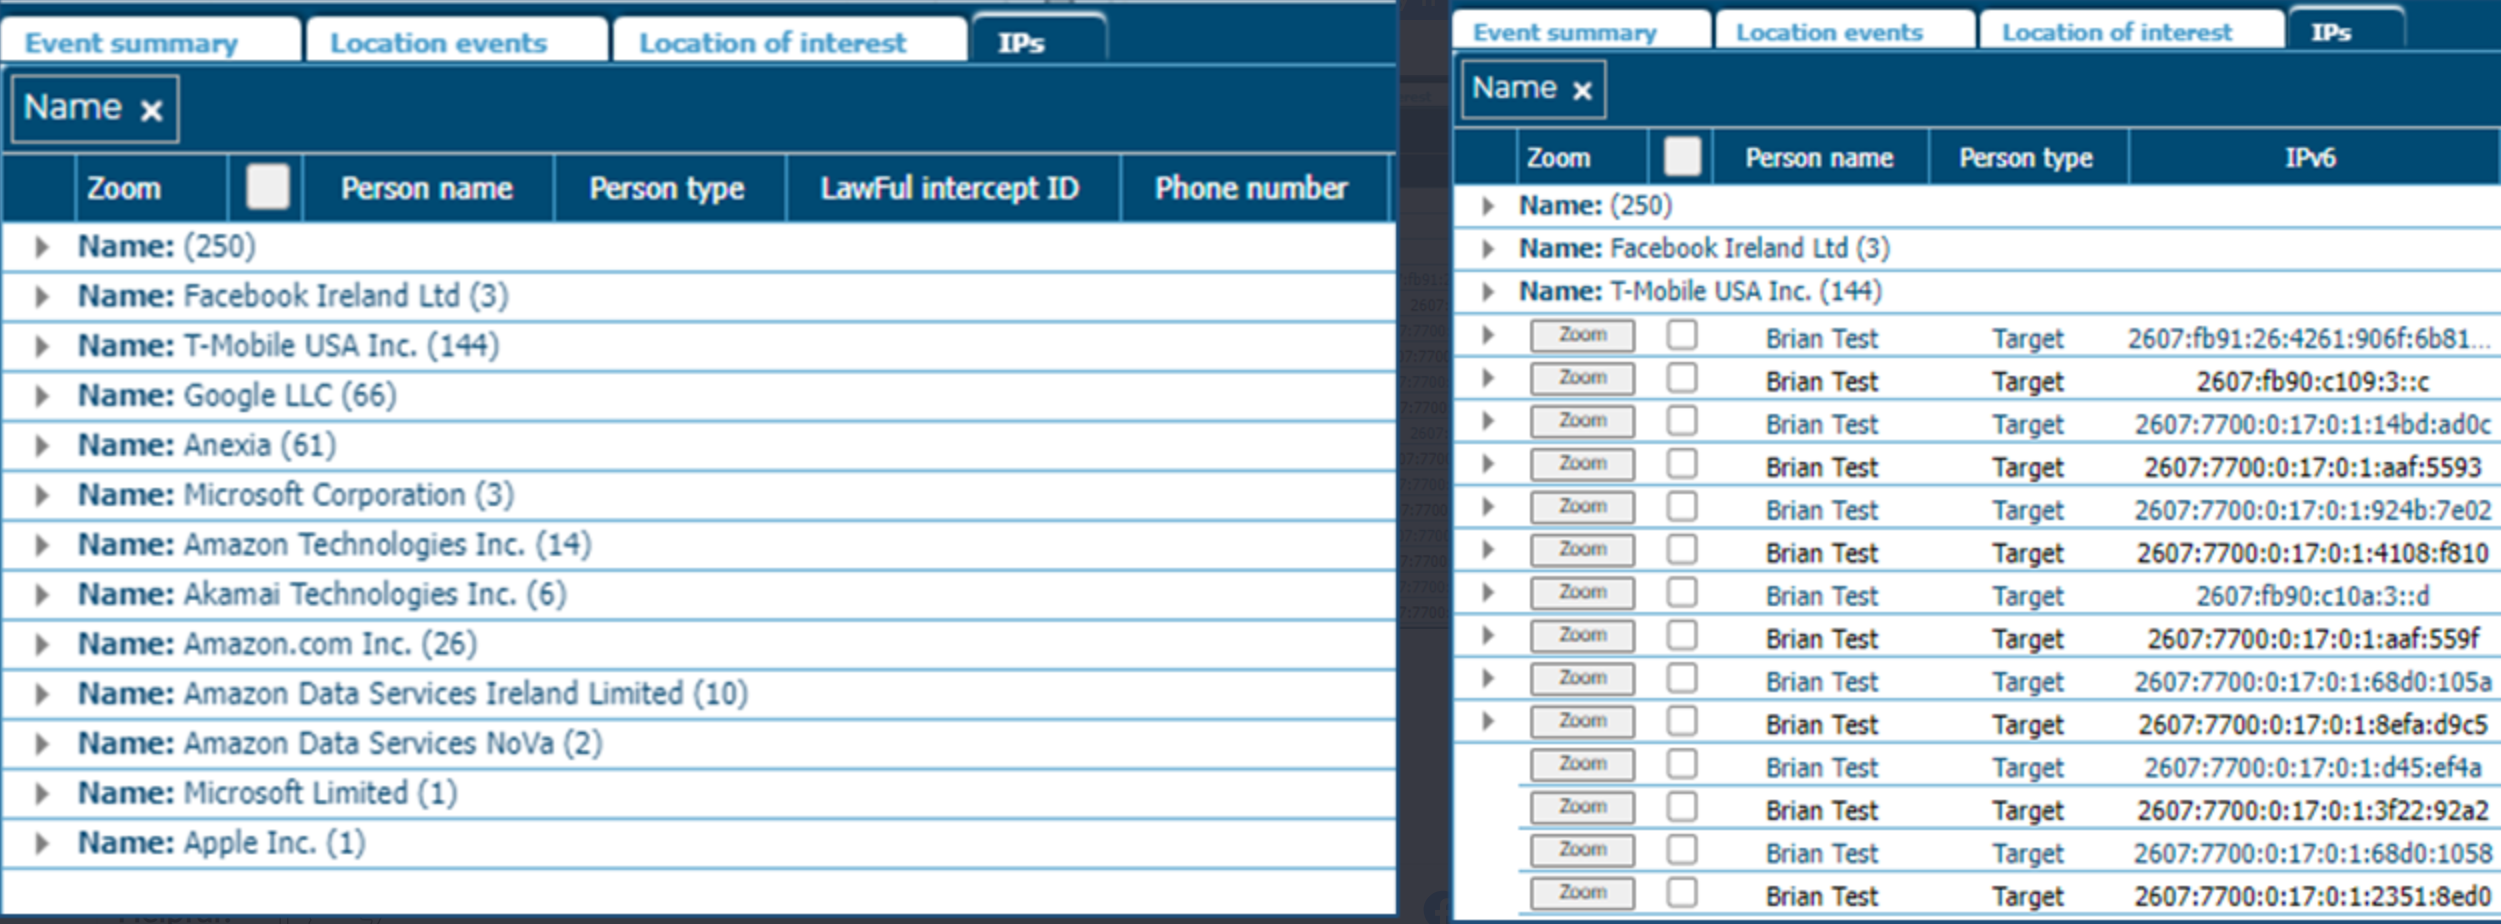
Grouping listings can be useful for many reasons, for example when you want to sort IP addresses by IPv6 and Cellular Providers when trying to determine a phone for a suspect.
How do I manually add geo-location and TA arc data to the Sentinel map?
Adding GPS pings and timing advance arcs to the map
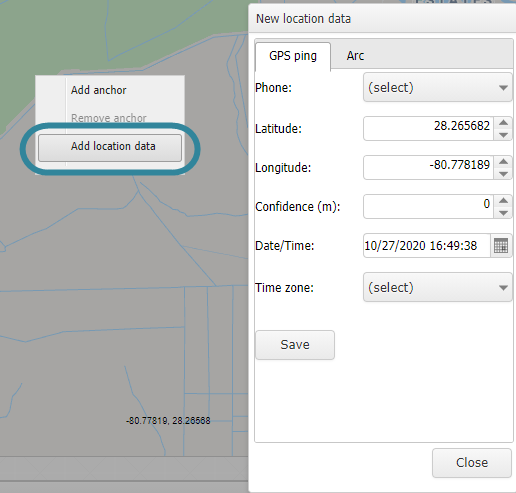
This topic details how to quickly add location data for GPS pings and timing advance arcs. This is useful if you've contacted the service provider for the latest location data and rather wait for them to send it to you, it allows you to enter it manually.
On Sentinel screen, right-click he map then select Add location data.
The New location data dialog box opens.
In Phone, select the phone the data is for.
If you are adding an arc, ensure Depth (m) is large enough that it displays on the map.
Click Save.
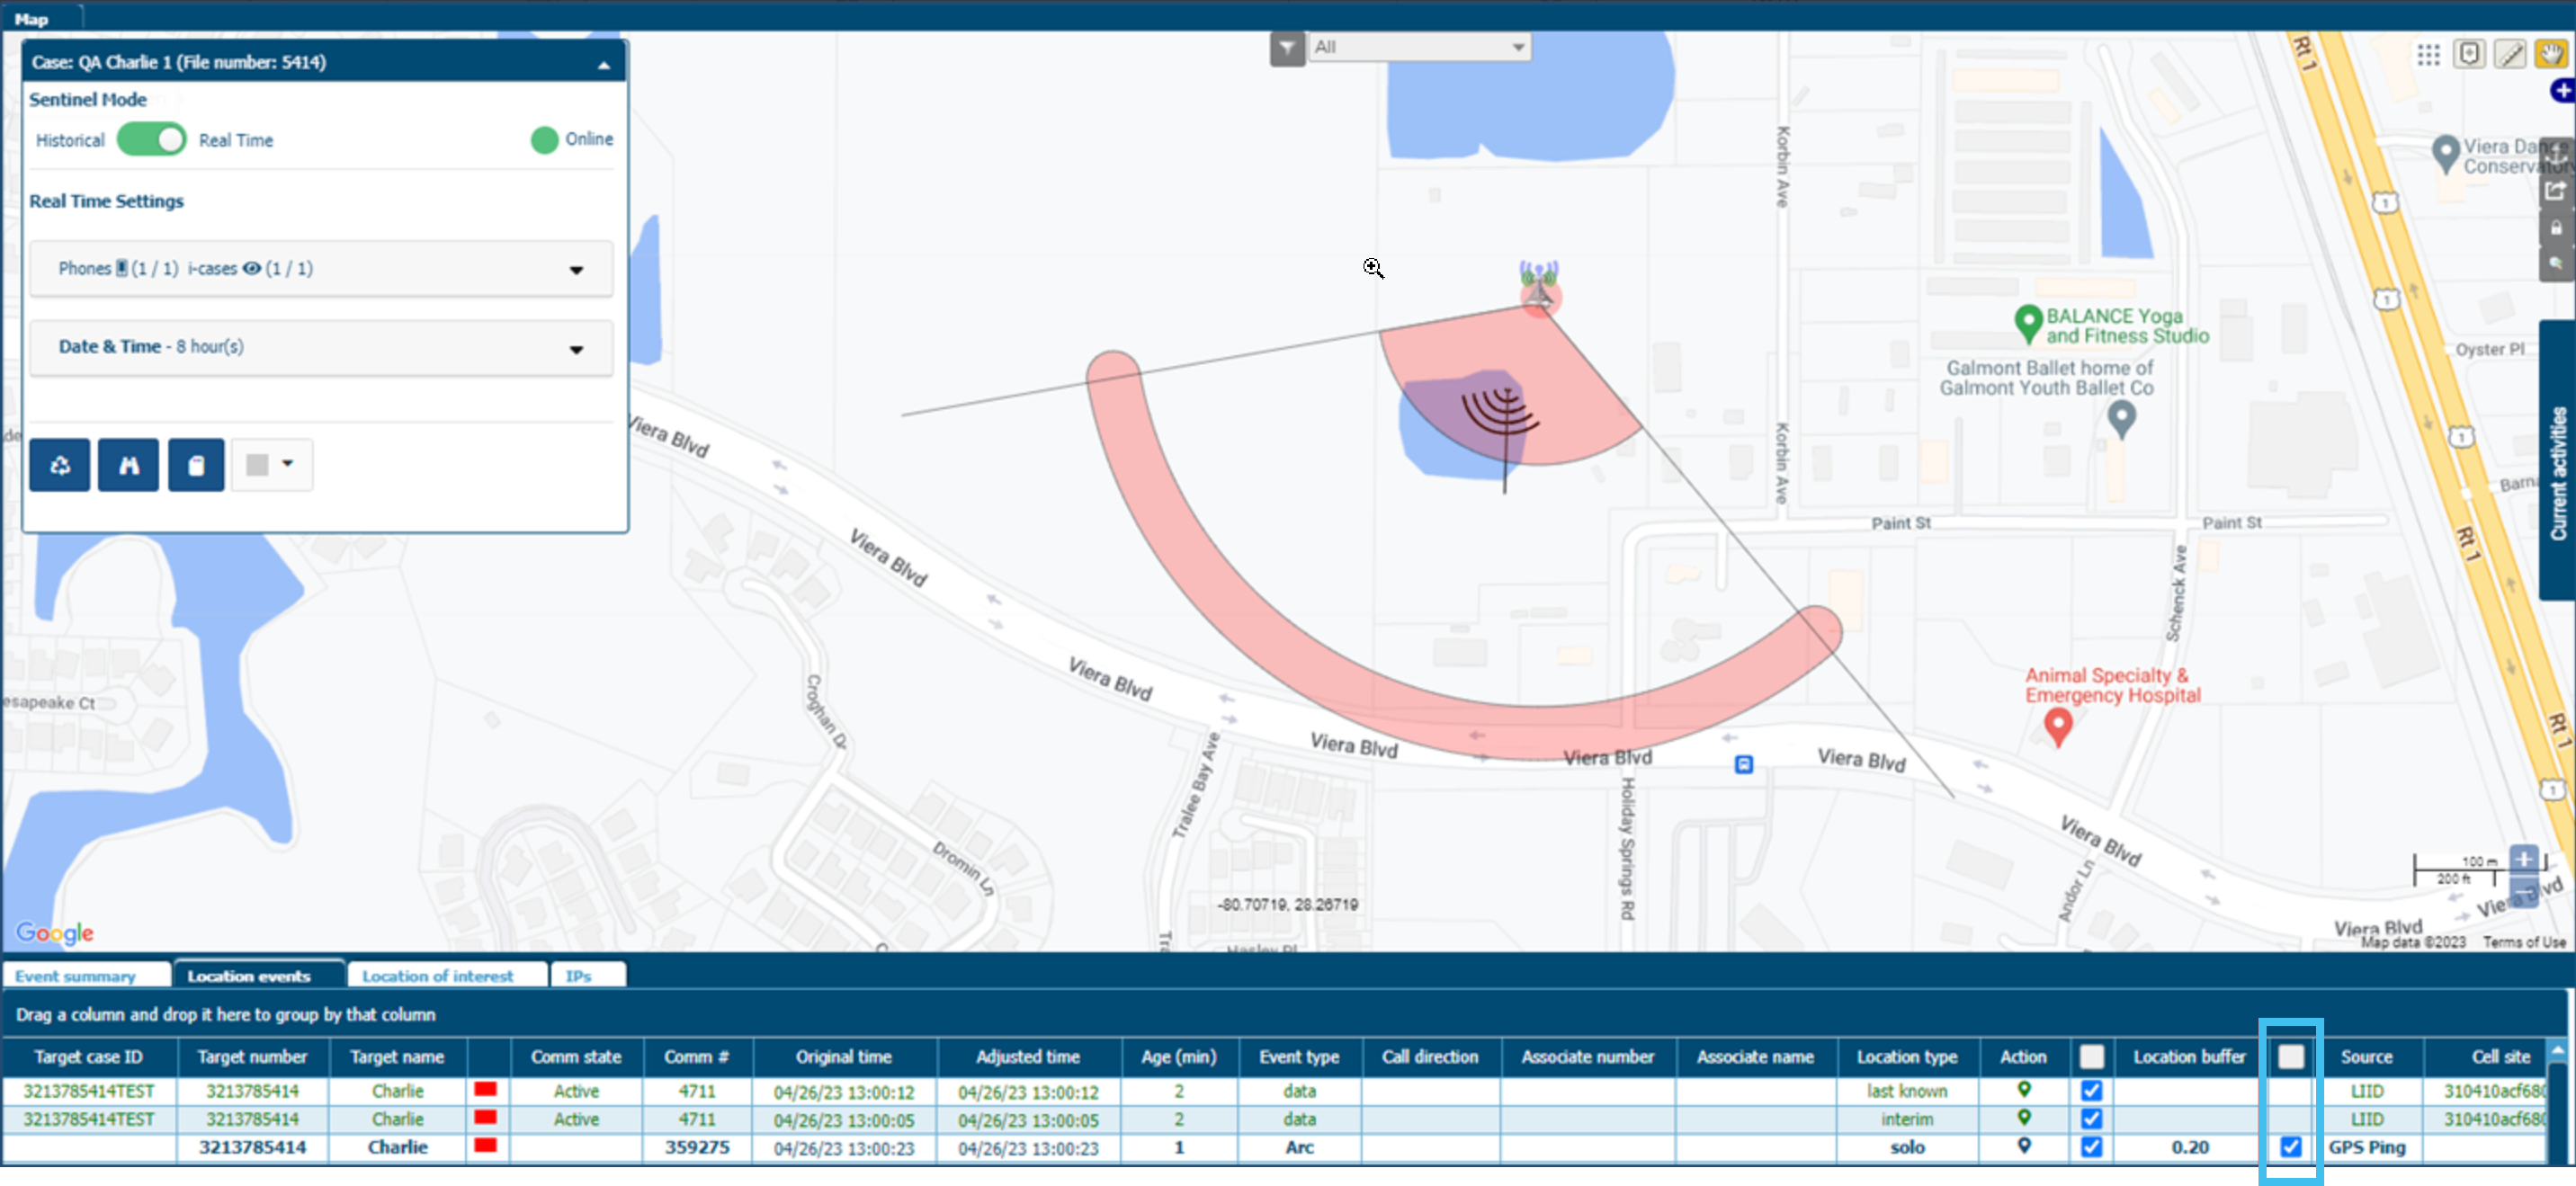
To view an arc, ensure the location buffer check-box is selected on the Location events view.
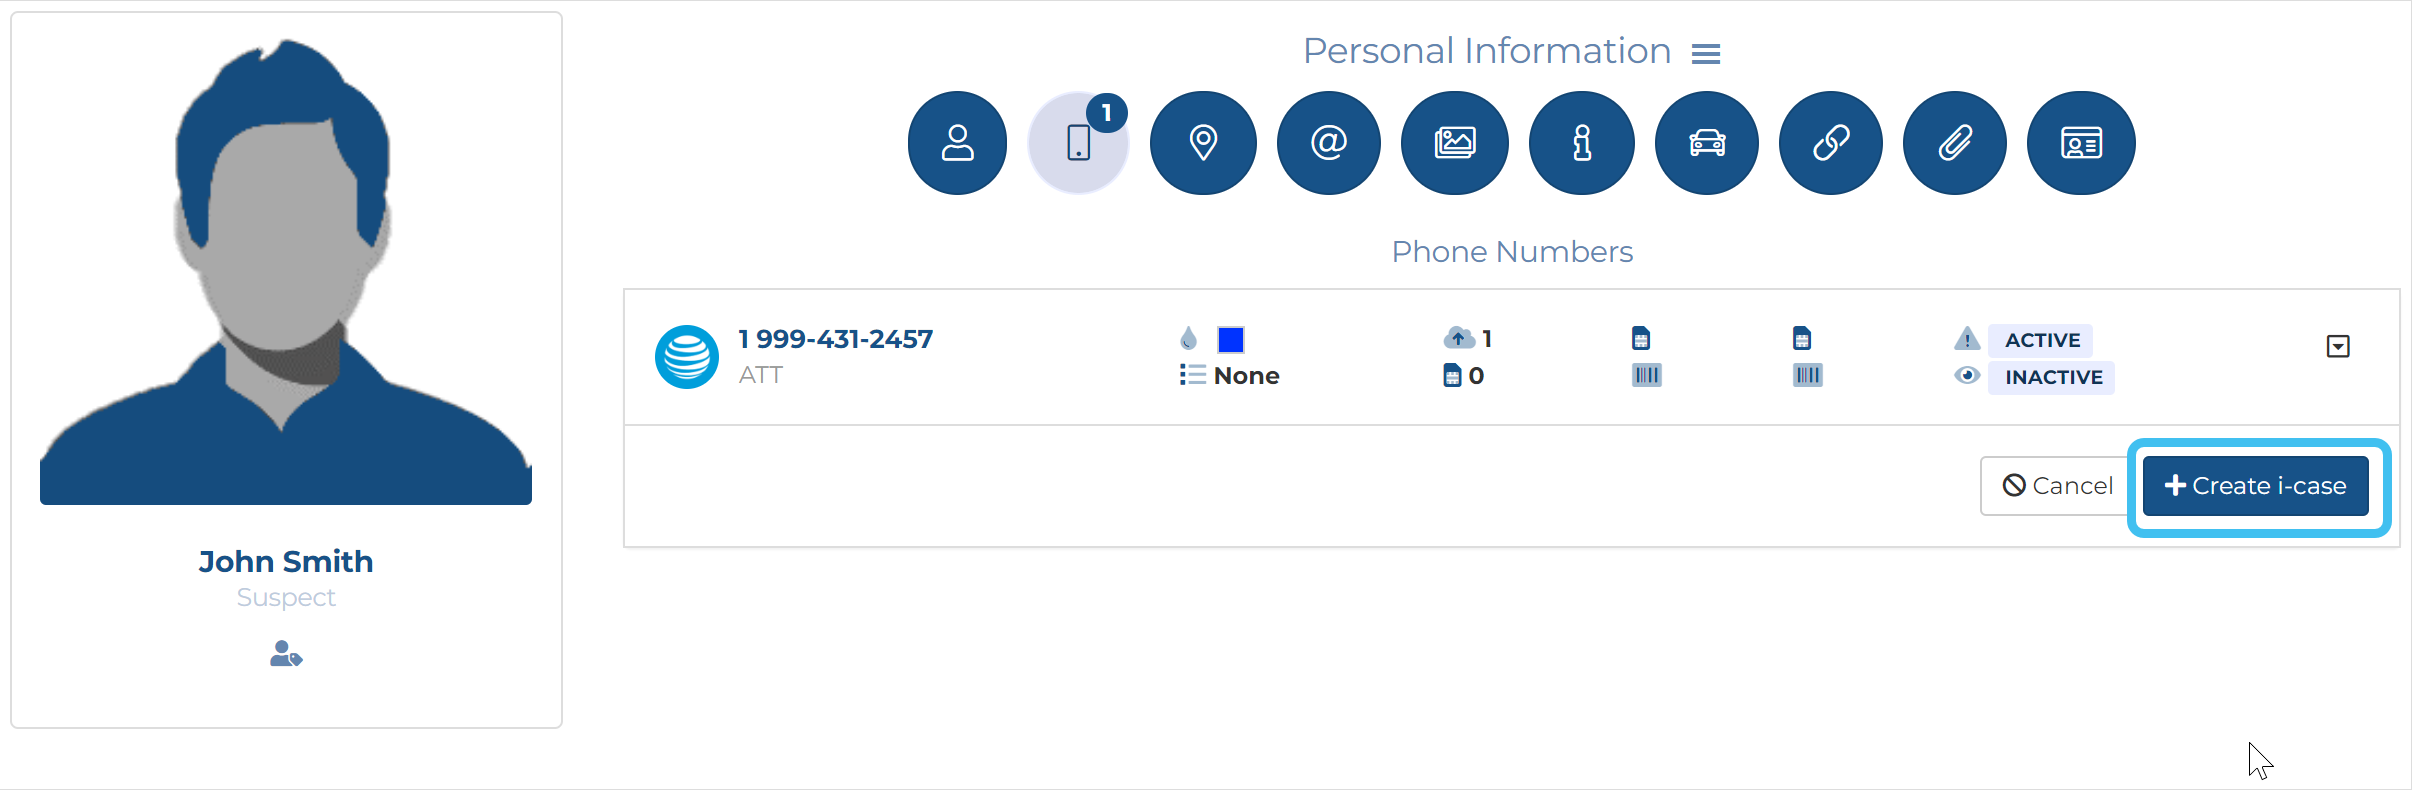
For the case you want to add a wiretap to, open the Manage case screen and in the People and device section click their name.
The People and device screen opens.
Click , then click and select Intercept monitoring.
Click Create i-case.
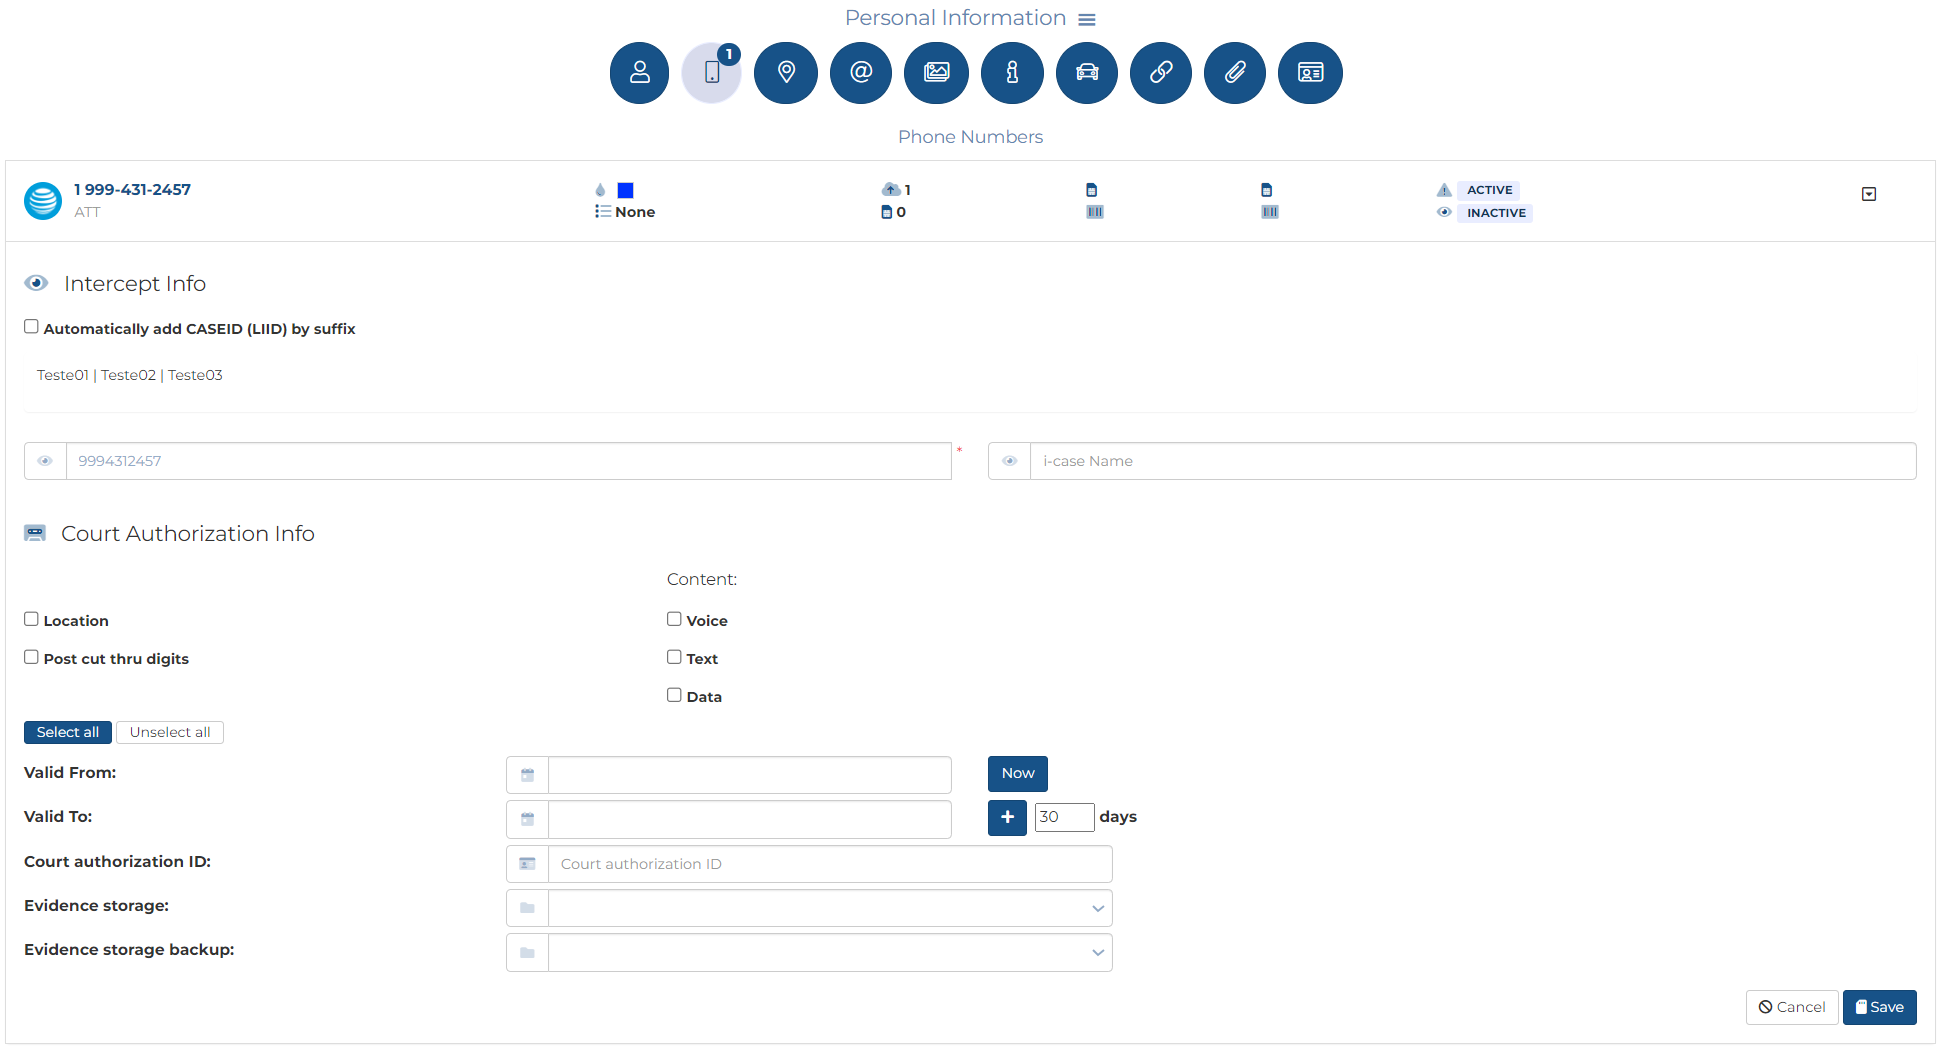
In Intercept info:
If your administrator has created suffixes for the selected operator then you have the option on which method you use to enter the CASEID (LIID). If not you can only use the manual option. Either:
Manually enter the CASEID (LIID):
In CASEID (LIID) enter the lawful interception identifier. This is the only mandatory setting, all others are optional although it is strongly recommended that you also enter a person name and phone number.
In i-case name enter a name for the i-case if you prefer to use a name rather than the CASEID (LIID). This is then used, rather than the CASEID (LIID), on the OSS-ESPA screens and the G-Scout App to identify the i-case.
Automatically enter the CASEID (LIID):
Select Automatically add LIID by prefix/suffix.
In Prefix and Suffix, if available, select the ones you want appended to the phone number.
In Court authorization info:
Select Locations if your warrant has authorized cell site locations.
Select Post cut thru digits if your warrant has authorized them.
If your intercept monitoring is for wiretaps, then in Content select which types of communication content your warrant has authorized. Note, this setting is not applicable for PRTT.
In Valid From and Valid To, enter the dates that the CASEID (LIID) is approved for. The monitoring will end when the valid to date expires. You can use the date pickers to select the dates. However, if you want the Valid From date as today's date then click Now and if the monitoring is valid for a specified number of days then select the number of days then click +.
NOTE: When entering the Valid From and Valid To date you must take into consideration the timezone of date/time on the warrant versus the timezone of your OSS-ESPA system. The timezone of your system is displayed above these settings. For example, if the timezone displays "Eastern Standard Time (-5.00)", and the warrant's date/time is in Eastern Standard Time then you must enter the warrant's date/time in Valid From and Valid To. However, if your warrant is in Pacific Standard Time then you must increase the time entered in the Valid From and Valid To settings by 3 hours.
In Court authorization ID enter the search warrant identifier. This is then included in Evidence Management and Reporting.
If your intercept monitoring is for wiretaps, then in Evidence storage and Evidence storage backup, select the paths you want used for archiving the case's Sentinel data. Note, this setting is not applicable for PRTT.
Click Save.
To verify your intercept is configured, ensure it displays in the Sentinel i-cases section on the Manage case screen.
When OSS-ESPA receives the first PRTT data or GPS ping from the operator it sends an email to the case creator, case assignees and administrator to notify them that the first alert has been received. The email is titled "First Data <person name> - First Data ALERT". Note, administrators can change who receives these emails using Send "First data alert" notification for administrators and Exclude domains.
This topic describes how to set up a social media PRTT on an existing person. Facebook, Instagram and WhatsApp social media files are all supported. Social media PRTT is delivered via email to your OSS-ESPA account's Smart Track email address.
You can also click here for a short video showing how to set up a social media PRTT case and view the received data.
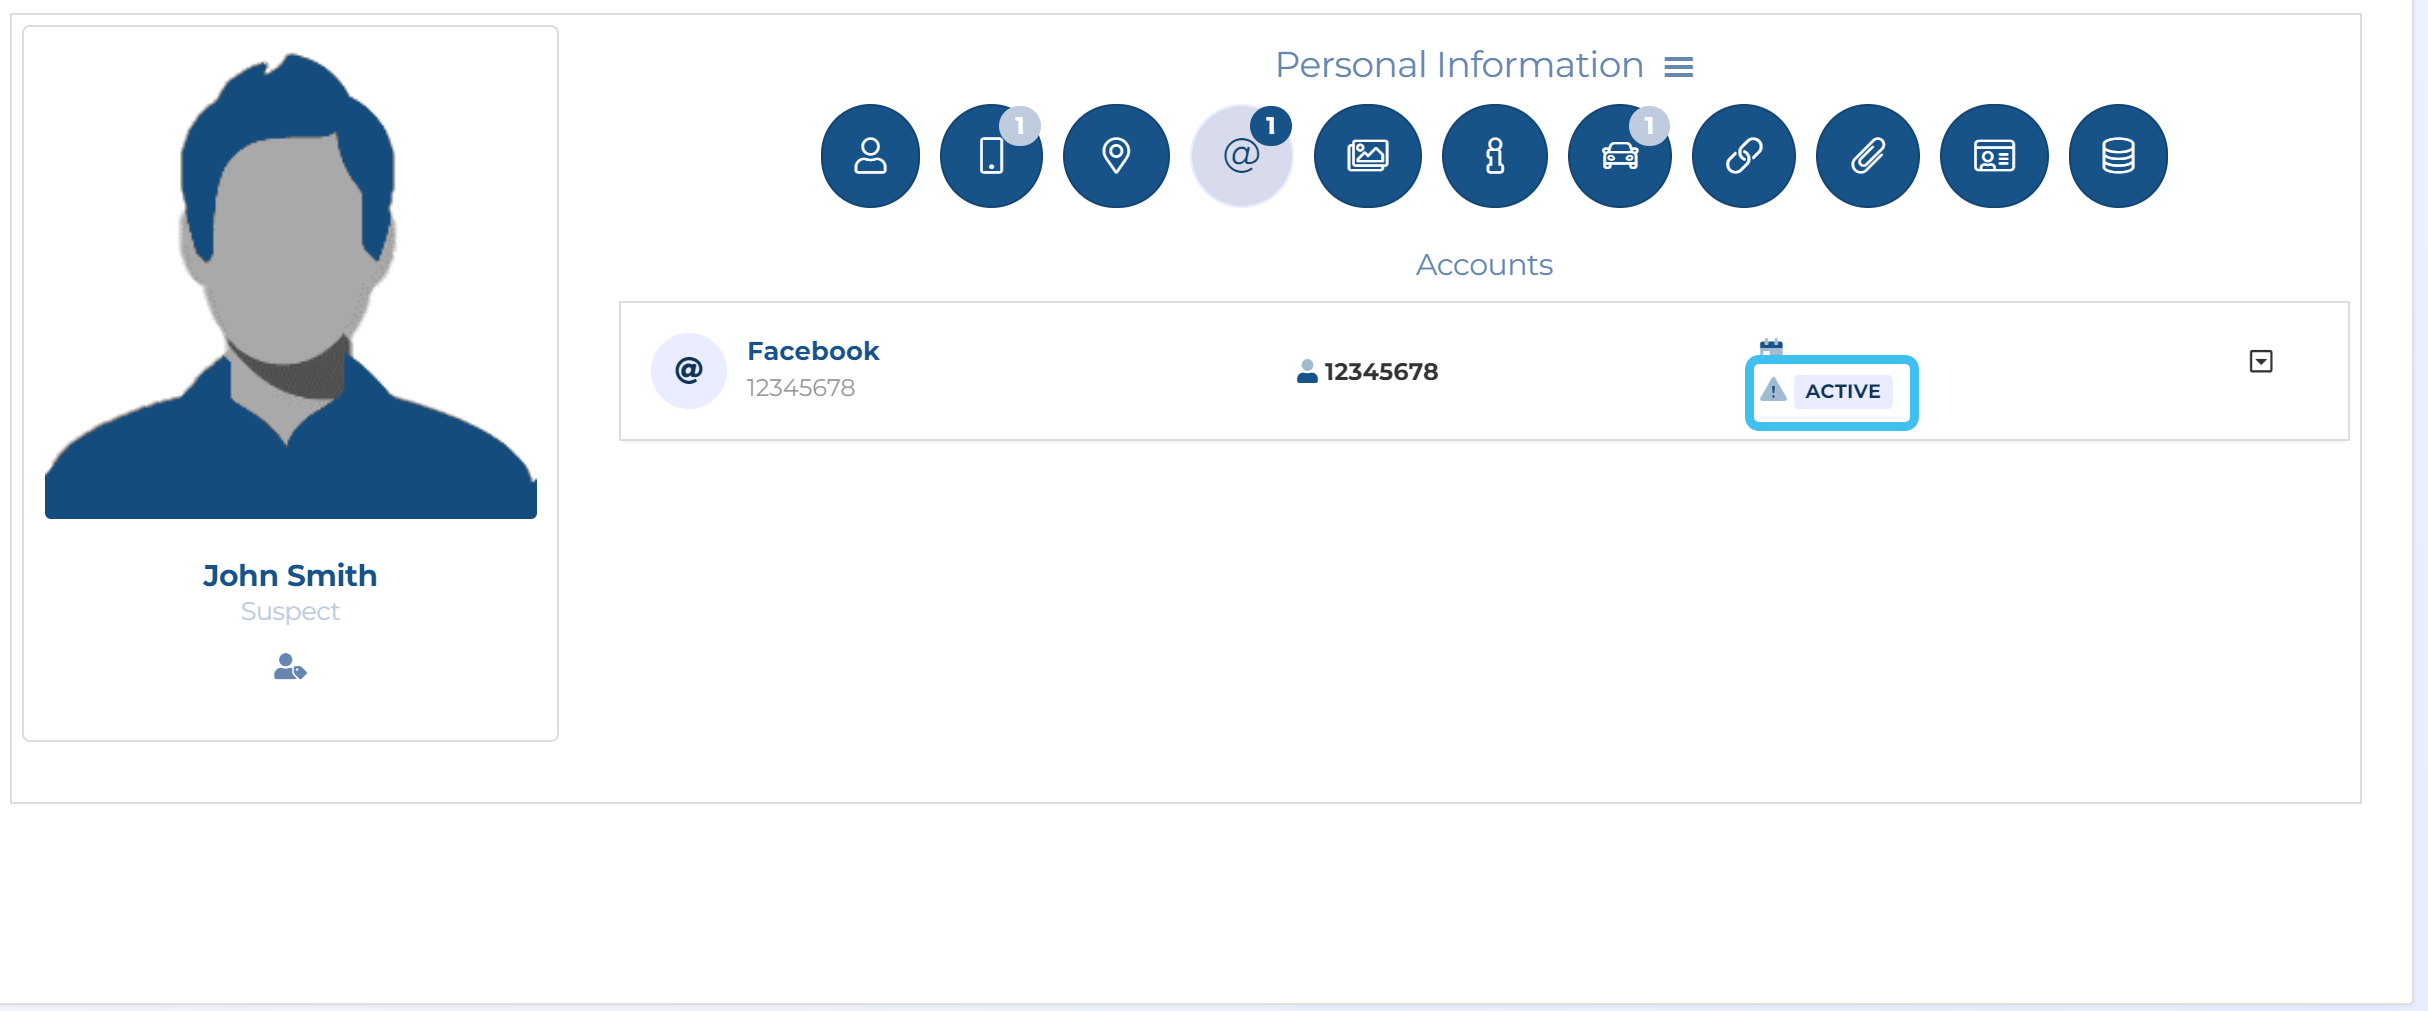
Firstly you must create the social media account for the person. To do this, on the People and devices screen, select the person you want to add the social media PRTT to, then click . Note, if is not displayed, click , then select Accounts.
You must now enter the account settings. Note, if the settings for entering a new account are not already displayed, then click New. You must:
Select the account type in Service.
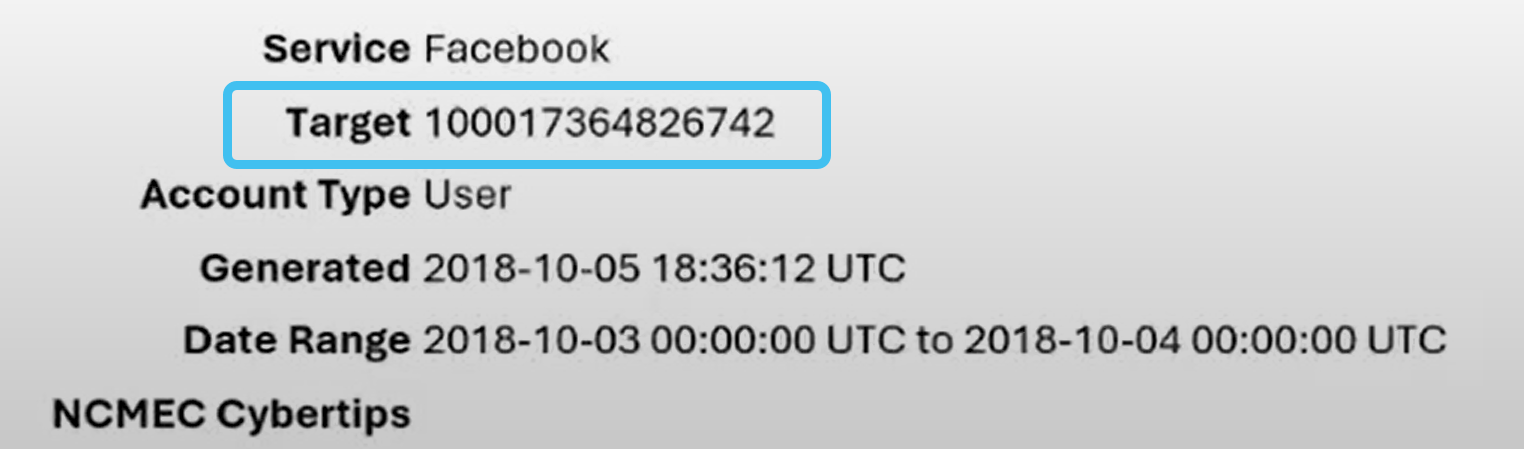
Enter the Account identifier. The account identifier is contained within the email provided by the social media provider, for example:
Enter the User/Vanity name. Although you must enter the user/vanity name, if you do not know it then you may just want to re-enter the account identifier.
Click Save.
The Accounts tab now displays the new account.
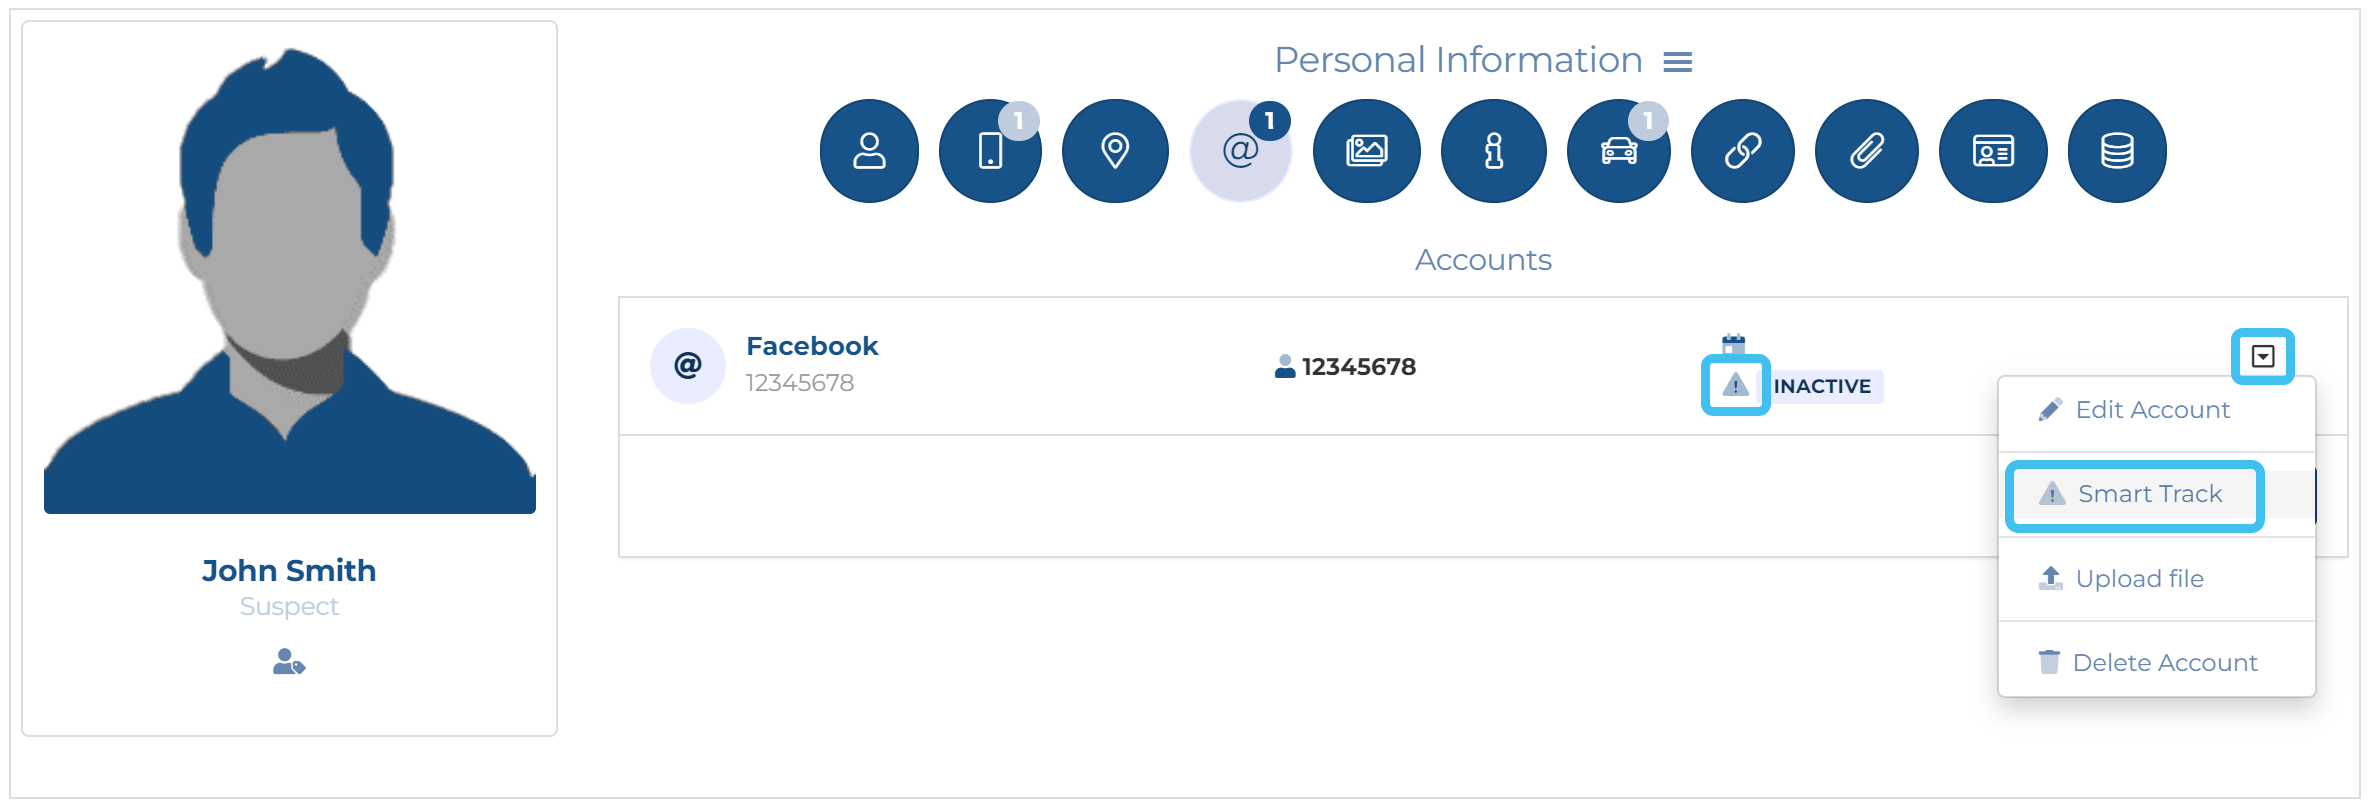
You must now enable Smart Track. To do this:
Either click , or click then select Smart Track.
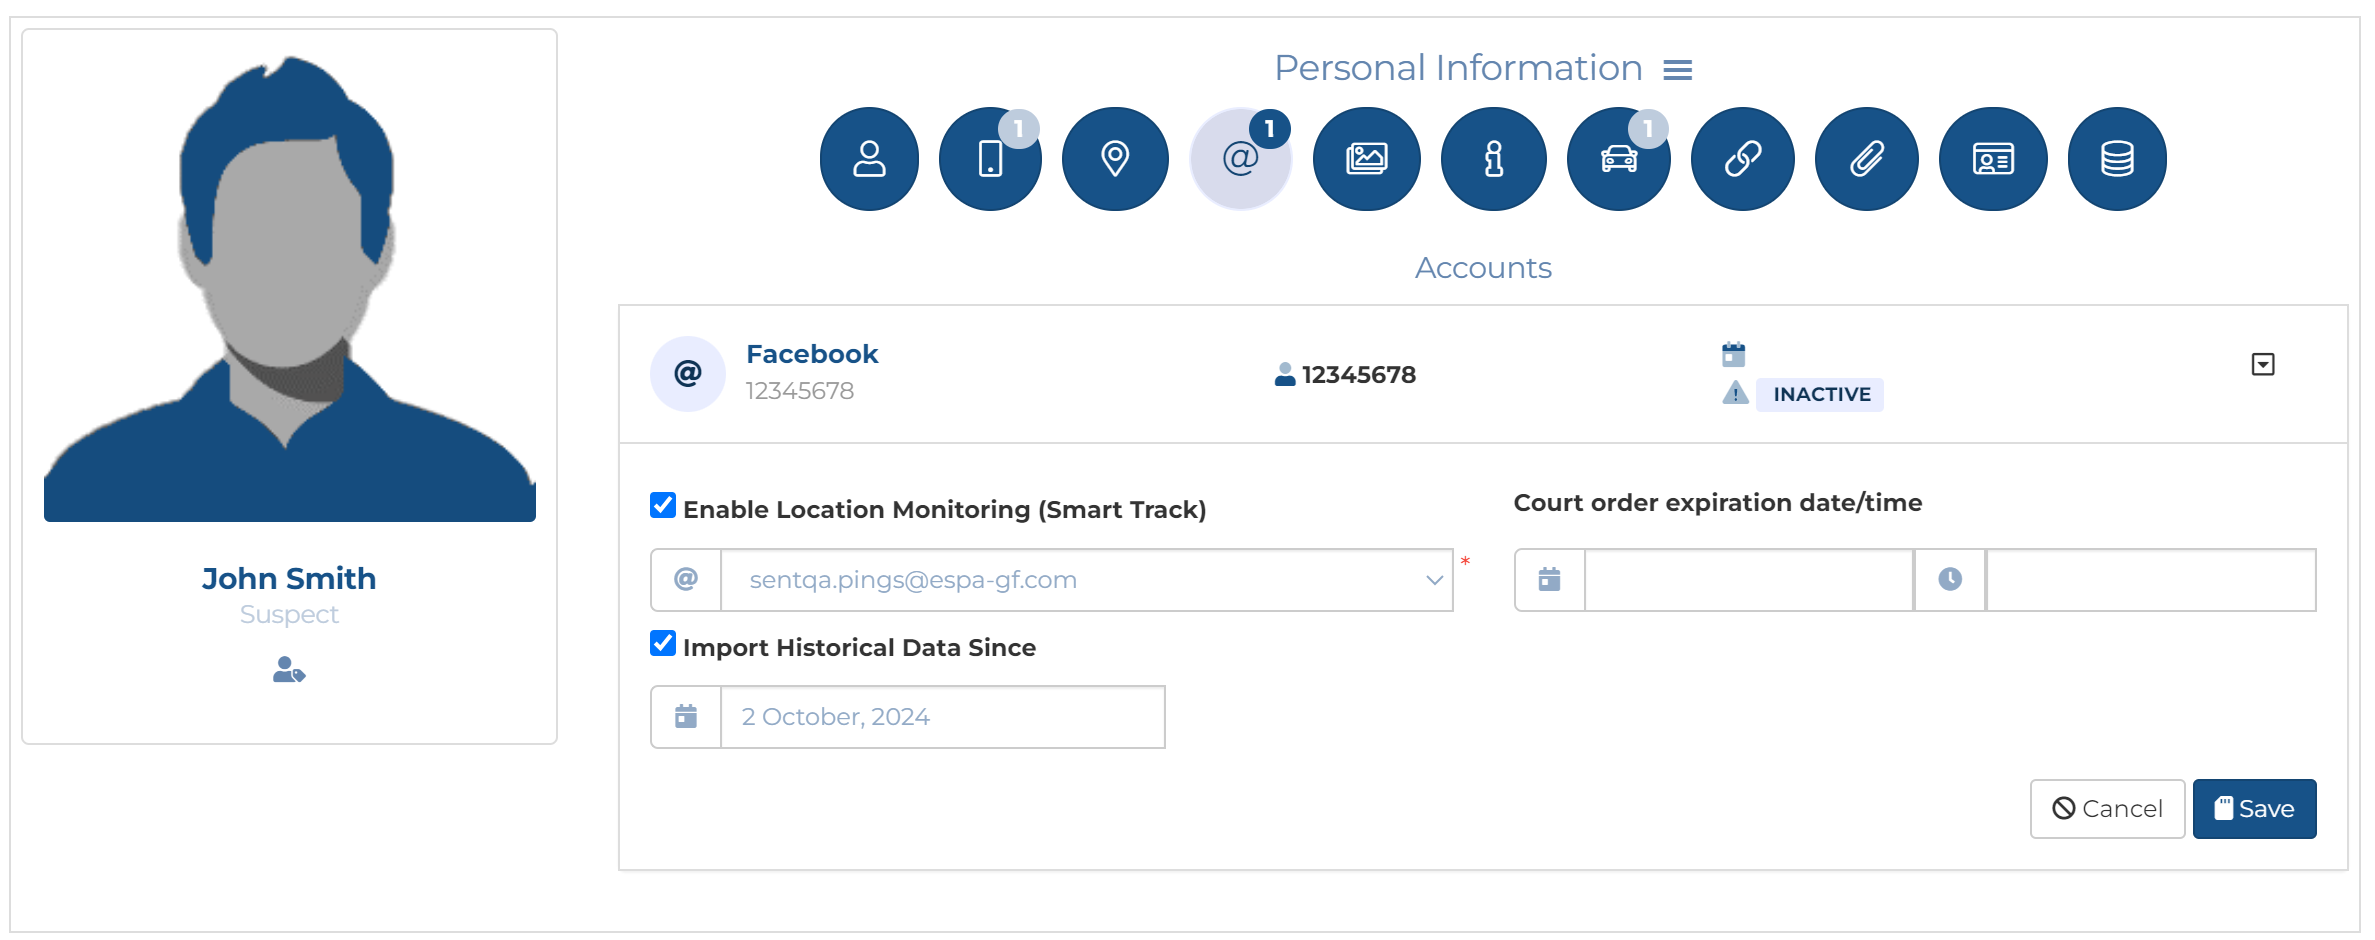
Ensure Enable location monitoring (Smart Track) is selected.
Optionally, if the social media provider has already been sending emails prior to you creating the case then you can select Import historical data since and select a date if you want to import the earlier data.
In Import from ensure the correct email is selected, often this is defined by your administrator.
Optionally, you can enter a date in Court order expiration date.
NOTE: OSS-ESPA stops importing the social media provider's emails when this date is reached, therefore you must update this date if you extend your warrant.
Click Save. The Smart Track now displays as Active.
You can now view the social media data in two places. To view the data in real-time open the Sentinel screen; or if you are viewing the data historically you can open the ESPA analysis center. Both these screens can be opened from the top of the Manage case screen by clicking either to open theESPA analysis center or to open the Sentinel screen.
If you open the Sentinel screen, simply set the Sentinel Mode to Real time to view the social media data arriving. You can then use the Event summary and IPs views to investigate the data.
On the main menu click View cases. The screen that opens depends on your setting of View cases. If it is set to:
Advanced view, then the Advanced view cases screen opens.
If your case is listed on the Favorite & recent cases tab, click the case name to open the Manage case screen.
If it is not listed on the Favorite & recent cases tab, then click the Cases tab. Use the search filters to help locate your case. You can also click to open the FILTERS group which allows you to set your own default filter defining what is displayed on this tab, for example you may wish to set it to cases that you created which are currently open.
If your case is listed under My recent cases click it to open the Manage case screen.
If it is not listed under My recent cases then select your case from the table, using the search filters to help locate it if required. Note, by default the search is set to only display cases that you created; if you are not the original creator but an assignee then ensure you set Case filter to Assigned cases before clicking Search.
Tree view, then the View i-cases screen opens.
Click at the top-right of the screen to open either the View Cases or Advanced view cases screen and follow the above description.
On the Manage case screen click Sentinel i-cases. Alternatively, you can click the CASEID (LIID).
The Sentinel i-cases screen opens.
In Sentinel messages, use Phone number and CASEID (LIID) to select the intercepts you want to verify, then click . If your intercept:
has just been activated, then you can verify that messages are now being received.
has reached its expiry date, or if you have just requested it to be canceled, you can verify that the operator has correctly canceled the intercept as you should not be receiving any new messages.
is active, you can verify that messages are still being received.
includes multiple CASEID (LIID), you can use the CASEID (LIID) filter to verify that each is being received correctly.
This topic describes how to view each of the call's HI2 messages in their raw format.
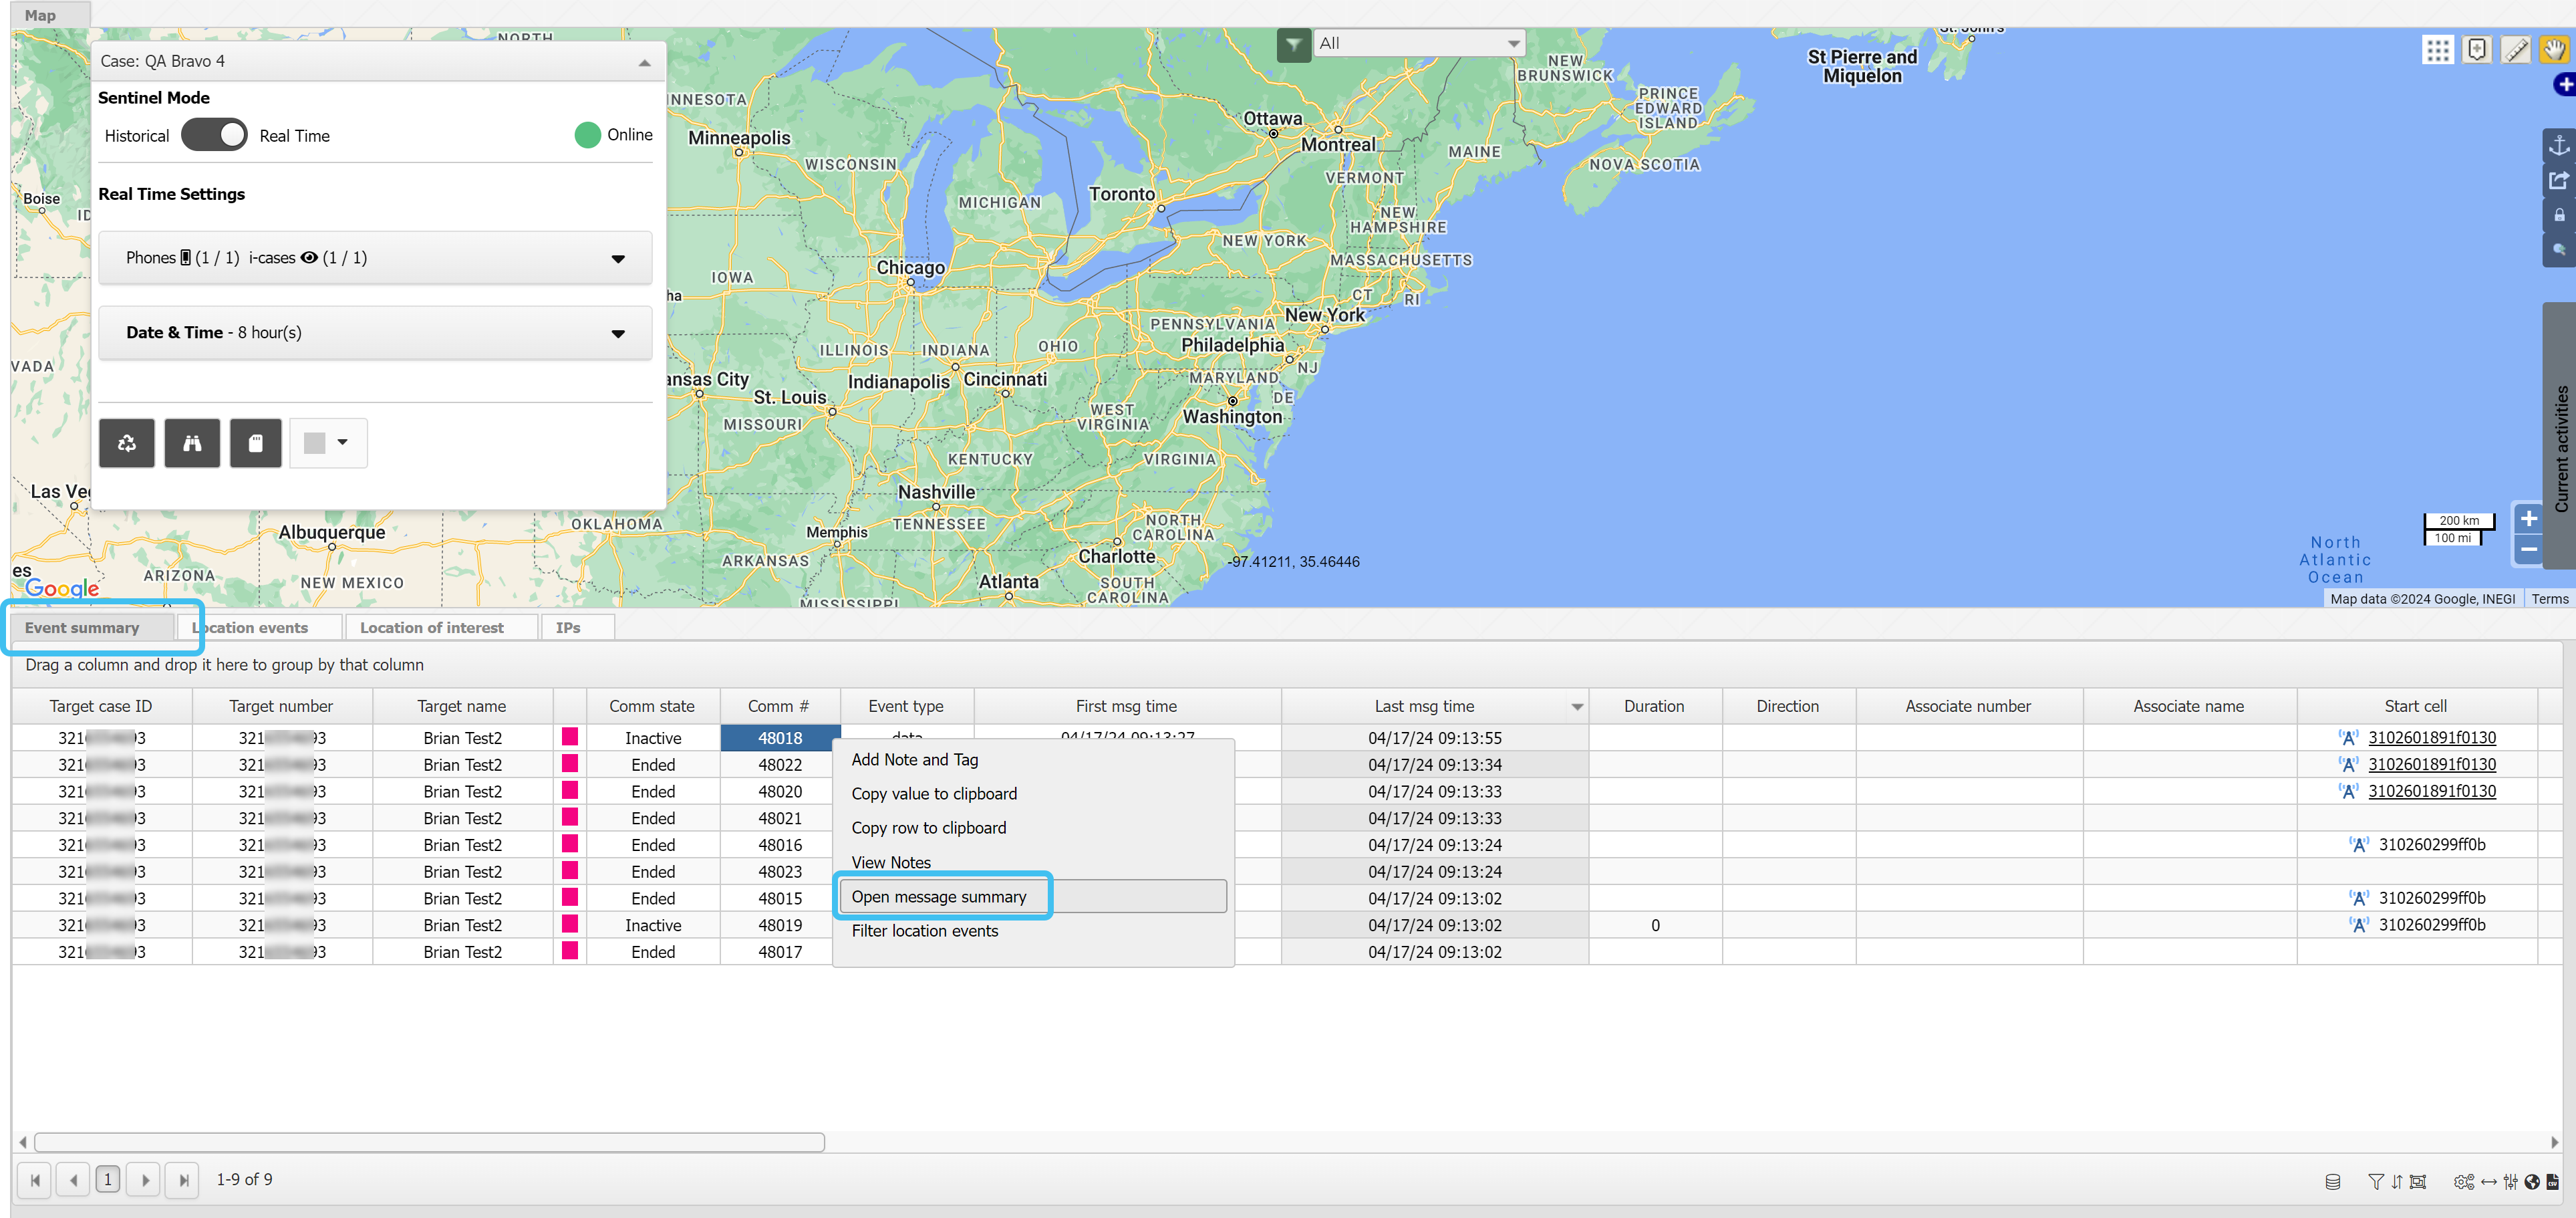
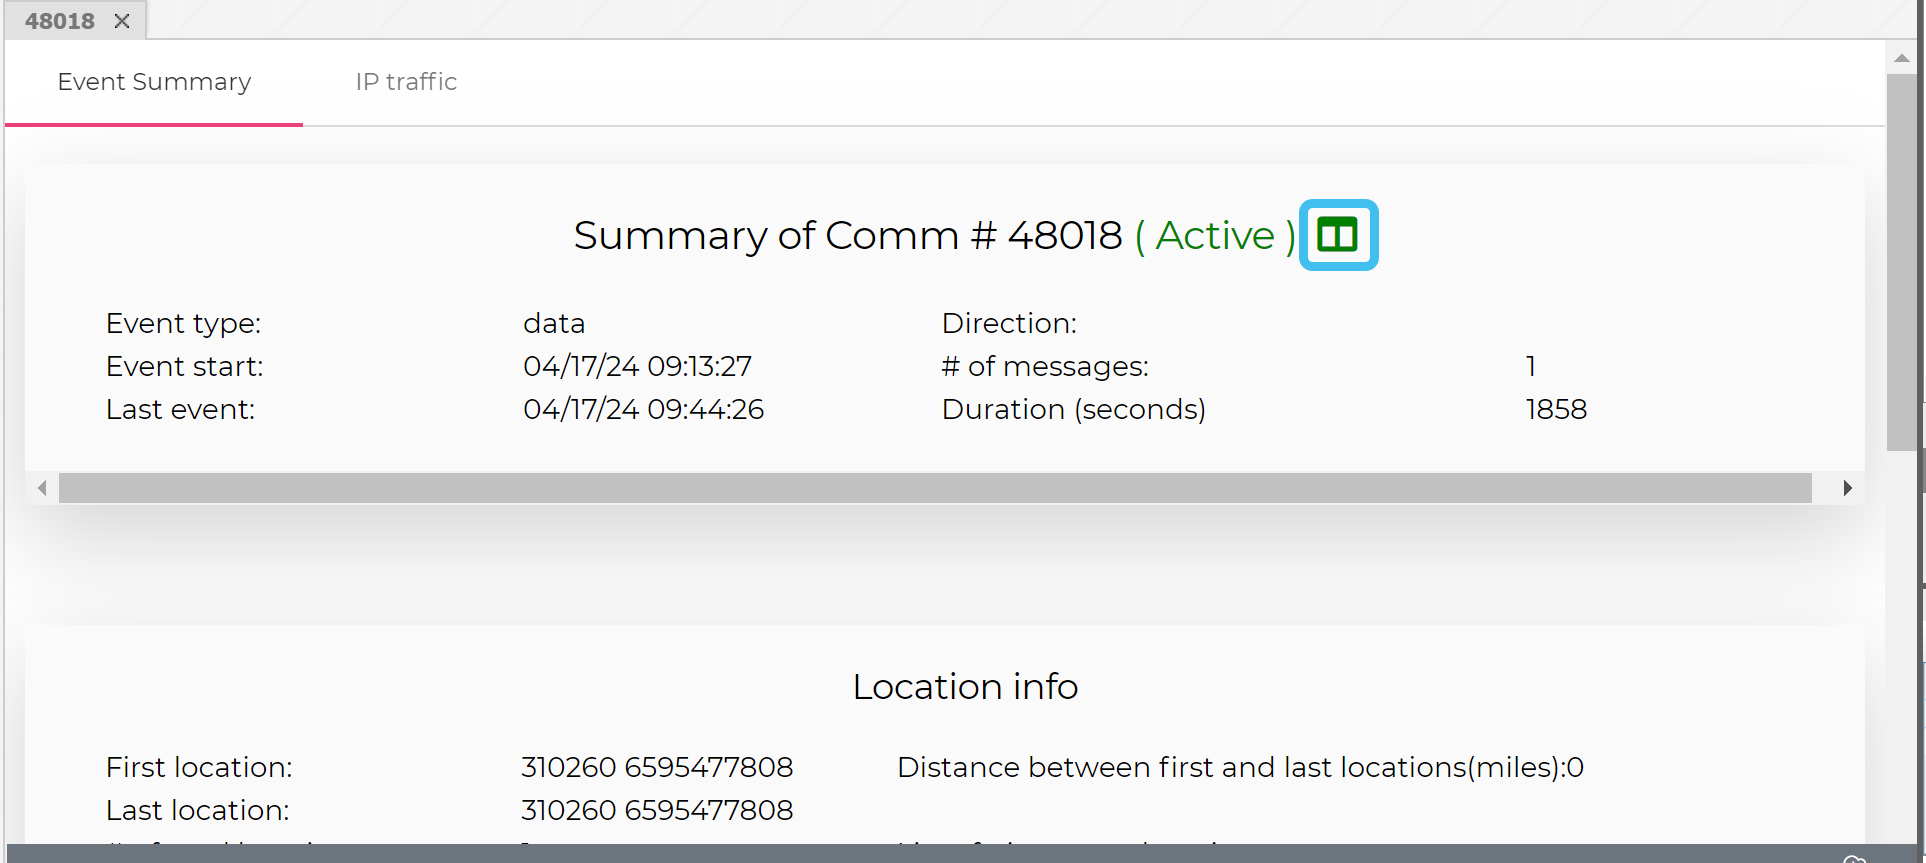
For the communication of interest, open the Message summary view. The Message summary can be opened in a variety of ways. A common method of opening it is from the Event summary view by either clicking on the call's Comm # or right-clicking on any row then selecting Open message summary.
If required, for additional methods of opening, refer to the Message summary view.
The Message summary view opens to the right of the Event summary view and is named using the Comm #.
Click the Event summary tab.
Click .
The original HI2 message traffic text is displayed. If required you can copy the complete call using or use your mouse to highlight and copy messages of interest.
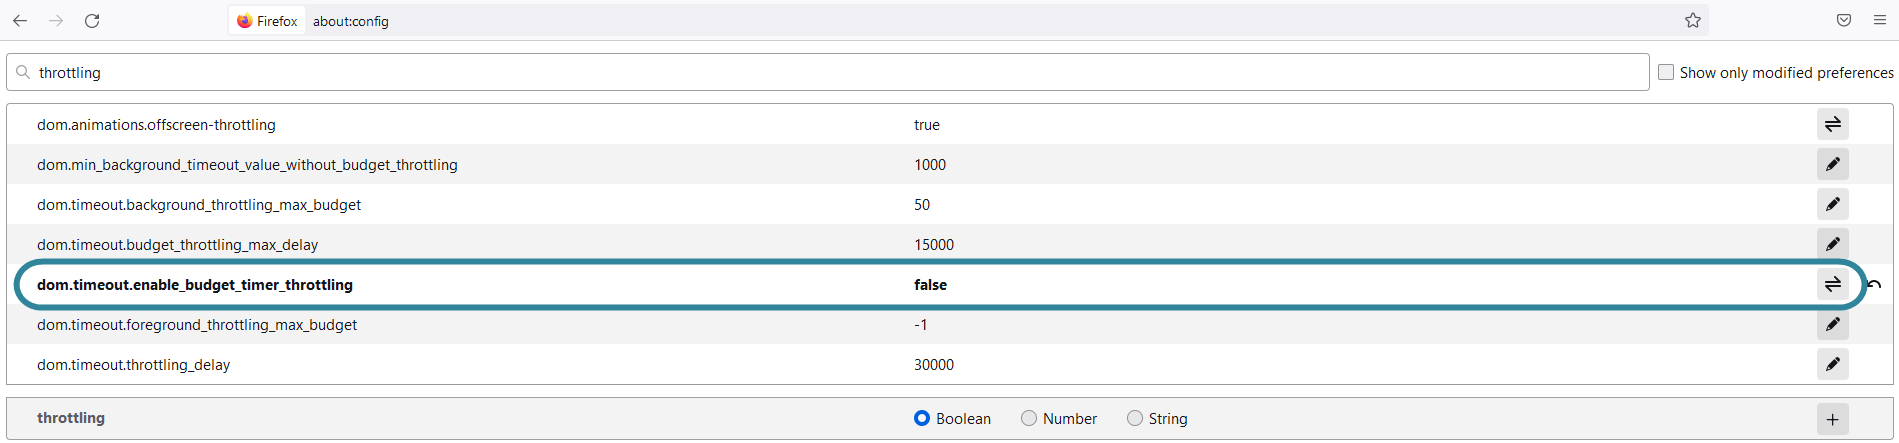
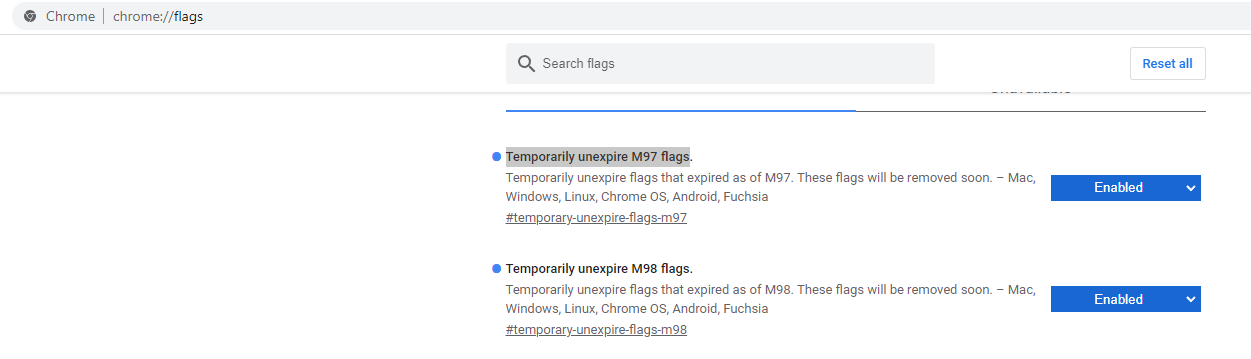
If the Sentinel screen disconnects unexpectedly it may be due to your Web browser settings. Web browsers have recently added an internal functionality that disable Javascript processes (timed out) if either a browser or tab is inactive. To resolve this issue:
Whilst in administrator mode, copy and paste the following content into a text file of any name and save it with a ".reg" extension. Double-click the file to execute it.
Windows Registry Editor Version 5.00 ; Disables browser throttling and occlusion calculation for Chromium-based Edge and Chrome at the local-machine and current-user paths. [HKEY_LOCAL_MACHINE\Software\Policies\Microsoft\Edge] "IntensiveWakeUpThrottlingEnabled"=dword:0 [HKEY_LOCAL_MACHINE\Software\Policies\Google\Chrome] "IntensiveWakeUpThrottlingEnabled"=dword:0 [HKEY_CURRENT_USER\Software\Policies\Microsoft\Edge] "IntensiveWakeUpThrottlingEnabled"=dword:0 [HKEY_CURRENT_USER\Software\Policies\Google\Chrome] "IntensiveWakeUpThrottlingEnabled"=dword:0 [HKEY_LOCAL_MACHINE\Software\Policies\Microsoft\Edge] "WindowOcclusionEnabled"=dword:0 [HKEY_LOCAL_MACHINE\Software\Policies\Google\Chrome] "WindowOcclusionEnabled"=dword:0 [HKEY_CURRENT_USER\Software\Policies\Microsoft\Edge] "WindowOcclusionEnabled"=dword:0 [HKEY_CURRENT_USER\Software\Policies\Google\Chrome] "WindowOcclusionEnabled"=dword:0
report: UE reporting information messaging (for example, location reporting, session failed, network/subject signaling)
notify: LI standard surveillance messaging
test: LI standard connection test messages
Other messaging types
ims-sms-ack: SMS acknowledgement; (obsolete) ack is grouped with ims-sms
sms-notify: SMS notification (not used)
sms-report: SMS report messaging
wap-sms: WAP protocol encapsulated in SMS PDU; other signaling over SMS protocol that is not messaging, for example mms notification, voicemail, carrier signaling
mms-notify: multimedia notification; message waiting for retrieval
 Using Sentinel for intercept monitoring
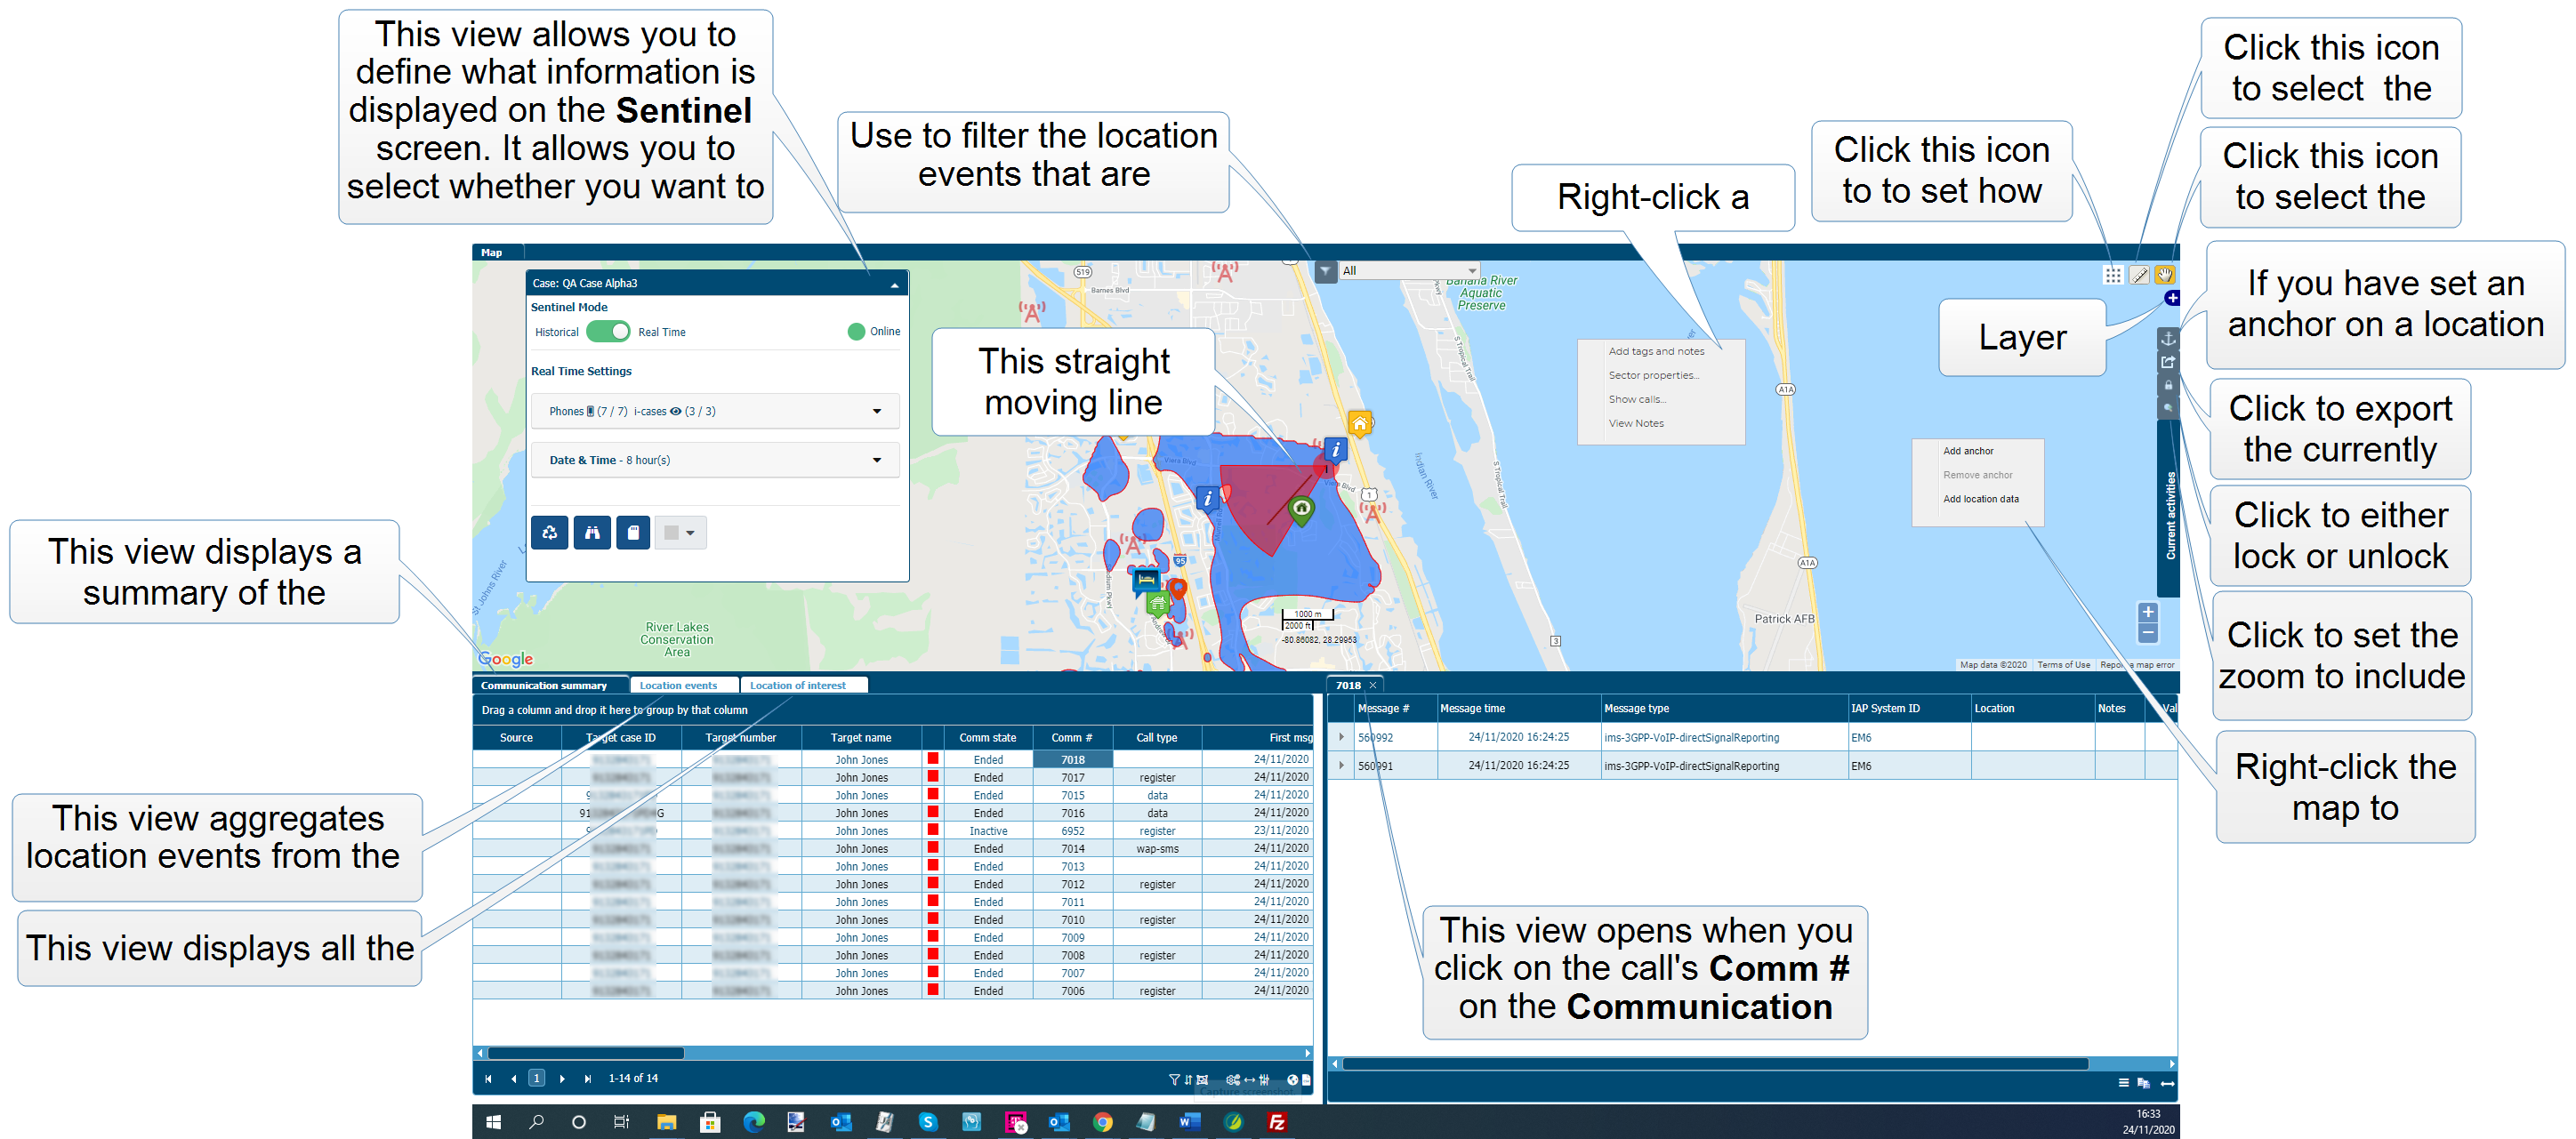


 , click


 and ensure the icon is orange
  .
. 

 then from the menu select
  alongside their phone number.
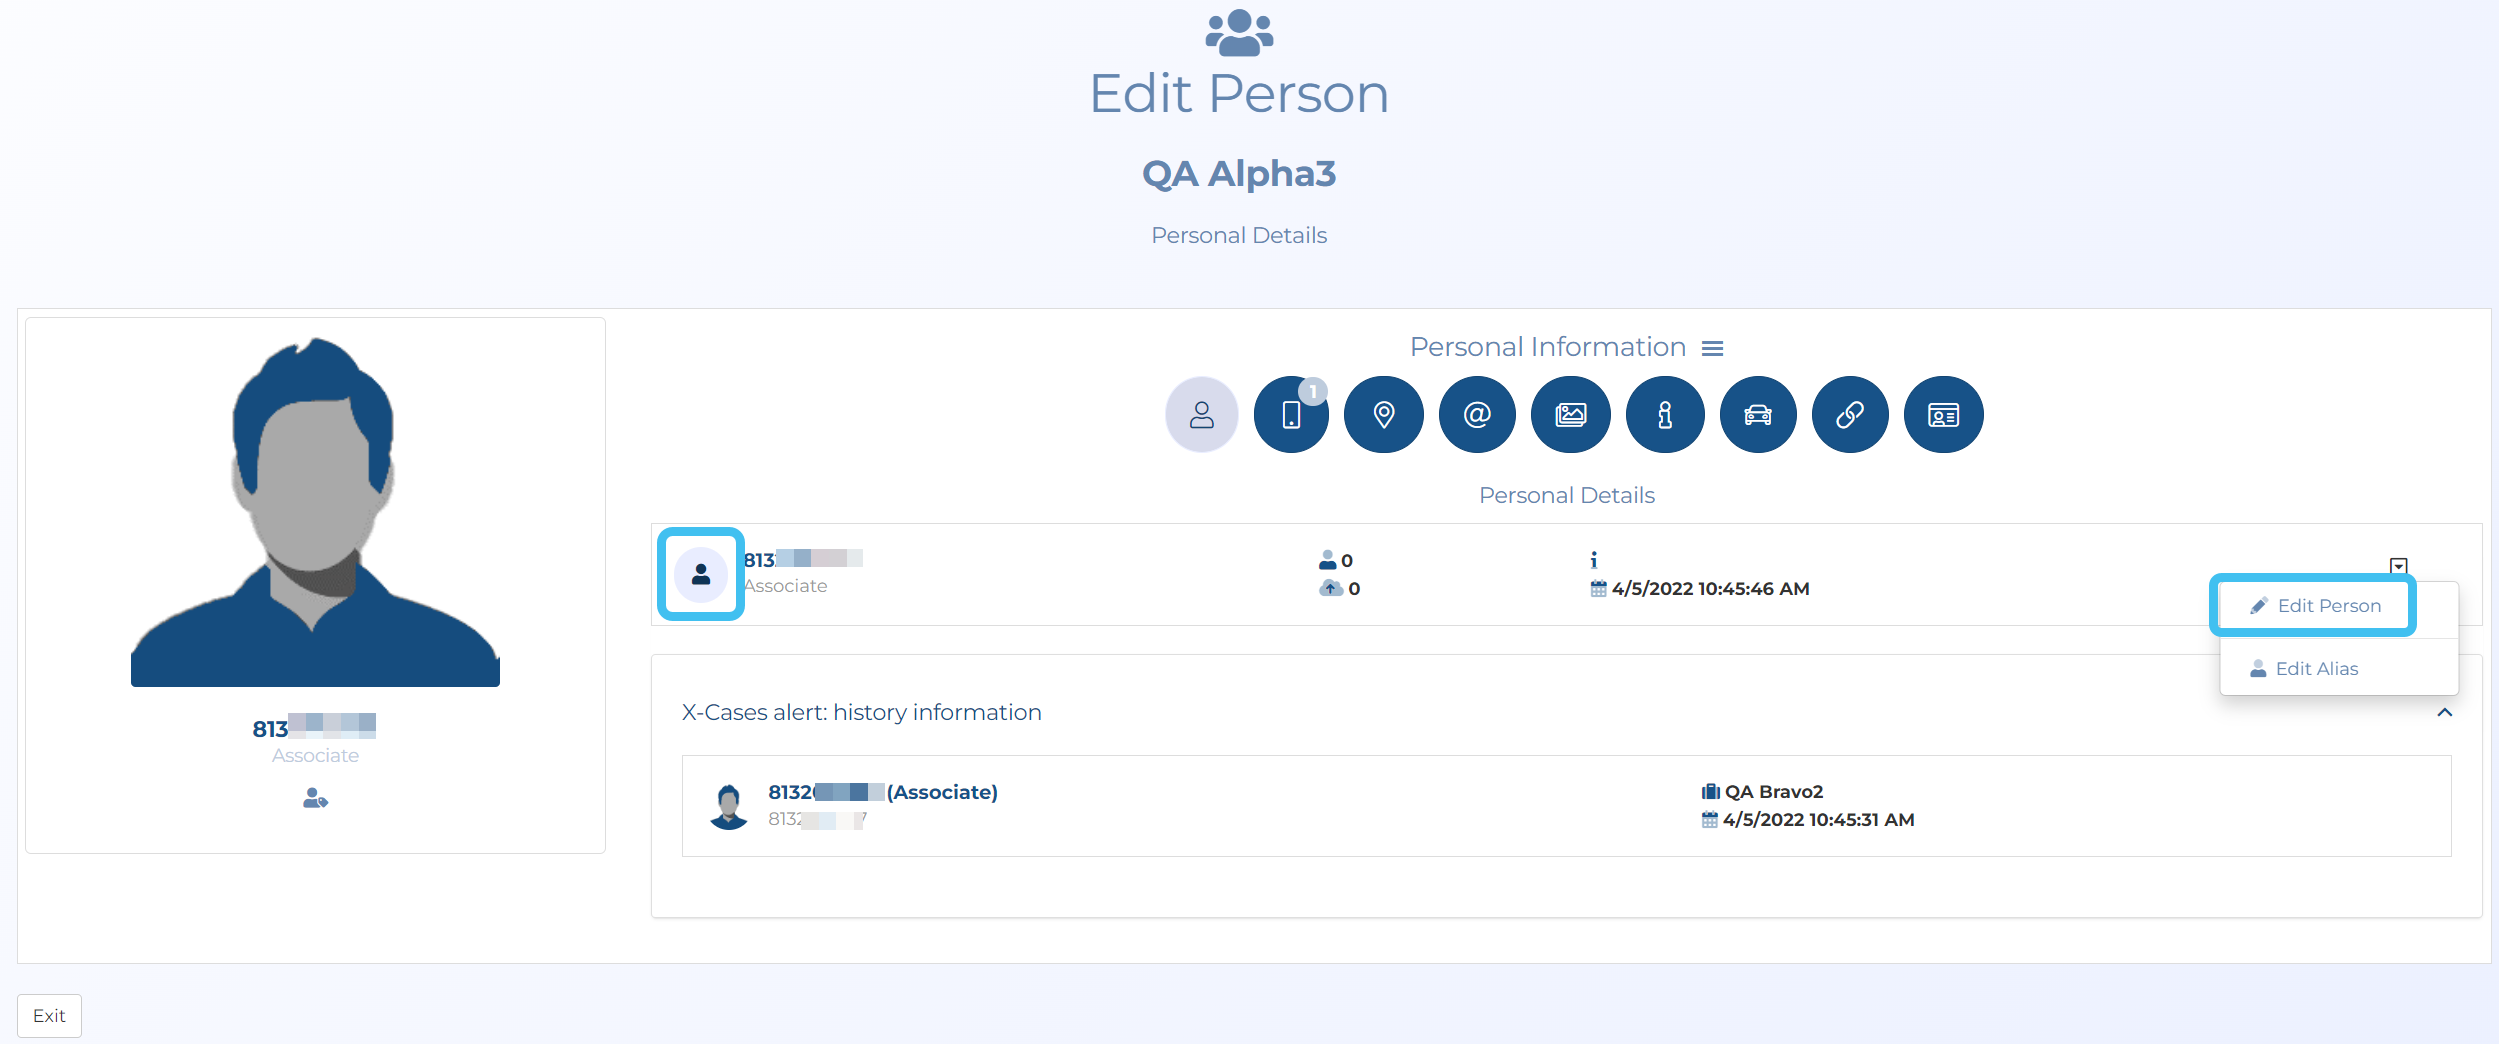


 to open the
  at the top-right of the screen to open either the

 .
.
 .
.

 to open the
 then
then  .
.


 to save the contents of the view to an html file format.
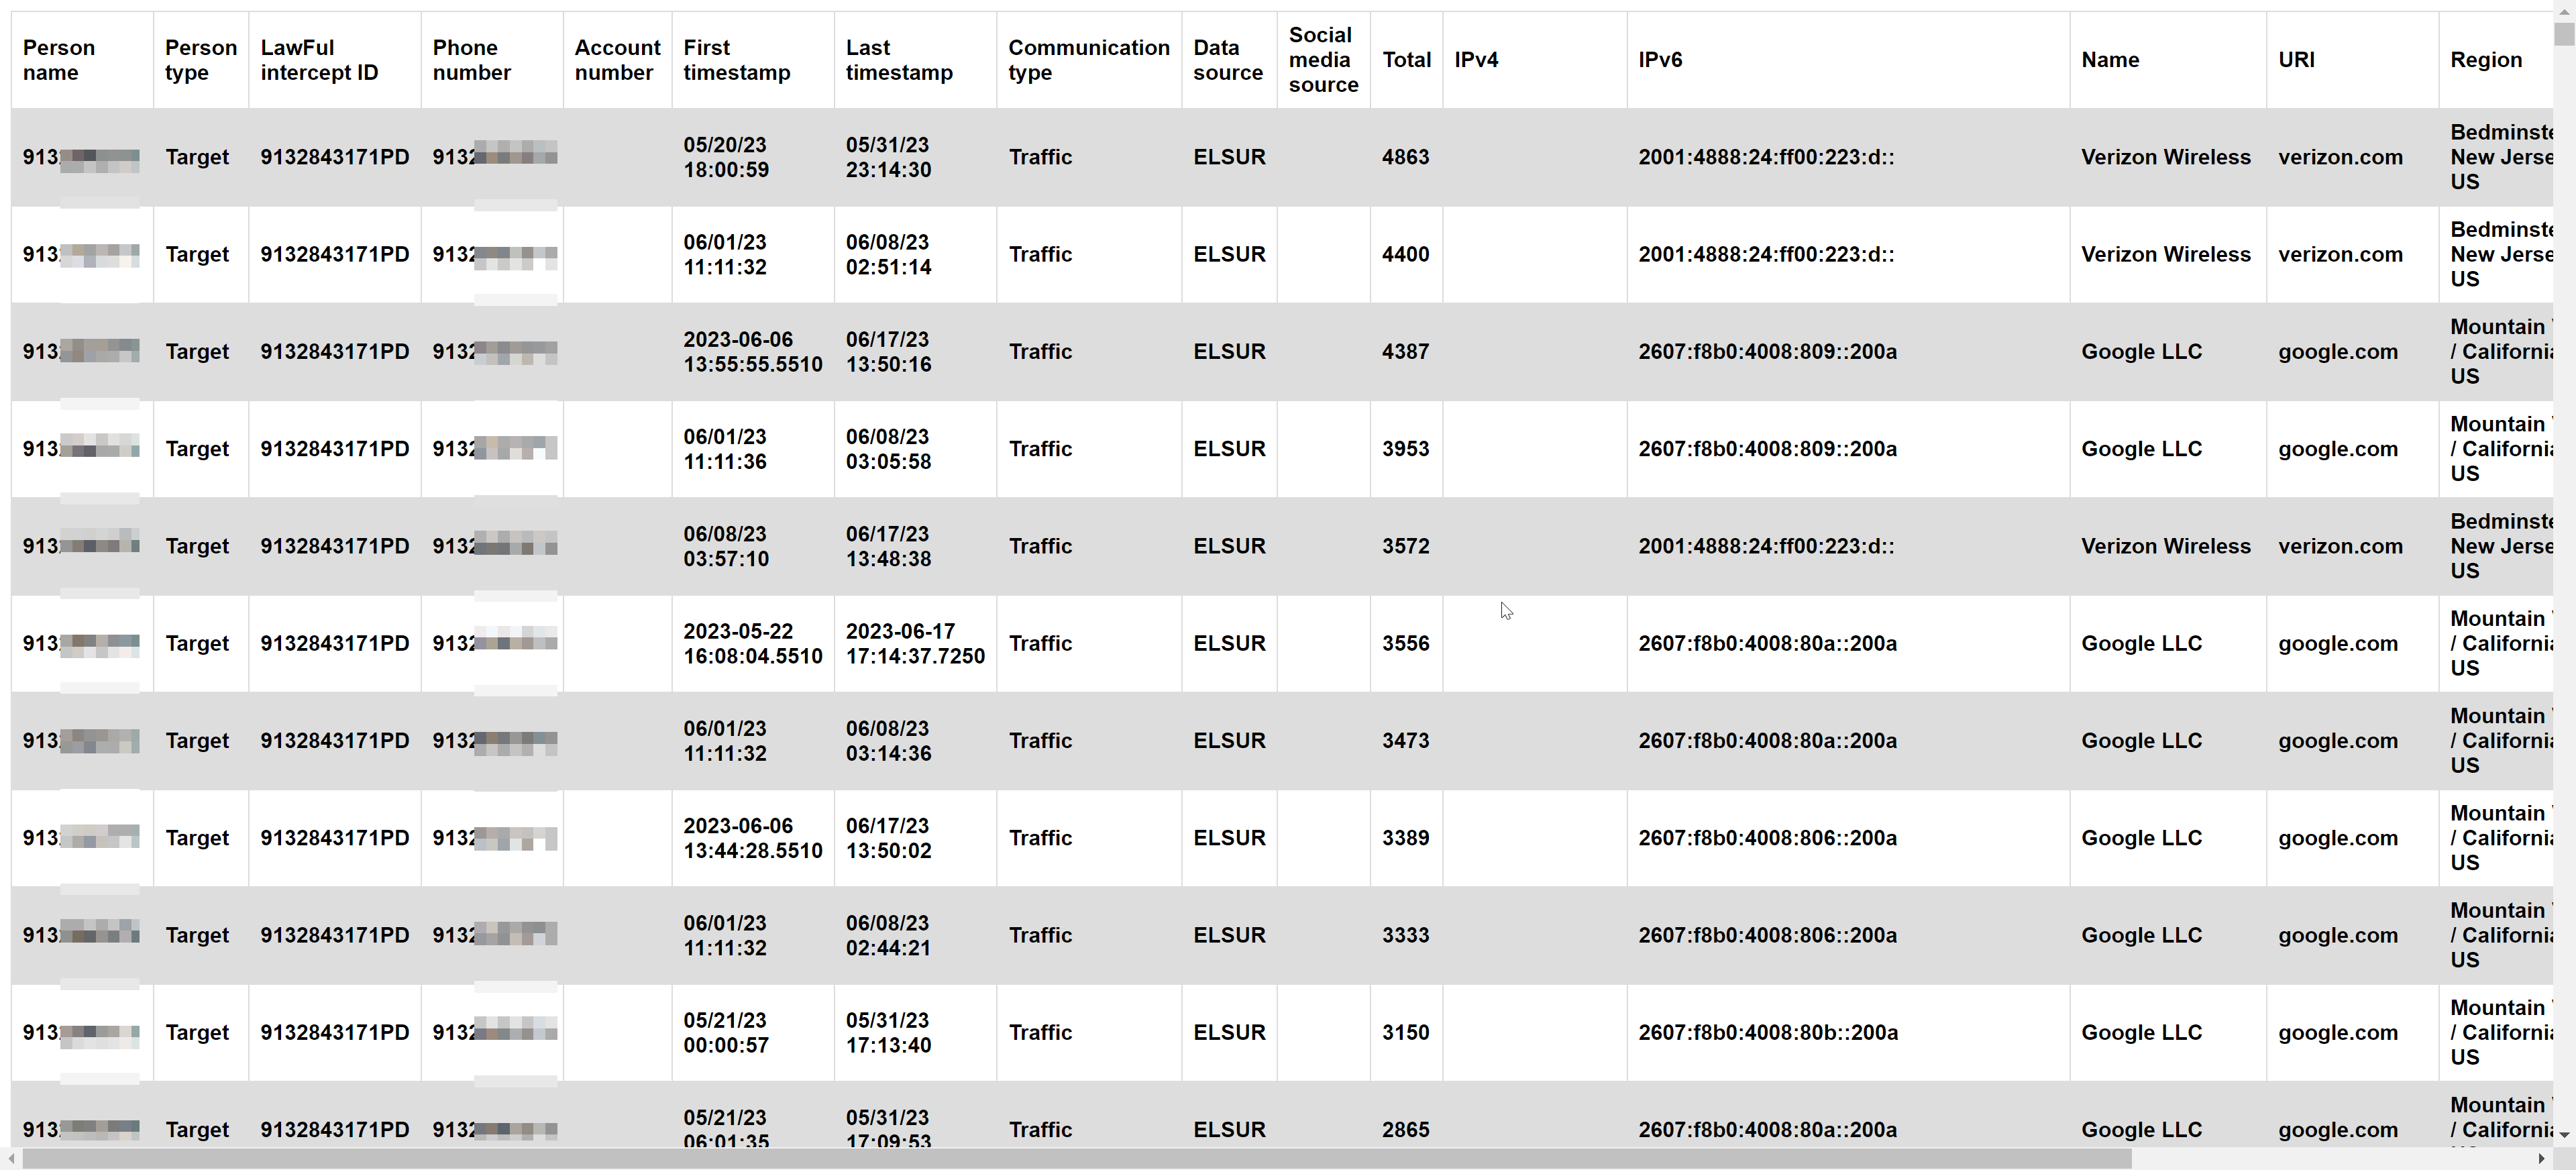
 to save the contents of the view to a csv file format.
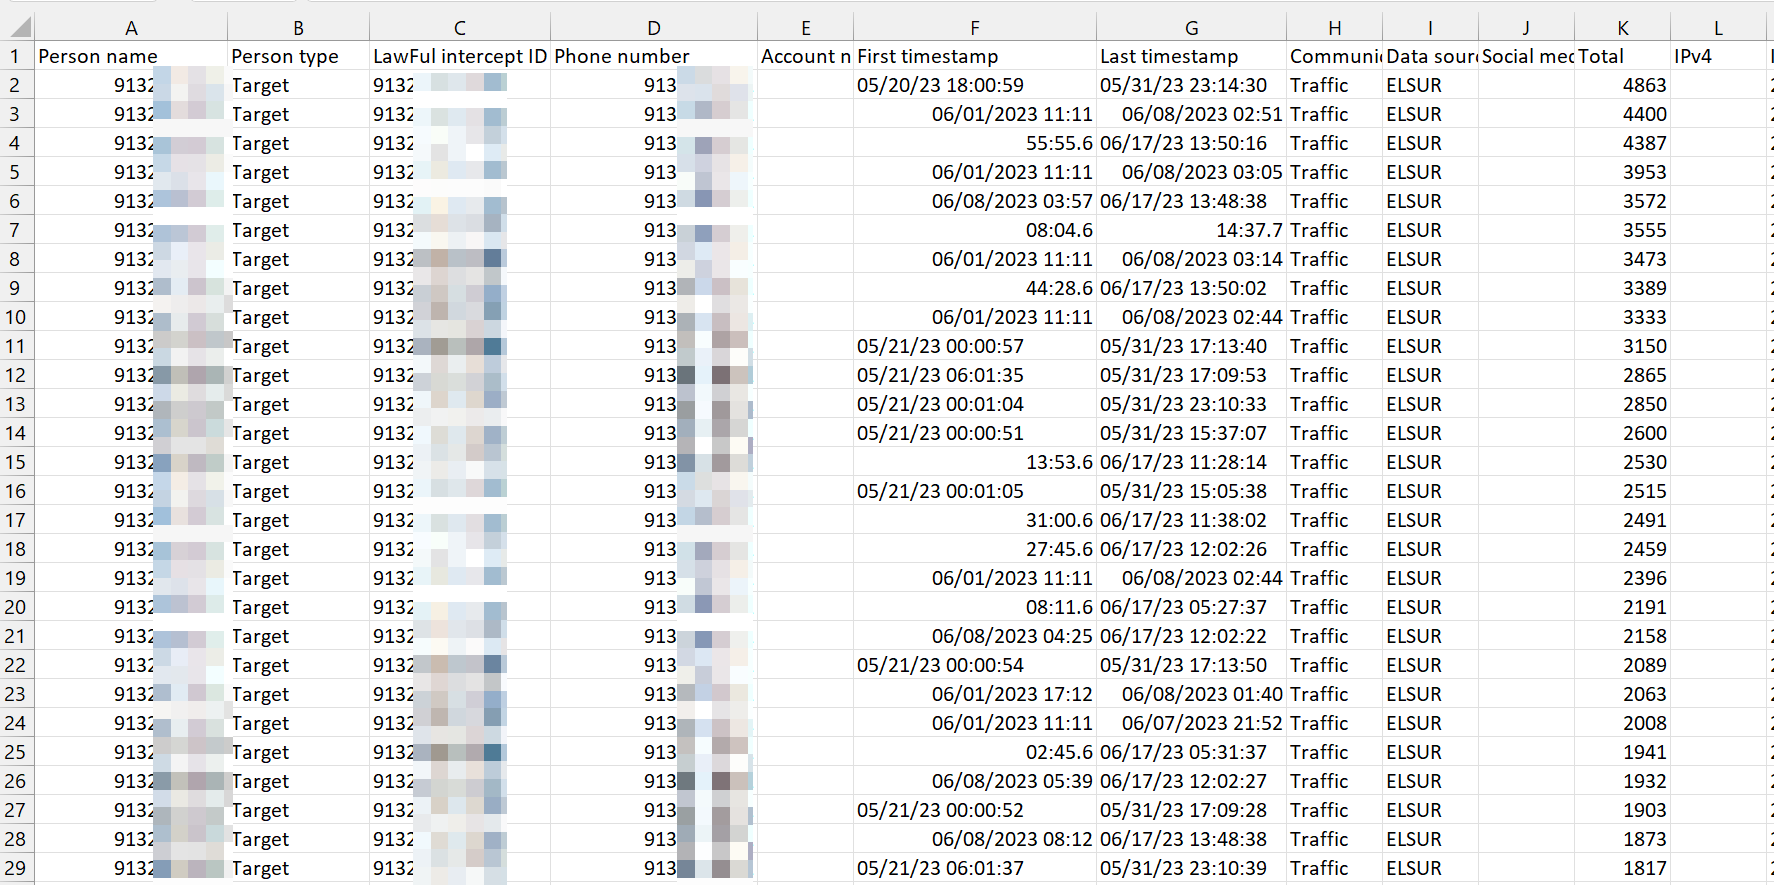

 , then click

 . Note, if
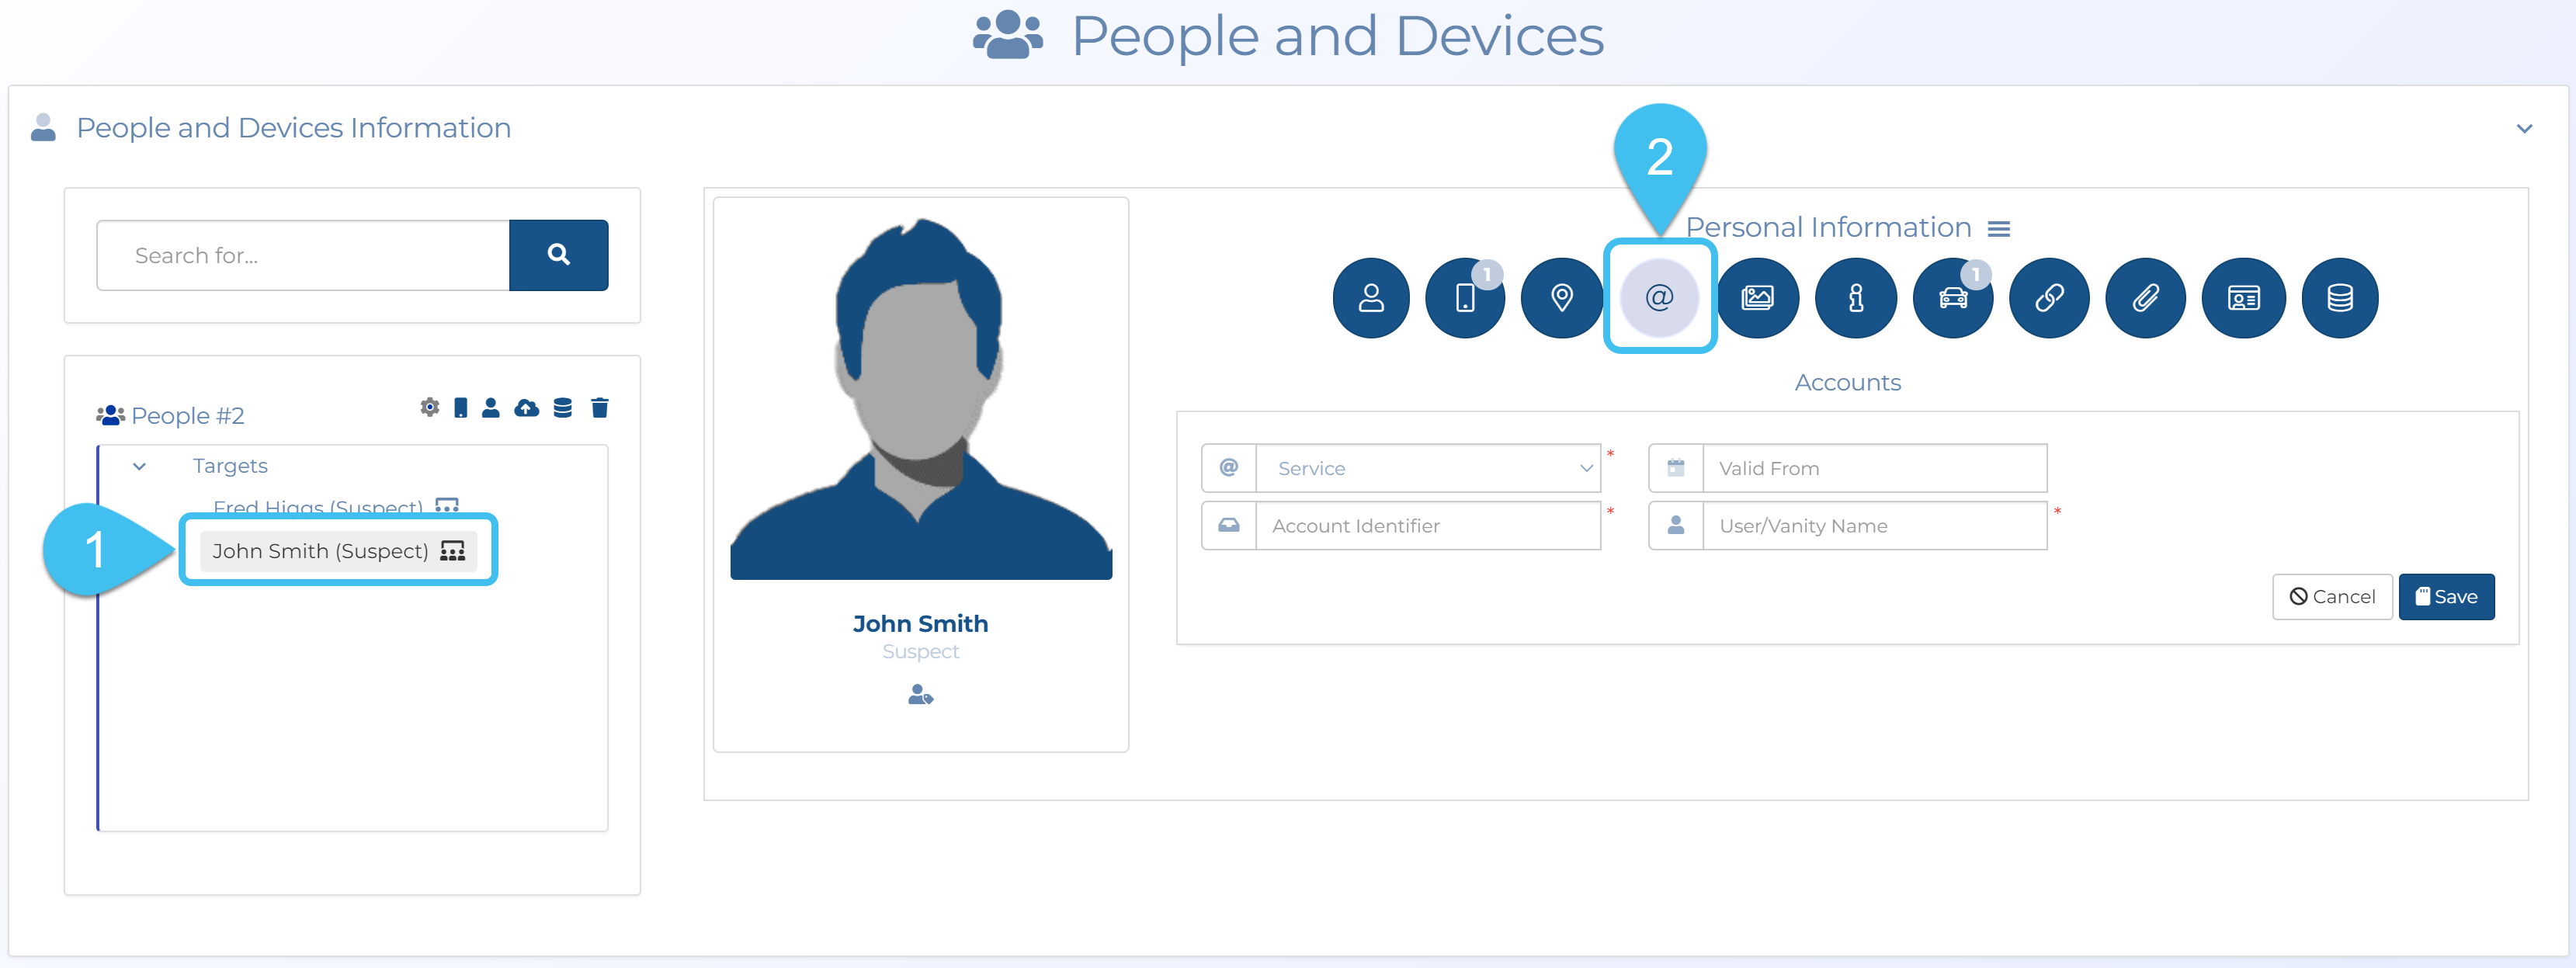

 to open the
 to open the
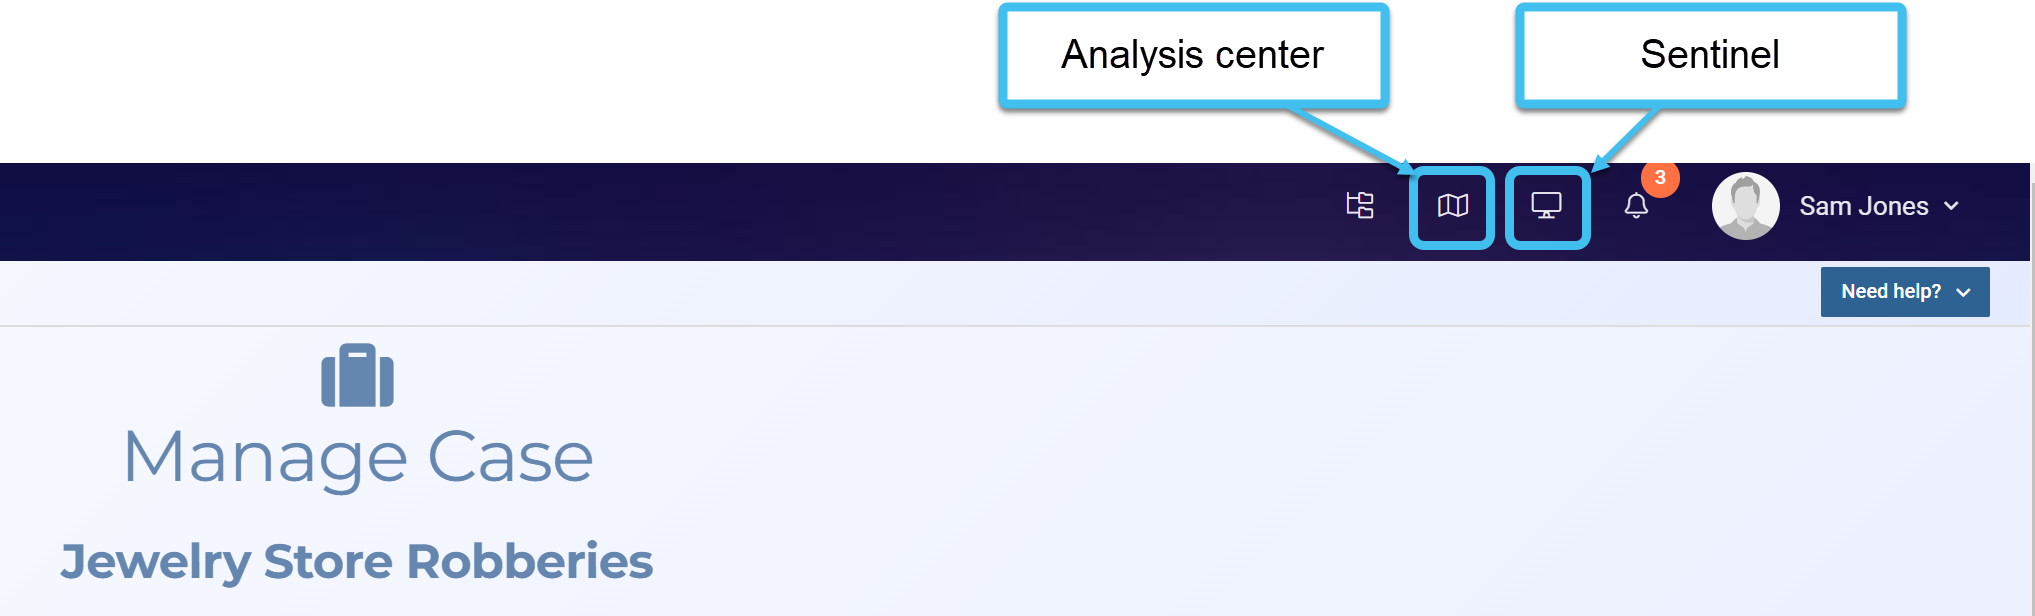

 . If your intercept:
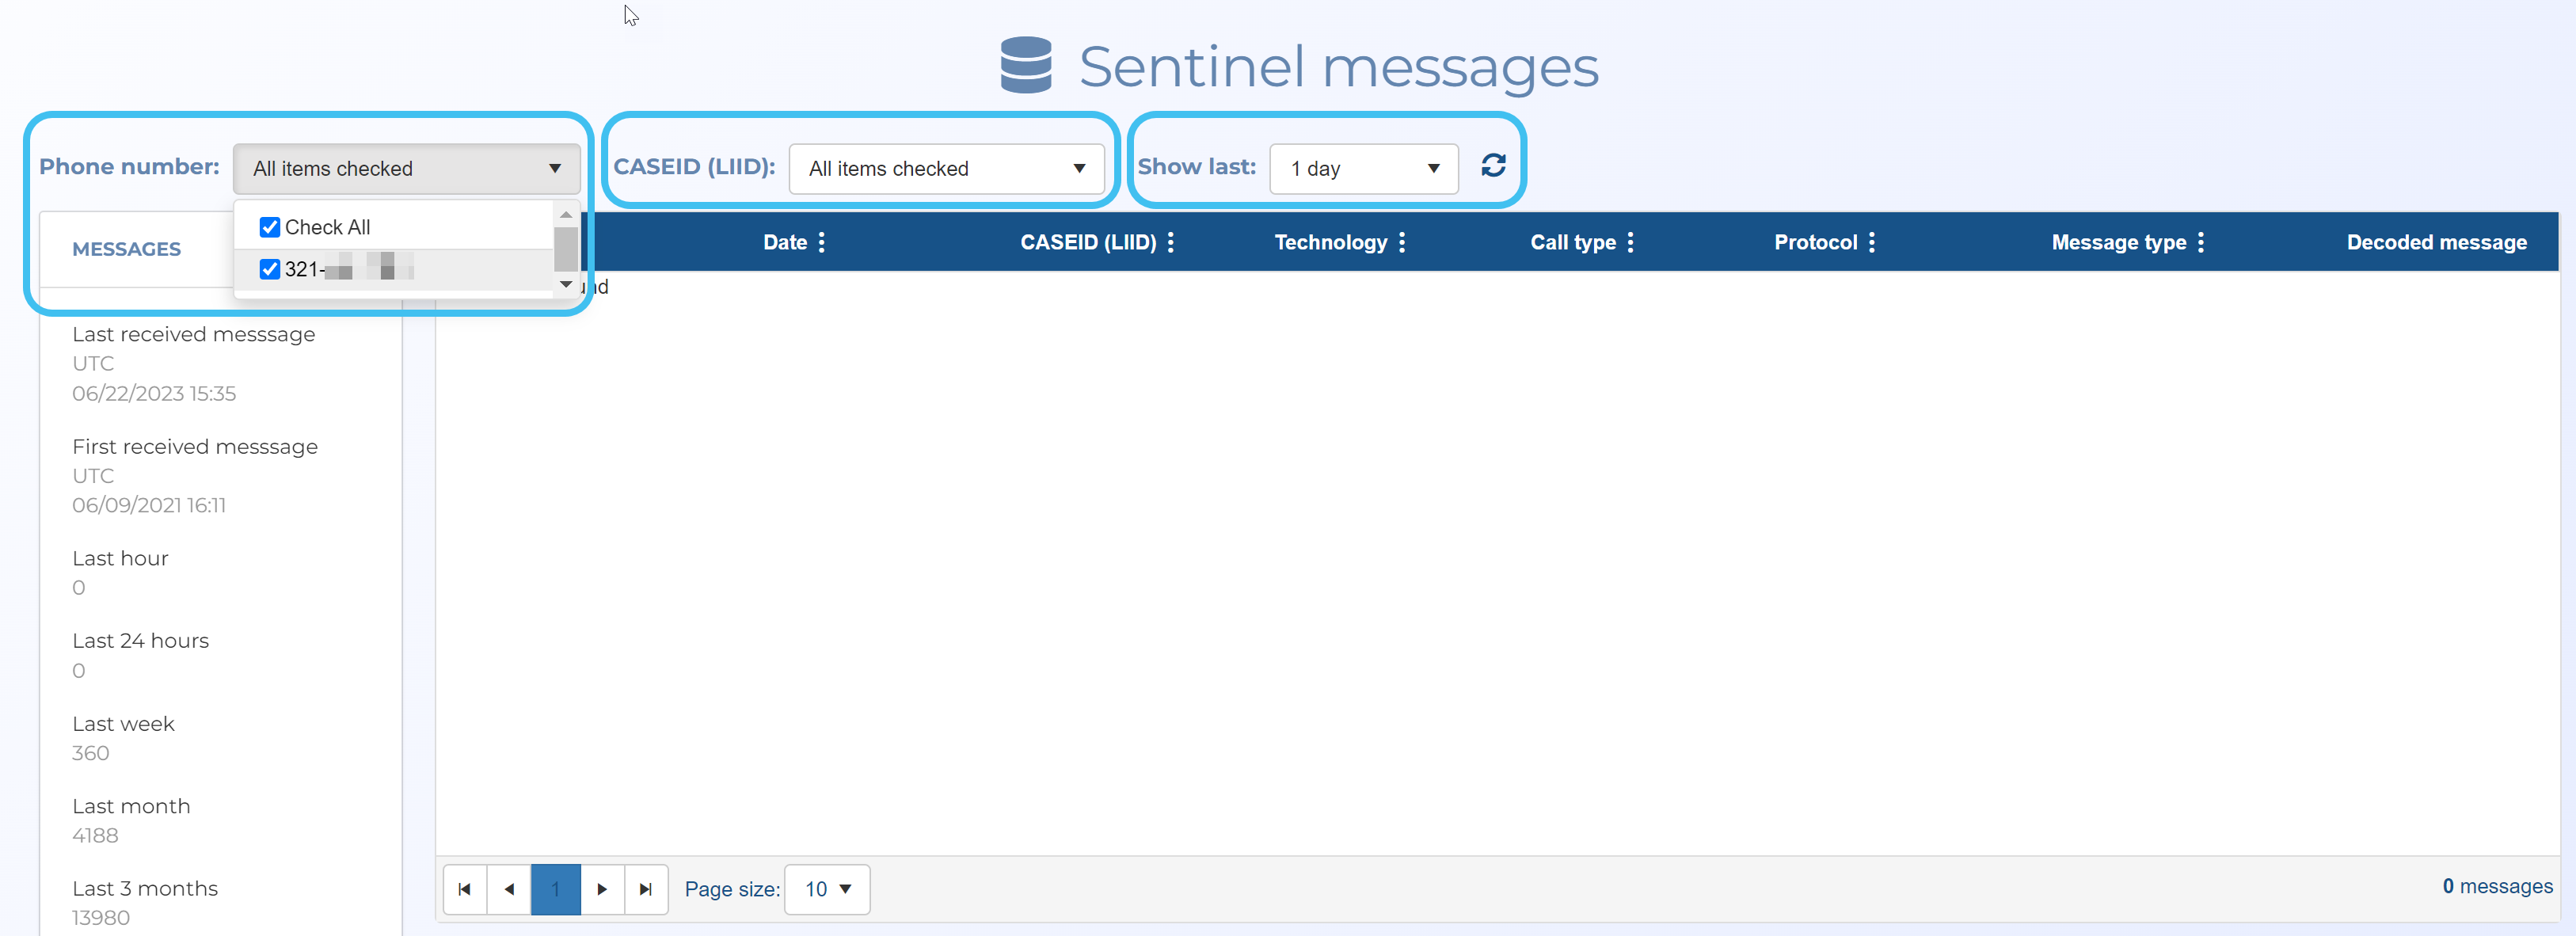

 .
.
 or use your mouse to highlight and copy messages of interest.
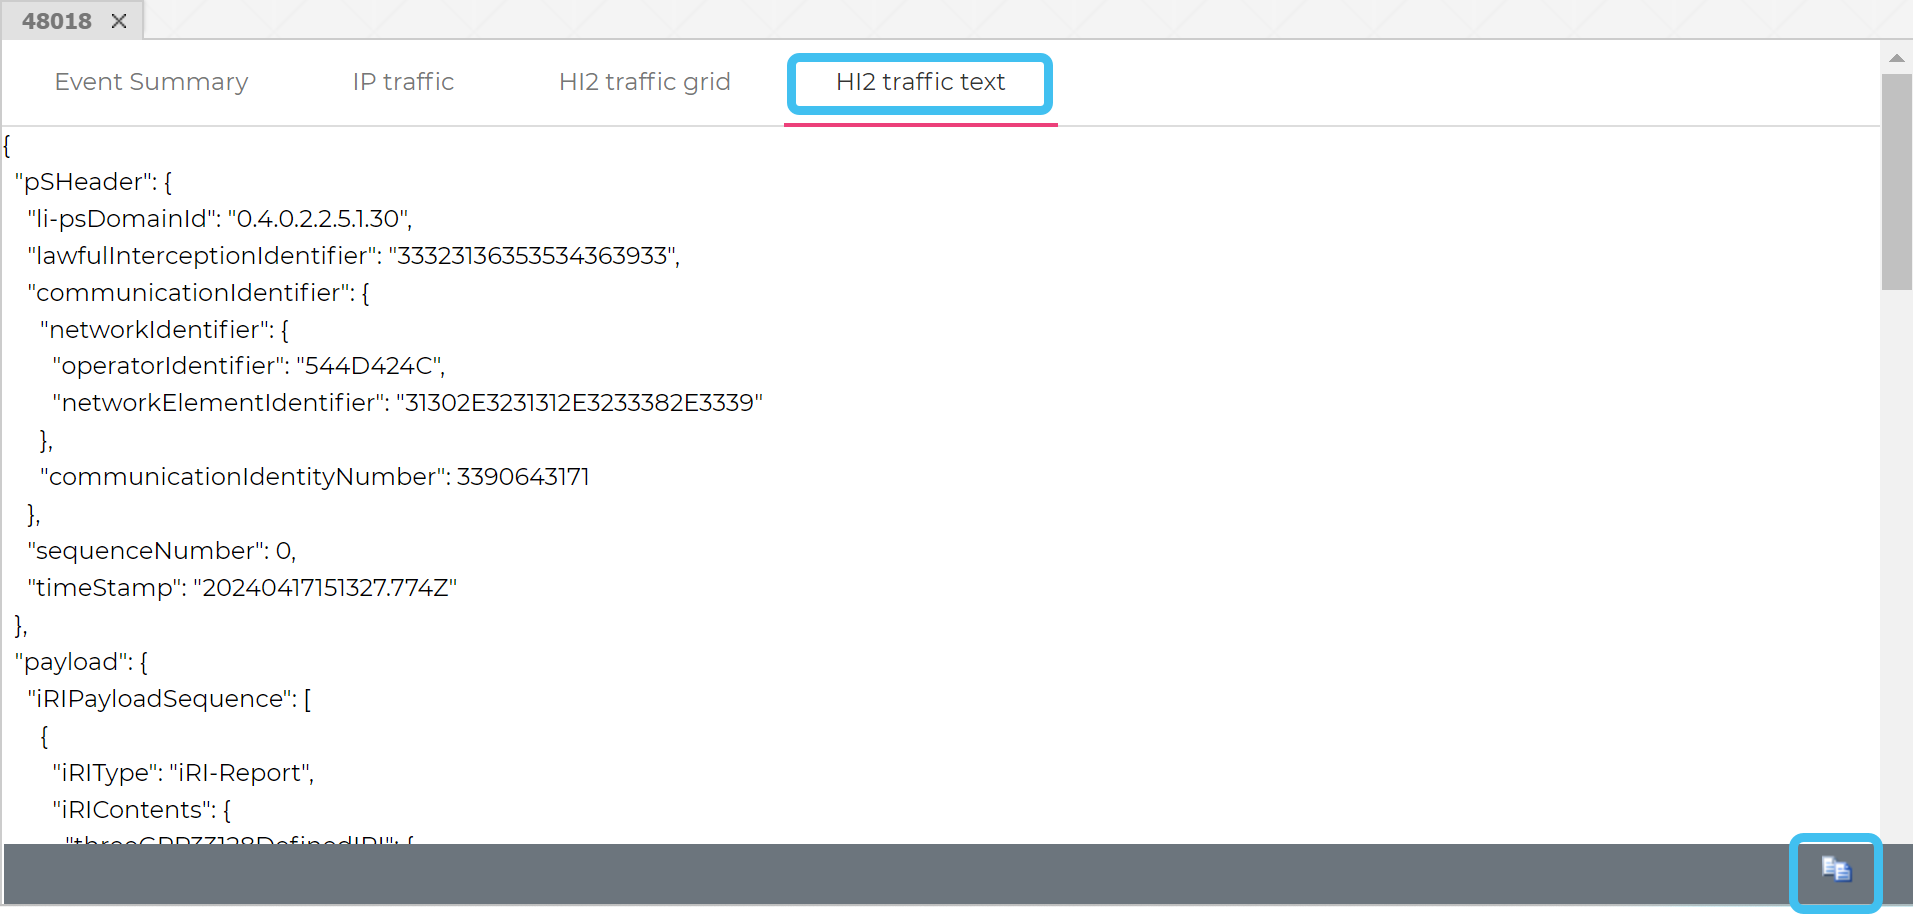

 .
.