Managing monitoring evidence and creating 10 day, 30 day and evidence reports
This topic describes how to quickly create an interactive html report of pertinent monitoring evidence data. This can be used as:
-
an evidence report when your wiretap is complete.
-
a working copy report for case agents, district attorneys and defense attorneys.
-
a report for monitors to work on calls without being on the Live monitoring screen.
This feature requires option E23 Sentinel HI3 (T3/T50). If you do not have this option this feature is not available.
How to create evidence management reports
-
For the case you want to create a monitoring report for, open the Evidence management and reporting screen. You can do this either from the Live monitoring screen or the Manage case screen.
 From the Live monitoring screen
-
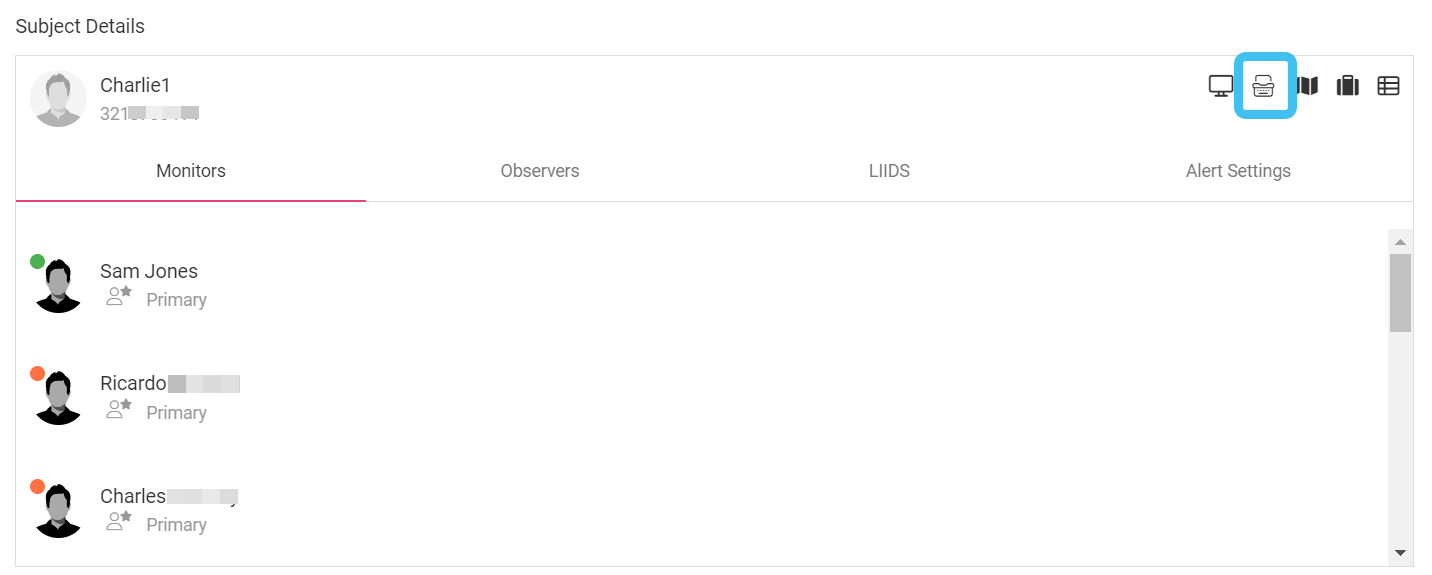
In Subject Details click
 .
.
From the Manage case screen
-
Open the Manage case screen.
Need help finding your case?
On the main menu click View cases. The screen that opens depends on your setting of View cases. If it is set to:
- Advanced view, then the Advanced view cases screen opens.
- If your case is listed on the Favorite & recent cases tab, click the case name to open the Manage case screen.
- If it is not listed on the Favorite & recent cases tab, then click the Cases tab. Use the search filters to help locate your case. You can also click
 to open the FILTERS group which allows you to set your own default filter defining what is displayed on this tab, for example you may wish to set it to cases that you created which are currently open.
For further information refer to Searching for a case.
- Grid view, then the View cases screen opens.
- If your case is listed under My recent cases click it to open the Manage case screen.
- If it is not listed under My recent cases then select your case from the table, using the search filters to help locate it if required. Note, by default the search is set to only display cases that you created; if you are not the original creator but an assignee then ensure you set Case filter to Assigned cases before clicking Search.
- Tree view, then the View i-cases screen opens.
- Click
 at the top-right of the screen to open either the View Cases or Advanced view cases screen and follow the above description.
- Click
- Advanced view, then the Advanced view cases screen opens.
-
On the Manage case screen click Evidence management and reporting above the Sentinel i-cases group.
The Evidence management and reporting screen opens.
-
-
In Court authorization information, either select a specific court authorization id or select Discovery.

-
If you selected Discovery, then in Start date and End date, select the dates of interest.
-
If you selected a court authorization id then the dates are automatically populated but you must select either a 10 Day, 30 Day or Court authorization period.
-
By default all the target phone numbers in the case are included but if you only want certain target numbers then select them in Case target numbers.
-
In Report options, select the information that you want included in the report for the selected events.
For Court authorization period you typically want to include all the events. For others, you may want to include the:
- HI2 information, this is referred to as the Intercept Related Information (IRI) and is the pen register data.
-
HI3 information, this is referred to as the Contents of Communications (CC) and is the wiretap content.
-
GPS ping information, sent by the operator.
-
Social media information, sent by the operator.
-
Google Earth files, this produces an easy to view Google Earth output of the location information.
-
Click View working copy.
In Working copy, OSS-ESPA displays all the monitoring evidence data that matches your selected criteria.
-
Use the check-boxes to select which events you want to include. If required, you can use the filters to quickly locate the events you want to include, for example you may want to set the Category Content filter to only display Pertinent events.
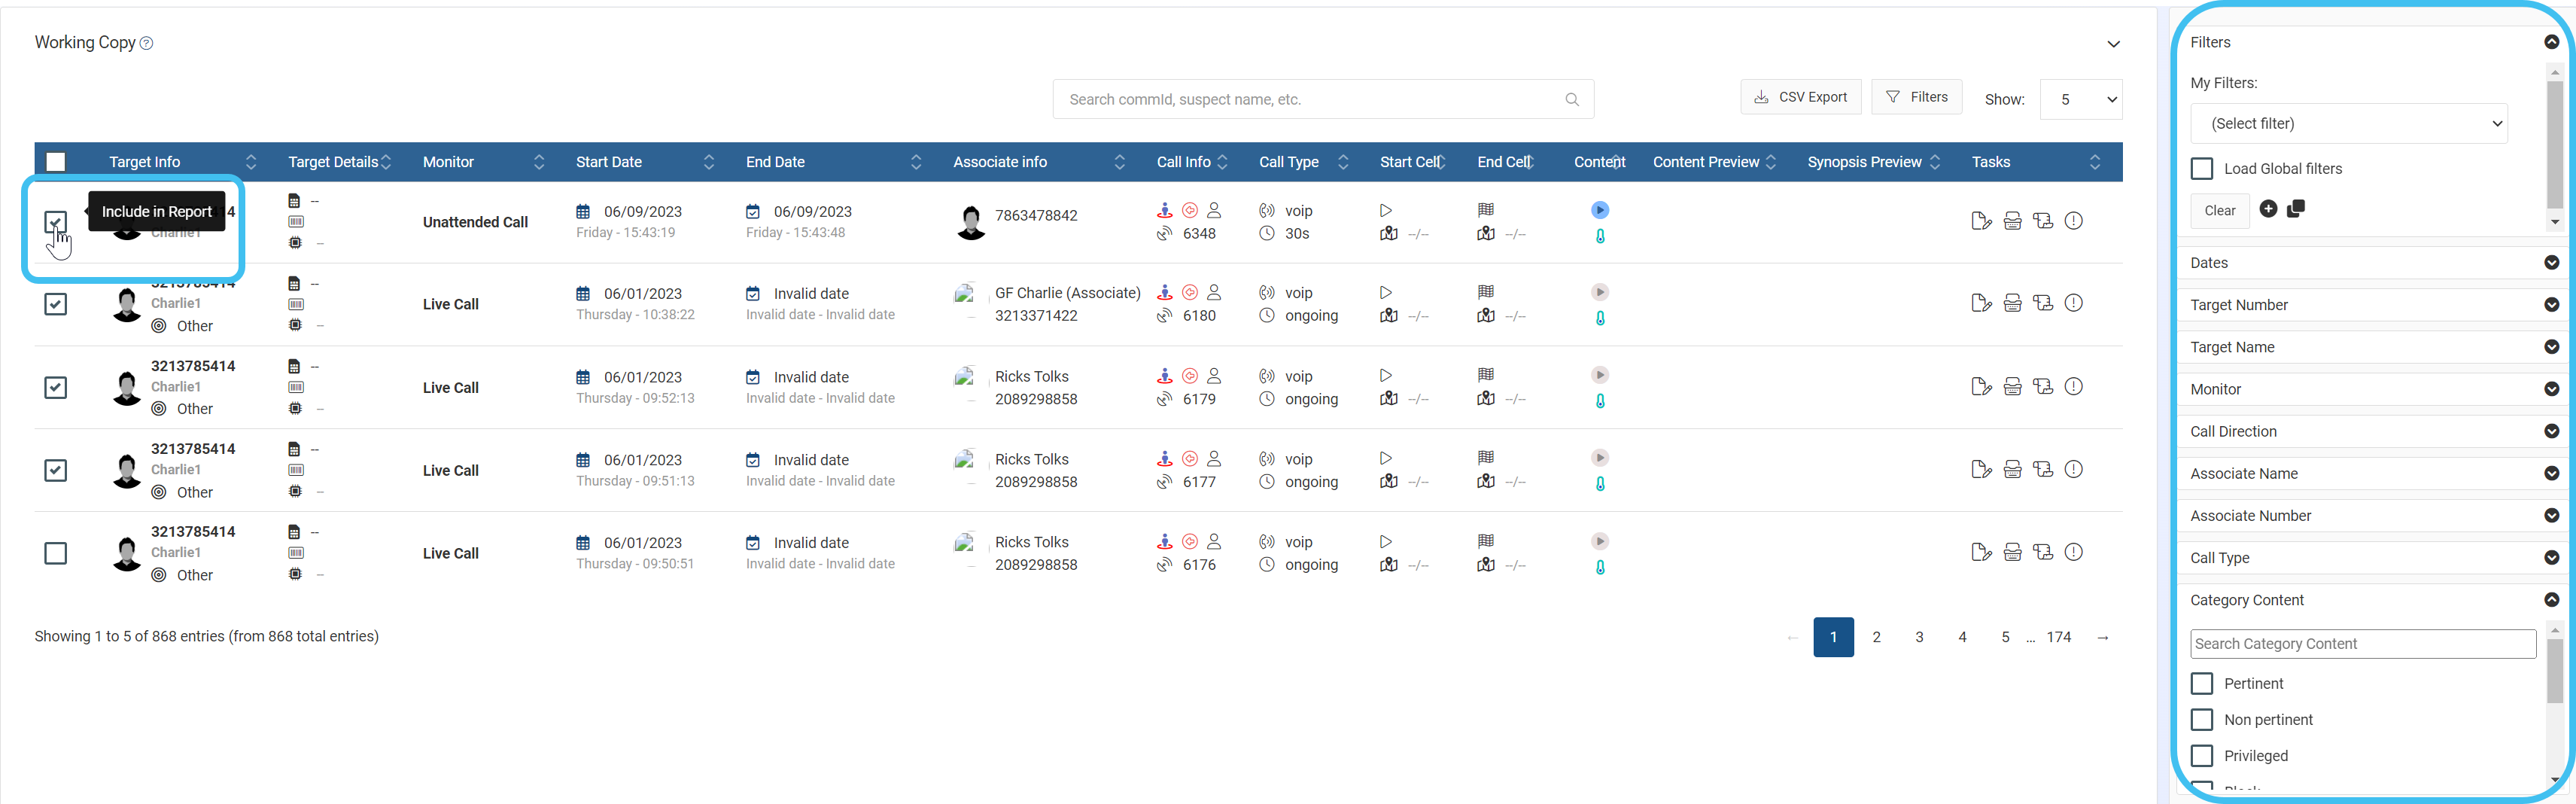
-
Click Generate report.
-
A link to the completed report is emailed to you, and is also available to download directly from the IQ packets (reports) section of the Manage case screen.
The report is output as an interactive easy-to-use html file. A summary of information about the case and the call statistics are provided at the start of the report followed by a list itemizing each event that you selected to include. For each event, links to the location, synopsis, transcript and notes histories are included. You can also view SMS and MMS content, replay voice calls and view social media data.
NOTE: The content of events with the categories of: Blocked, Privileged, Uncategorized and Not Monitored is not included in the report.
To view social media content, such as picture, click @ in the Content column. To open the communication in a separate window, click
 .
.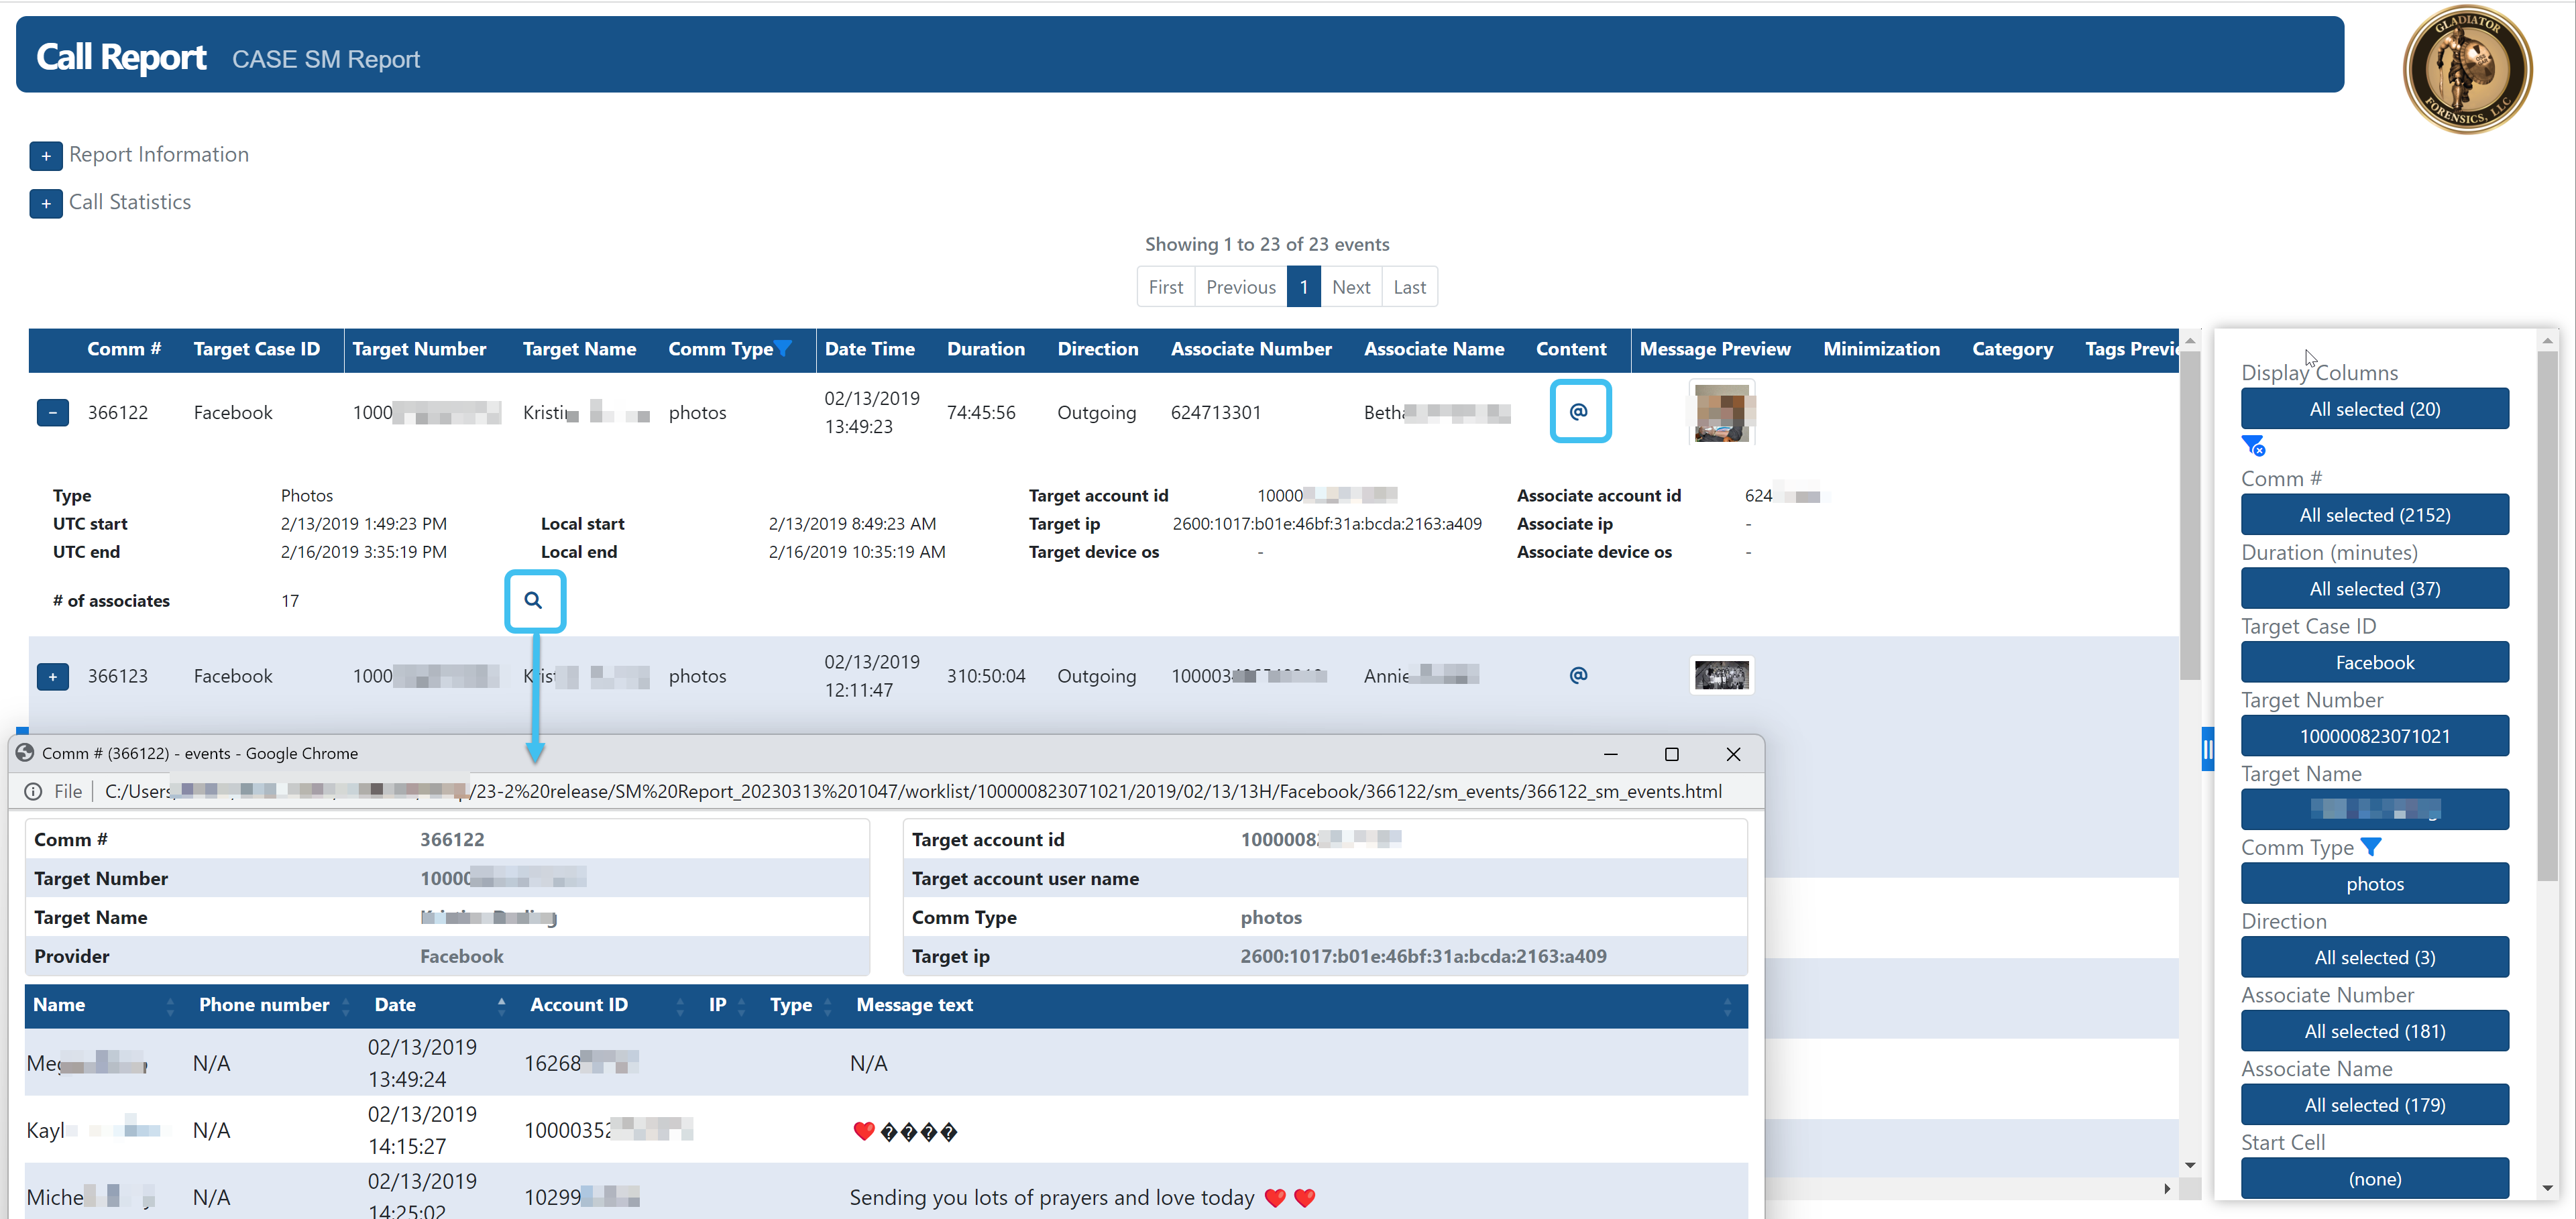
Filters are available on the right of the report, allowing you to search on a variety of columns such as the comm # and communication type.
For further details on using the .html file refer to Viewing a Live target summary HTML report.
How to create a pen register evidence report
-
For the case you want to create a monitoring report for, open the Manage case screen.
Need help finding your case?
On the main menu click View cases. The screen that opens depends on your setting of View cases. If it is set to:
- Advanced view, then the Advanced view cases screen opens.
- If your case is listed on the Favorite & recent cases tab, click the case name to open the Manage case screen.
- If it is not listed on the Favorite & recent cases tab, then click the Cases tab. Use the search filters to help locate your case. You can also click to open the FILTERS group which allows you to set your own default filter defining what is displayed on this tab, for example you may wish to set it to cases that you created which are currently open.
For further information refer to Searching for a case.
- Grid view, then the View cases screen opens.
- If your case is listed under My recent cases click it to open the Manage case screen.
- If it is not listed under My recent cases then select your case from the table, using the search filters to help locate it if required. Note, by default the search is set to only display cases that you created; if you are not the original creator but an assignee then ensure you set Case filter to Assigned cases before clicking Search.
- Tree view, then the View i-cases screen opens.
- Click at the top-right of the screen to open either the View Cases or Advanced view cases screen and follow the above description.
- Click
- Advanced view, then the Advanced view cases screen opens.
-
On the Manage case screen click Evidence management and reporting above the Sentinel i-cases group.

The Evidence management and reporting screen opens.
-
In Court authorization information, select Discovery.
-
In Start date and End date, select the dates of interest. OSS-ESPA automatically populates these dates with the first and last time it received messages.
-
In Report options, select the data you want to include.
Include HI2 (IRI) Information, is referred to as the Intercept Related Information (IRI) and is the pen register data.
Include HI3 (CC) information, is referred to as the Contents of Communications (CC) and is the wiretap content.
Optionally, you may also want to select Include Google Earth files, as this produces an easy to view Google Earth output of the location information.
-
Click View working copy.

-
Click Generate report.
-
A link to the completed report is emailed to you, and is also available to download directly from the IQ packets (reports) section of the Manage case screen.
The report is output as an interactive easy-to-use html file. A summary of information about the case and the call statistics are provided at the start of the report followed by a list itemizing each event that you selected to include. For each event, links to the location, synopsis, transcript and notes histories are included. You can also view SMS and MMS content, replay voice calls and view social media data.
NOTE: The content of events with the categories of: Blocked, Privileged, Uncategorized and Not Monitored is not included in the report.
To view social media content, such as picture, click @ in the Content column. To open the communication in a separate window, click
.
Filters are available on the right of the report, allowing you to search on a variety of columns such as the comm # and communication type.
For further details on using the .html file refer to Viewing a Live target summary HTML report.