The Case management features allow you to create and manage your cases, and request and manage IQ packet reports. You can create cases for different purposes such as for: historical analysis, target development analysis (through geofence and tower dumps), live monitoring Smart Track, Sentinel intercept monitoring and Live wiretap monitoring. It is within Case management that you create the structure of you case, which may include: people, locations, timelines, i-cases, Smart Track alerts and files of interest such as CDRs (Call Detail Records), phone data files, public record files, geo-location files, geofence files, tower dump files, cell tower data, drive data, social media files,location files, person files, subscriber information and additional files.
This section of the Help describes how to manage your case once you have initially created it using Create New case. Each of the topics in this section describe how to use OSS-ESPA's Manage case screen to add and deleted locations, people, CDRs, cell tower data, phone data, public records data, geo-location data and other files of interest. Refer to the relevant "Managing" topic, for example if you want to add a new location, or edit or delete an existing location refer to Managing locations. This section also explains how to resolve notifications so as to ensure your case is ready to be analyzed.
Creating and analyzing a historical analysis case example
This topic is intended as a getting started example of how to create a case and view it on the ESPA analysis center and is a good place to start if you are just getting started using OSS-ESPA for a historical analysis.
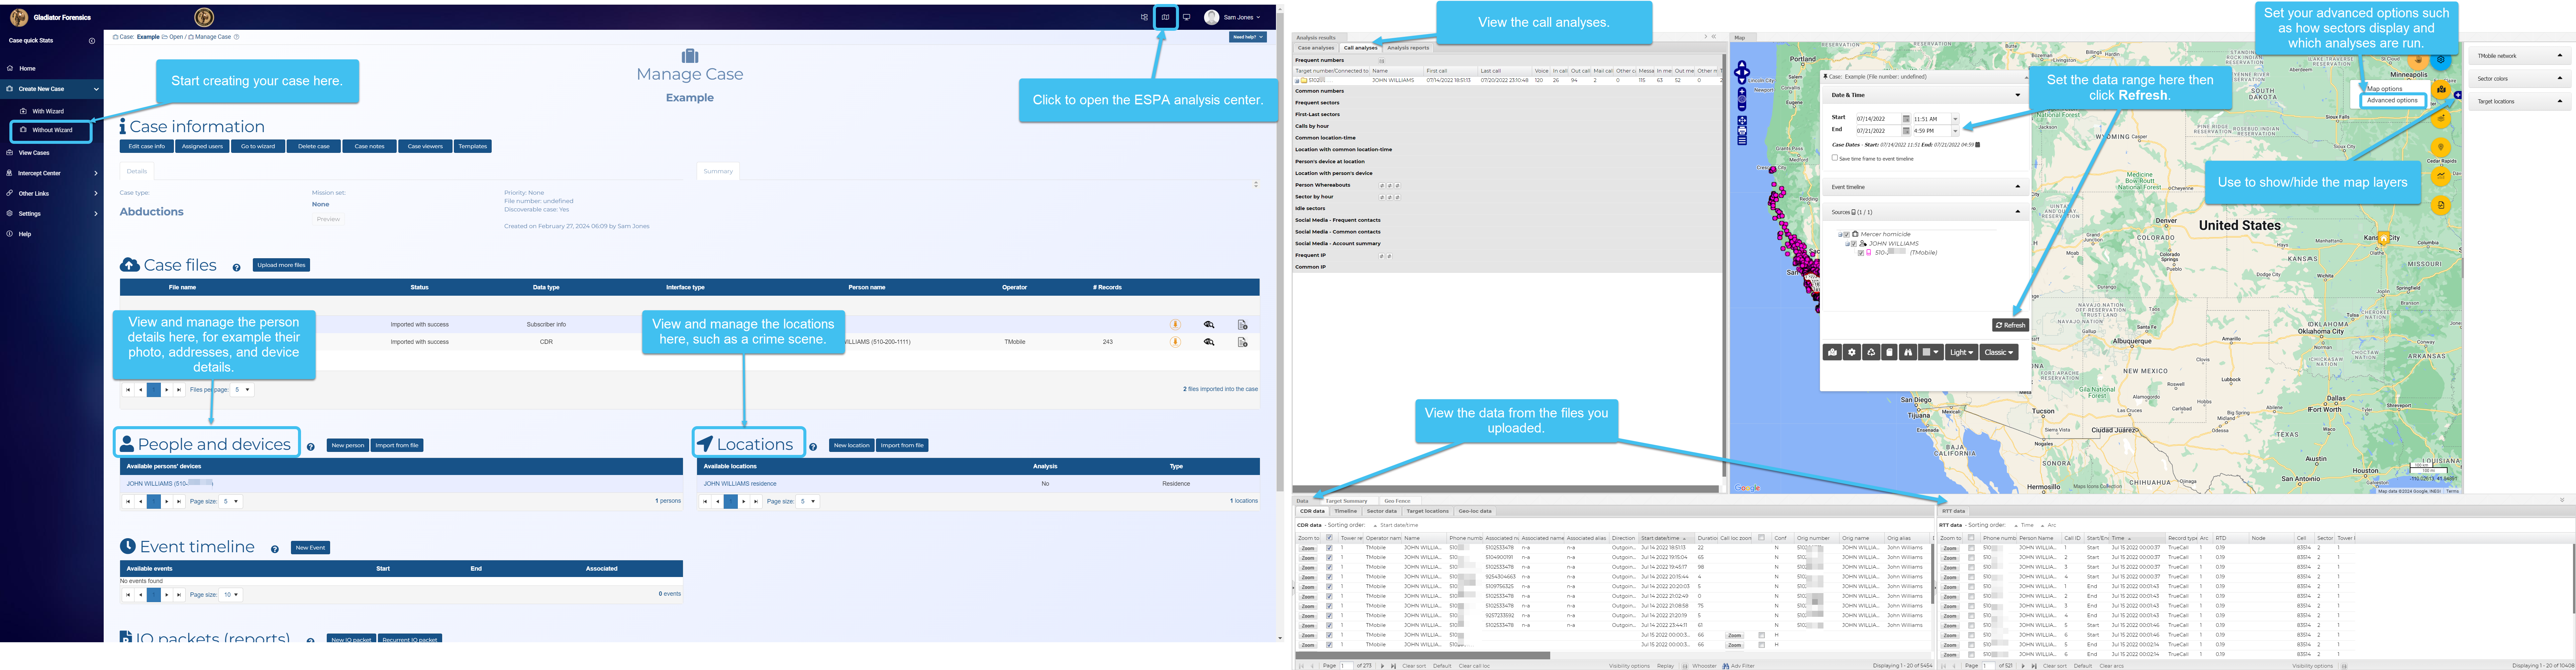
To create a case, from the main menu click Create new case, Without wizard then complete the required case details. You can then upload your files and ensure the correct persons and locations are in your case. To analyze your case open the ESPA analysis center by clicking , select the required data range then click Refresh. You can now use the Data view, Case management view and the Map view to analyze the case. For further information click the link below.
You can also click here for a short video showing how to create and analyze a historical case.
How do I create and analyze geo-fence and tower dump cases?
Creating and analyzing geofence and tower dump cases
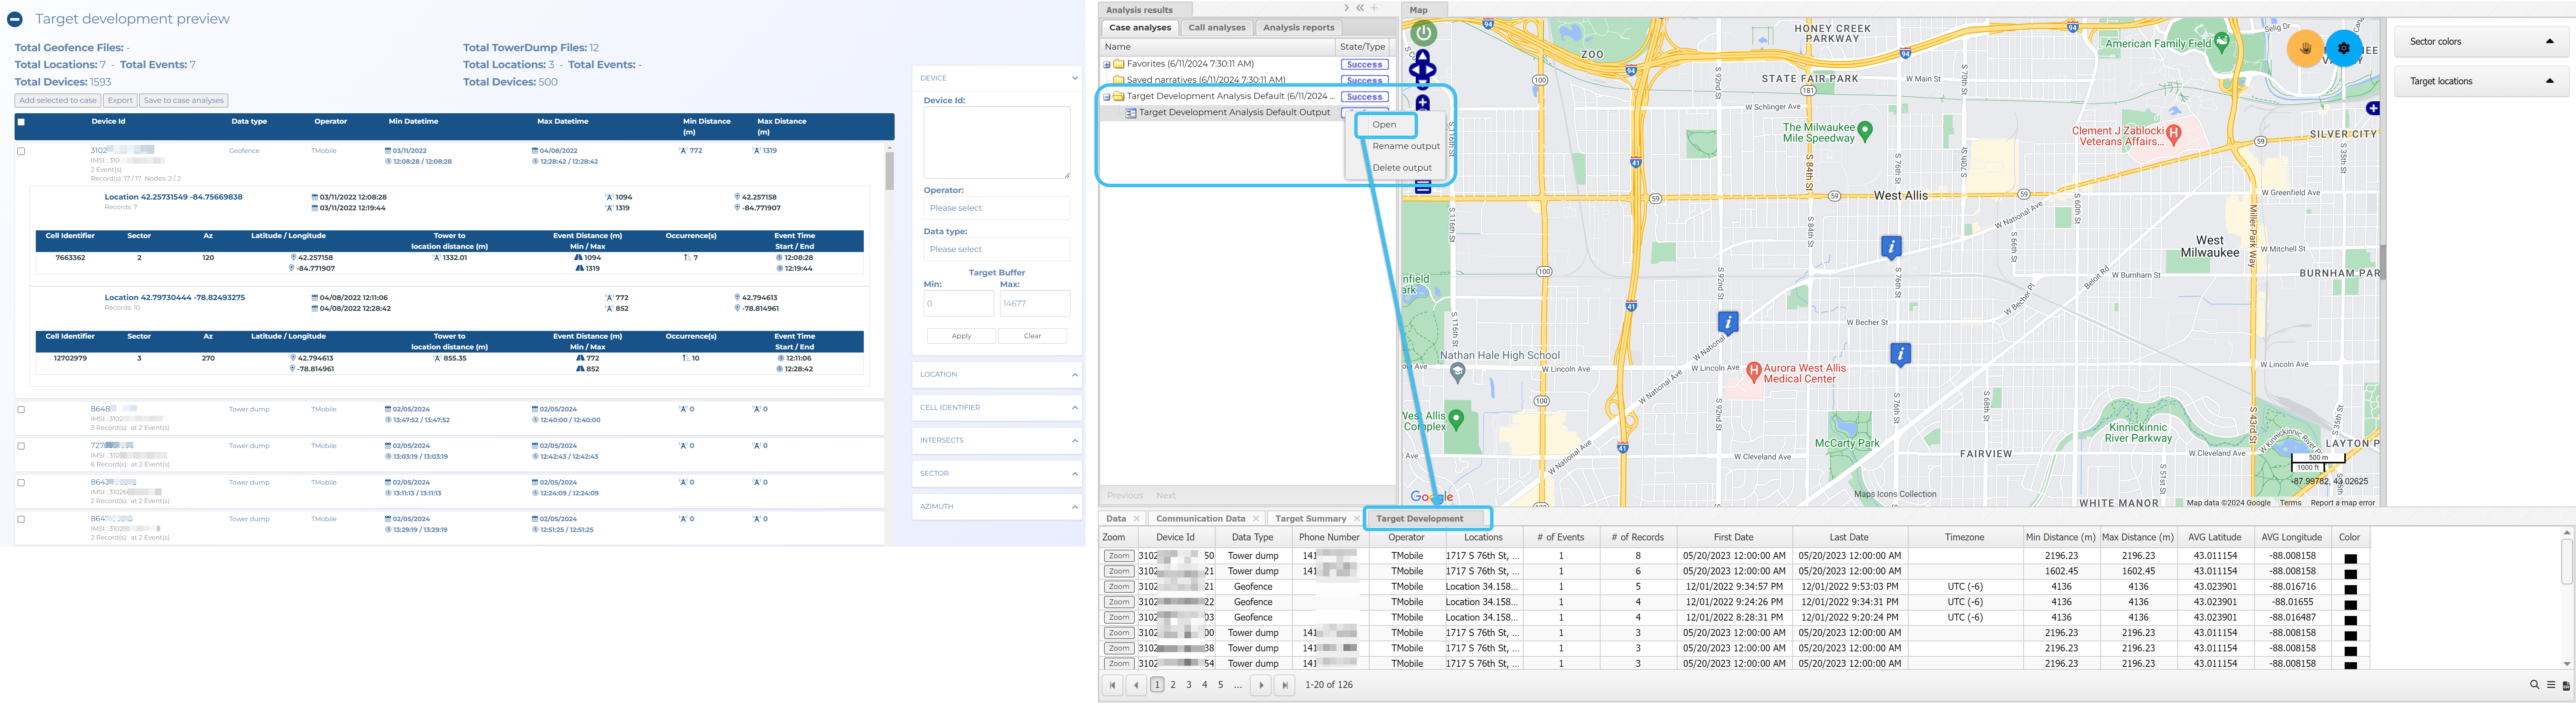
You can create and analyze geofence and tower dump files using the Manage file screen's Target development preview tab and the Target development view on the ESPA analysis center.
Geo-location files are records which provide an accurate location of a person at an accurate time. These records may come from the mobile phone service provider (that is, the operator) if the source is for example a mobile phone, or they may come from a GPS tracker fitted to a vehicle, or a license plate reader which is located in a known position, or ankle bracelets fitted to a person. OSS-ESPA requires the following information from a geo-location file: time, latitude and longitude, and additionally for GPS ping files the accuracy buffer or call location confidence.
Click here for a short video on how to import geo-location data, and here for a video showing the custom geo-location option.
For the case you want to upload a geo-location to, open the Manage case screen.
On the main menu click View cases. The screen that opens depends on your setting of View cases. If it is set to:
Advanced view, then the Advanced view cases screen opens.
If your case is listed on the Favorite & recent cases tab, click the case name to open the Manage case screen.
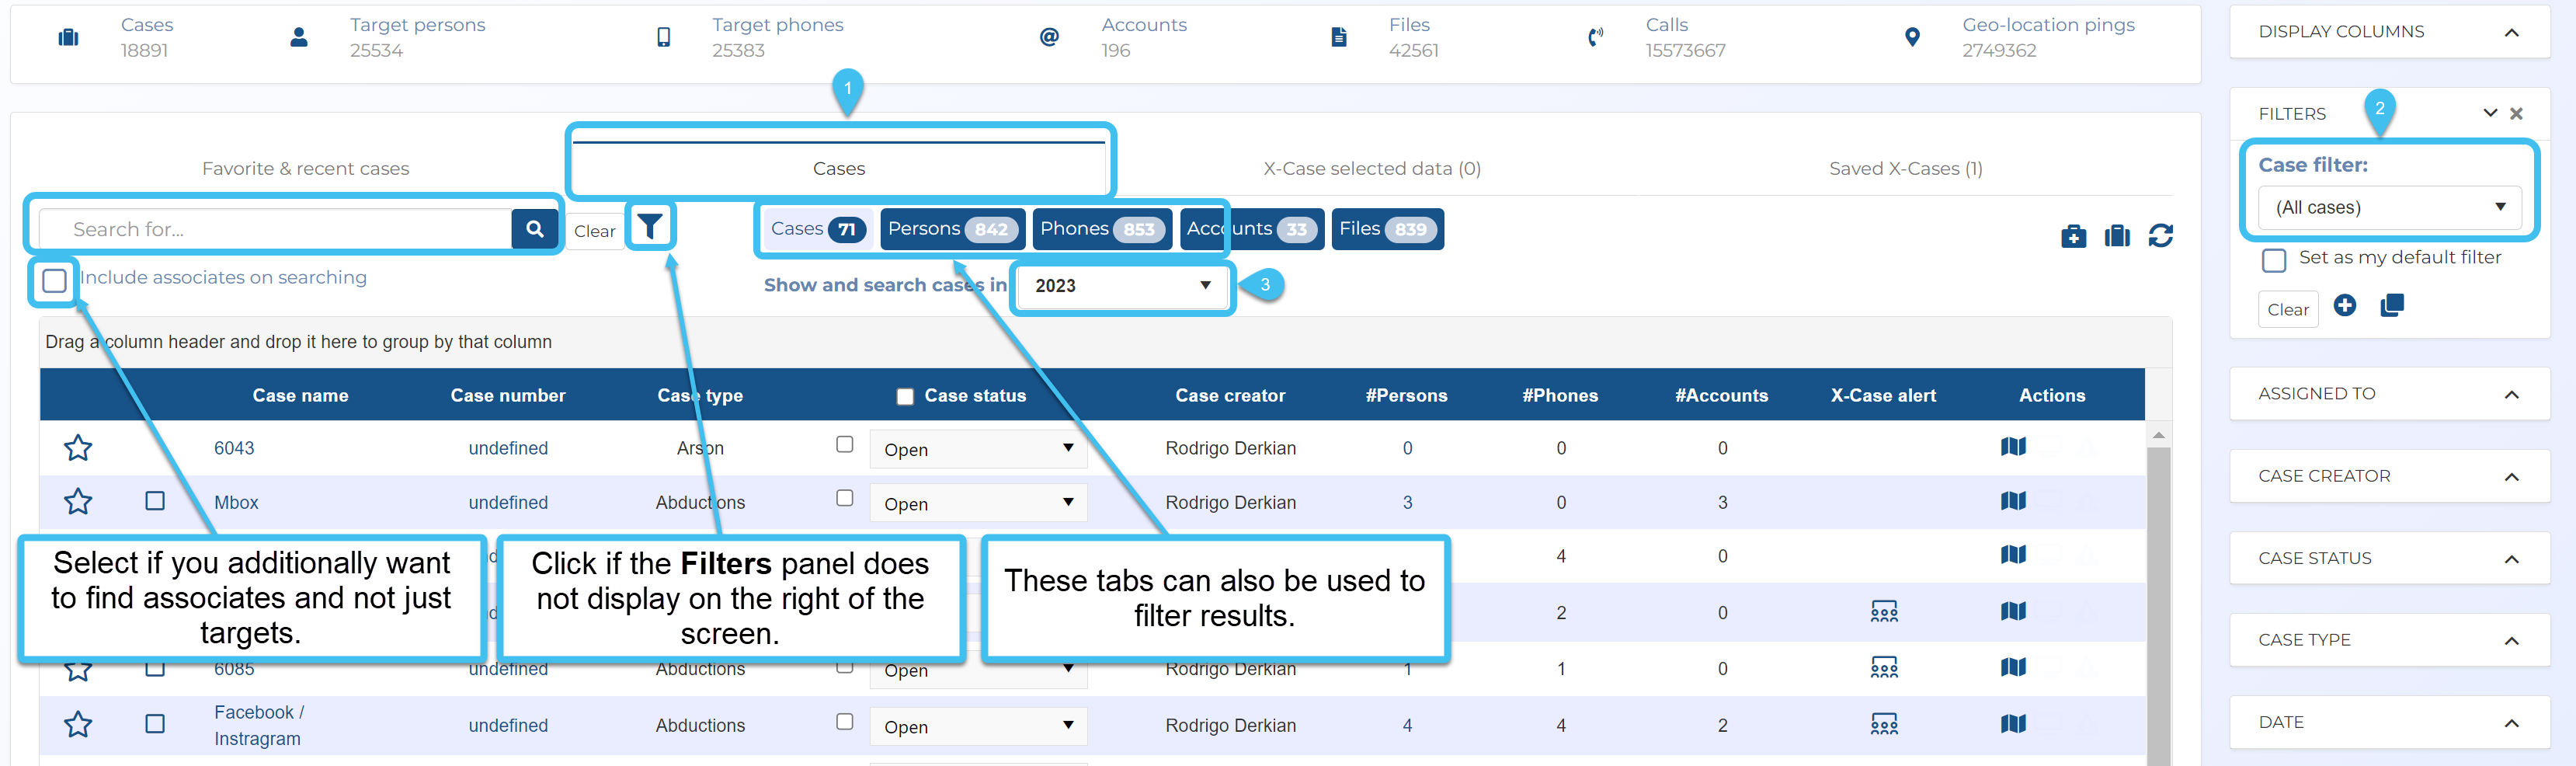
If it is not listed on the Favorite & recent cases tab, then click the Cases tab. Use the search filters to help locate your case. You can also click to open the FILTERS group which allows you to set your own default filter defining what is displayed on this tab, for example you may wish to set it to cases that you created which are currently open.
If your case is listed under My recent cases click it to open the Manage case screen.
If it is not listed under My recent cases then select your case from the table, using the search filters to help locate it if required. Note, by default the search is set to only display cases that you created; if you are not the original creator but an assignee then ensure you set Case filter to Assigned cases before clicking Search.
Tree view, then the View i-cases screen opens.
Click at the top-right of the screen to open either the View Cases or Advanced view cases screen and follow the above description.
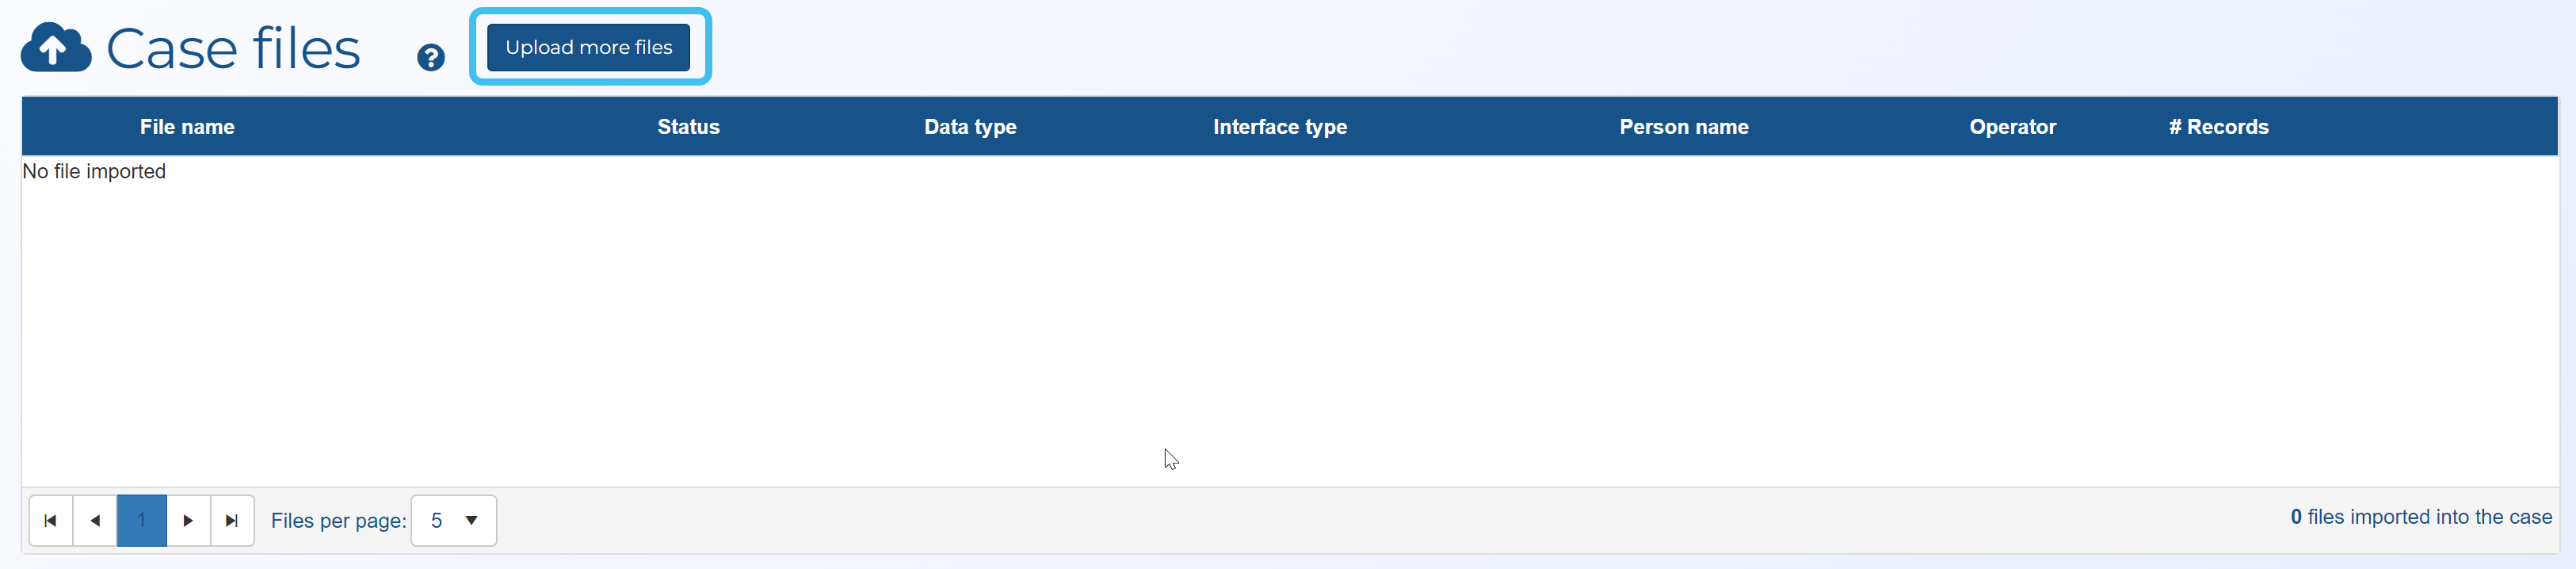
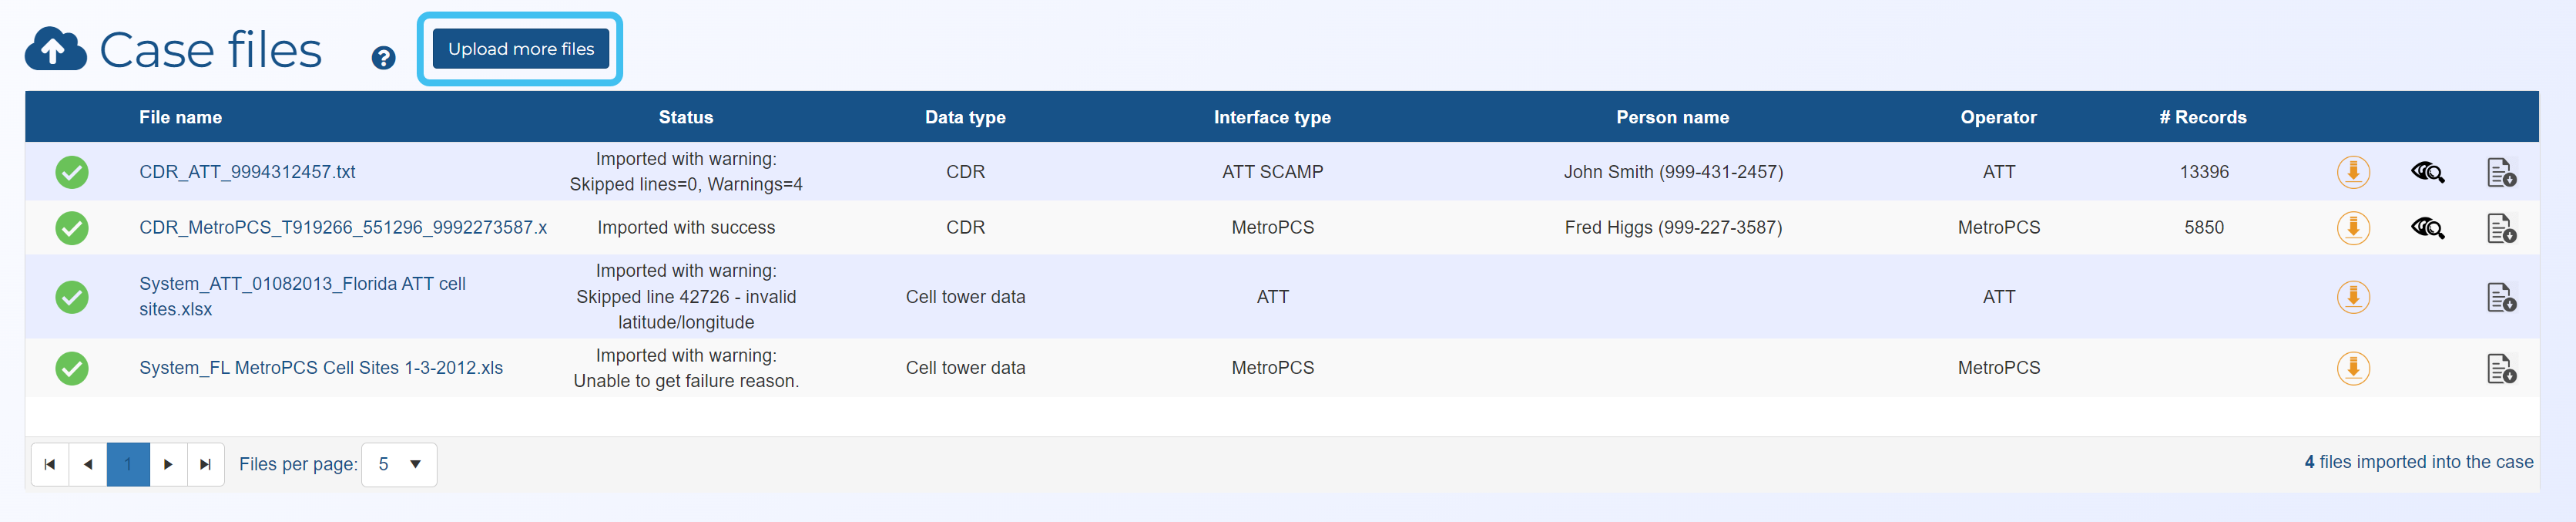
On the Manage case screen click Upload more files.
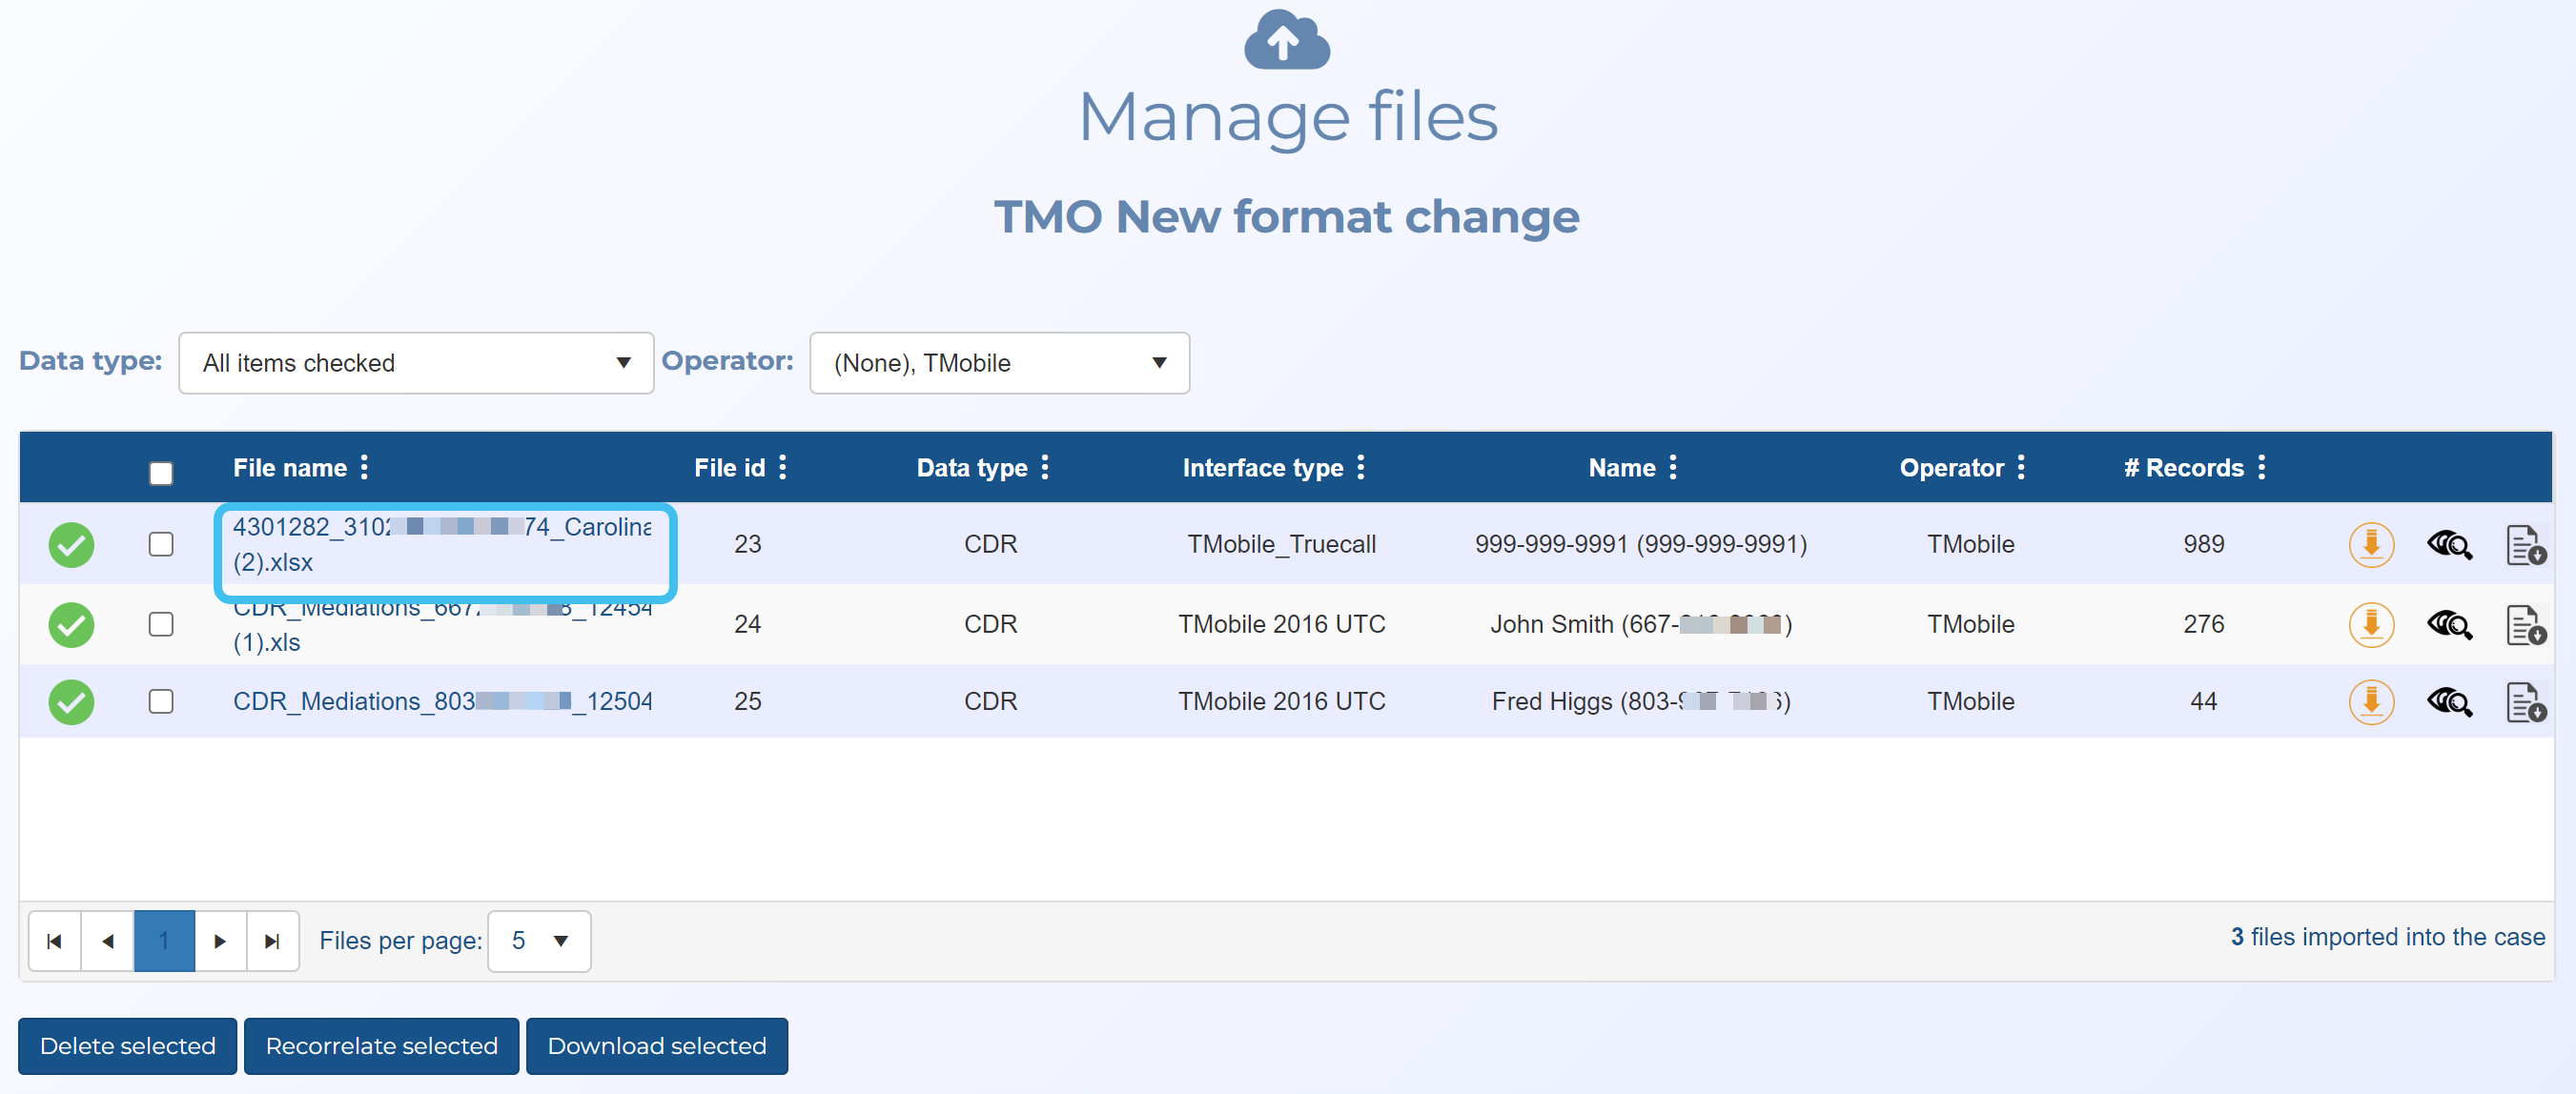
The Manage files screen opens.
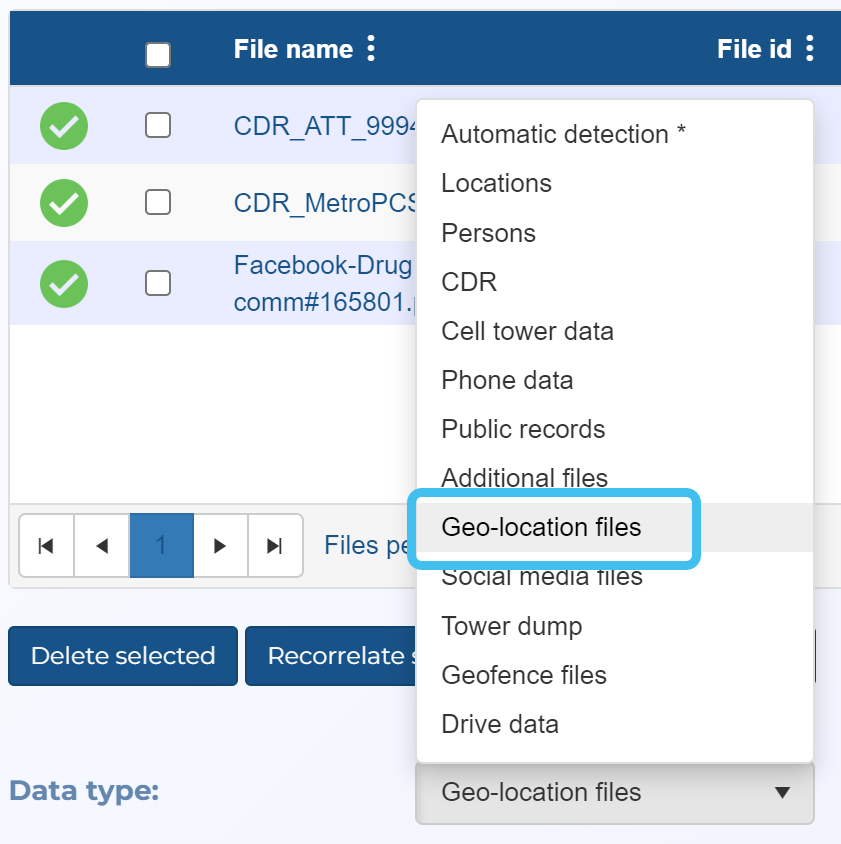
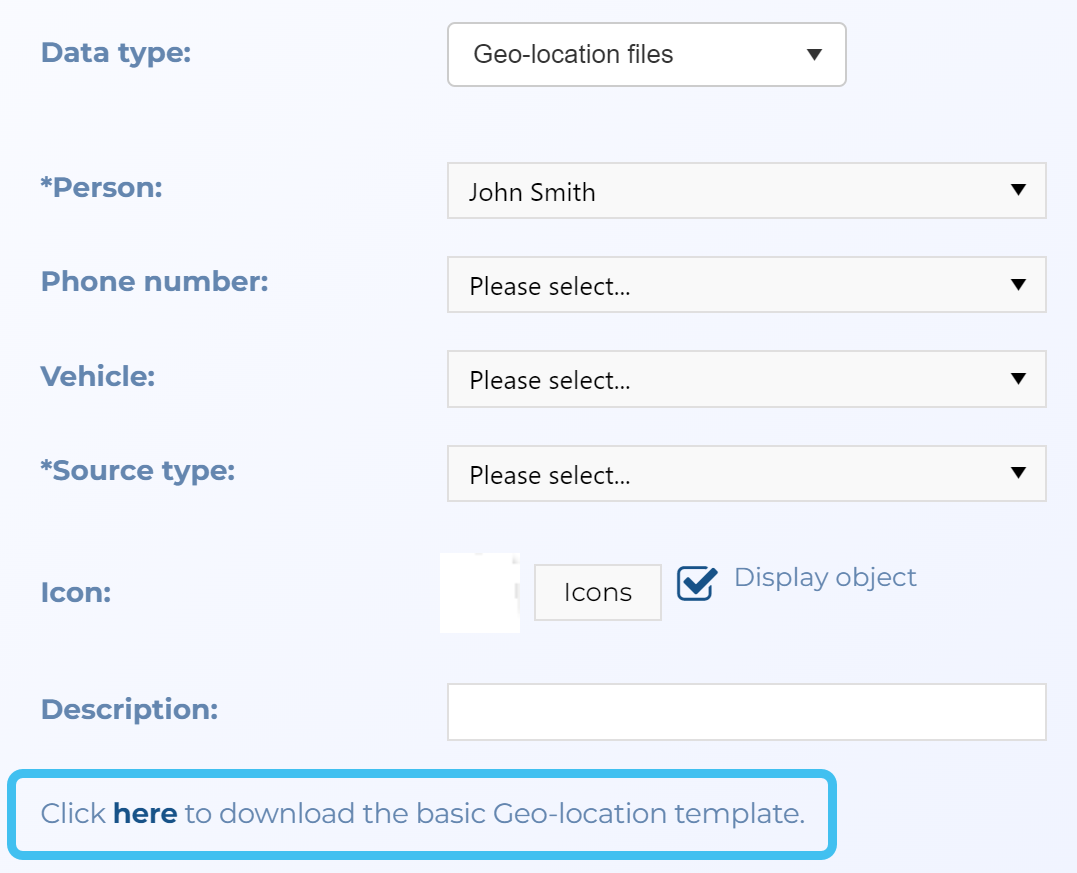
In Data type select Geo-location files or Custom Geo-location. Both allow you to import geolocation files but with the first option your file must contain specified headers. With the custom option your file's column headers can be named whatever you want and when you upload the file, you can view a preview of the file and define which columns map to each of the OSS-ESPA settings. The custom option is useful as geo-location files come in many different formats, such as from phones, car navigation, notebooks, and smart watches, and this option allows you to customize your own import templates to support the different formats.
You must select a Person, a Source type, either a Phone number or Vehicle and a geo-location file.
In Person select the applicable person for the geo-location file you want to upload.
Either select a Phone number or Vehicle to associate the geo-location file with.
In Source type select the source of the geo-location file.
GPS Ping: these are initiated by the telecom network to determine the location of a mobile device, such as a mobile phone or tablet. These files are supplied by the mobile phone service provider and the data maps out as one point for each individual location.
NOTE: GPS pings can be imported into OSS-ESPA using a variety of methods. The geo-location file type on the Manage files screen allows you to import historical GPS pings as described in Importing geo-location data. The Sentinel screen allows you to import historical GPS pings individually when you right-click the map and select Add location data. The Smart Track feature allows you to import live GPS pings from the operator as described in How to create a smart track alert.
GPS Tracker: these are fitted onto vehicles and are tracked via the Global Positioning Satellite System. These files are supplied by your GPS tracking software and you can select to either map the data out as one point for each individual location or as a breadcrumb trail of movement per day.
License Plate Reader: these read the license plate of vehicles and are located in a known position. These files are supplied by your license plate reader software.
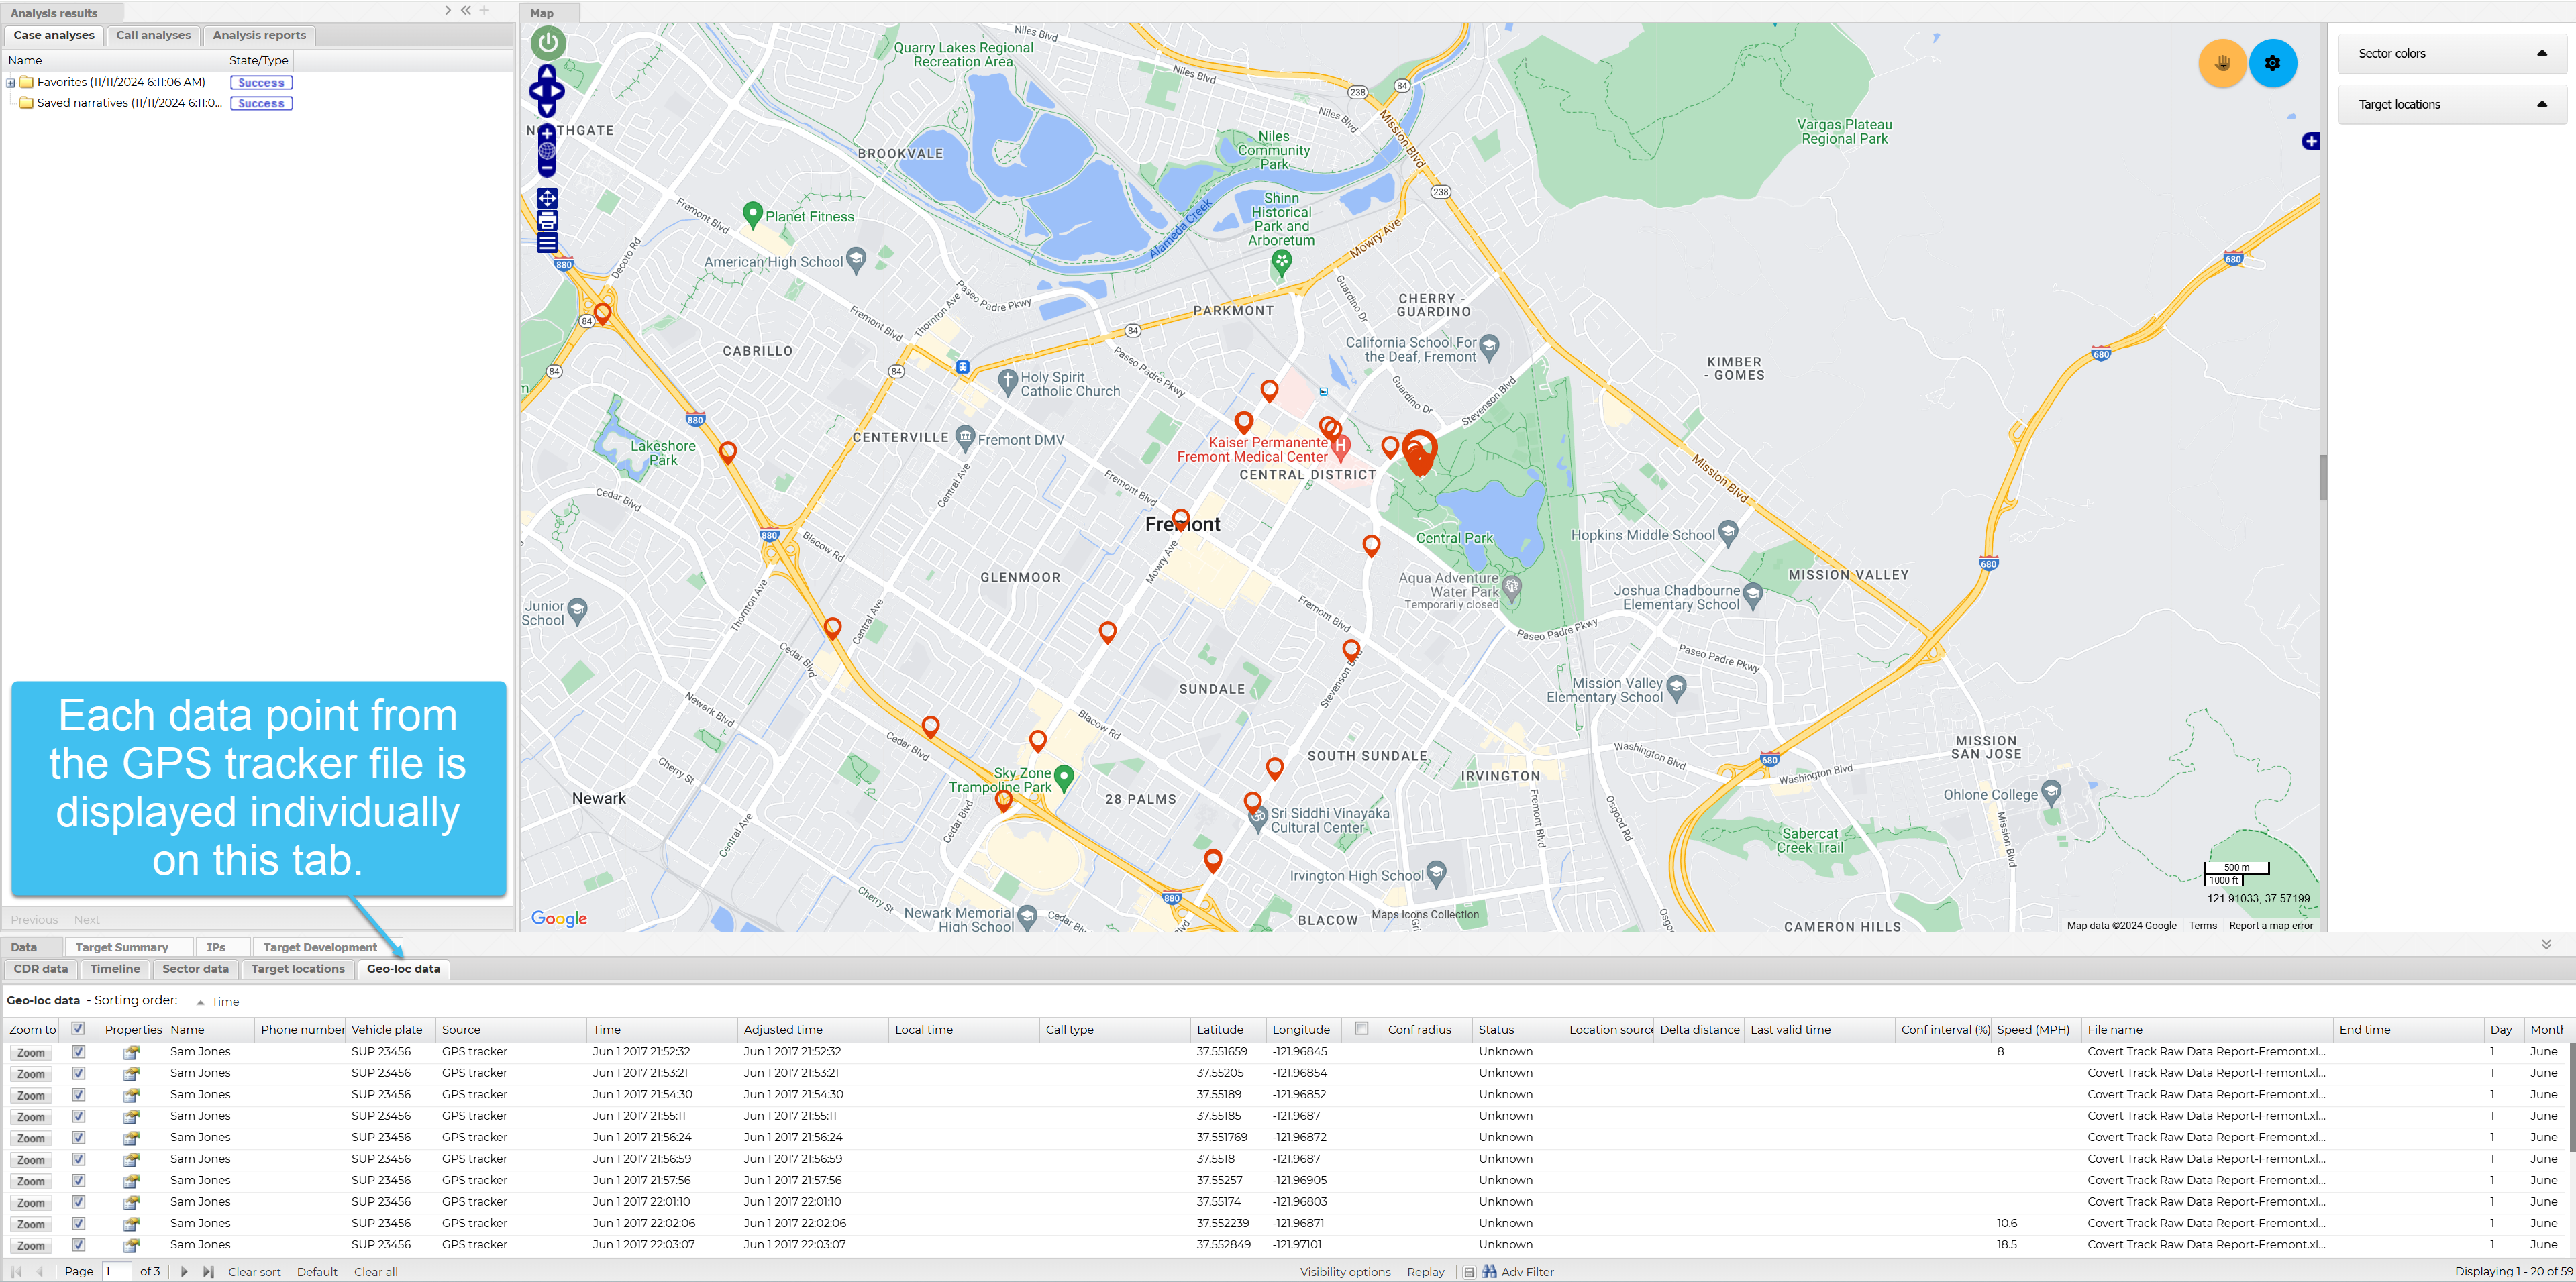
If you selected GPS tracker as the source type then in Source type option select either Plot individually or Plot per day.
Plot individually: the data displays on the ESPA analysis center as one point for each individual location. This is the default option. This means that on the Geo-loc data tab you can select to display and zoom to each individual location on the map as shown in the following graphic.
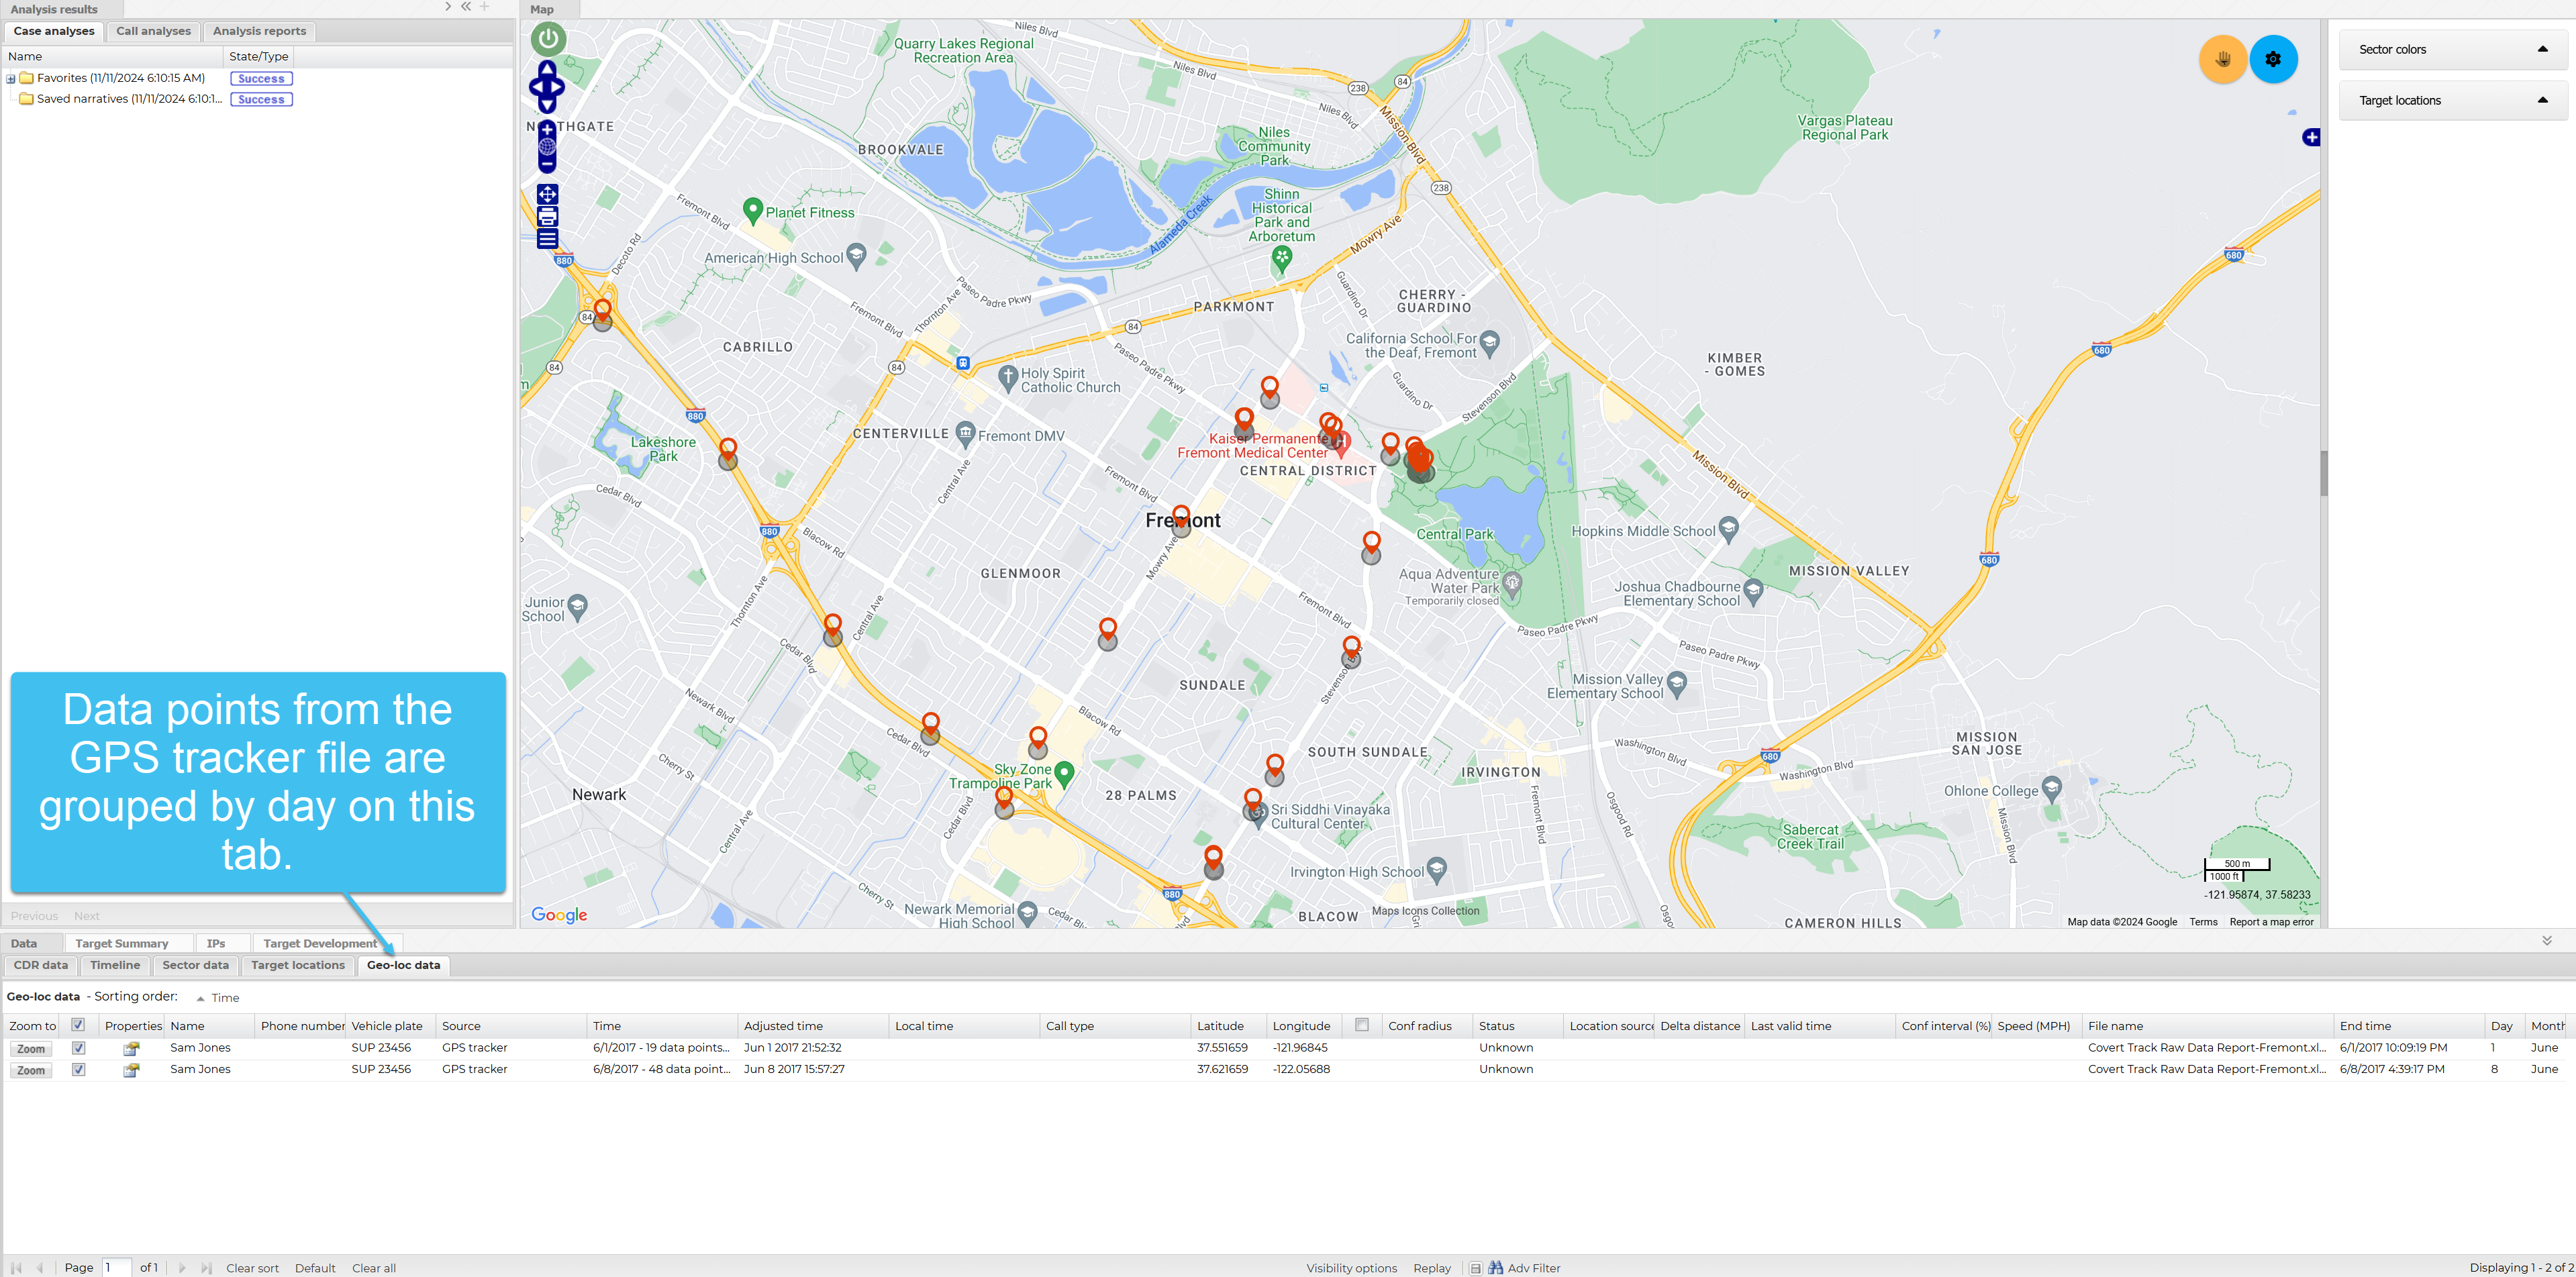
Plot per day: the data displays on the ESPA analysis center as a breadcrumb trail of movement per day. This means that on the Geo-loc data tab you can select to display and zoom to each day's breadcrumb trail on the map as shown in the following graphic. The Time column details the number of individual locations included in each day.
This step is only applicable if you set Data type to Geo-location files.
To import geo-location data there is a template that you can download from the Manage files screen and add your data to.
Once downloaded, open the Excel template and replace your data into the columns. Do not change the column headers. The mandatory columns are Date/Time, Latitude and Longitude. Radius is optional and is used for the accuracy buffer or call location confidence in GPS ping files. Once you have entered your data, save the file.
Click Select. Windows Explorer opens. Navigate to the folder and select the required file.
NOTE: The geo-location file you select must be the original file you received and not one which you have edited.
This step is only applicable if you set Data type to Custom Geo-location.
Click Load preview.
In Distance units, select which units are used in the file for distance measurements.
The preview table header displays the titles from your file and you must map those to one or more OSS-ESPA fields. Not all columns must be mapped but for the data to be useful it is recommended that you map the location (such as Location or Latitude and Longitude), and the Date and Time.
On the Manage case screen, click Upload more files.
The Manage files screen opens.
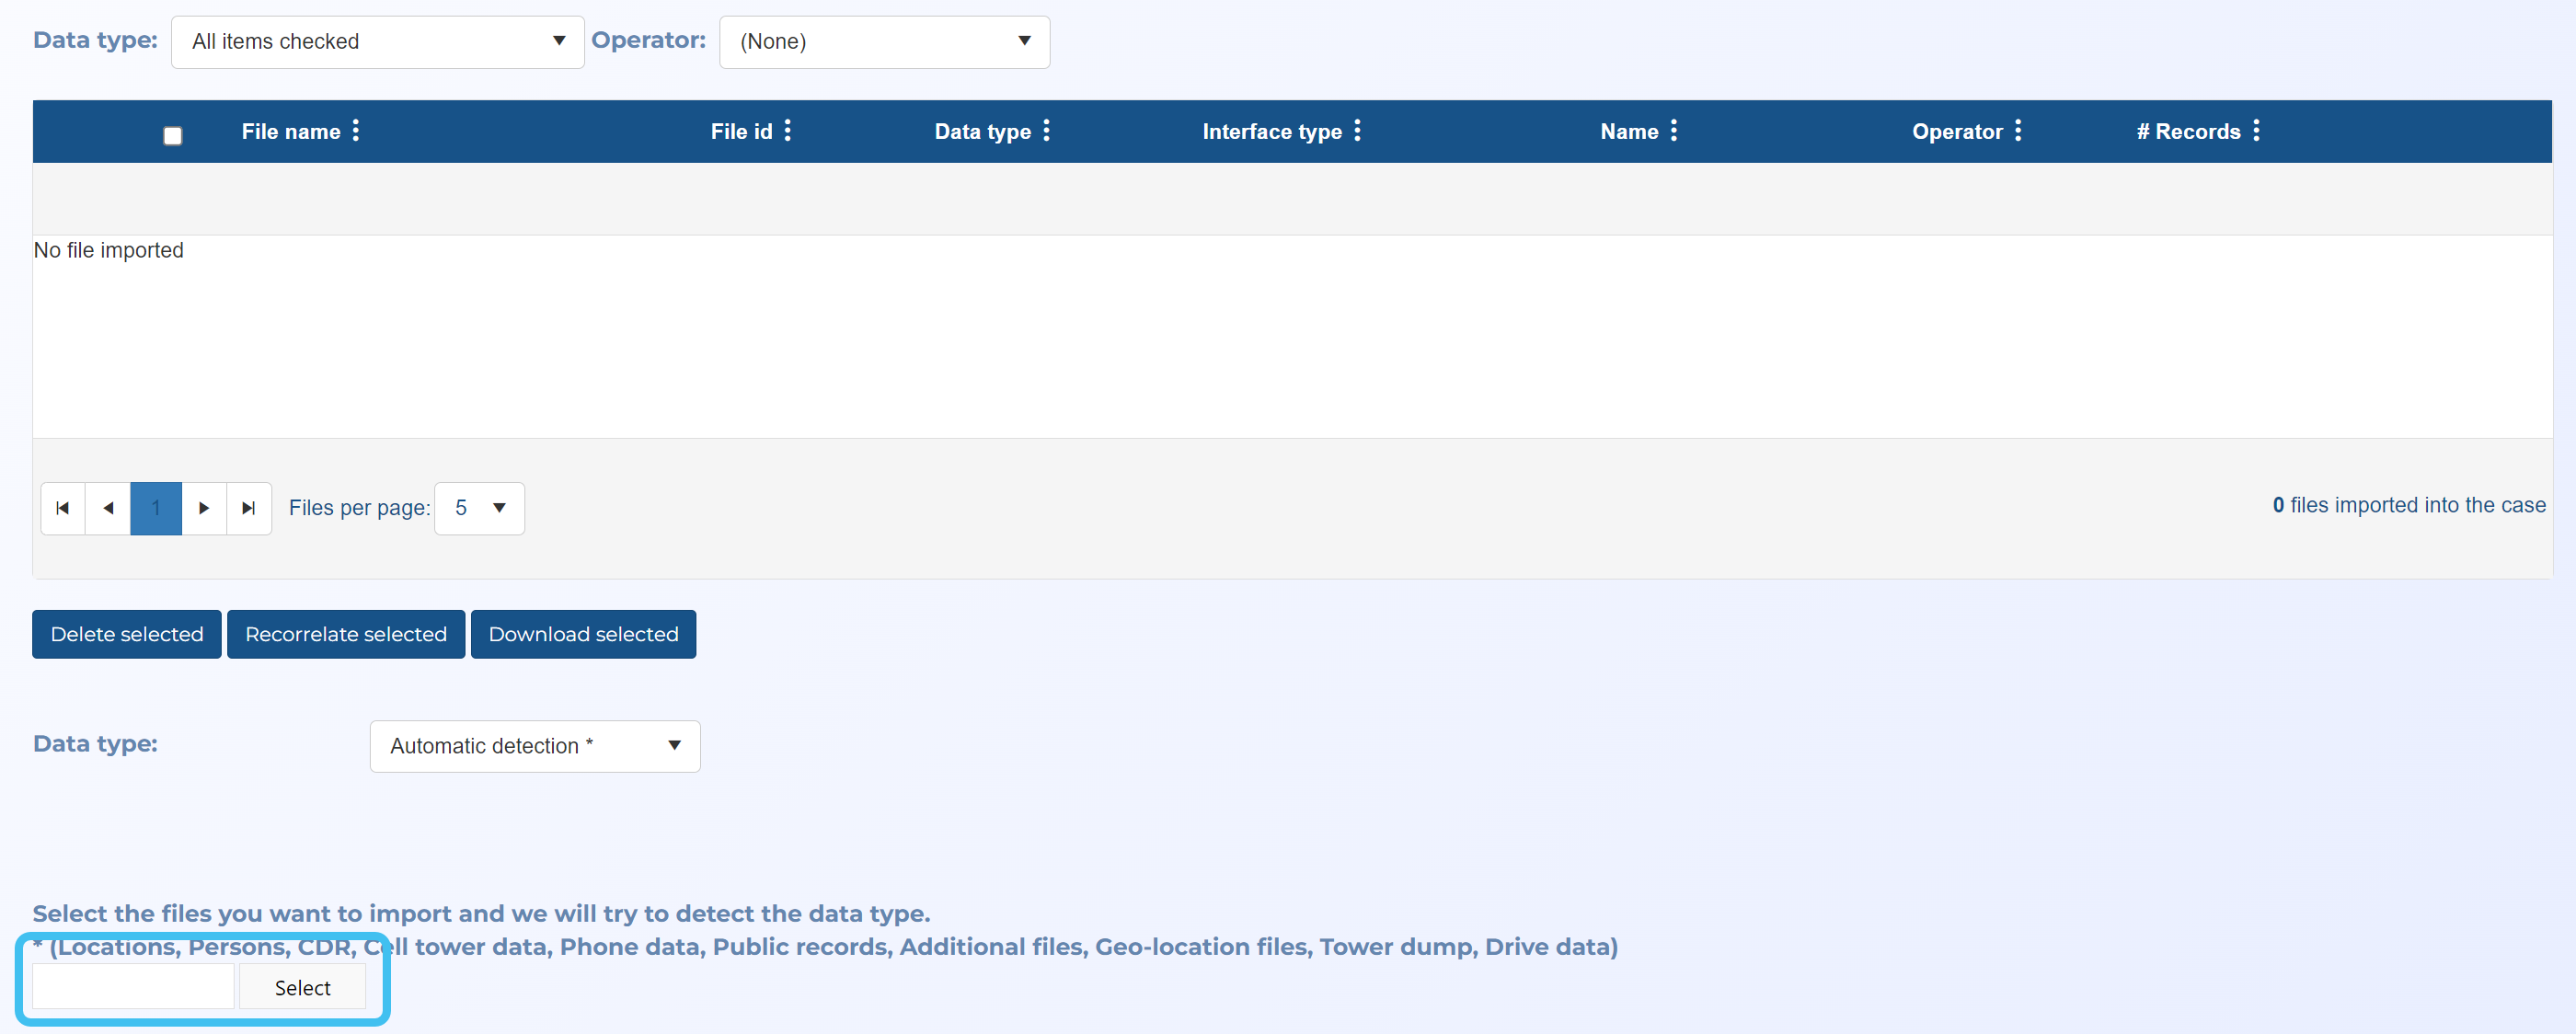
In Data type, select Automatic detection.
Alternatively, you can select Social media files then select the Person name.
Click Select. Windows Explorer opens. Navigate to the folder and select the required files. The file uploads and a green circle alongside the file name indicates when the upload is complete. If the file sent to you is in .zip format then you do not need to extract the files, you can simply select the .zip file.
On the main menu click View cases. The screen that opens depends on your setting of View cases. If it is set to:
Advanced view, then the Advanced view cases screen opens.
If your case is listed on the Favorite & recent cases tab, click the case name to open the Manage case screen.
If it is not listed on the Favorite & recent cases tab, then click the Cases tab. Use the search filters to help locate your case. You can also click to open the FILTERS group which allows you to set your own default filter defining what is displayed on this tab, for example you may wish to set it to cases that you created which are currently open.
If your case is listed under My recent cases click it to open the Manage case screen.
If it is not listed under My recent cases then select your case from the table, using the search filters to help locate it if required. Note, by default the search is set to only display cases that you created; if you are not the original creator but an assignee then ensure you set Case filter to Assigned cases before clicking Search.
Tree view, then the View i-cases screen opens.
Click at the top-right of the screen to open either the View Cases or Advanced view cases screen and follow the above description.
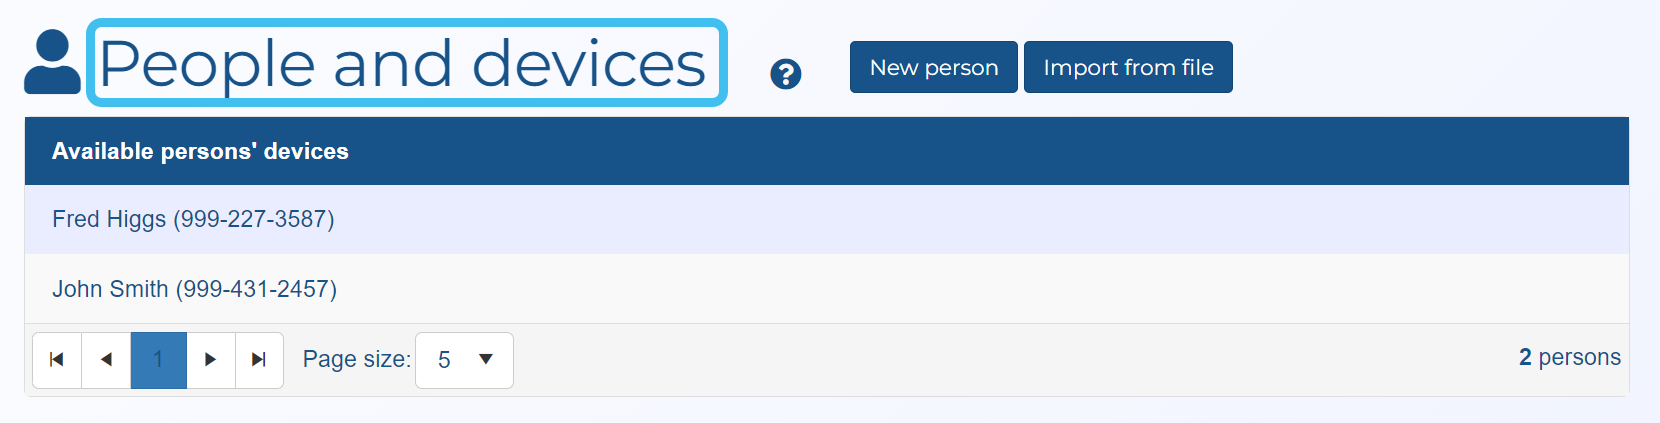
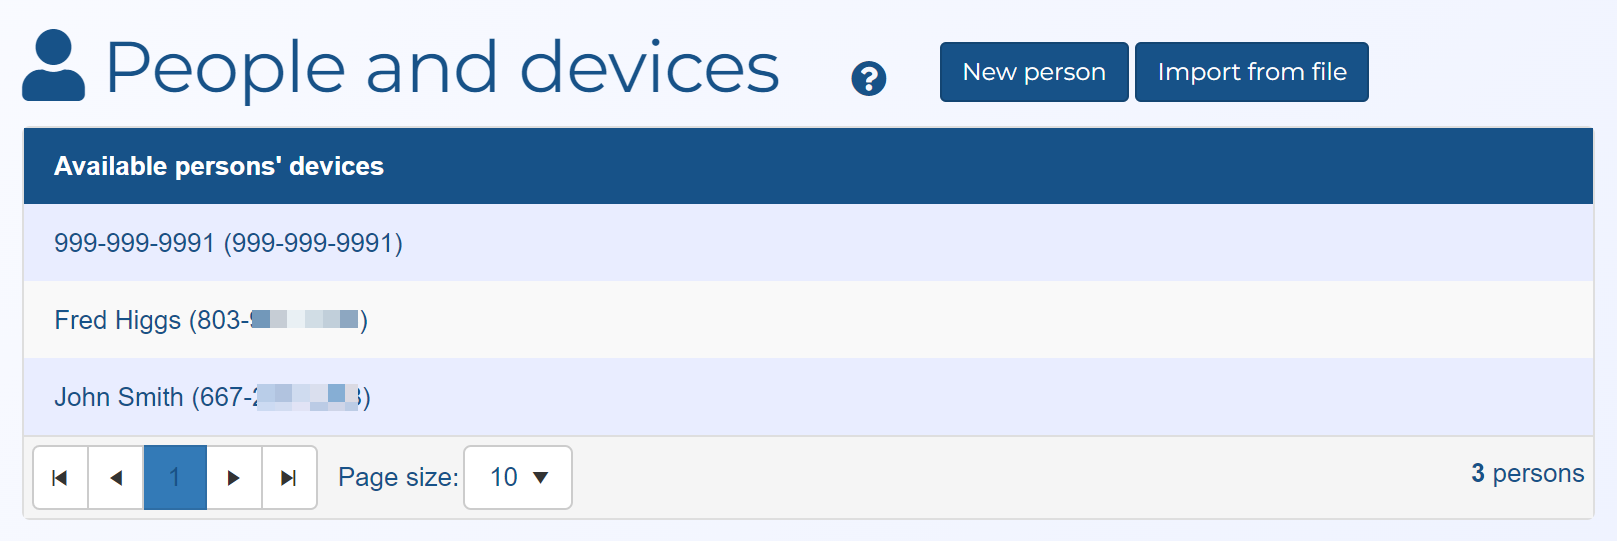
On the Manage case screen click People and devices.
The People and devices screen opens.
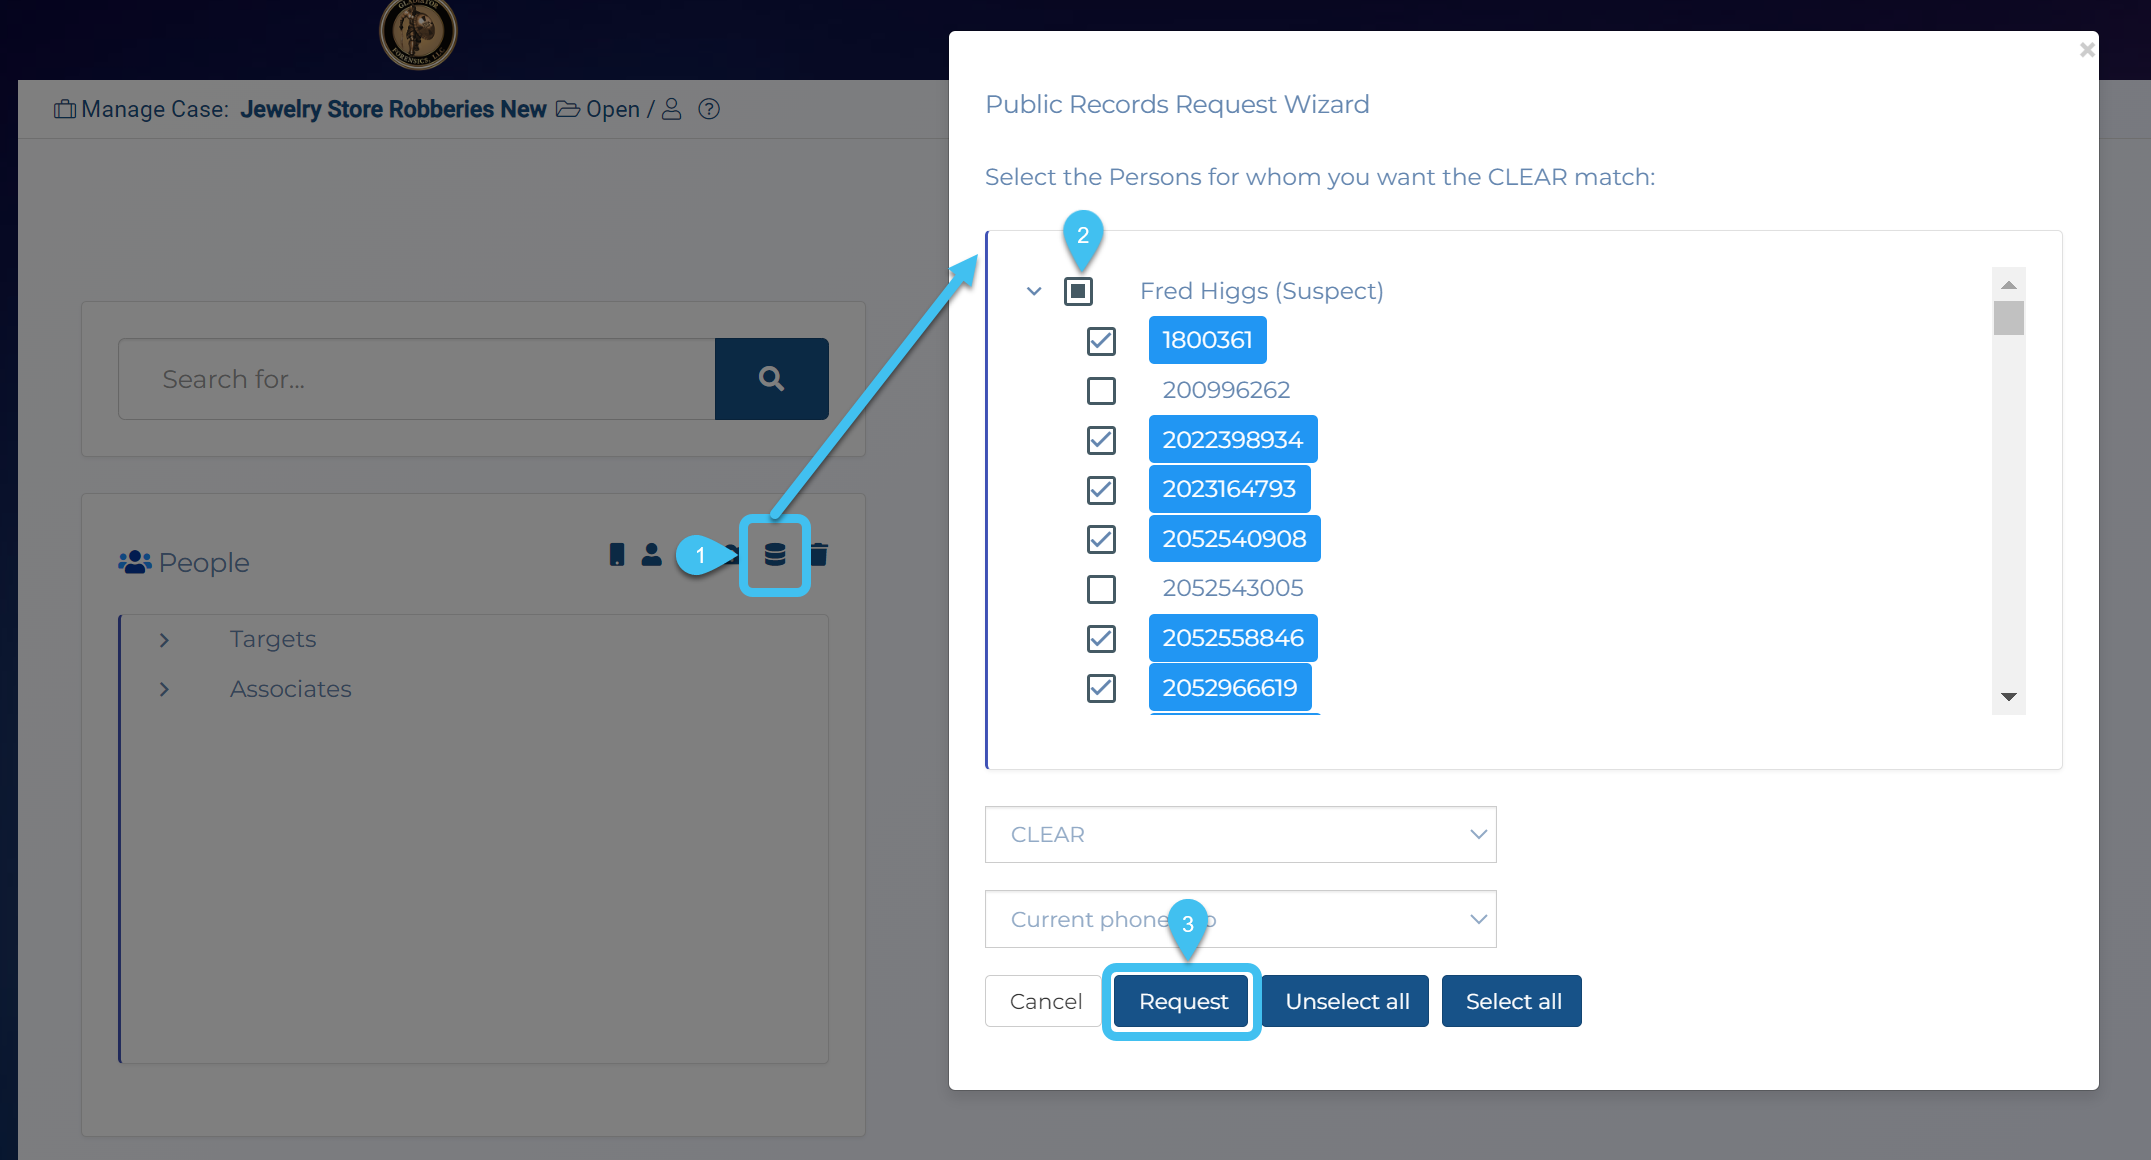
Click , then in the Public Records Request Wizard dialog box select the check-boxes next to the names you want to do a CLEAR or Whooster match on then click Request.
When the CLEAR or Whooster match request is queuing or running it will display a notification alarm; once complete there will be no notification alarm and its status will be updated with in the Case files section of the Manage case screen. The length of time for the CLEAR or Whooster match request to complete is dependent on a number of factors including the number of phone numbers being matched however you will also receive an email when it completes.
Click Back to return to the Manage case screen.
There are two methods of importing public records into OSS-ESPA:
The preferred method for public records that are from Thomson Reuters CLEAR or Whooster, is for you to use the CLEAR or Whooster request feature which is available from multiple locations in OSS-ESPA as detailed in the following procedures. Using this method OSS-ESPA automatically exports the phone numbers you are interested in directly to Thomson Reuters CLEAR or Whooster then automatically imports the public record data into OSS-ESPA. You will receive an email when the CLEAR or Whooster request is complete and the data is available for you to use in OSS-ESPA. In order to use the CLEAR request feature your administrator must first provide Gladiator Forensics with your organization's CLEAR certificate which you can obtain from your Thomson Reuters CLEAR representative. Gladiator Forensics will then apply your CLEAR certificate to your OSS-ESPA account. Your administrator must also enter your organization's User ID and Password for CLEAR, or API key for Whooster.
The alternative method can be used for public records from other applications or files you have created. This method is a manual process. Using the ESPA analysis center screen, OSS-ESPA allows you to generate a .csv file containing phone numbers of interest. This list is then imported into a public record tool which generates a public record file in .csv format. You can then upload the public record file to OSS-ESPA.
NOTE: You can also use this feature to import .csv files you've created yourself which contain names, phone numbers and other data. For further information refer to Manage files screen.
Once uploaded the records are available to view and use in People and devices and on the Public records tab.
The Show phones with public records setting on People and devices allows you to filter the associate records so that you only display those which have public records. You can then click on the associate's name, then click on to view the public records details, and click on to use their name from the public records. Note, that currently the name is used throughout OSS-ESPA with the exception of the ESPA analysis center that currently the names selected on the Public records tab.
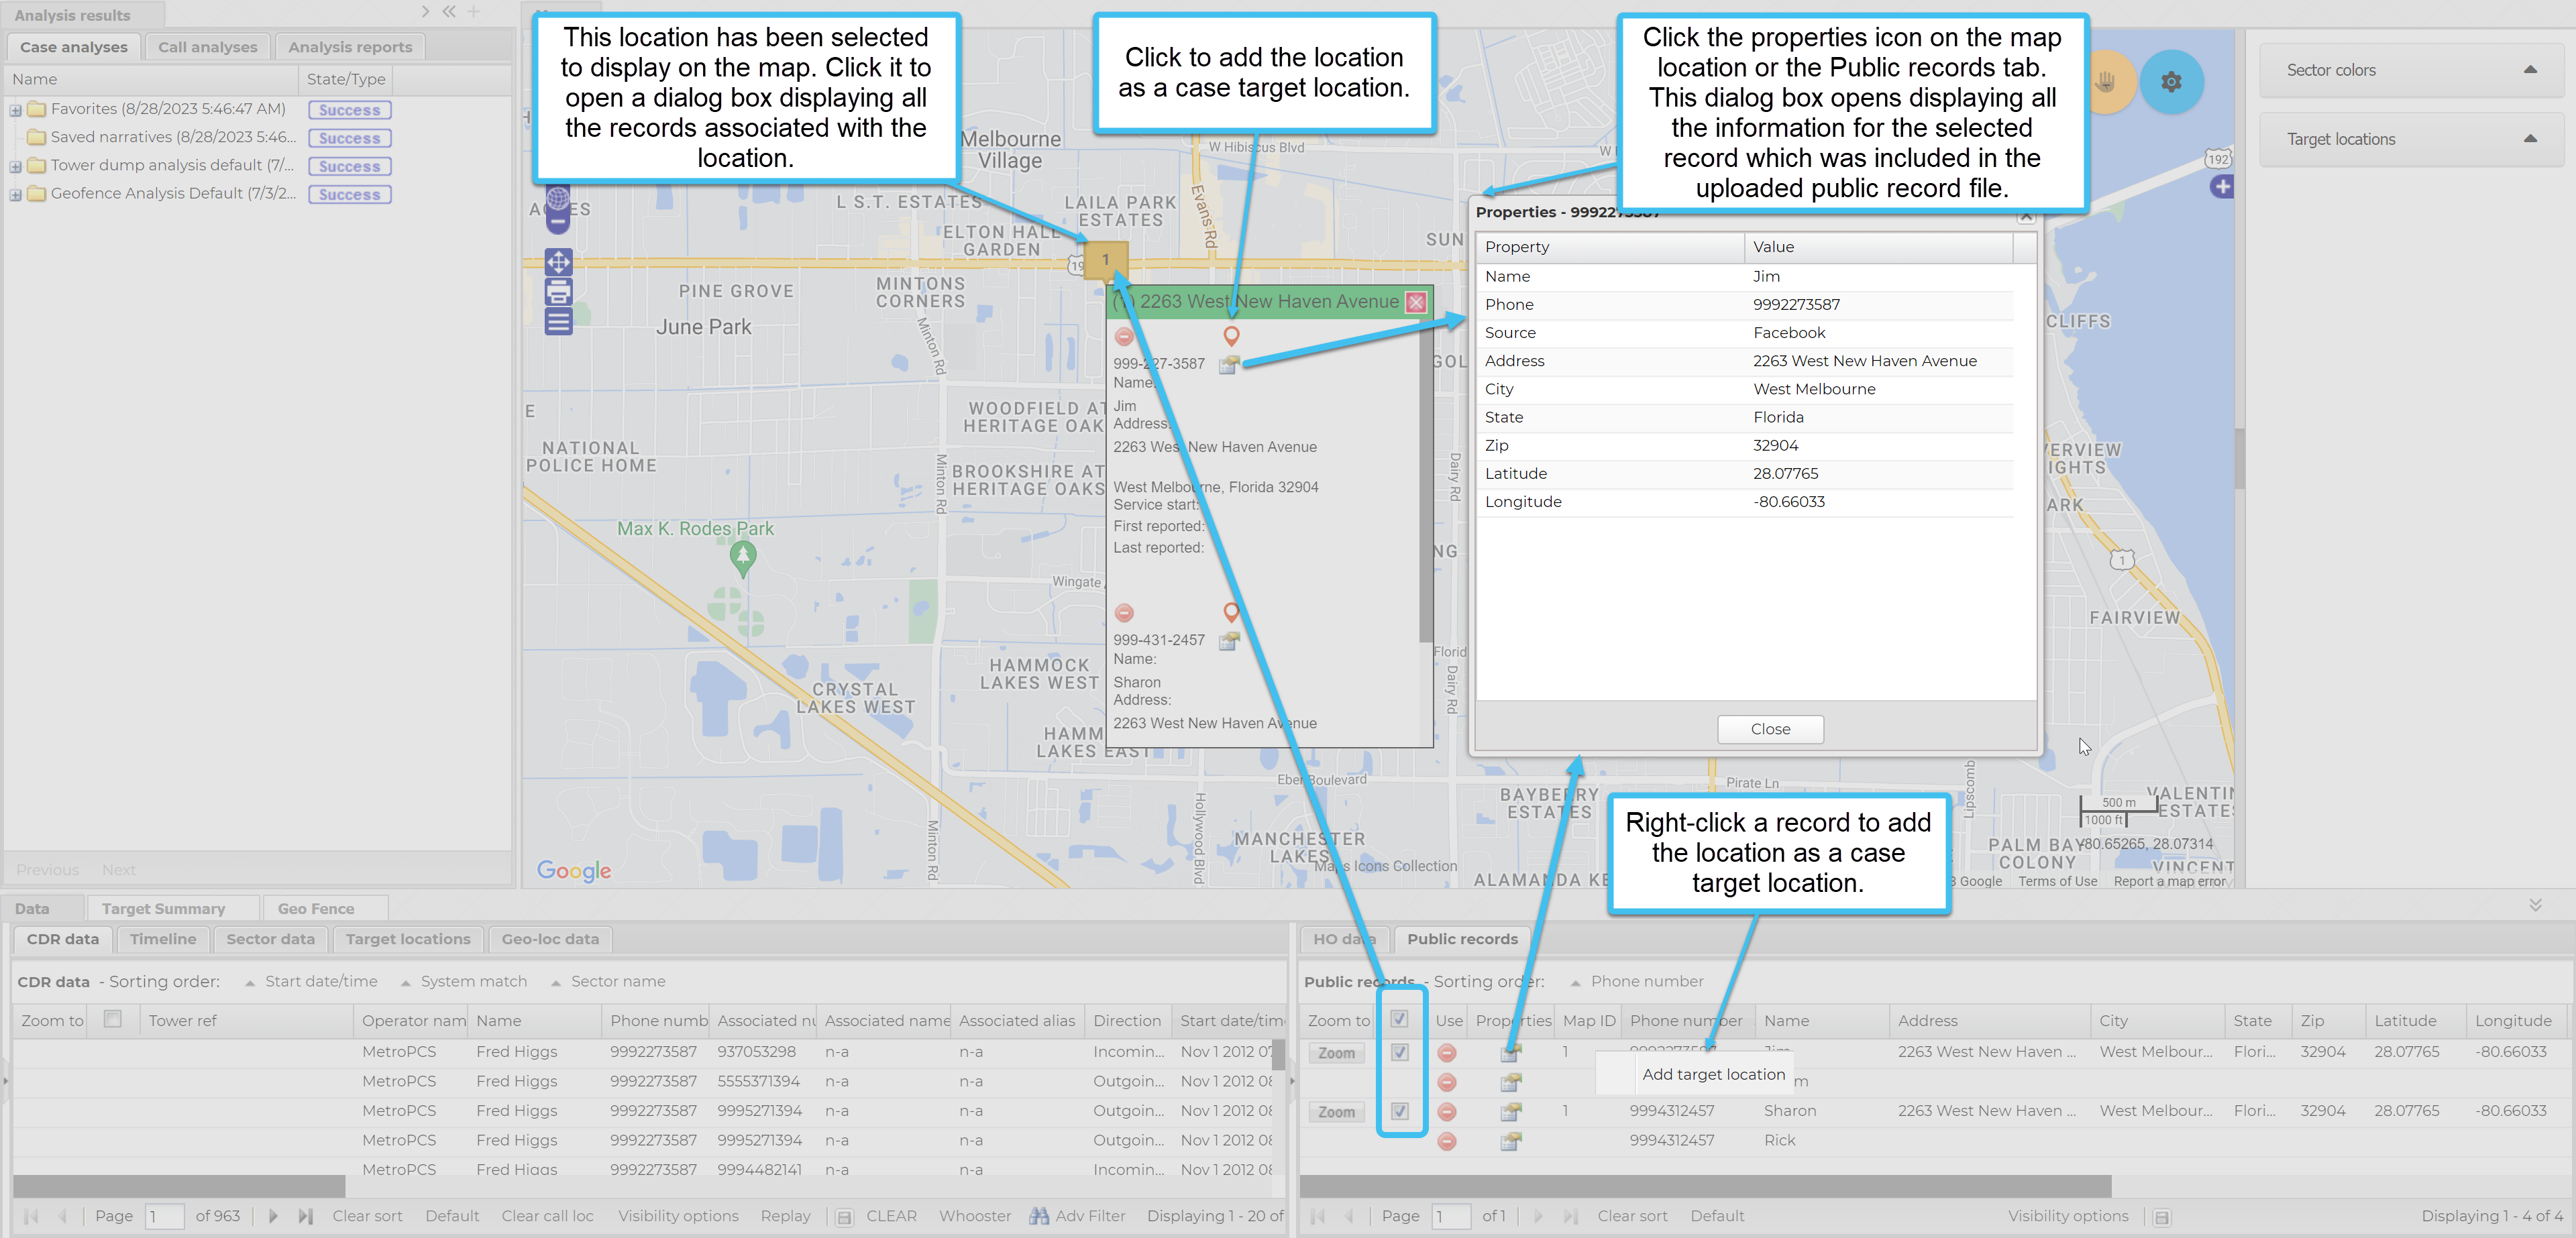
Once uploaded the records are available on the ESPA analysis center screen for you to use in your investigation. The records are displayed on the Public records tab and on the map. You can select on an individual basis which records you want to use in your case. When you select to use a record the name associated with that record is then automatically displayed on the CDR data tab, the Timeline tab and the Call analysis tab.
The following graphics provide overviews of how public record data is used on the ESPA analysis center screen.
This graphic displays how and where the names are displayed on the ESPA analysis center.
This graphic displays how the location markers and location properties are displayed on theESPA analysis center. If required you can add the location to your case from both the map and the Public records tab as shown in the graphic.
If you have an account which includes IQ packets then the public record data is included in your IQ packet's common and frequent analyses results.
How do I reassign a file to another person or device, such as a 999-999-9999 number?
To reassign a file such as a 999-999-9999 number
This procedure allows you to reassign a phone, vehicle or location for a file if it is not currently assigned to the correct one. This procedure can also be used if you have uploaded CDR or Timing Advance file into OSS-ESPA and a person is created with a 999 name as shown below.
Click here for a short video showing how to reassign files.
For the case you want to reassign a file from, open the Manage case screen.
On the main menu click View cases. The screen that opens depends on your setting of View cases. If it is set to:
Advanced view, then the Advanced view cases screen opens.
If your case is listed on the Favorite & recent cases tab, click the case name to open the Manage case screen.
If it is not listed on the Favorite & recent cases tab, then click the Cases tab. Use the search filters to help locate your case. You can also click to open the FILTERS group which allows you to set your own default filter defining what is displayed on this tab, for example you may wish to set it to cases that you created which are currently open.
If your case is listed under My recent cases click it to open the Manage case screen.
If it is not listed under My recent cases then select your case from the table, using the search filters to help locate it if required. Note, by default the search is set to only display cases that you created; if you are not the original creator but an assignee then ensure you set Case filter to Assigned cases before clicking Search.
Tree view, then the View i-cases screen opens.
Click at the top-right of the screen to open either the View Cases or Advanced view cases screen and follow the above description.
On the Manage case screen, click the file name you want to reassign.
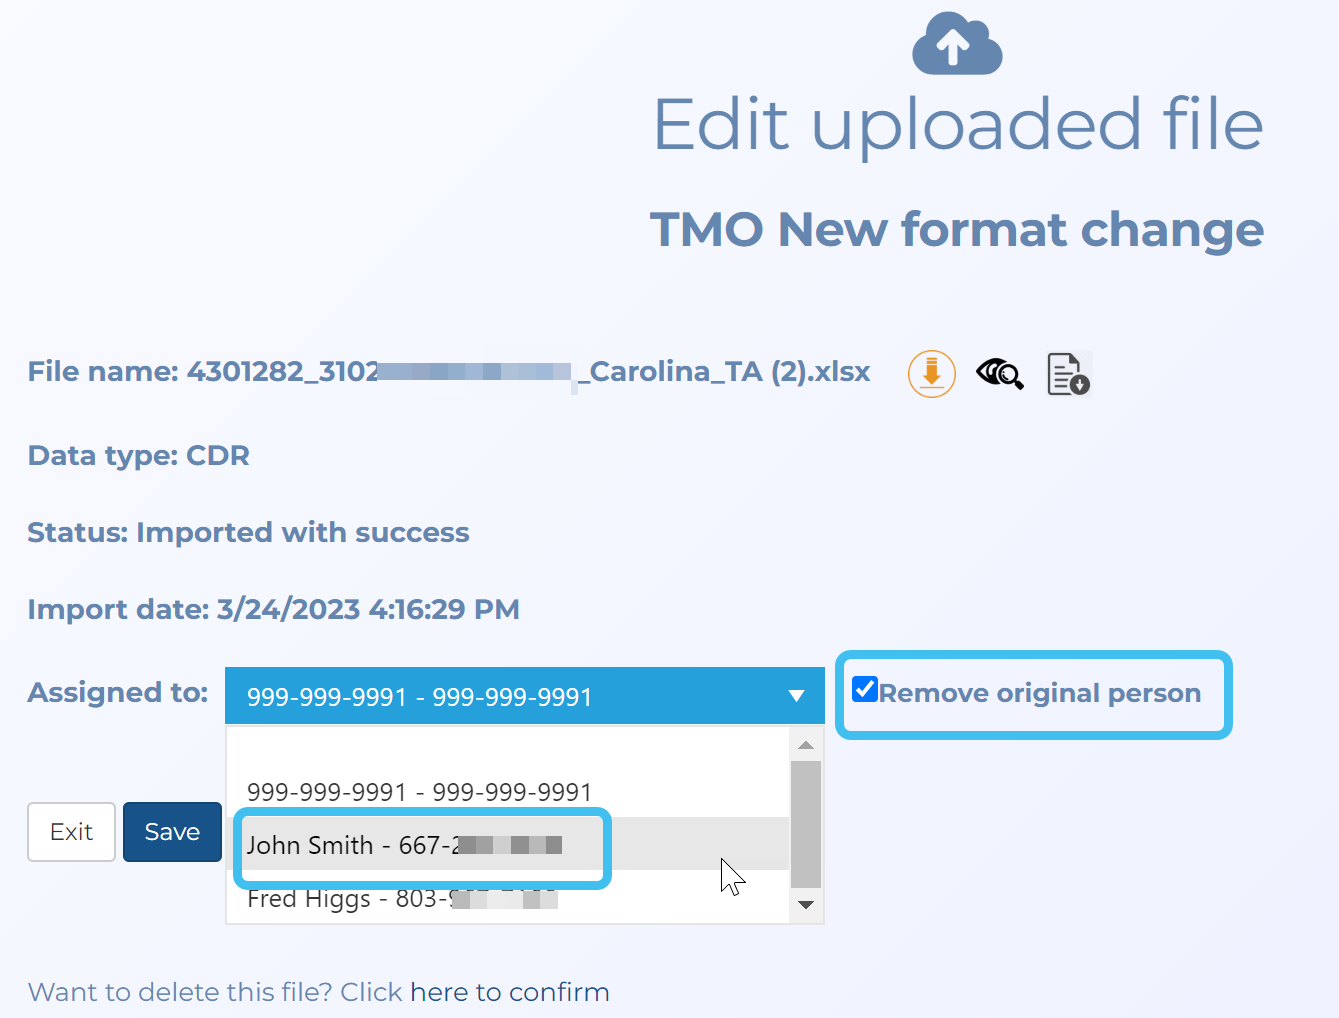
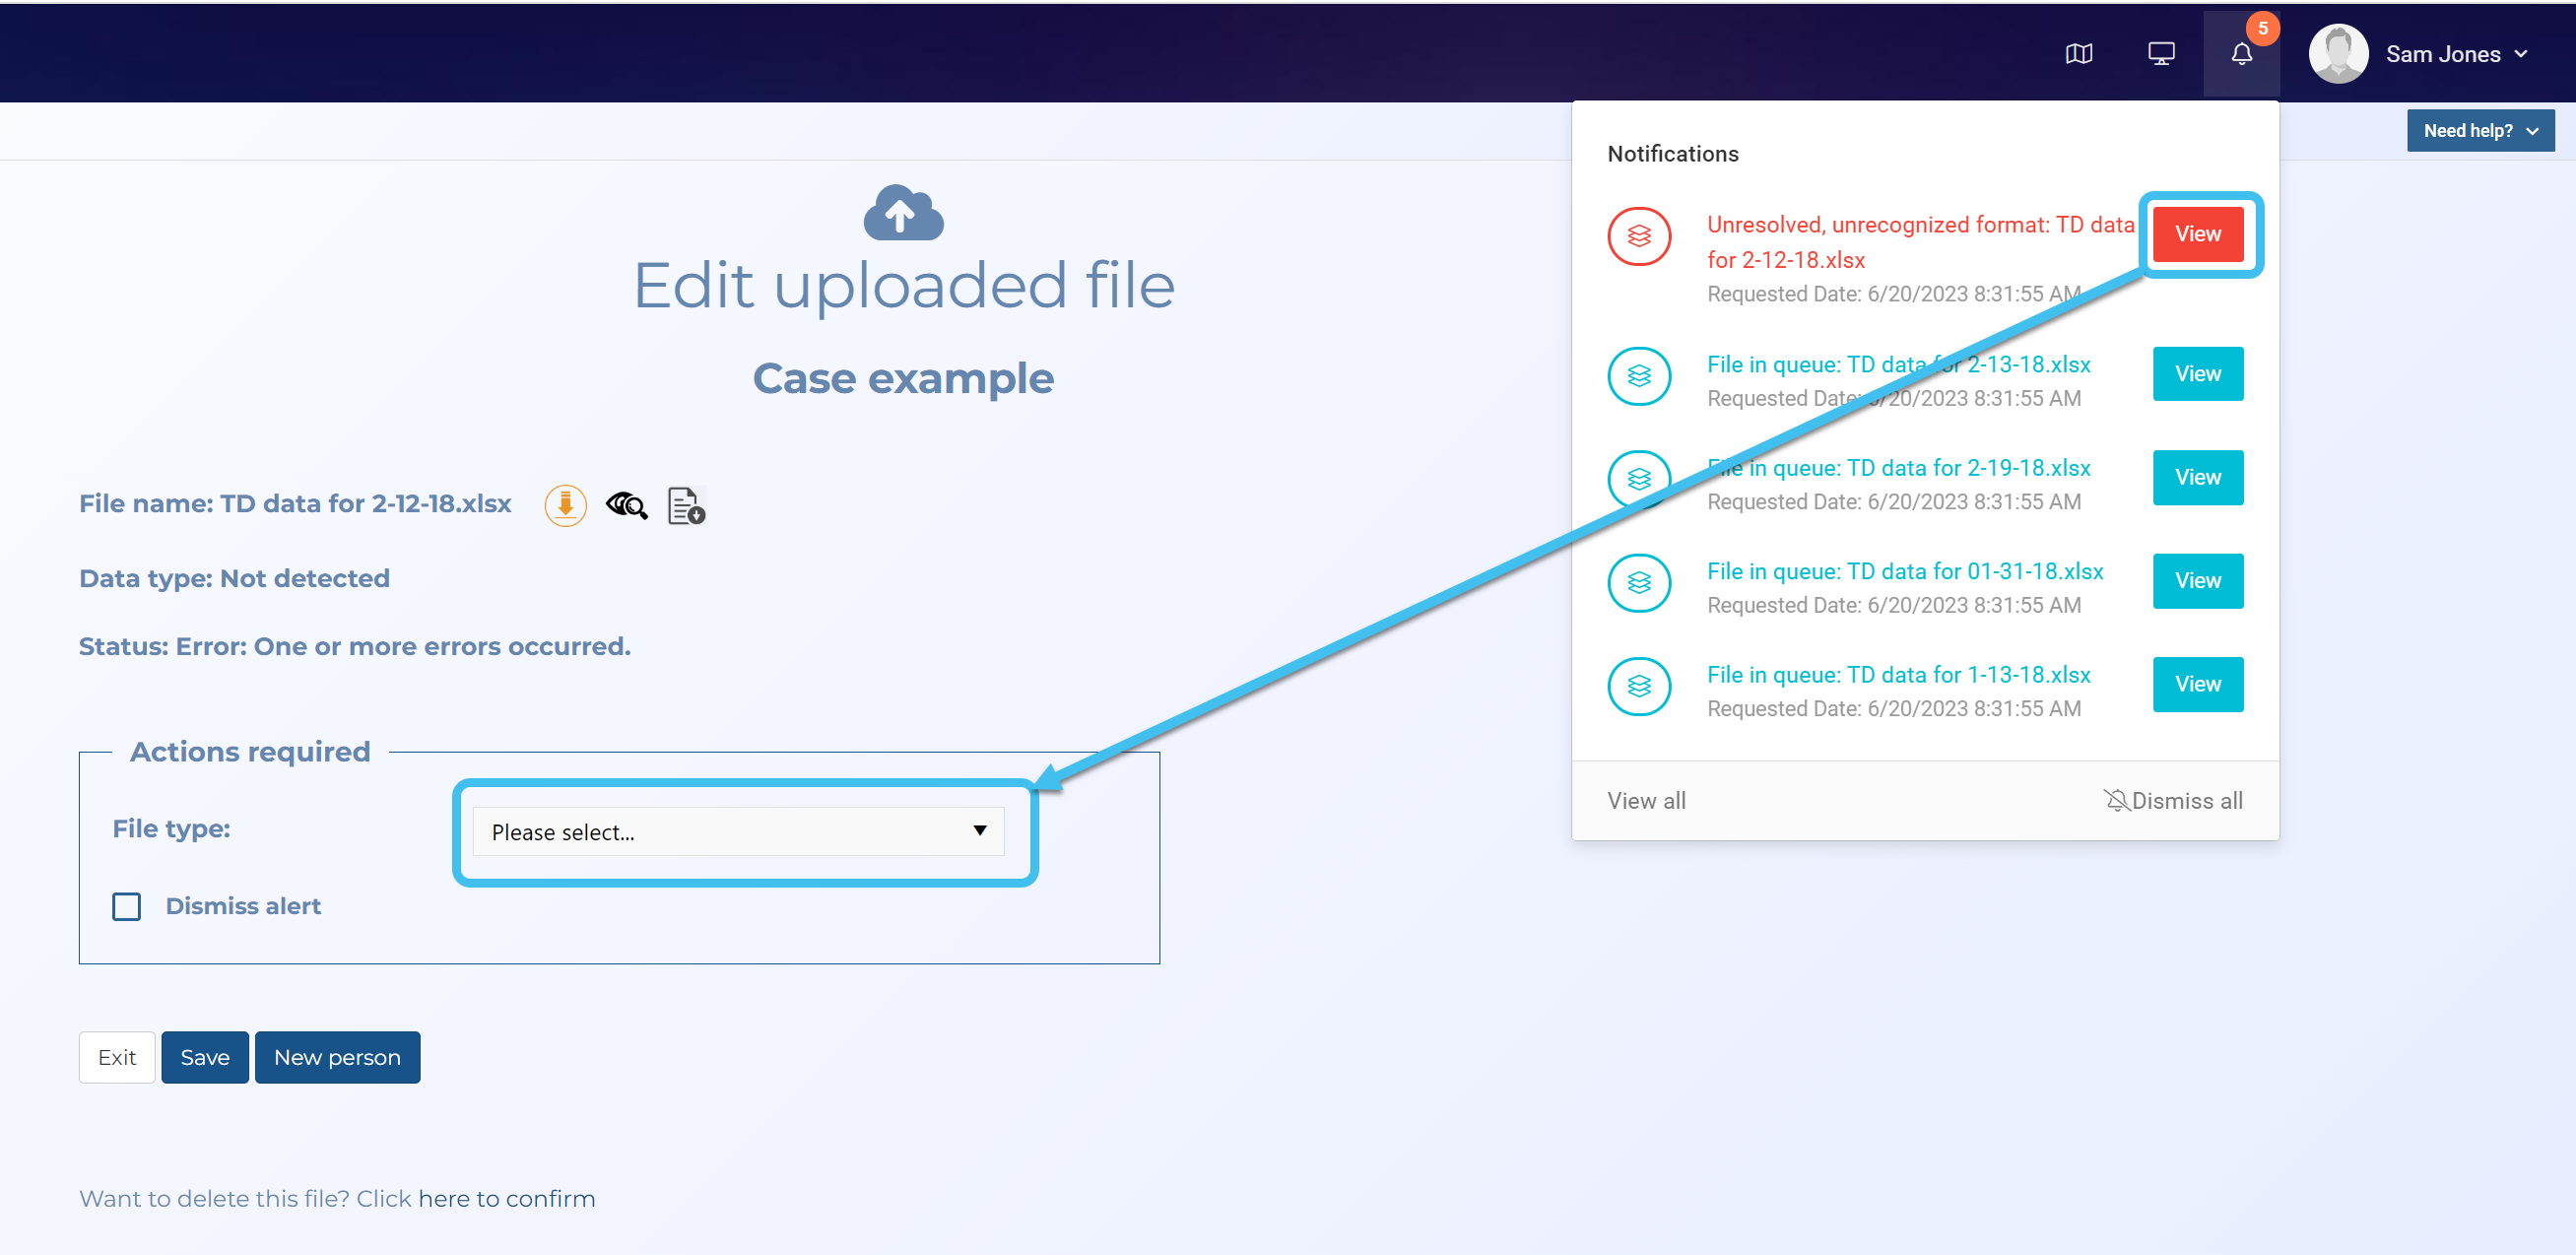
The Edit uploaded file screen opens.
In Assigned to select the correct option and select Remove original person.
NOTE: If you have additional files associate with the 999 number then do not select Remove original person until you assign the last file otherwise the remaining files are immediately deleted.
NOTE: If you want to avoid creating 999 numbers, you can upload the standard CDR file first, which allows OSS-ESPA to create a person, and then you can upload and select the person the file is associated with before it is imported by OSS-ESPA.
How do I resolve notifications such as file autodetect issues?
Resolving notifications
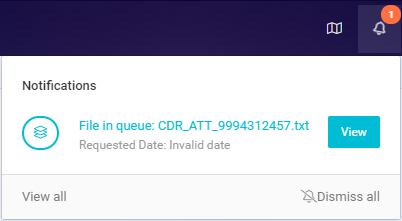
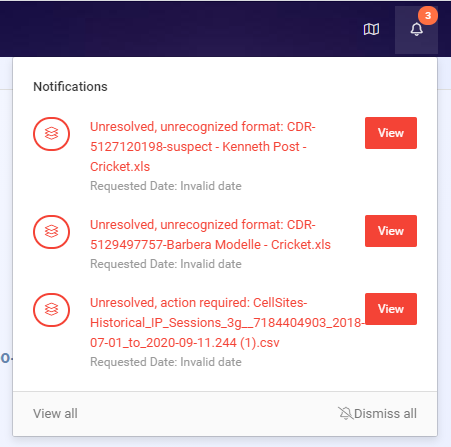
If the notification bell is displayed at the top of the screen then there are notifications that may need resolved. Alongside the notification bell it indicates the number of current notifications. This number may change automatically if OSS-ESPA is importing files.
This graphic shows blue notifications that do not require you to do anything, for example that OSS-ESPA is still importing files. There are different icons displayed at the start of the notification and these identify what the notification is for, for example a file is still awaiting to import displays the icon in the following graphic.
Amber notifications provide you with information that may be helpful to you, for example this example informs you that a target phone number and a file you added to the case already exist in other cases.
However, this graphic shows a red notifications that do require you to resolve them by providing OSS-ESPA with more information.
There are a number of methods you can use to find your case, using the Advanced view cases screen. Click here for a short video showing how to use the filters for finding cases or refer below for additional details.
If you were using your case recently it may be displayed on the Favorite & recent cases tab. You can also add your favorite cases to this tab as shown in this video.
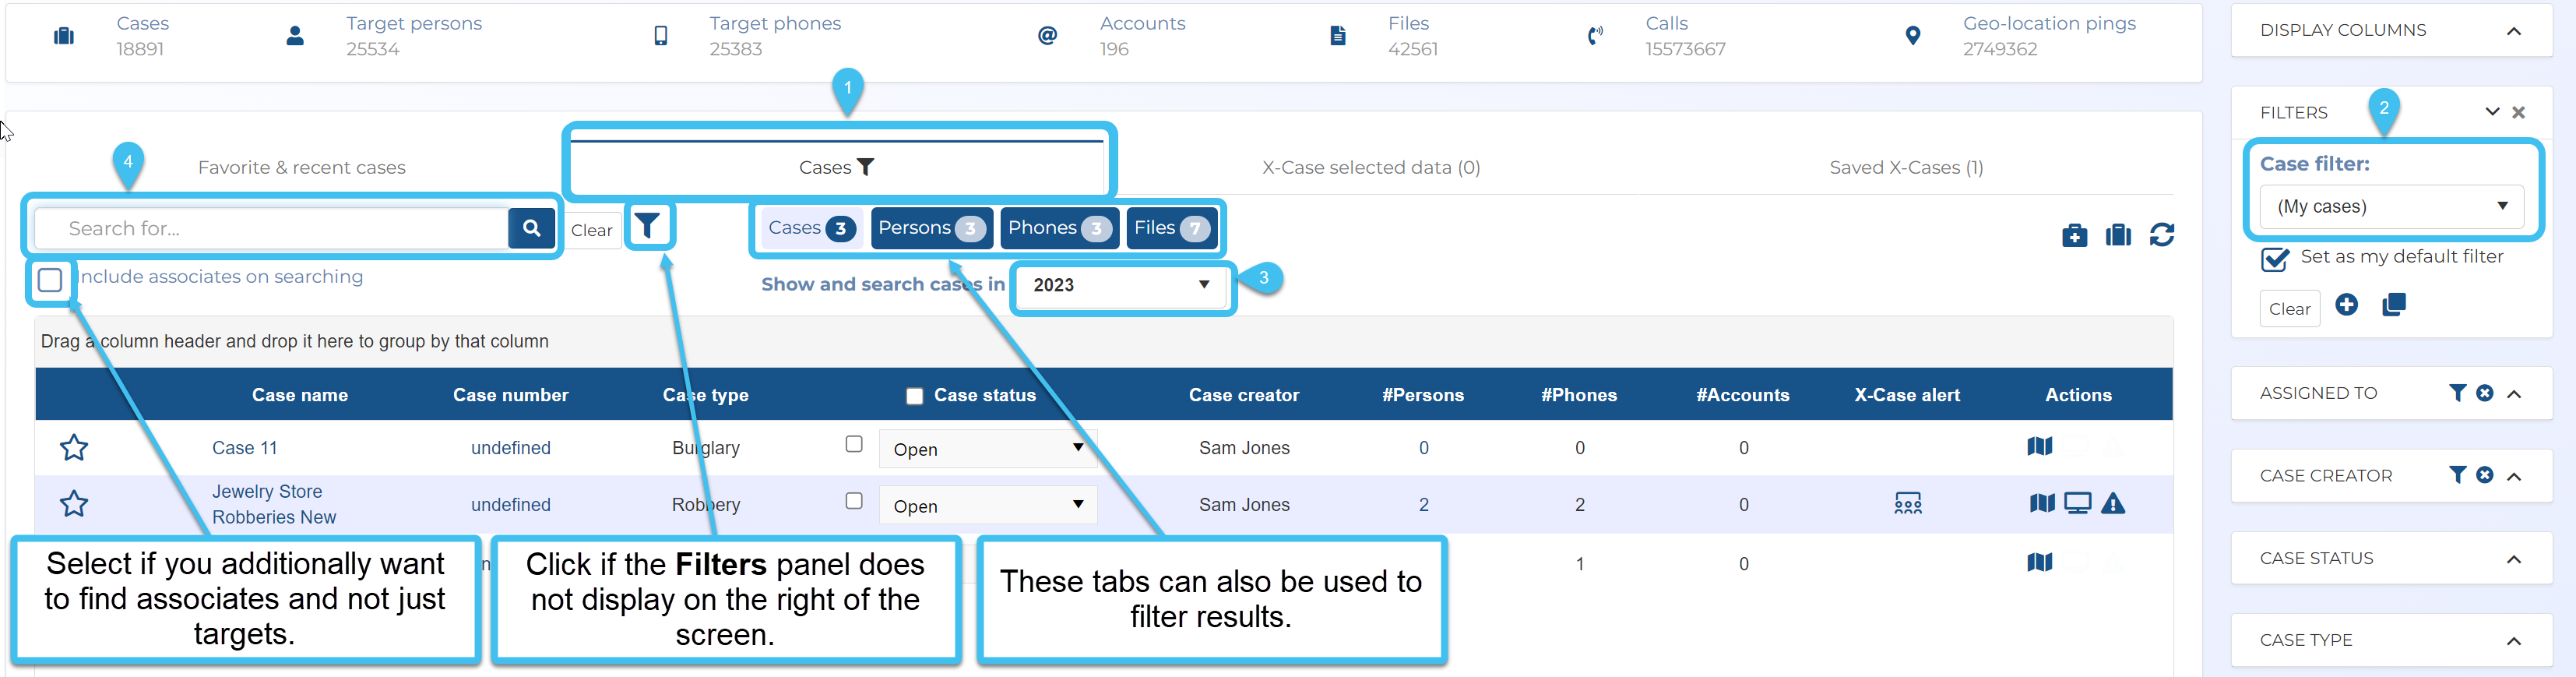
If you want to find a case you either created or were assigned to then, on the Cases tab, in Case filter select My cases. Note, if Case filter is not displayed click . In Show and search cases in, select the year. All the cases matching your criteria are displayed. If you want to filter further you can use Search. Refer below for what details you can search on.
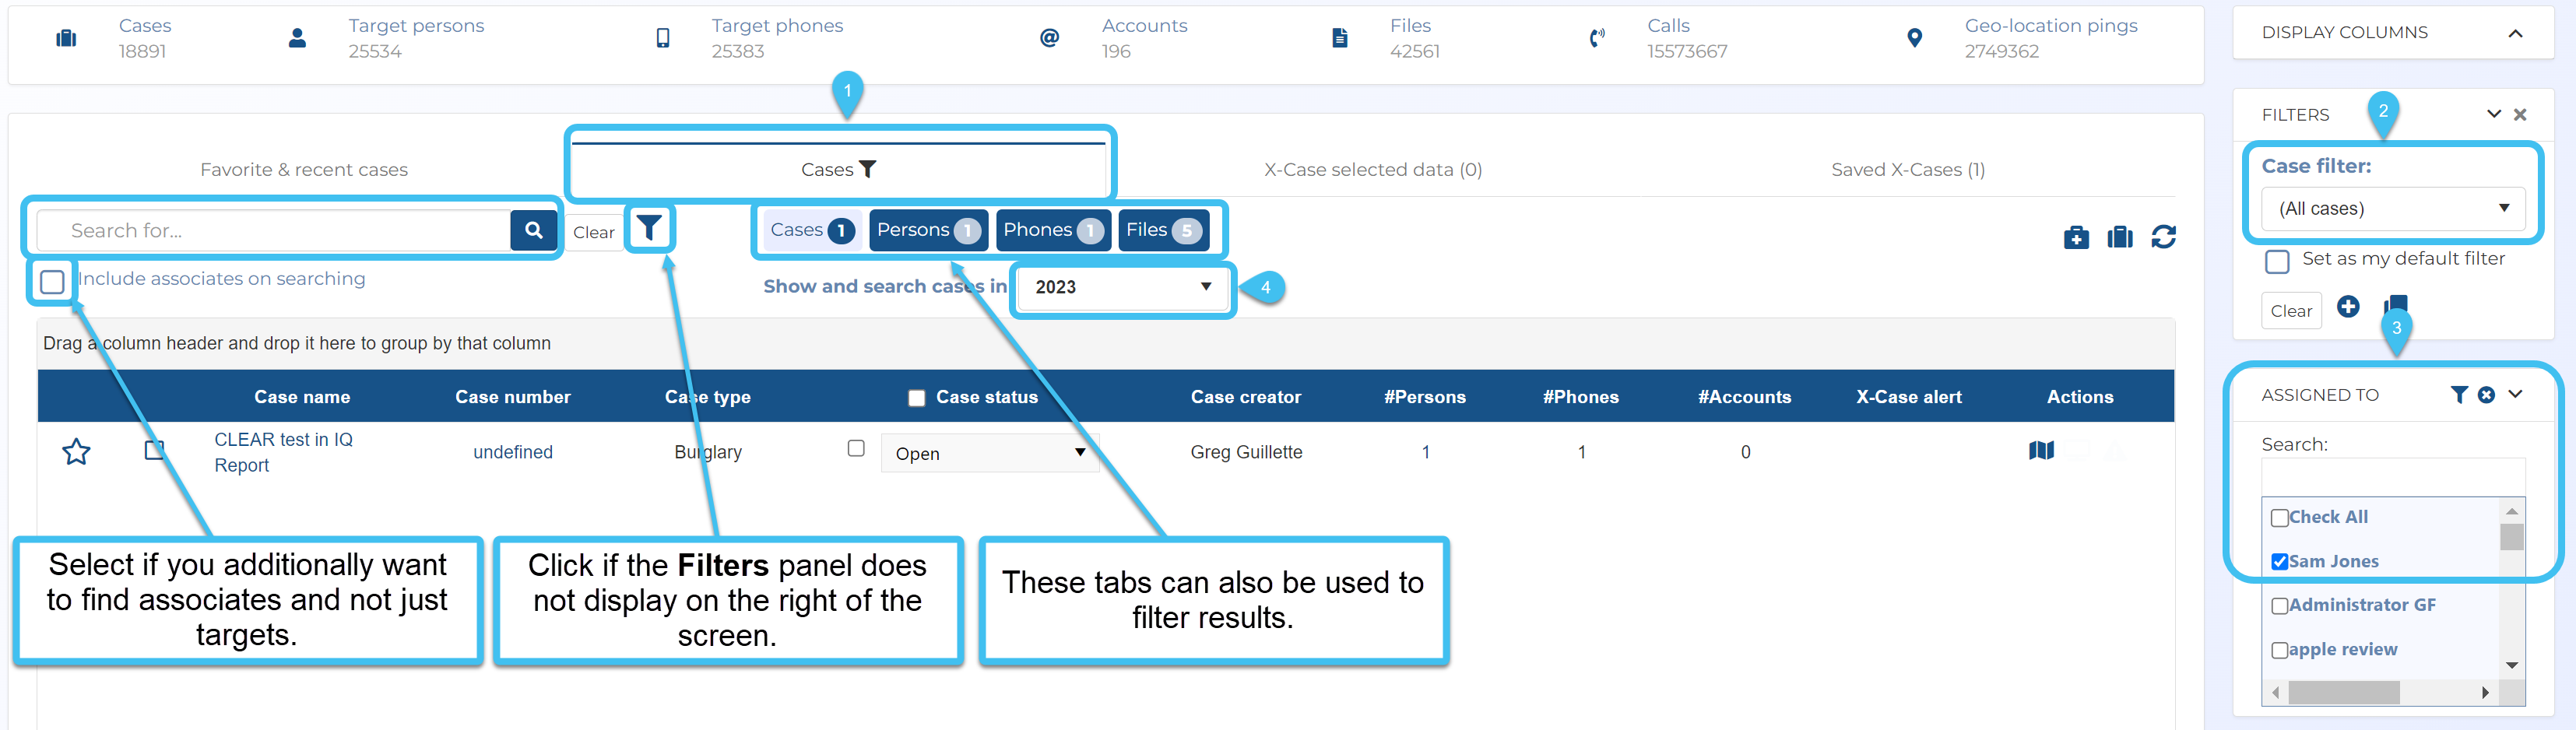
If you want to find any case assigned to a particular user then, on the Cases tab, in Case filter select All cases and in Assigned to select the user's name. Note, if Case filter is not displayed click . In Show and search cases in, select the year. All the cases matching your criteria are displayed. If you want to filter further you can use Search. Refer below for what details you can search on.
If you want to find all cases then, on the Cases tab, in Case filter select All cases. Note, if Case filter is not displayed click . In Show and search cases in, select the year. All the cases matching your criteria are displayed. If you want to filter further you can use Search. Refer below for what details you can search on.
You can use the search field on the Cases tab to search for specific words and numbers to help you find the cases. This search field searches for results in:
Case files
Person name
Phone numbers, IMSI, IMEI
Account, User/Vanity name
Vehicle license plate
Government IDs: SSN, driver license, passport, arrest ID
Both full and partial searches are possible. Phone numbers can be entered in any format, for example 123456789, 123-456-789 and (123) 456-789.
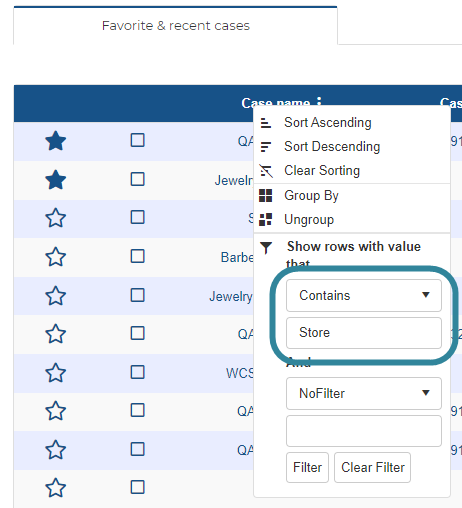
If you are using one of the tabs where the FILTERS group is not applicable then you can search for the case by filtering using the column titles' drop-down which opens the Column header menu. For example, if you were looking for a case which has store in it's title, in the Case name column, select Contains, enter "Store" then click Filter to display only the cases that match that criteria.
You can upload a cell tower data file to your specific case, this is what OSS-ESPA refers to as "Case tower data" as it is only available in one "case". If you do upload a cell tower data file to your case then it is used.
Your OSS-ESPA administrator may have already uploaded country-wide cell tower data files for specific time periods to OSS-ESPA as global files which makes them available for use in every case, this is what OSS-ESPA refers to as "Global tower data". If your administrator has done this then it is not mandatory that you upload cell tower data to your specific case and OSS-ESPA automatically selects a global cell tower data file based on the date of the first call in the CDR files for that operator.
CAUTION: Cell tower data files are typically updated by operators every quarter. It is important that your administrator is maintaining the global files and that you ensure that the file selected by OSS-ESPA is valid for the date of the first call in the CDR files for that operator. If the cell tower data that OSS-ESPA selects is more than five months after the date of the first call in the CDR file then OSS-ESPA provides a warning when the ESPA analysis center screen is opened. You must also ensure that the file covers the required locations.
Your OSS-ESPA administrator may have used the System Importer application to import cell tower data files to your OSS-ESPA server, therefore it is not mandatory that you upload cell tower data or reference existing cell tower data to your specific case. That is you do not need to use the Upload cell tower data screen and therefore you do not need to have any cell tower data listed on the Cell tower data management screen. OSS-ESPA only selects cell tower data files that have been imported using the System Importer application if you have not used any of the previous methods.
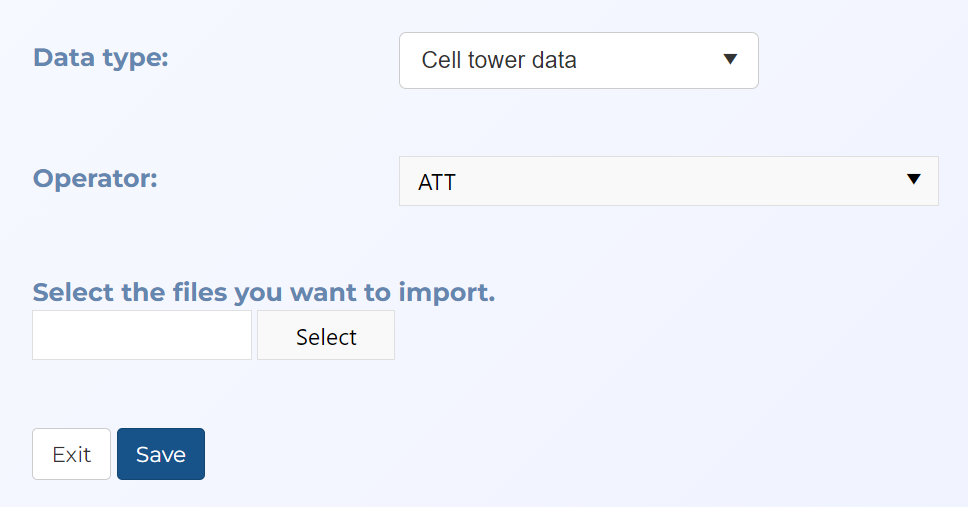
If you decide to upload a cell tower data file to your specific case then you must select an Operator and a cell tower data file. If you do not already have the Manage files screen open then on the Manage case screen click Upload more files.
In Data type select either Cell tower data or Automatic detection.
In Operator select the operator associated with the cell tower data file.
Click Select. Windows Explorer opens. Navigate to the folder and select the required file. When the upload is complete the file appears in Case files. This can take a few minutes.
Repeat this step for all the cell tower data files you want to import to the case for the selected operator.
NOTE: Although you can import multiple cell tower data files at one time they must all be from the same operator and of the same format, for example the column headers must be the same. If your file is large, or if you have multiple files from the same operator and of the same format it is recommended that you zip the files to minimize the upload time. Also, if you have previously uploaded a cell tower data file for the operator you cannot upload an additional cell tower data file for that operator. You must first delete any existing uploaded cell tower data files for that operator then upload the new file along with any of the previous files that you still require.
How to view OSS-SRN Express Portal cases in OSS-ESPA
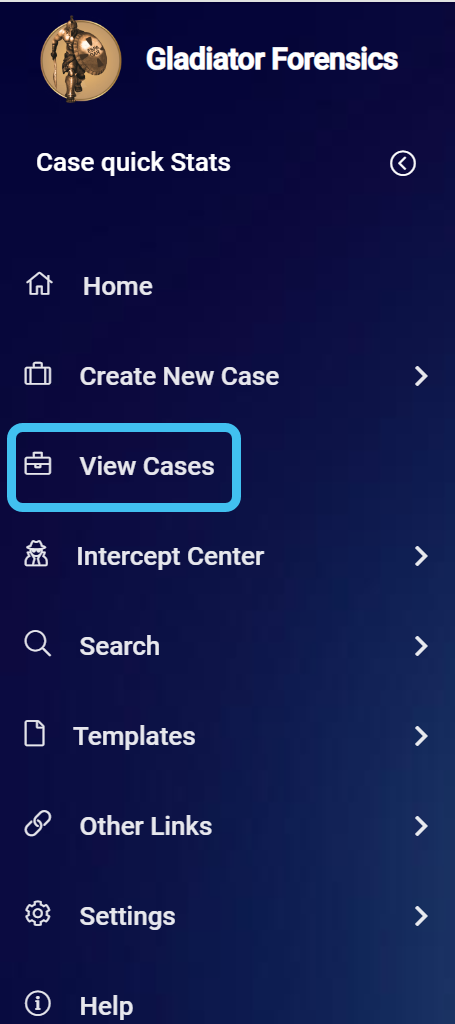
On the main menu, click View cases.
The Advanced view cases screen opens.
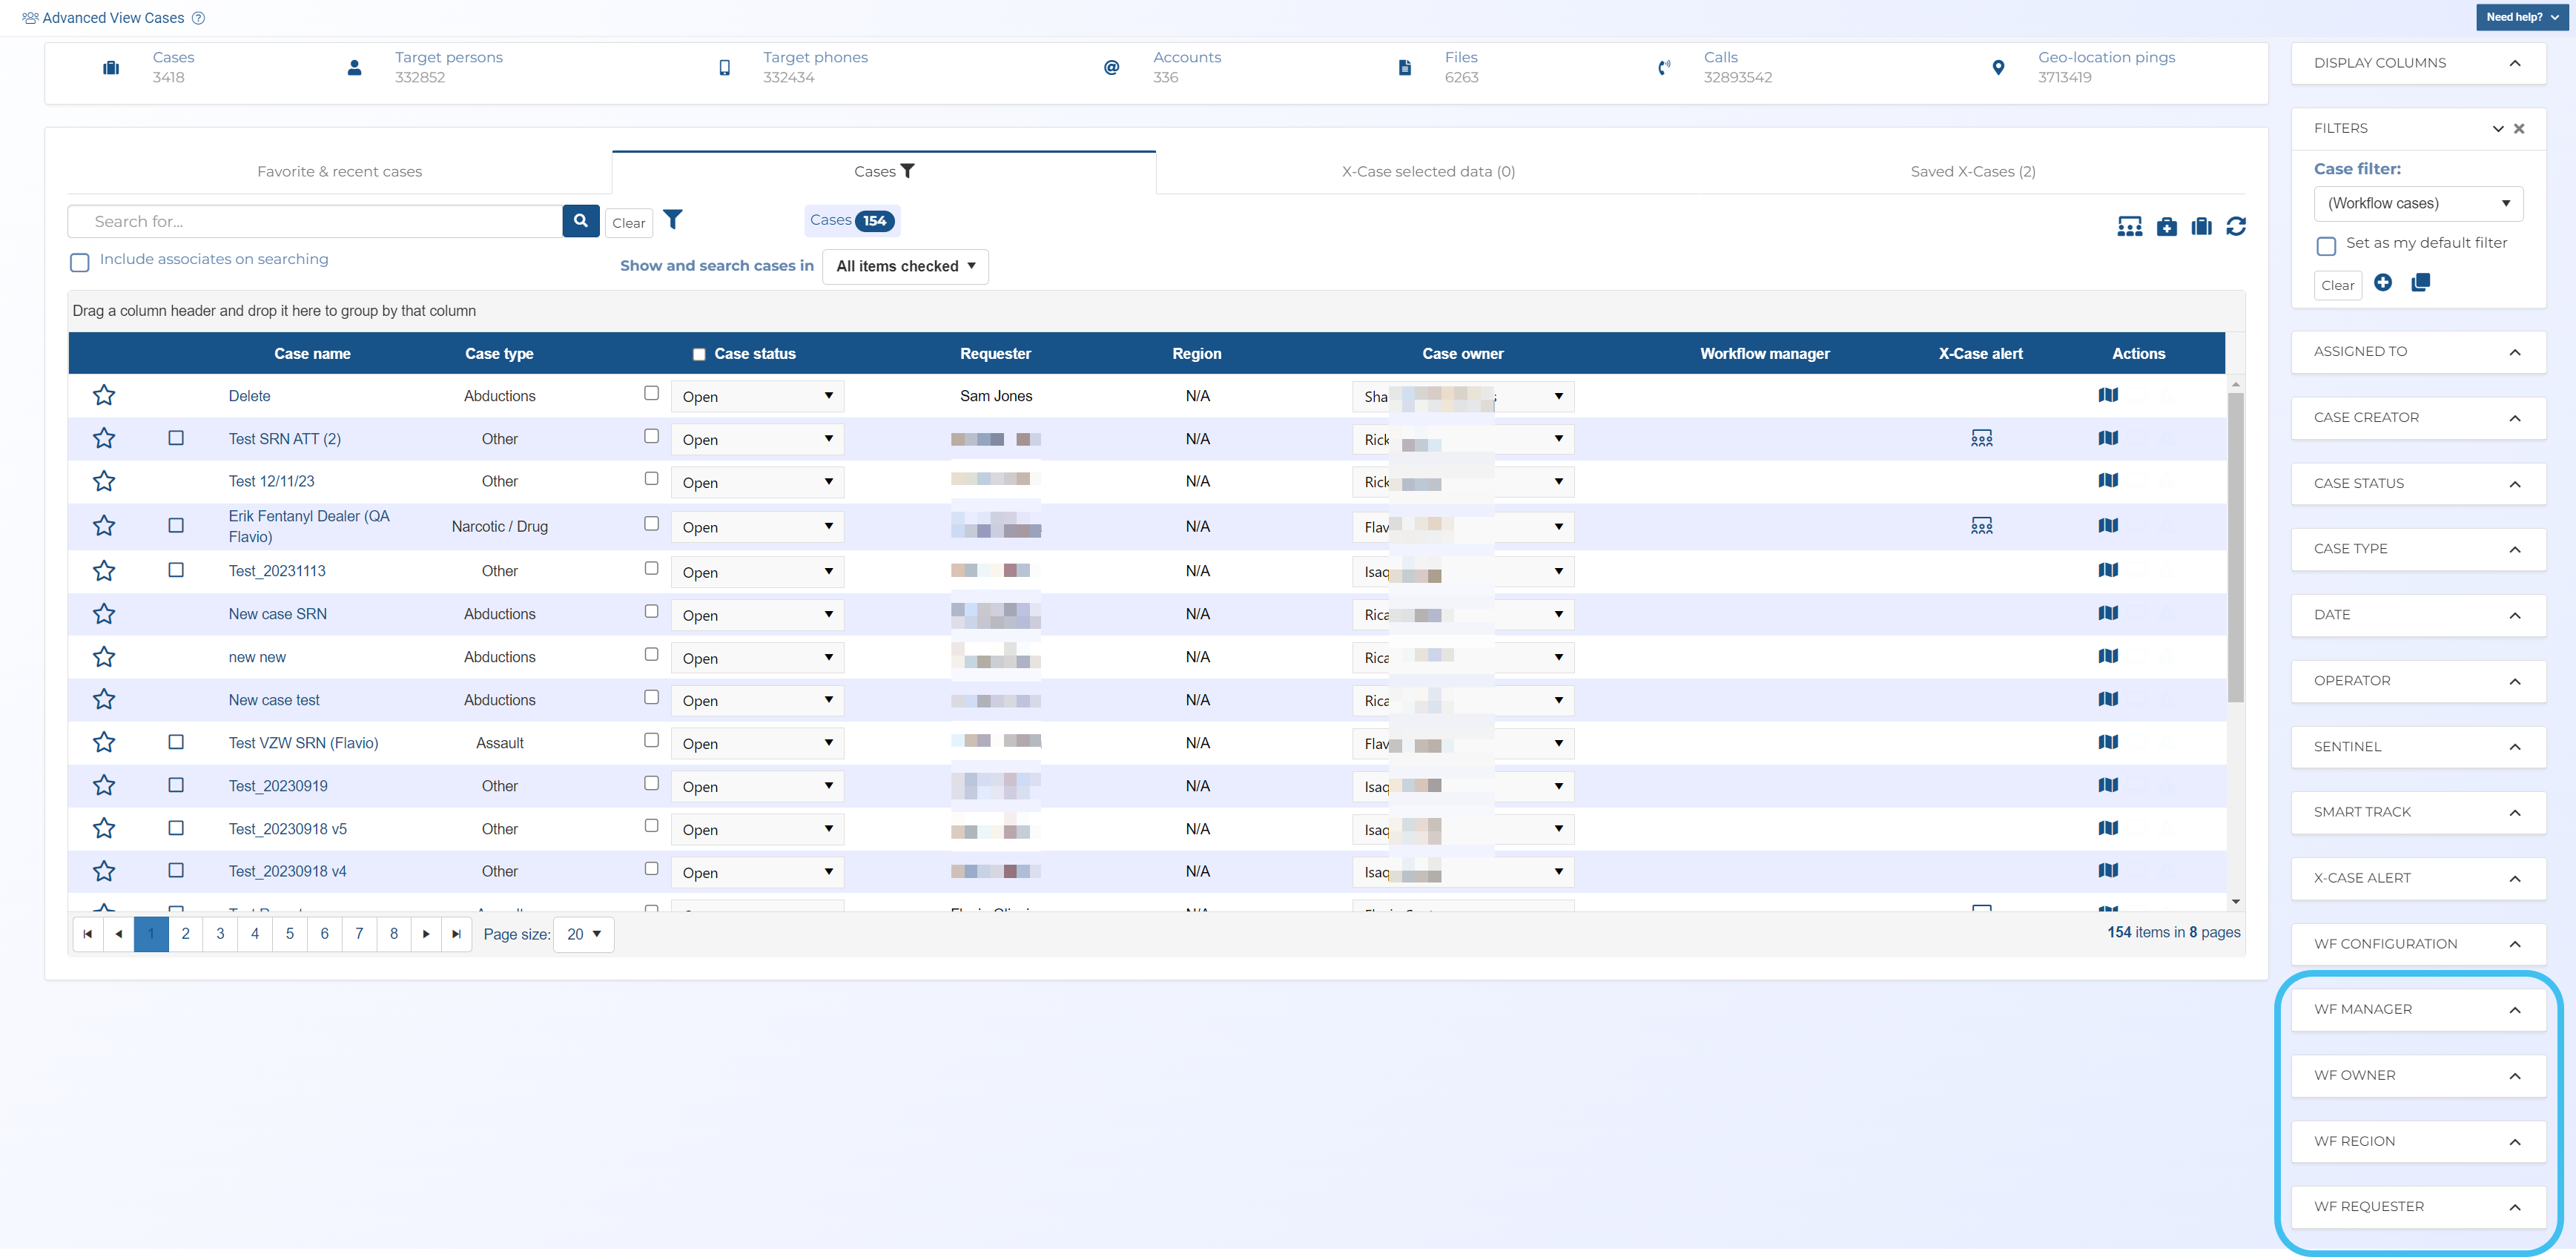
In Case filter, select Workflow cases.
The screen now only displays cases that were created using OSS-ESPA's workflow process which includes those created using the OSS-SRN Express Portal.
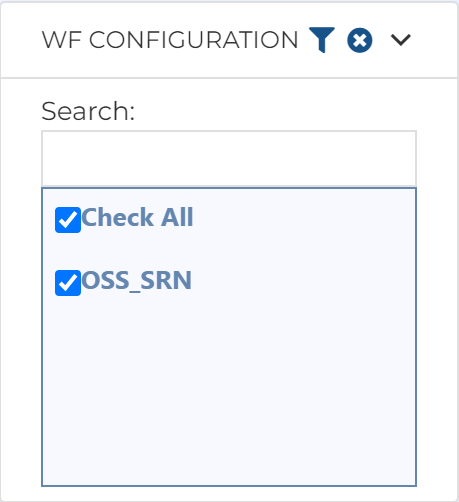
If there are other workflow cases that are not OSS-SRN cases you can filter them out by only selecting OSS_SRN in the WF configuration filter.
You can filter the cases displayed further using the other WF filters located at the bottom of the filter list. For example, if you only want to view cases that you created then you can filter on your name using the WF owner filter.
What can I do if I am having file import problems?
File import issues
When you attempt to import a file, a log file is automatically generated whether or not the file imports successfully. If you are having a file import issue you should refer to the log file as it may help you determine and resolve the issue.
On the Manage case screen, in the Case files section click for the file you want to download the log for.
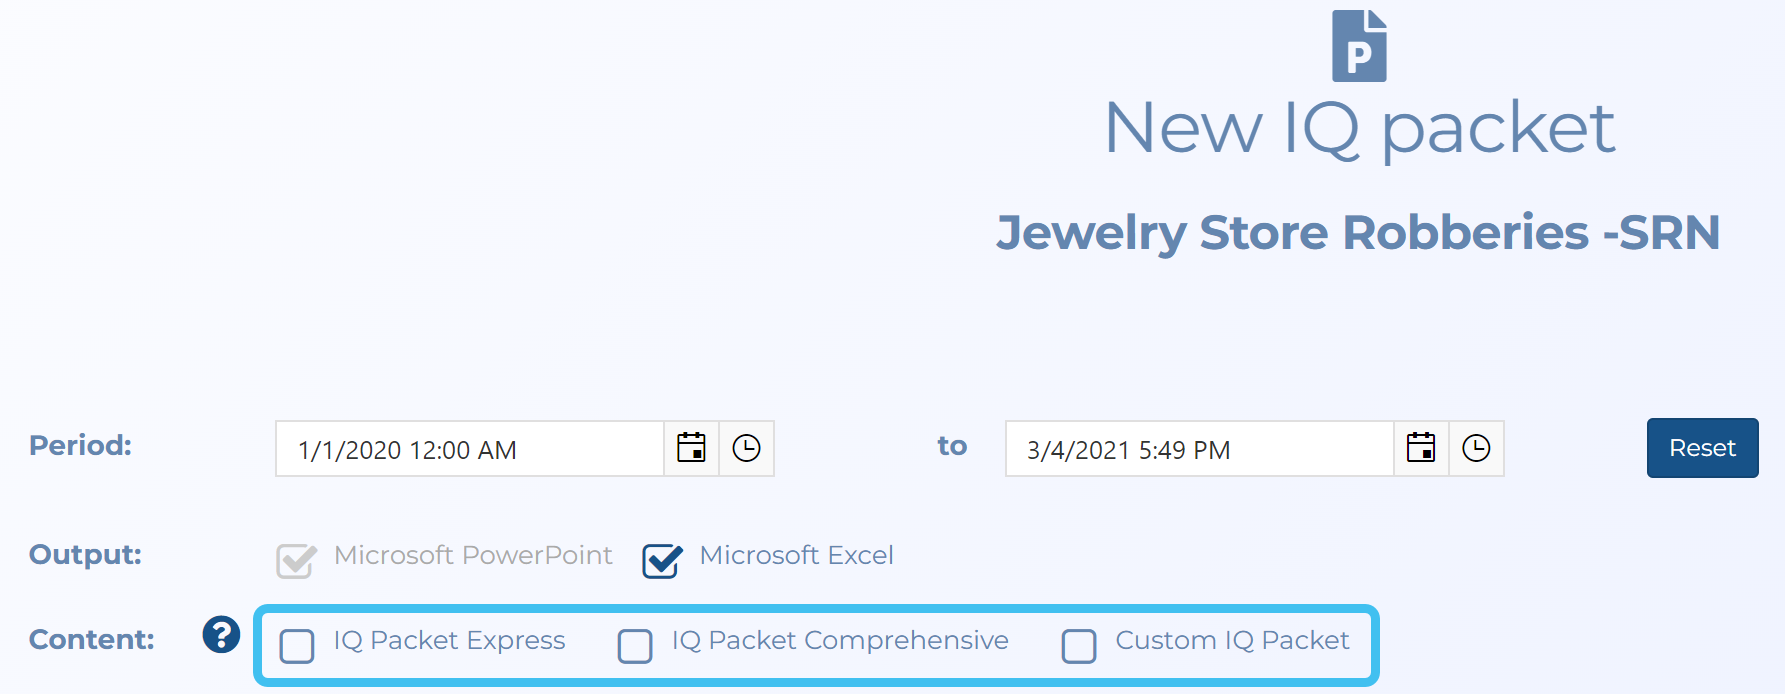
When you create an IQ packet report you can choose three options: IQ packet express, IQ packet comprehensive and Custom IQ packet. For further information on each of these refer to Content.
What is the difference between a location of interest and an analysis location?
Understanding location analytics
In OSS-ESPA there are two types of locations you can enter:
the first is referred to as a View location and is simply a location that is of interest that displays on the ESPA analysis centerscreen and the IQ packet report's map views. This requires you to enter the location's Latitude and Longitude. These can also be added by entering the Street address, Postal code then clicking Locate.
the second is referred to as an Analysis location, for example a crime scene, that compares the wireless records against the location producing a number of analyses that use the location. If you want the location included in analyses you must set the Time buffer, Event Start, Event end, Location buffer, Latitude and Longitude. You must also also select Include this location in analytics if you want to:
ensure that OSS-ESPA verifies you have completed all the settings required for the location to be included in all other analyses when you click Save. The settings required are: the Time buffer, Latitude, Longitude, Event start, Event end and Location buffer.
If you select a location to be an analysis location then OSS-ESPA can perform a variety of analyses on it which can help you determine if the target phone was near the target location during the event. If it was, then OSS-ESPA identifies all contacted phone numbers, and if it was not then it identifies the phone’s location during the event. In either situation it also:
identifies the tower’s distance to the target location.
identifies if the target phone was near the target location before and after the event.
identifies if the target phone was near the target location at the same time on a previous day.
plots out the phone’s whereabouts before and after the event of interest.
 Using Case management
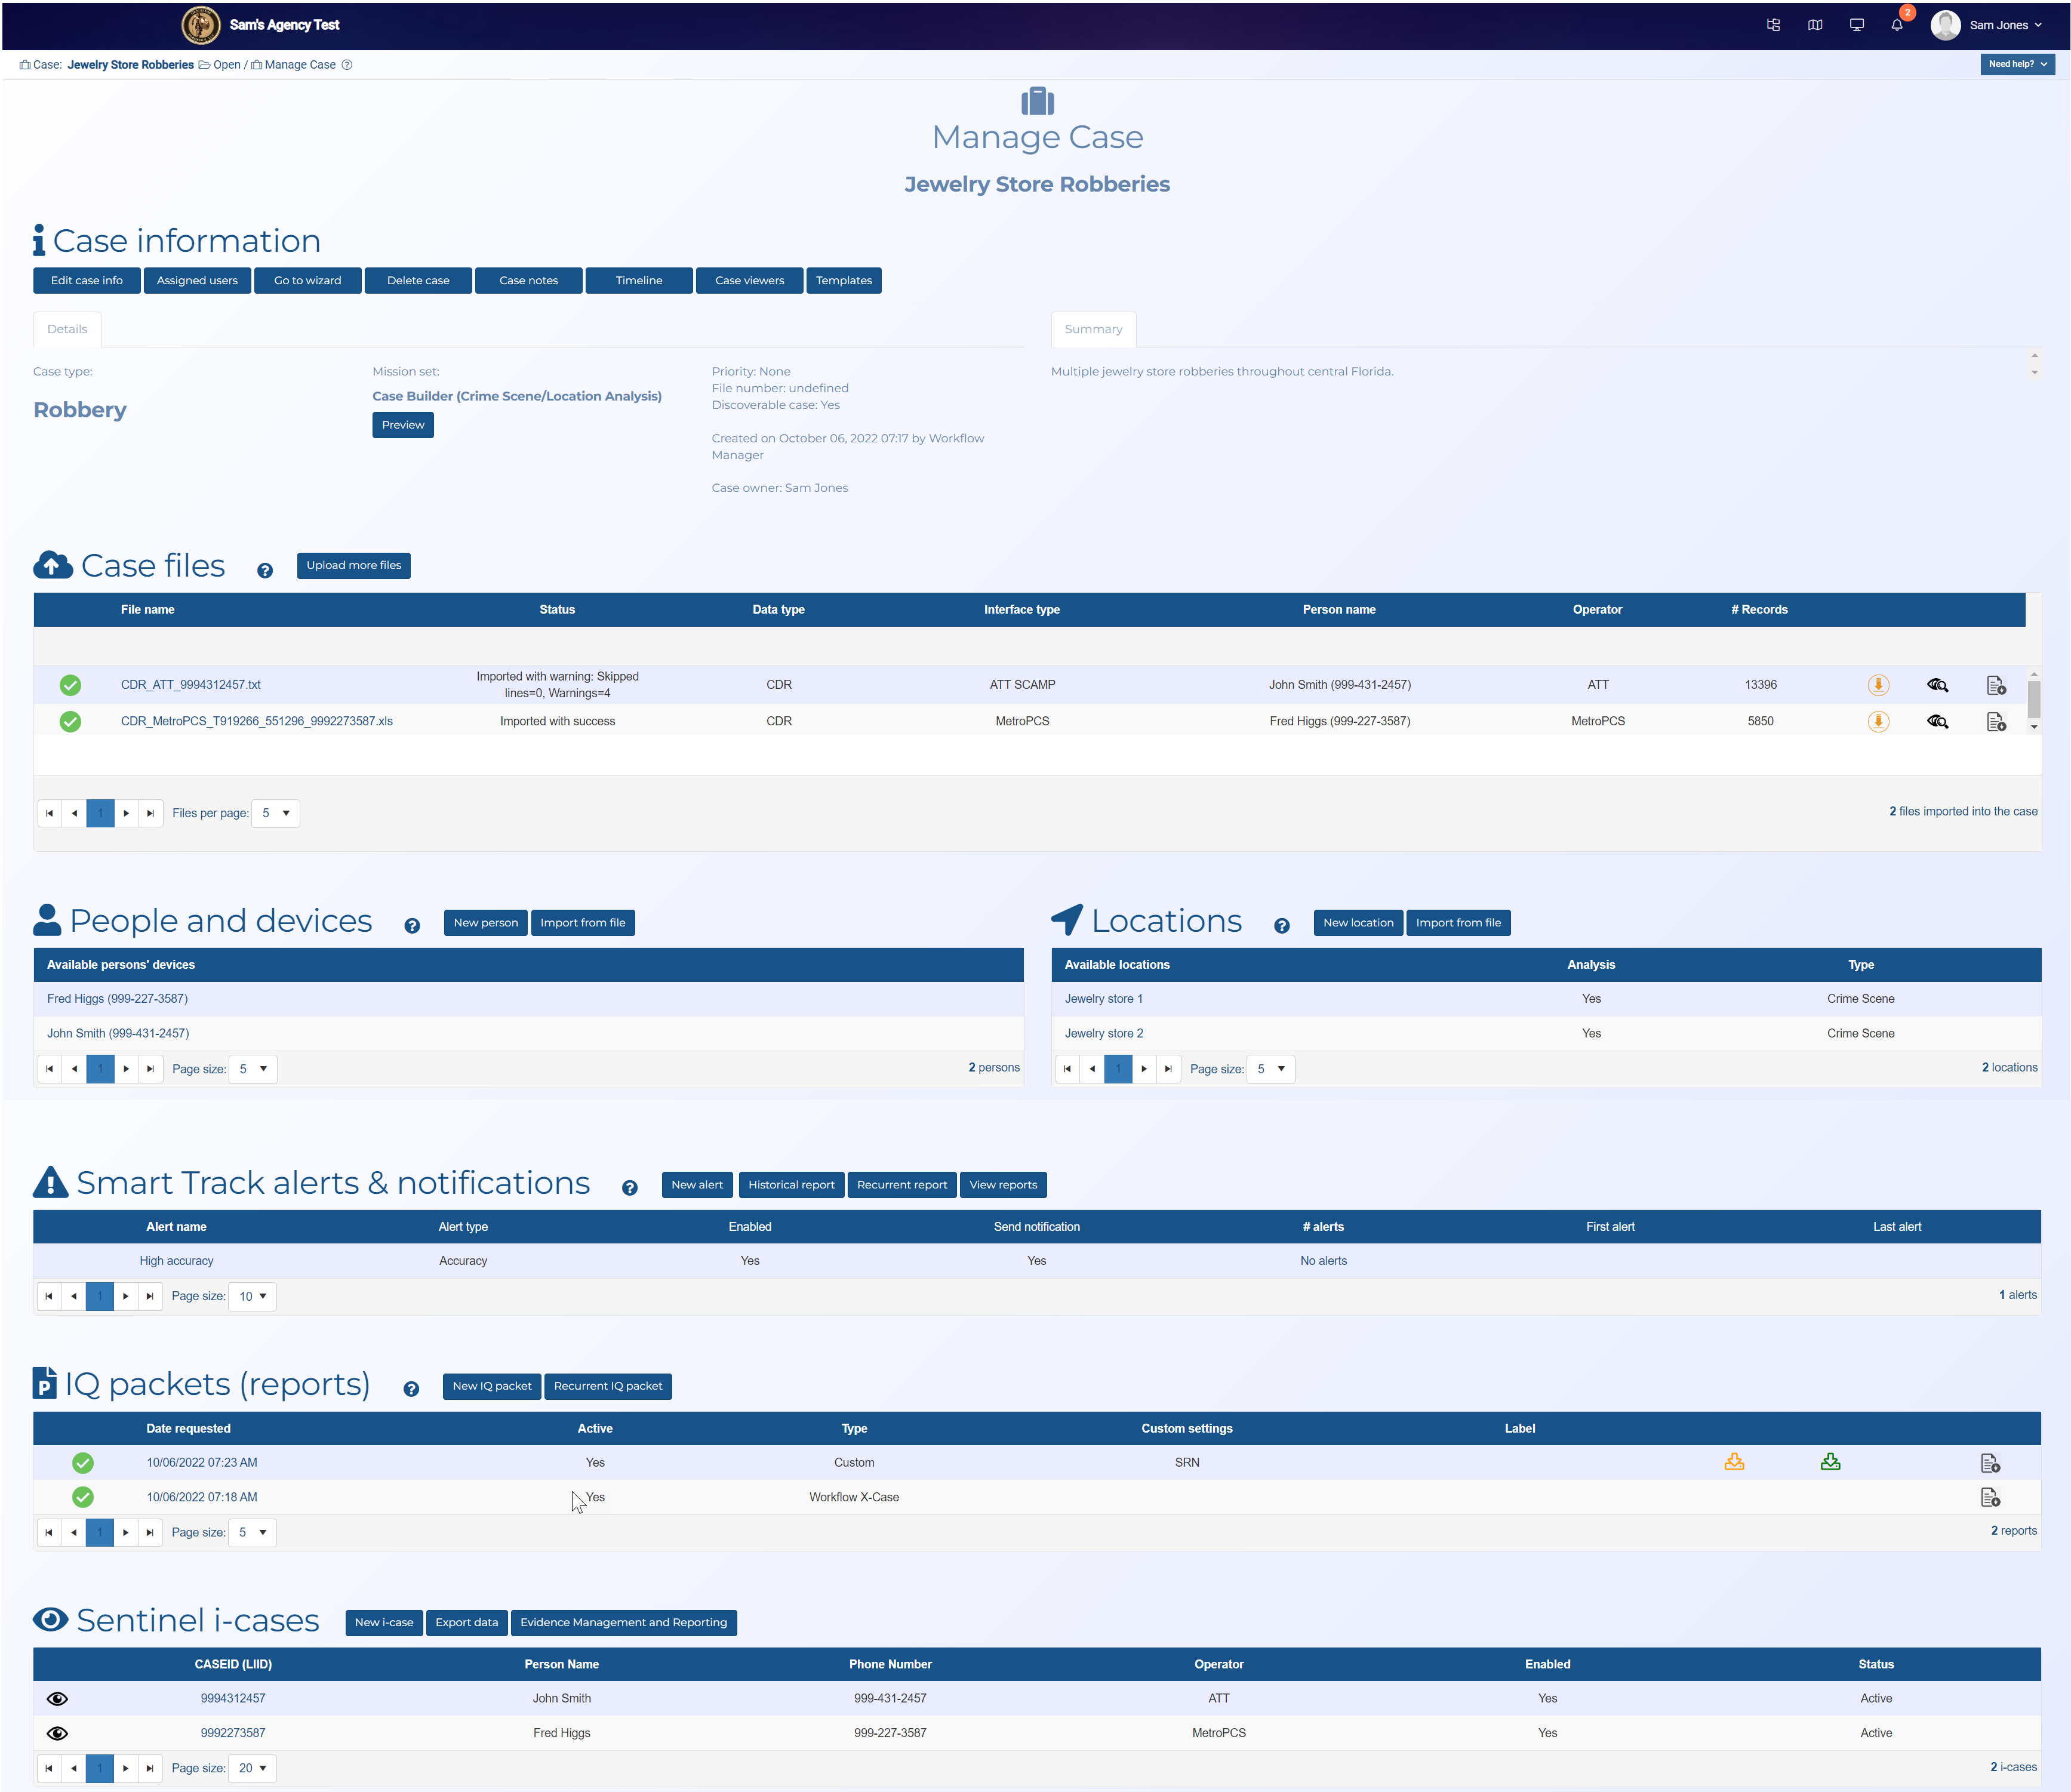


 to save the X-Case. The X-Case is displayed on the
  to open the
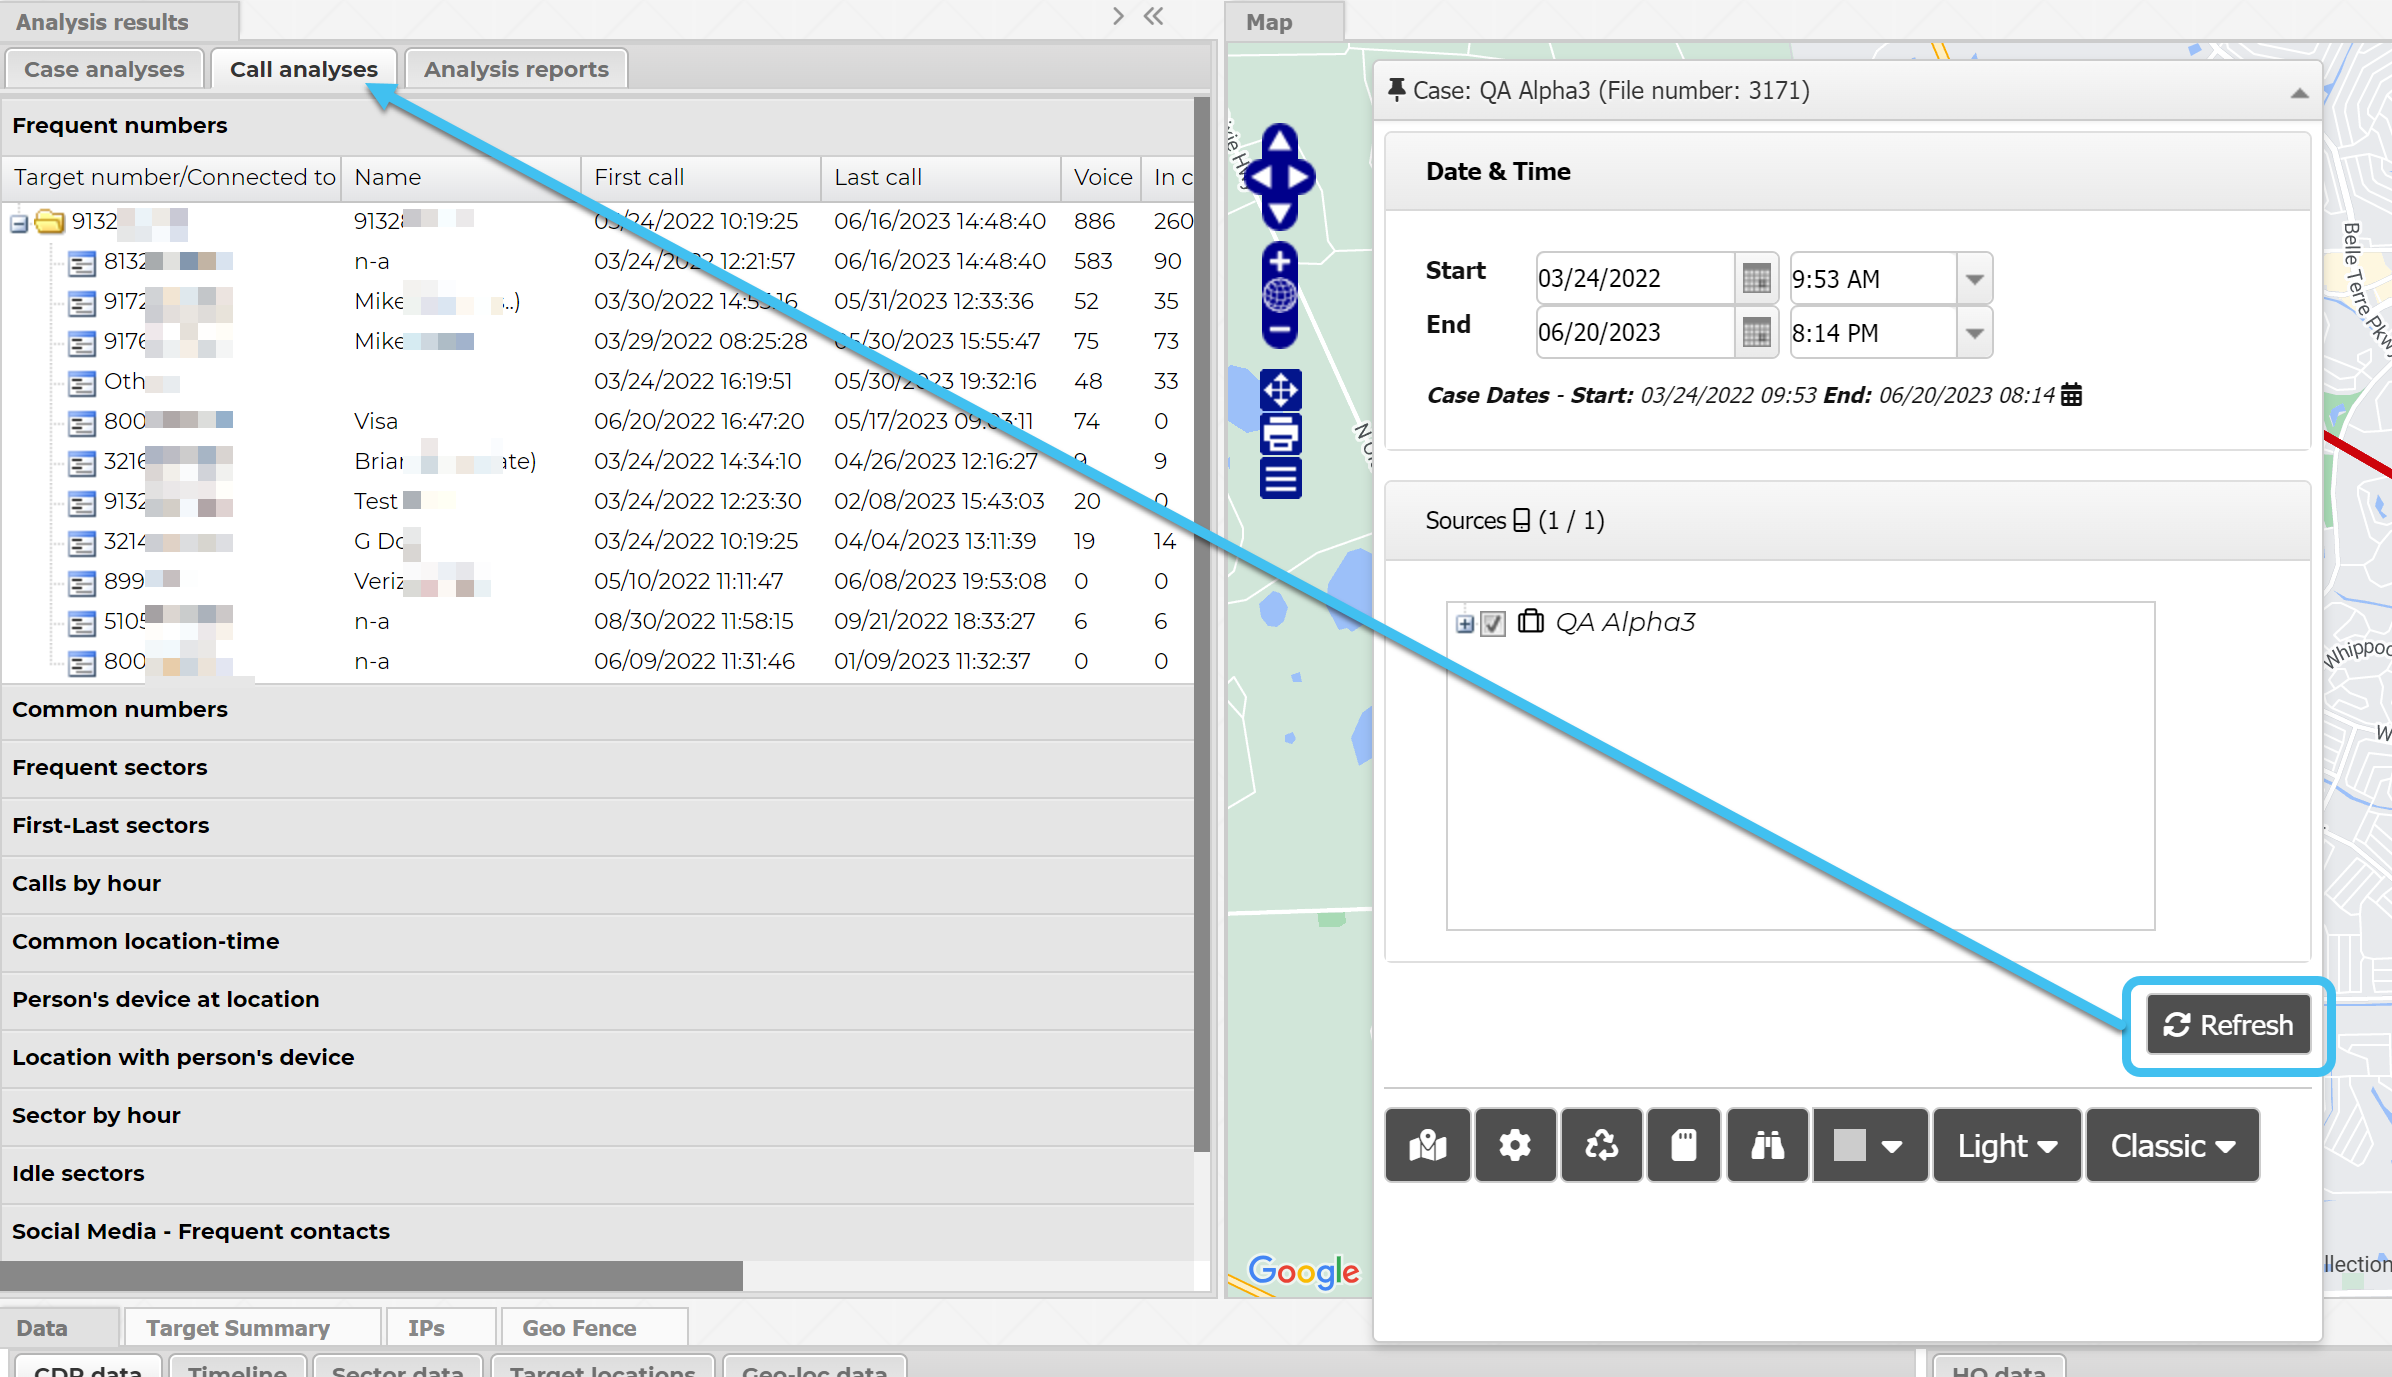

 to open the
  at the top-right of the screen to open either the
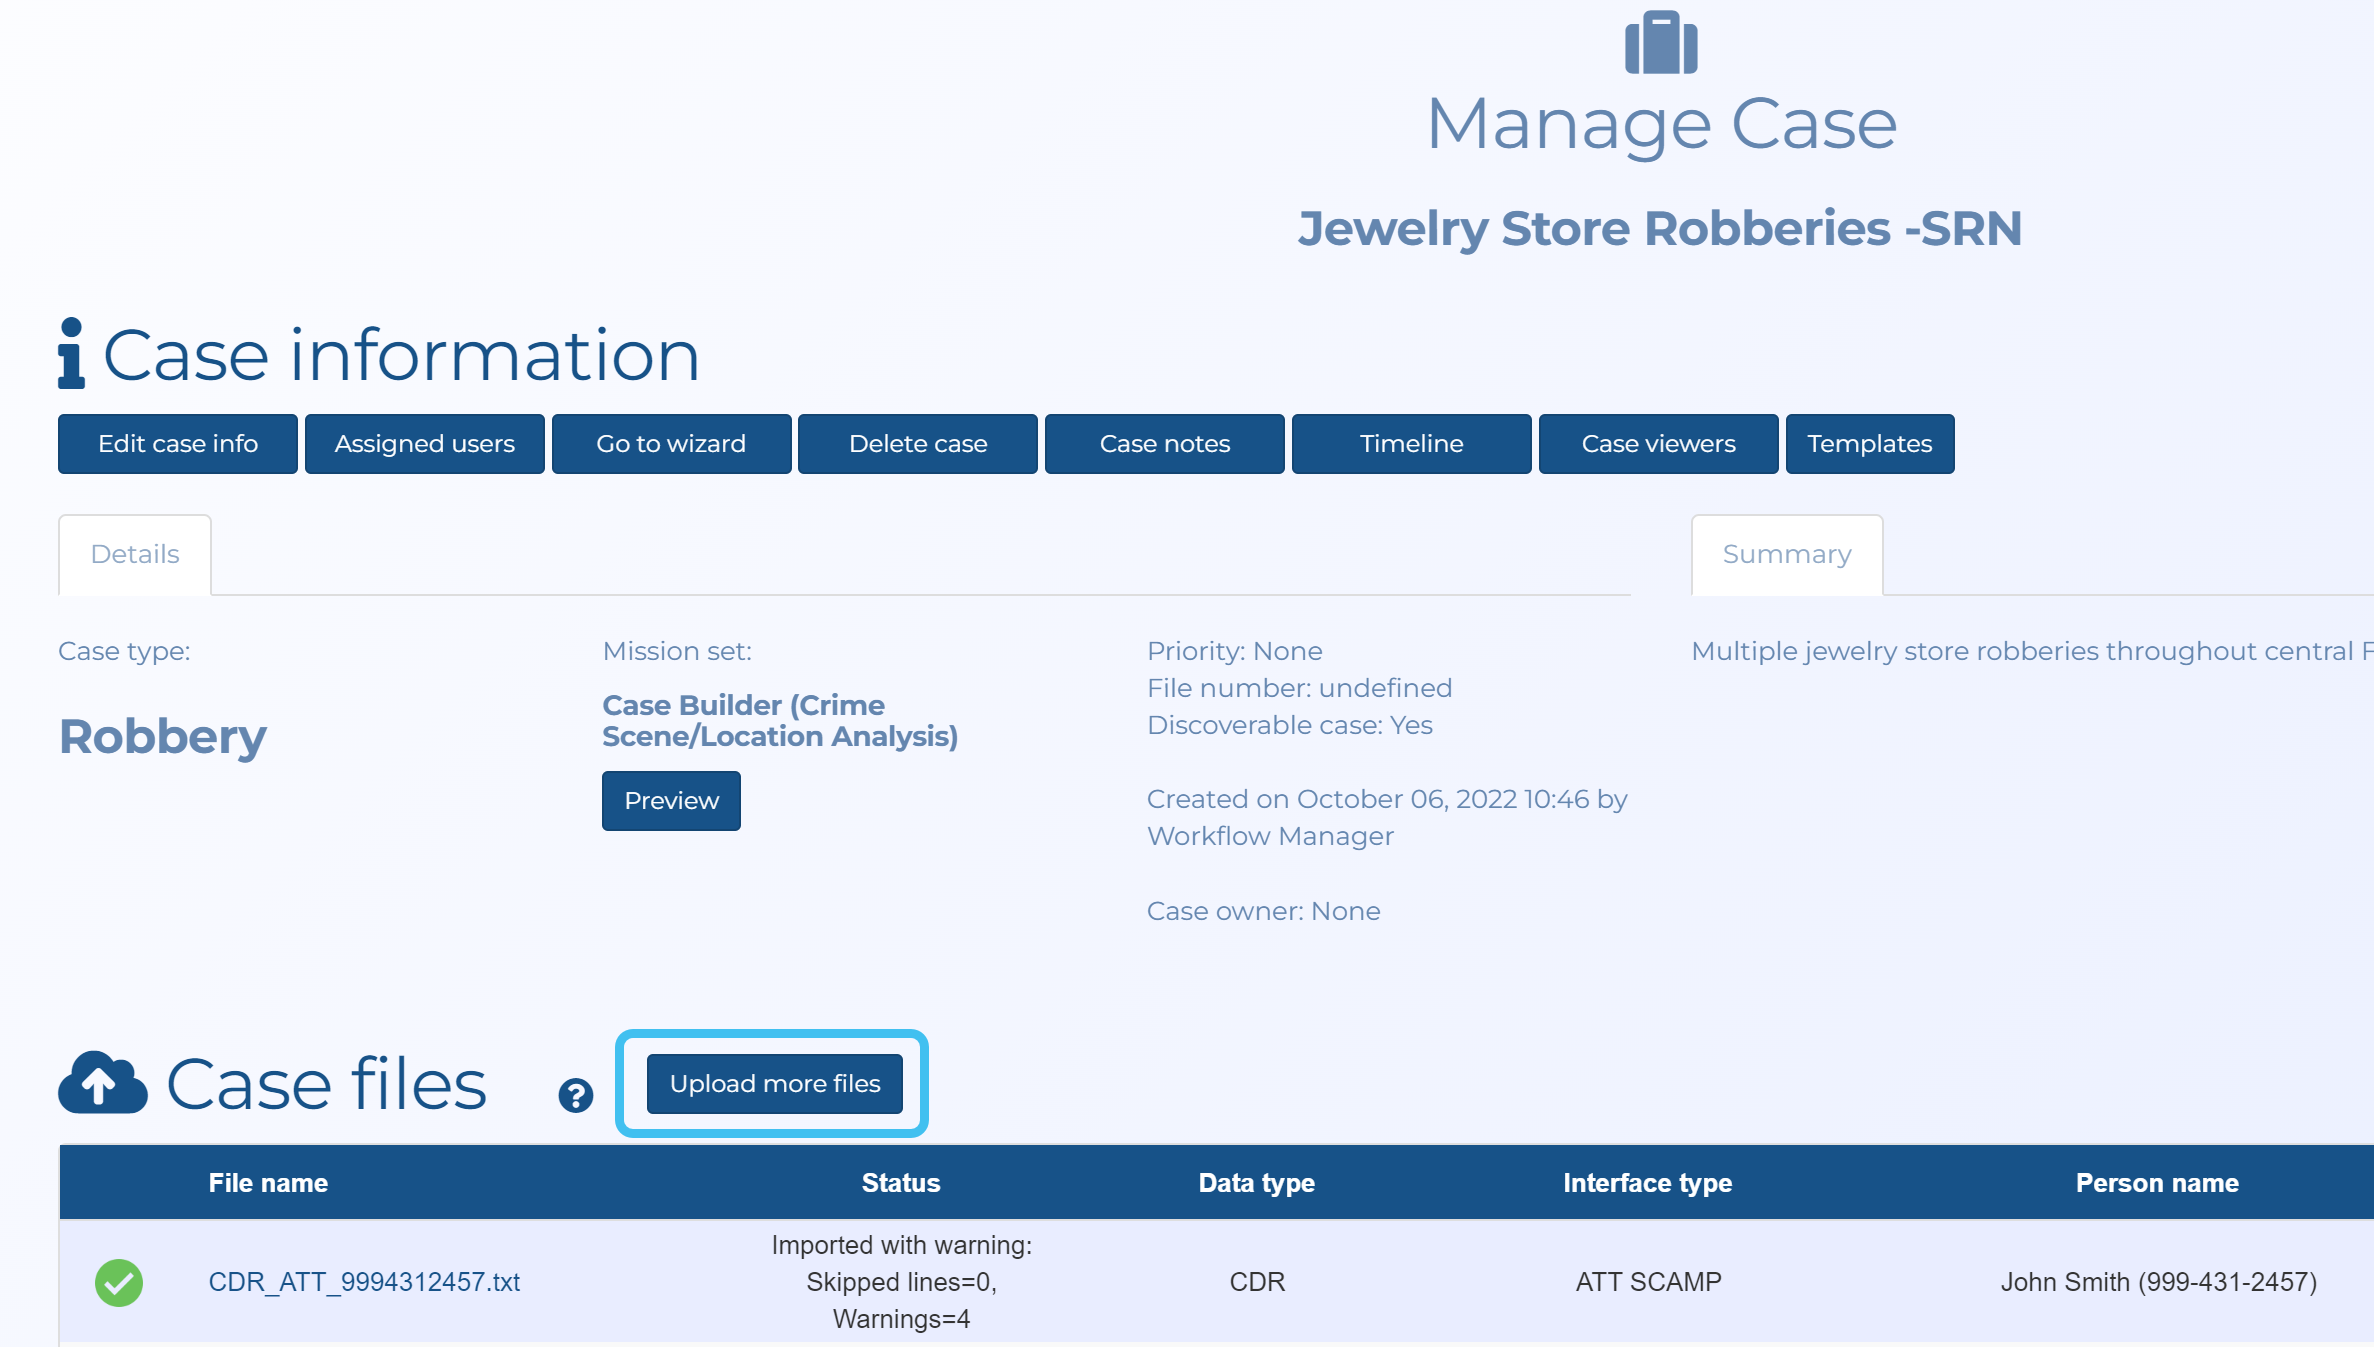


 to view the public records details, and click on
  to use their name from the public records. Note, that currently the name is used throughout
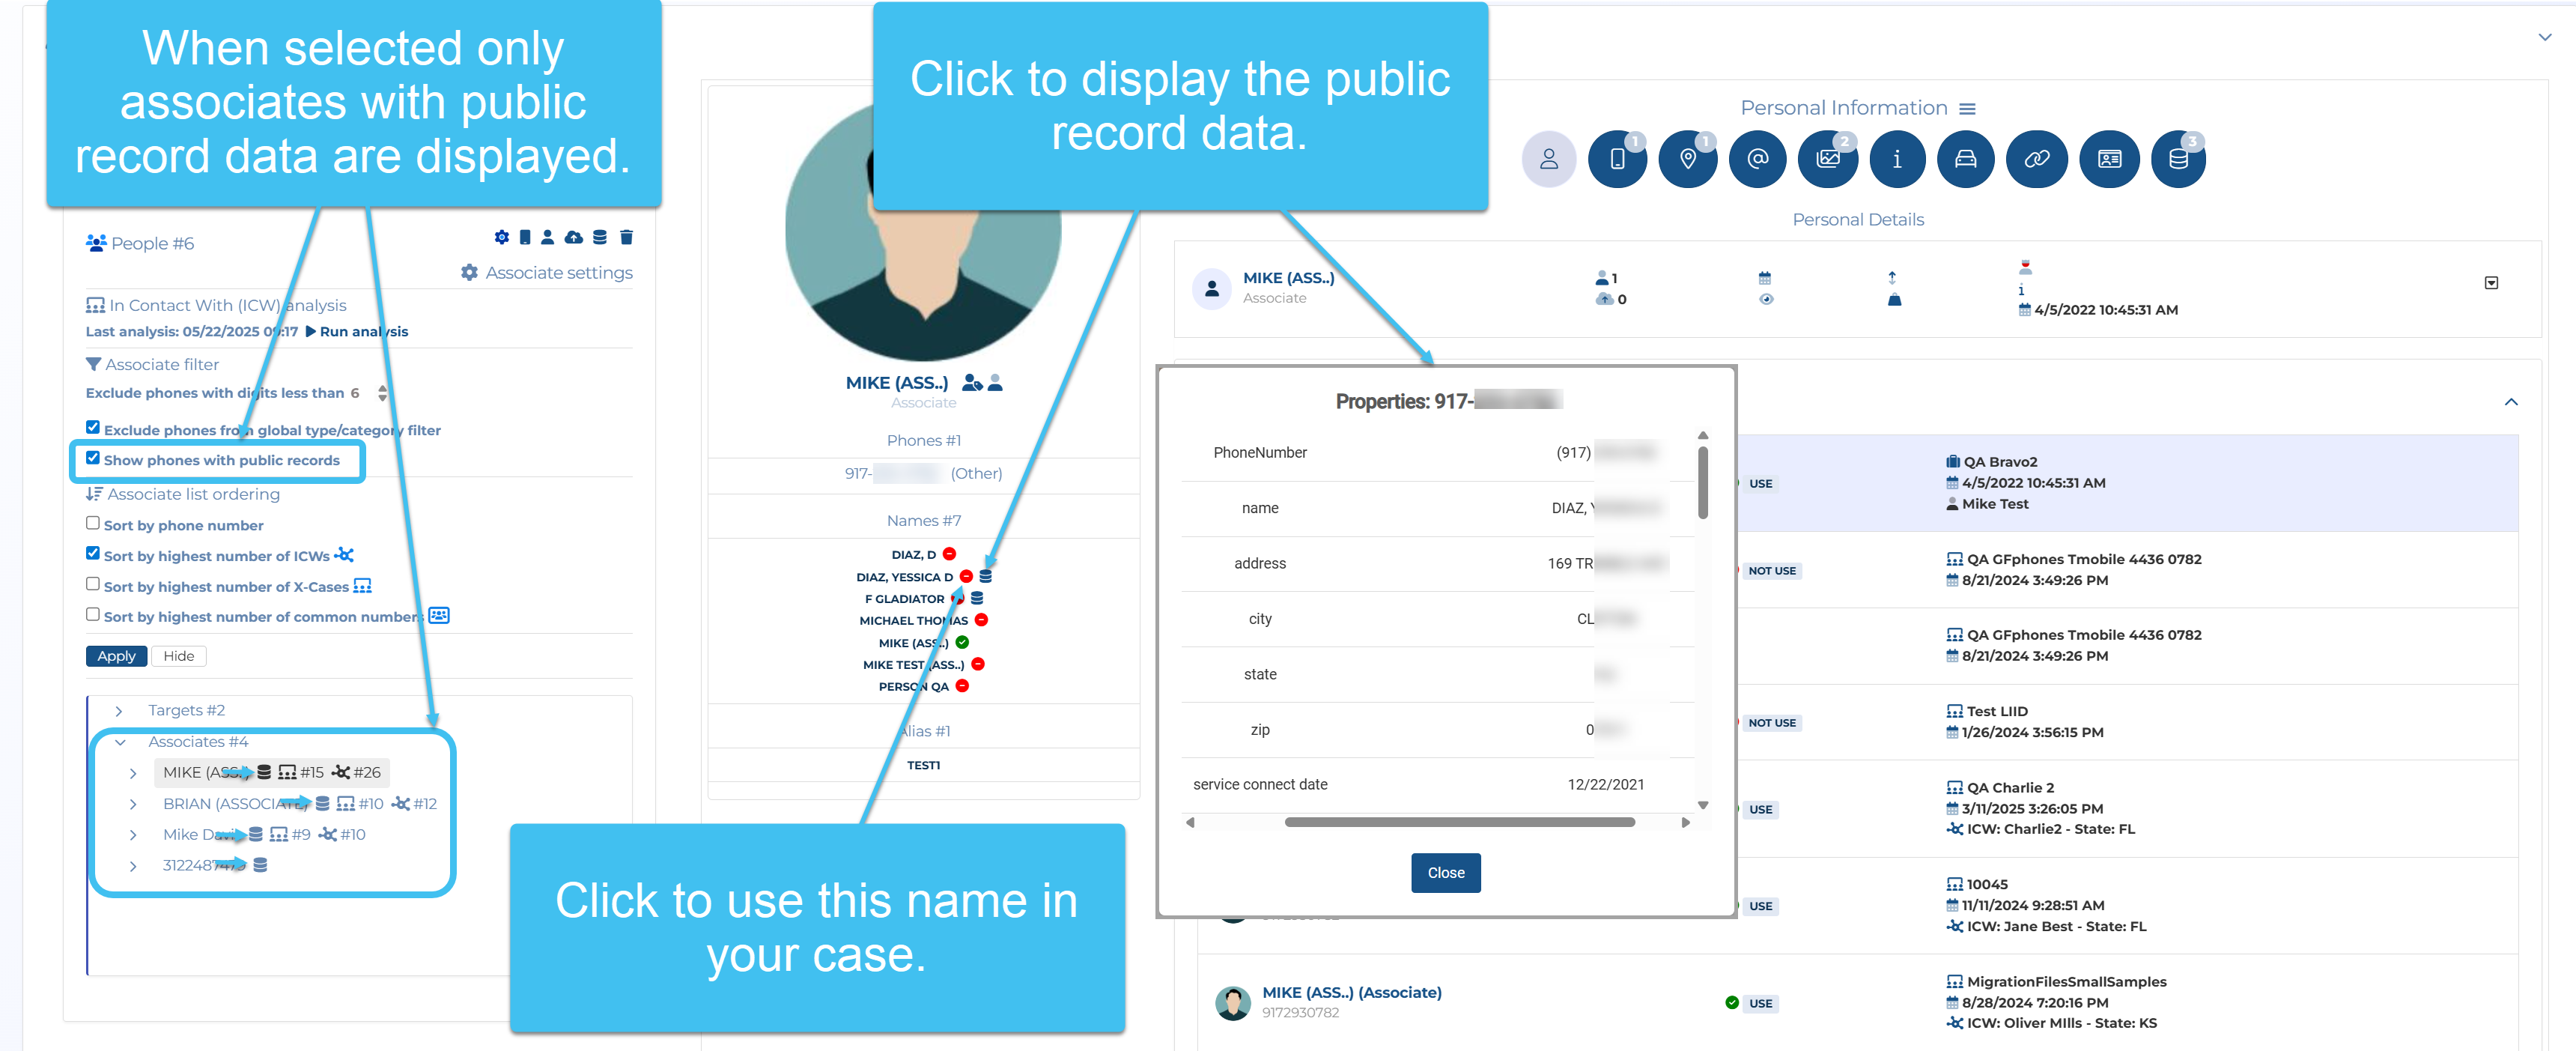


 for the file you want to download the log for.