Using public record files when investigating a case
This topic describes how to use public record files cases.
This feature requires option E6 Public records data. If you do not have this option this feature is not available.
Public record files are generated from tools such as Thomson Reuters CLEAR files and Whooster, and allow you to do reverse phone number look-up. This allows you to correlate phone numbers from the CDRs with names and address of the owners of those numbers.
There are two methods of importing public records into OSS-ESPA:
- The preferred method for public records that are from Thomson Reuters CLEAR or Whooster, is for you to use the CLEAR or Whooster request feature which is available from multiple locations in OSS-ESPA as detailed in the following procedures. Using this method OSS-ESPA automatically exports the phone numbers you are interested in directly to Thomson Reuters CLEAR or Whooster then automatically imports the public record data into OSS-ESPA. You will receive an email when the CLEAR or Whooster request is complete and the data is available for you to use in OSS-ESPA. In order to use the CLEAR request feature your administrator must first provide Gladiator Forensics with your organization's CLEAR certificate which you can obtain from your Thomson Reuters CLEAR representative. Gladiator Forensics will then apply your CLEAR certificate to your OSS-ESPA account. Your administrator must also enter your organization's User ID and Password for CLEAR, or API key for Whooster.
-
The alternative method can be used for public records from other applications or files you have created. This method is a manual process. Using the ESPA analysis center screen, OSS-ESPA allows you to generate a .csv file containing phone numbers of interest. This list is then imported into a public record tool which generates a public record file in .csv format. You can then upload the public record file to OSS-ESPA.
NOTE: You can also use this feature to import .csv files you've created yourself which contain names, phone numbers and other data. For further information refer to Manage files screen.
Once uploaded the records are available to view and use in People and devices and on the Public records tab.
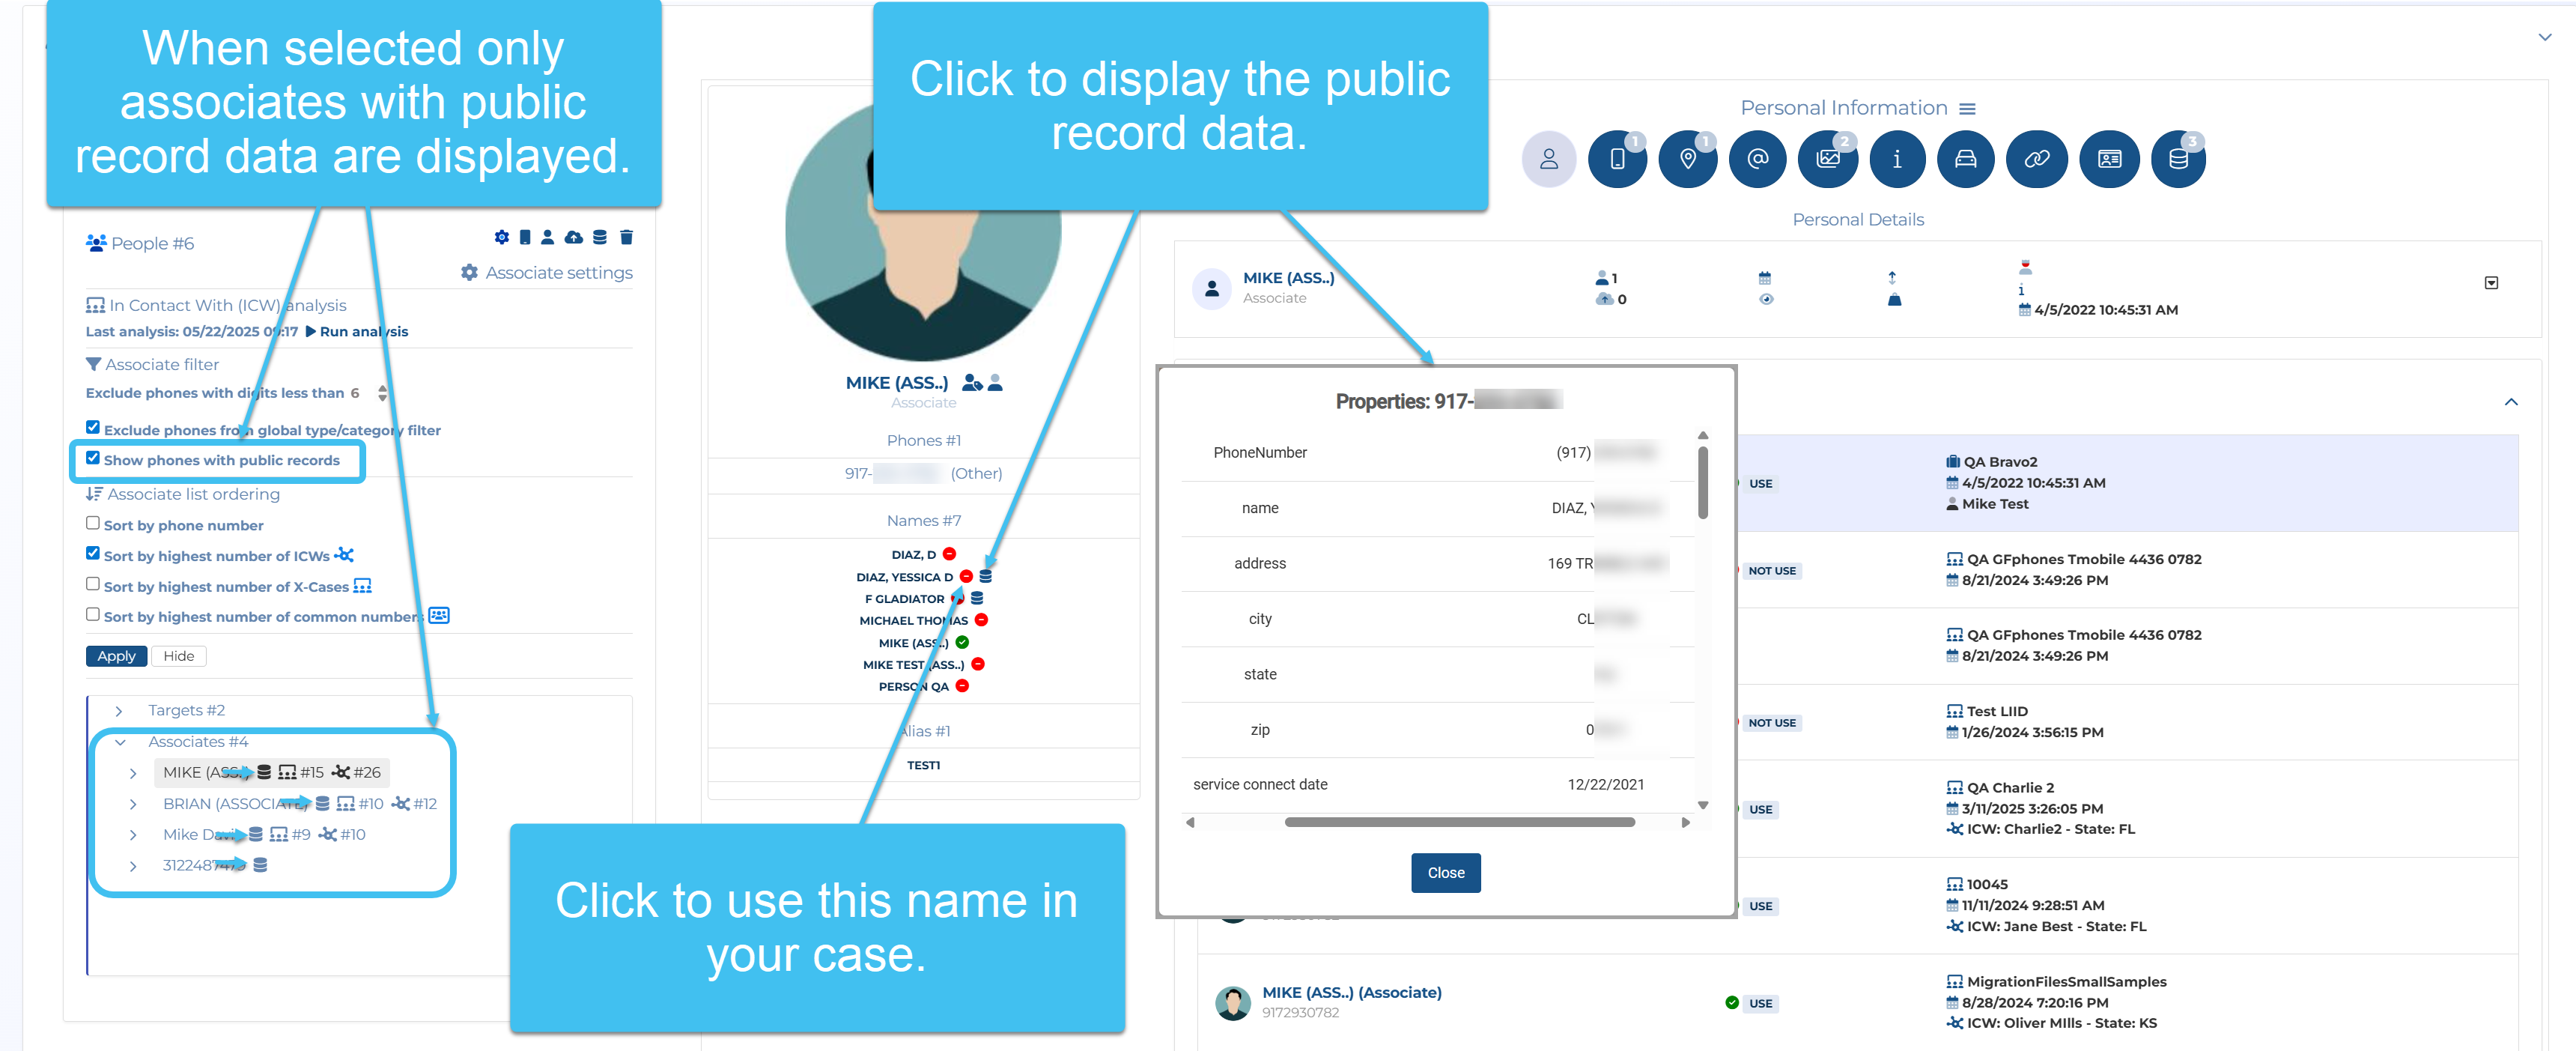
The Show phones with public records setting on People and devices allows you to filter the associate records so that you only display those which have public records. You can then click on the associate's name, then click on  to view the public records details, and click on
  to use their name from the public records. Note, that currently the name is used throughout OSS-ESPA with the exception of the ESPA analysis center that currently the names selected on the Public records tab.
Once uploaded the records are available on the ESPA analysis center screen for you to use in your investigation. The records are displayed on the Public records tab and on the map. You can select on an individual basis which records you want to use in your case. When you select to use a record the name associated with that record is then automatically displayed on the CDR data tab, the Timeline tab and the Call analysis tab.
The following graphics provide overviews of how public record data is used on the ESPA analysis center screen.
-
This graphic displays how and where the names are displayed on the ESPA analysis center.

-
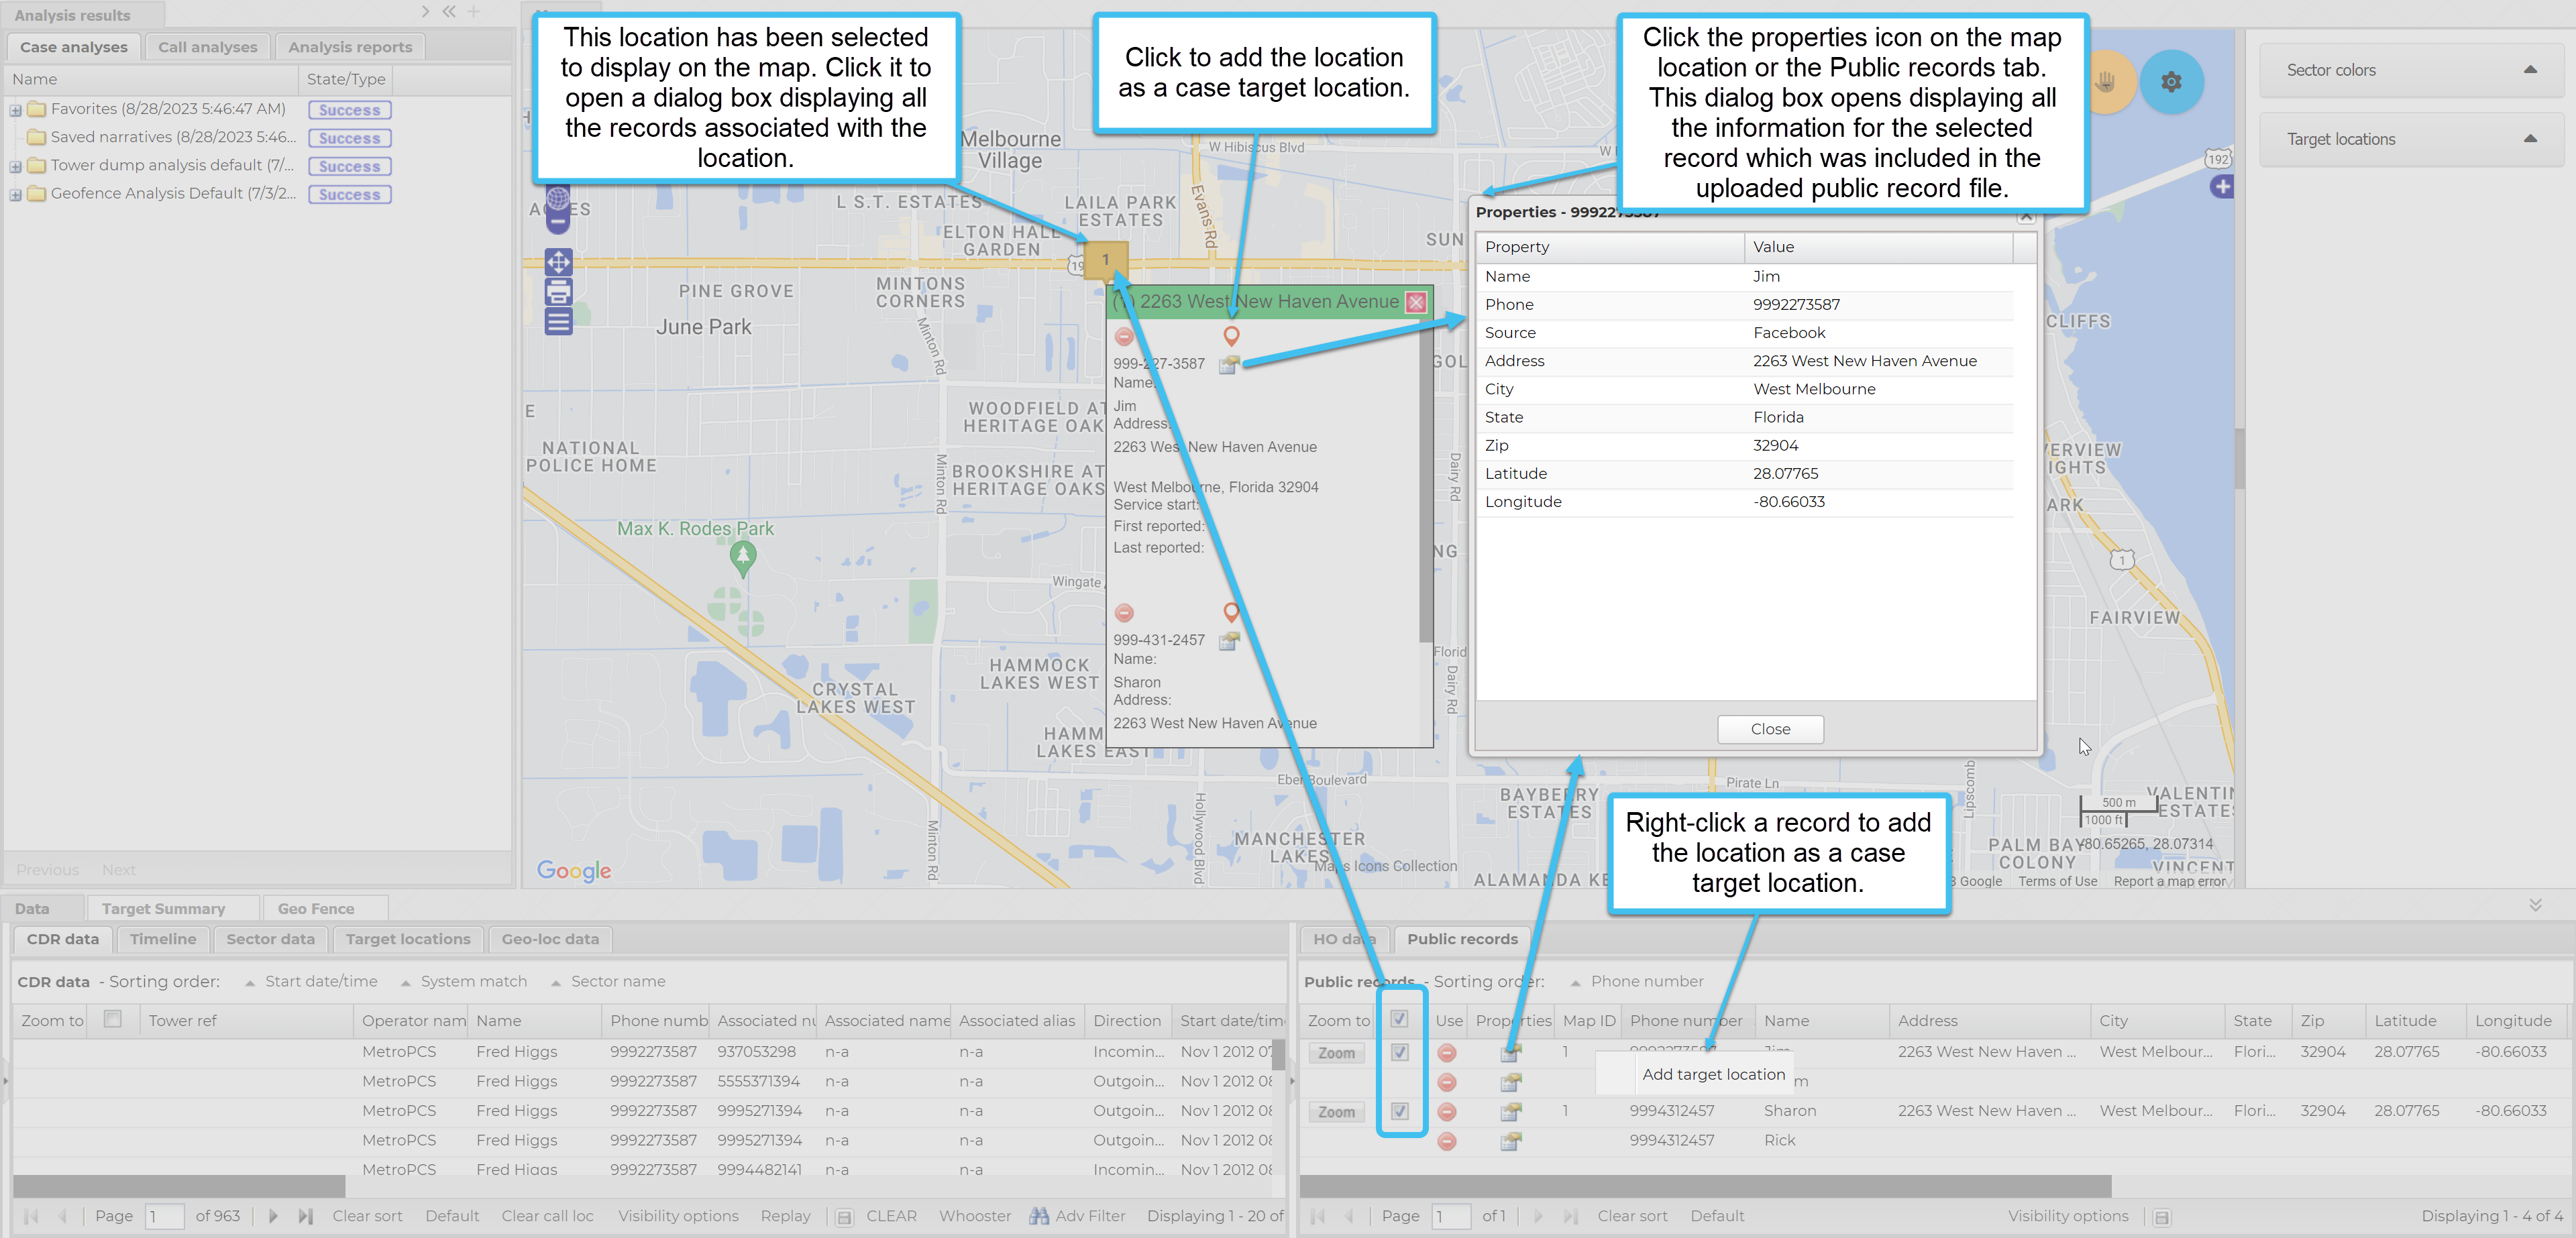
This graphic displays how the location markers and location properties are displayed on theESPA analysis center. If required you can add the location to your case from both the map and the Public records tab as shown in the graphic.
If you have an account which includes IQ packets then the public record data is included in your IQ packet's common and frequent analyses results.
Using public record files when investigating a case
-
For the case you want to do a CLEAR or Whooster match on, open the Manage case screen.
 Need help finding your case?
On the main menu click View cases. The screen that opens depends on your setting of View cases. If it is set to:
- Advanced view, then the Advanced view cases screen opens.
- If your case is listed on the Favorite & recent cases tab, click the case name to open the Manage case screen.
- If it is not listed on the Favorite & recent cases tab, then click the Cases tab. Use the search filters to help locate your case. You can also click
 to open the FILTERS group which allows you to set your own default filter defining what is displayed on this tab, for example you may wish to set it to cases that you created which are currently open.
For further information refer to Searching for a case.
- Grid view, then the View cases screen opens.
- If your case is listed under My recent cases click it to open the Manage case screen.
- If it is not listed under My recent cases then select your case from the table, using the search filters to help locate it if required. Note, by default the search is set to only display cases that you created; if you are not the original creator but an assignee then ensure you set Case filter to Assigned cases before clicking Search.
- Tree view, then the View i-cases screen opens.
- Click
 at the top-right of the screen to open either the View Cases or Advanced view cases screen and follow the above description.
- Click
- Advanced view, then the Advanced view cases screen opens.
-
On the Manage case screen click People and devices.
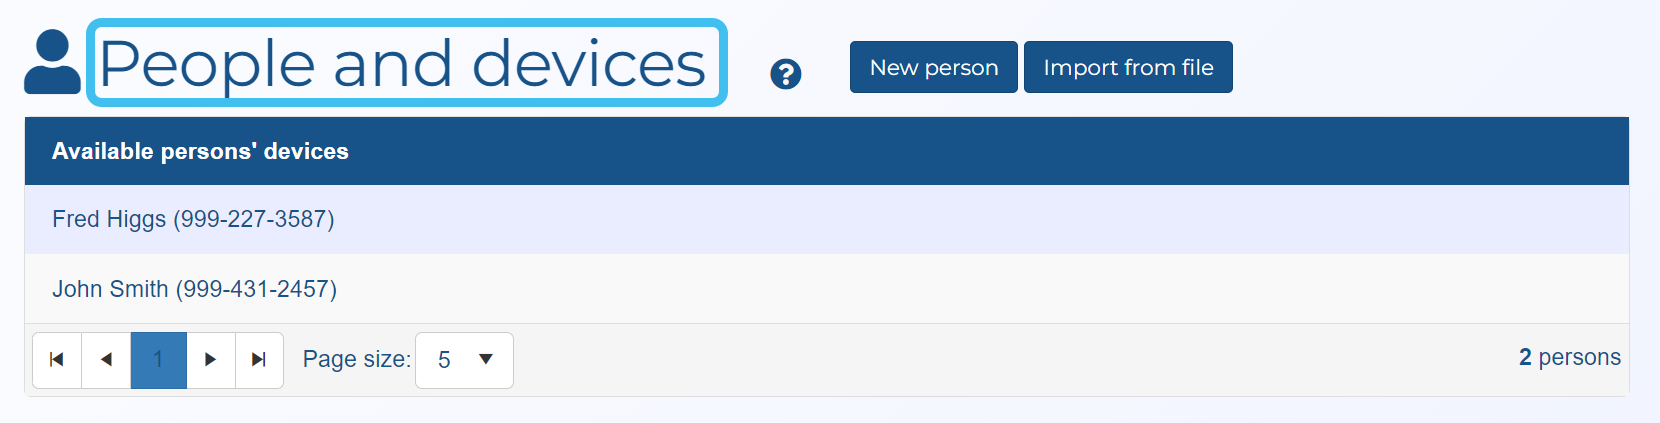
The People and devices screen opens.
-
Click
 , then in the Public Records Request Wizard dialog box select the check-boxes next to the names you want to do a CLEAR or Whooster match on then click Request.
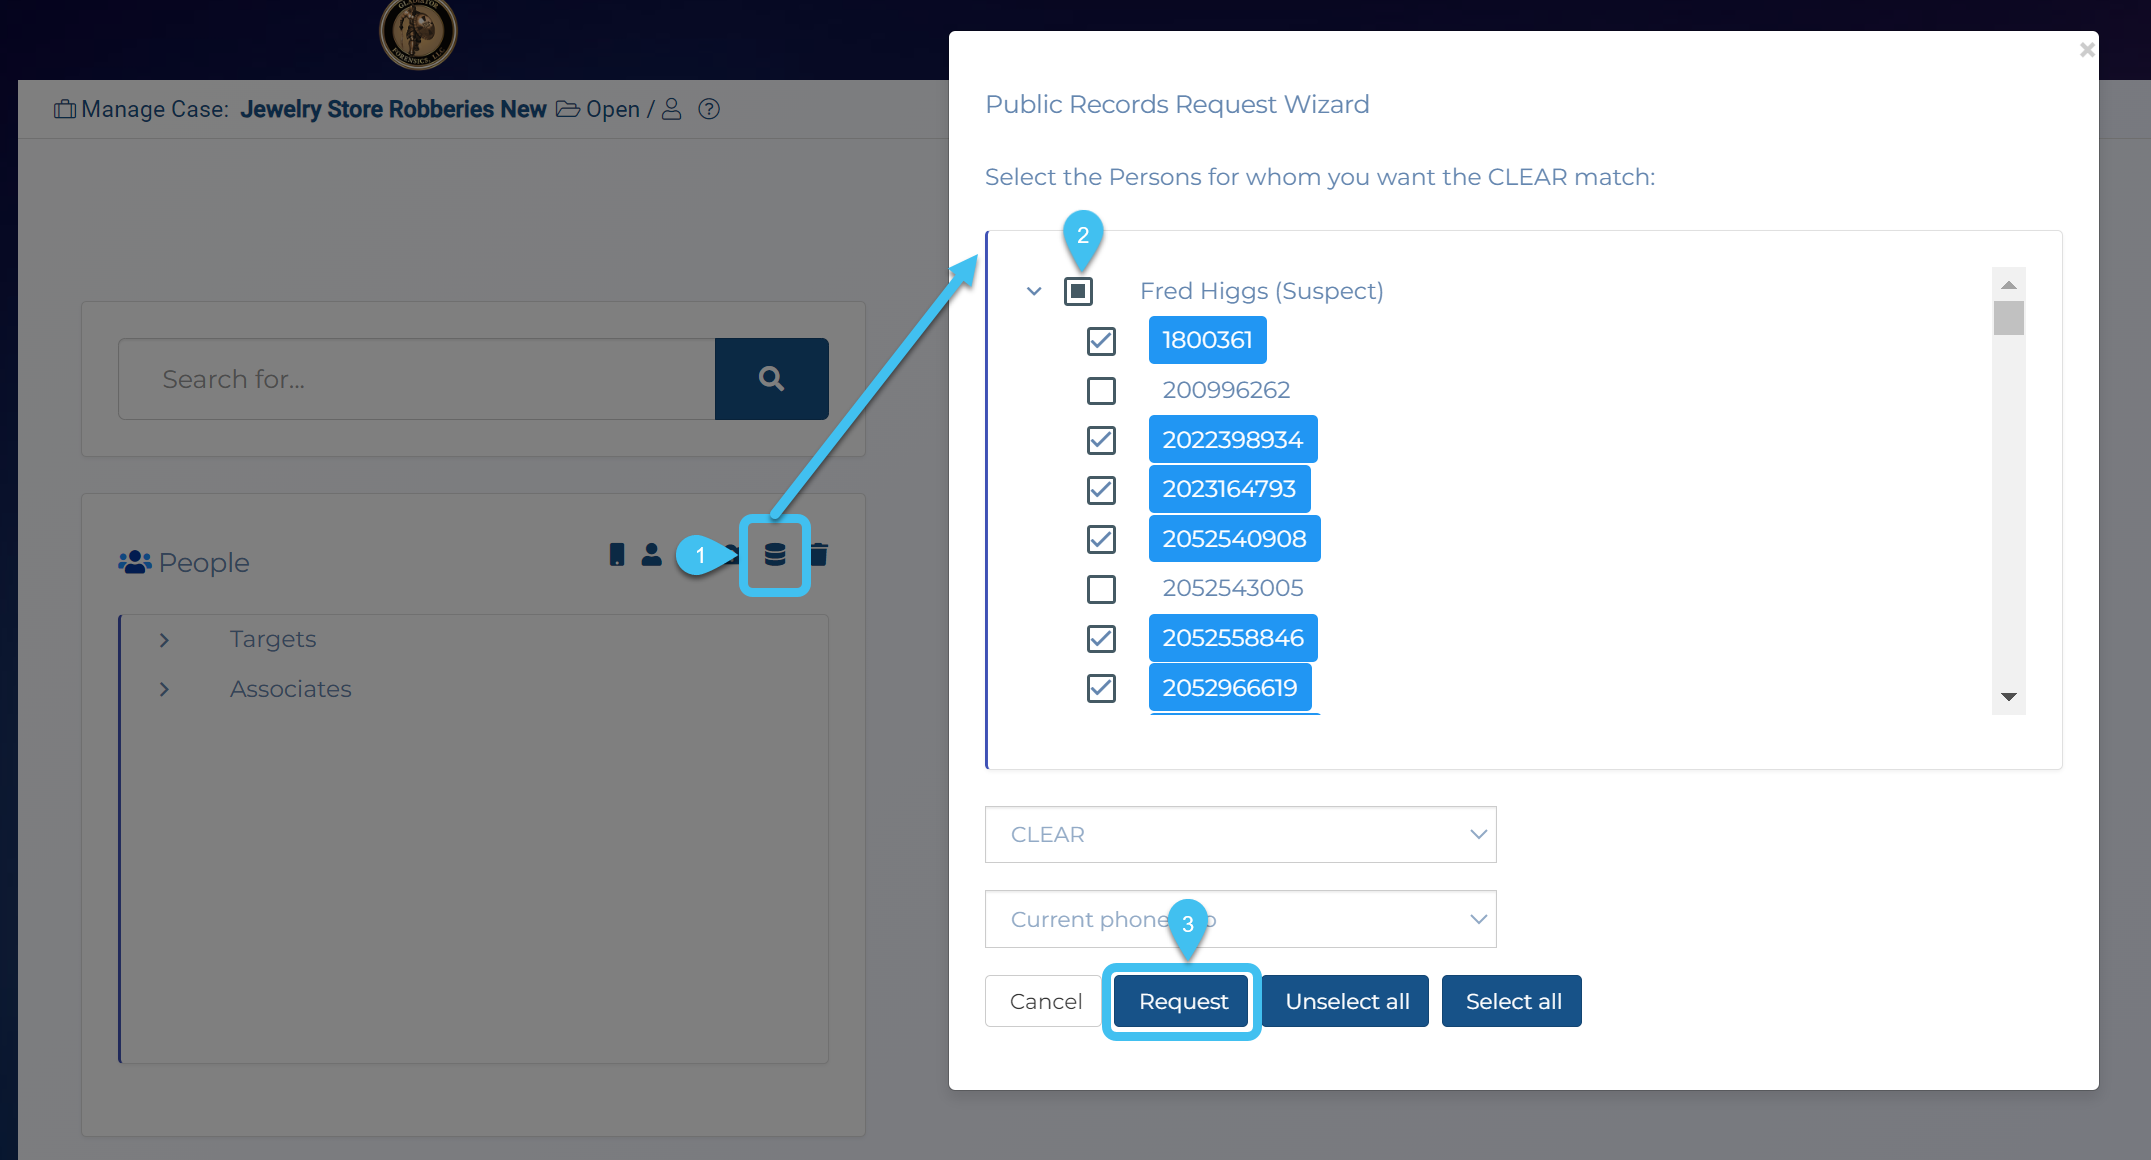
-
When the CLEAR or Whooster match request is queuing or running it will display a notification alarm; once complete there will be no notification alarm and its status will be updated with
 in the Case files section of the Manage case screen. The length of time for the CLEAR or Whooster match request to complete is dependent on a number of factors including the number of phone numbers being matched however you will also receive an email when it completes.
 - Click Back to return to the Manage case screen.
There are two methods of importing public records into OSS-ESPA:
- The preferred method for public records that are from Thomson Reuters CLEAR or Whooster, is for you to use the CLEAR or Whooster request feature which is available from multiple locations in OSS-ESPA as detailed in the following procedures. Using this method OSS-ESPA automatically exports the phone numbers you are interested in directly to Thomson Reuters CLEAR or Whooster then automatically imports the public record data into OSS-ESPA. You will receive an email when the CLEAR or Whooster request is complete and the data is available for you to use in OSS-ESPA. In order to use the CLEAR request feature your administrator must first provide Gladiator Forensics with your organization's CLEAR certificate which you can obtain from your Thomson Reuters CLEAR representative. Gladiator Forensics will then apply your CLEAR certificate to your OSS-ESPA account. Your administrator must also enter your organization's User ID and Password for CLEAR, or API key for Whooster.
-
The alternative method can be used for public records from other applications or files you have created. This method is a manual process. Using the ESPA analysis center screen, OSS-ESPA allows you to generate a .csv file containing phone numbers of interest. This list is then imported into a public record tool which generates a public record file in .csv format. You can then upload the public record file to OSS-ESPA.
NOTE: You can also use this feature to import .csv files you've created yourself which contain names, phone numbers and other data. For further information refer to Manage files screen.
Once uploaded the records are available to view and use in People and devices and on the Public records tab.
The Show phones with public records setting on People and devices allows you to filter the associate records so that you only display those which have public records. You can then click on the associate's name, then click on to view the public records details, and click on to use their name from the public records. Note, that currently the name is used throughout OSS-ESPA with the exception of the ESPA analysis center that currently the names selected on the Public records tab.
Once uploaded the records are available on the ESPA analysis center screen for you to use in your investigation. The records are displayed on the Public records tab and on the map. You can select on an individual basis which records you want to use in your case. When you select to use a record the name associated with that record is then automatically displayed on the CDR data tab, the Timeline tab and the Call analysis tab.
The following graphics provide overviews of how public record data is used on the ESPA analysis center screen.
-
This graphic displays how and where the names are displayed on the ESPA analysis center.
-
This graphic displays how the location markers and location properties are displayed on theESPA analysis center. If required you can add the location to your case from both the map and the Public records tab as shown in the graphic.
If you have an account which includes IQ packets then the public record data is included in your IQ packet's common and frequent analyses results.
- Open and configure the ESPA analysis center screen as detailed in Getting started with investigating case data visually.
-
On the CDR data tab click CLEAR or Whooster.
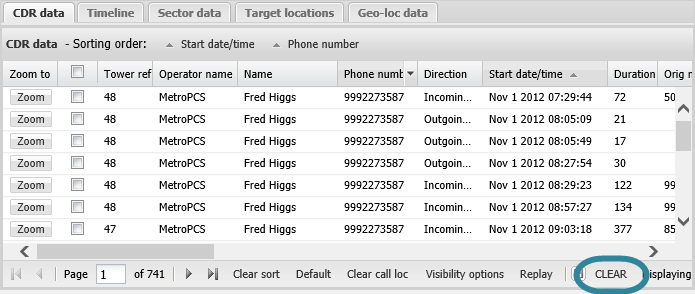
The CLEAR or Whooster request wizard opens.
-
Select the phone numbers whose associated CDRs you want a CLEAR or Whooster match for then click Request.
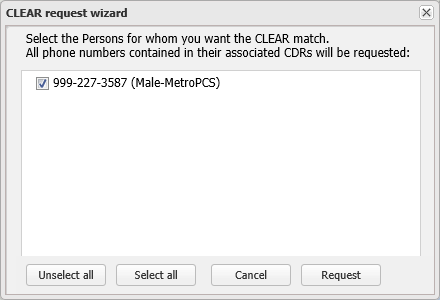
NOTE: It is not just the phone number displayed that a CLEAR or Whooster match is requested for, it is all the phone numbers listed in the associated CDRs.
The Public records tab is automatically updated when a CLEAR or Whooster match request completes successfully. You can also determine if the data has been updated when the State of the CLEAR Match Request or Whooster Match Request analysis on the Case analyses tab displays as Success. To confirm which phone numbers you requested for the CLEAR or Whooster match download and view the Analysis log. The length of time for the CLEAR or Whooster match request to complete is dependent on a number of factors including the number of phone numbers being matched however you will also receive an email when it completes.
-
On the Event summary view, right-click in the Associate number column then select either Clear request for this number or Whooster request for this number .
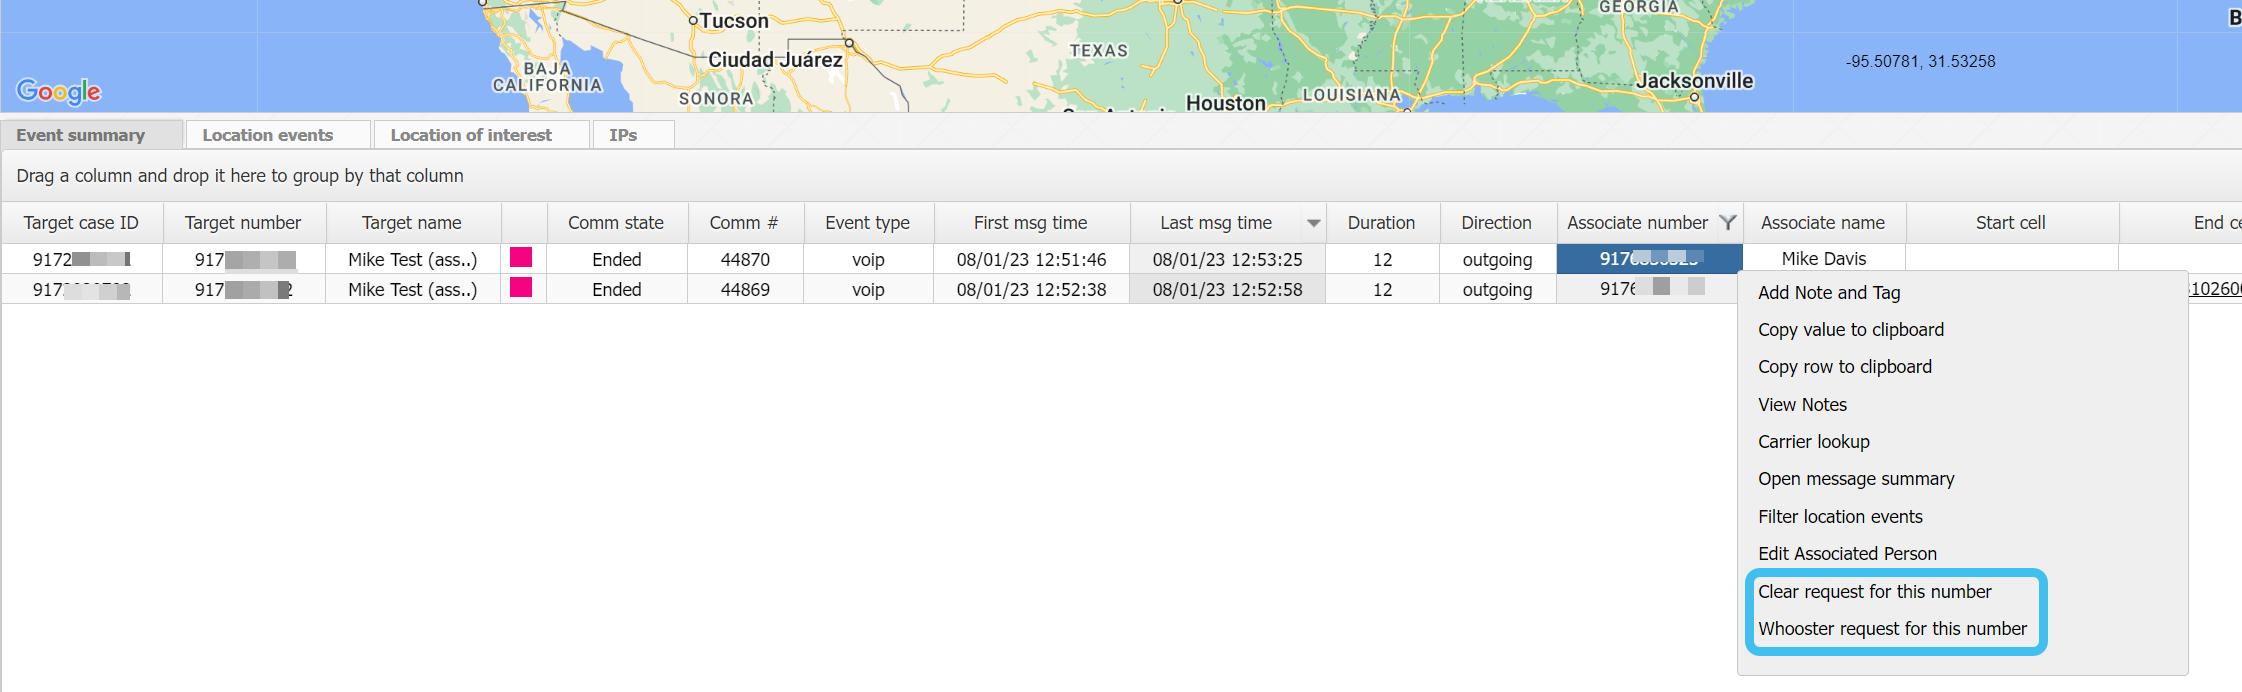
Click
 at the bottom-right of the view to display the status of the request. If the request discovers missing information, such as no address, this is displayed.
Any names and addresses from the request are automatically used throughout OSS-ESPA.
- Open and configure the ESPA analysis center screen as detailed in Getting started with investigating case data visually.
-
On the Case management view ensure Call analyses is selected.
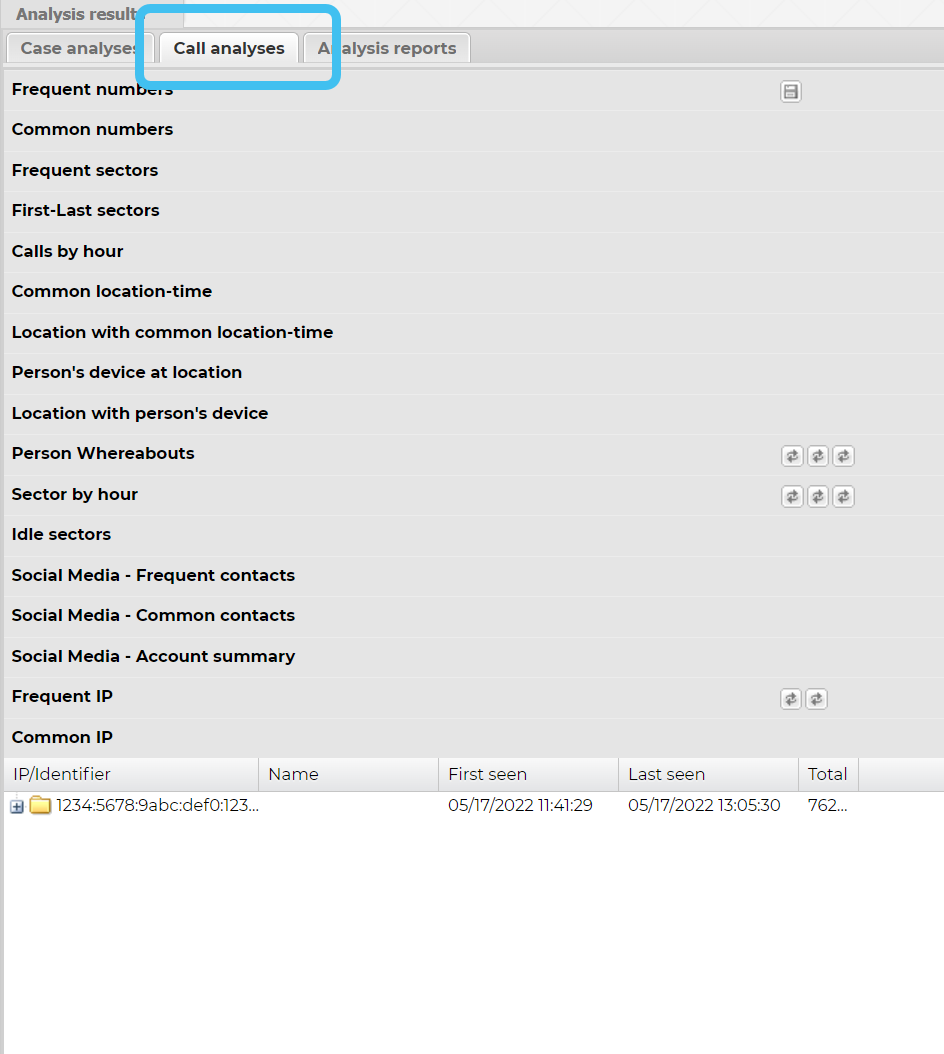
- Click Frequent numbers to expand the list.
-
Click
 beside a target phone number to display the details of the frequently called phone numbers. This allows you to view the top ten most frequently called numbers.
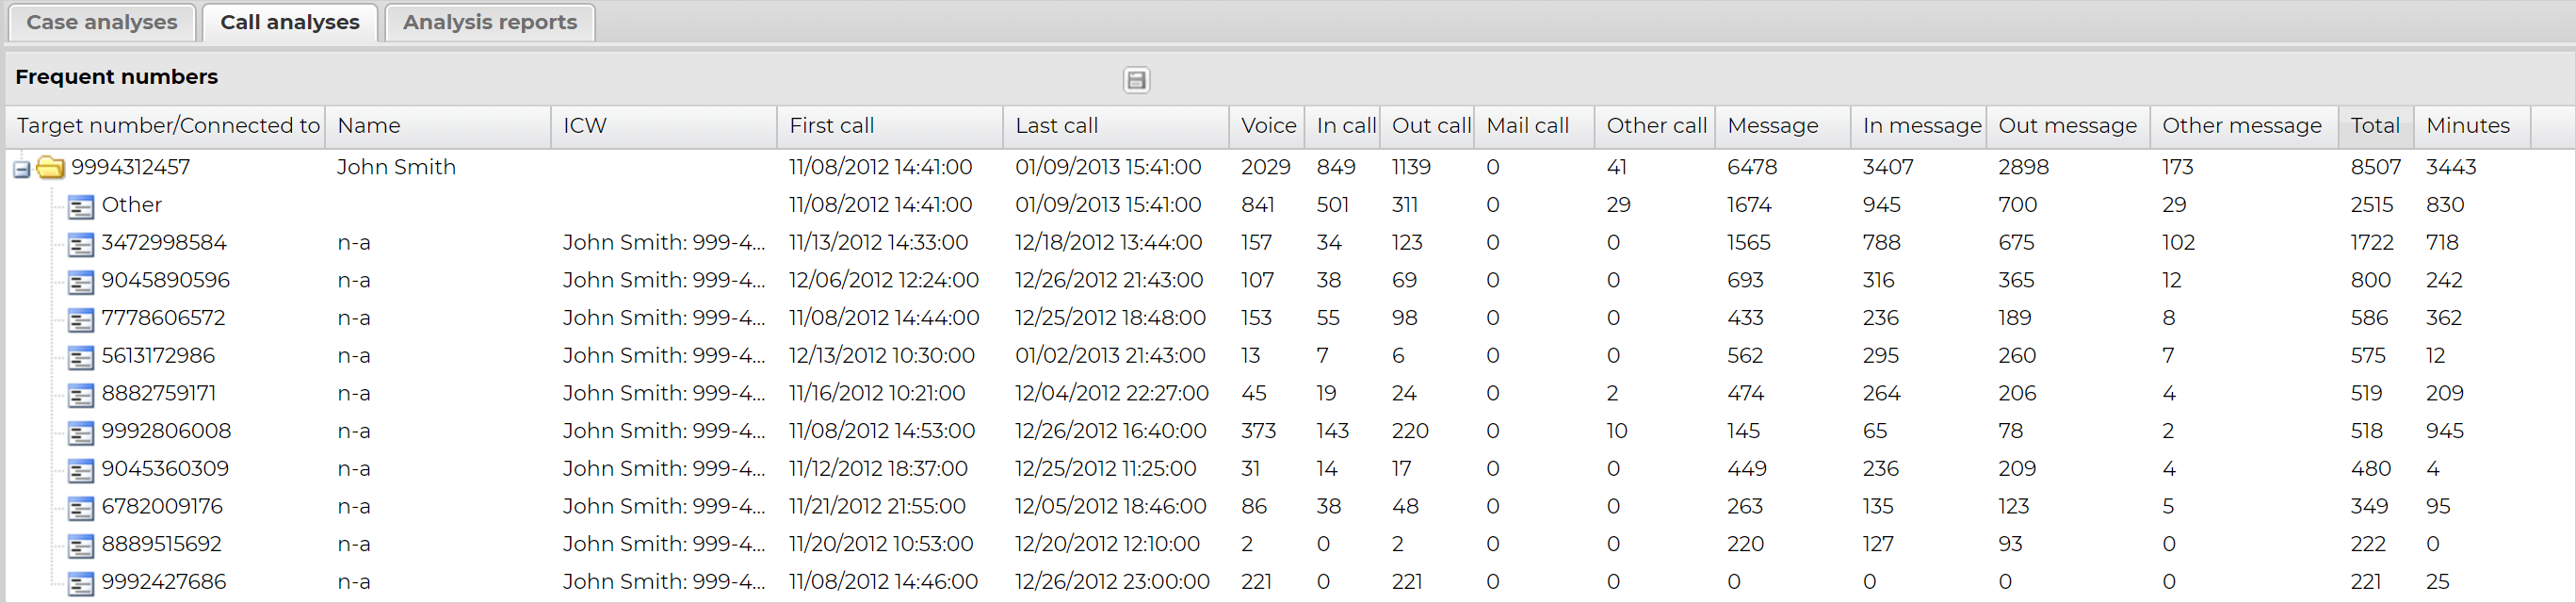
-
You can request a CLEAR or Whooster match on: just one number, all numbers in the folder associated with a target number, or you can customize which numbers you want.
-
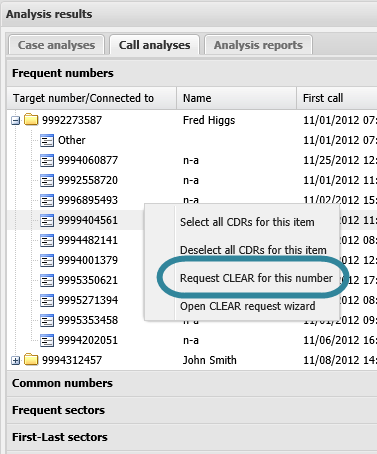
For just one number, right-click the frequent number you want to investigate further, then select Request CLEAR for this number or Request Whooster for this number. For Whooster, you can further select the type of data you require, for further information refer to Call analyses tab.
-
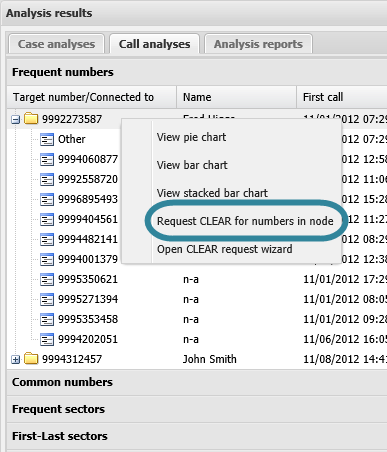
For all numbers in the folder associated with a target number, right-click the folder associated with a target number you want to investigate further, then select Request CLEAR for numbers in node or Request Whooster for numbers in node. For Whooster, you can further select the type of data you require, for further information refer to Call analyses tab.
-
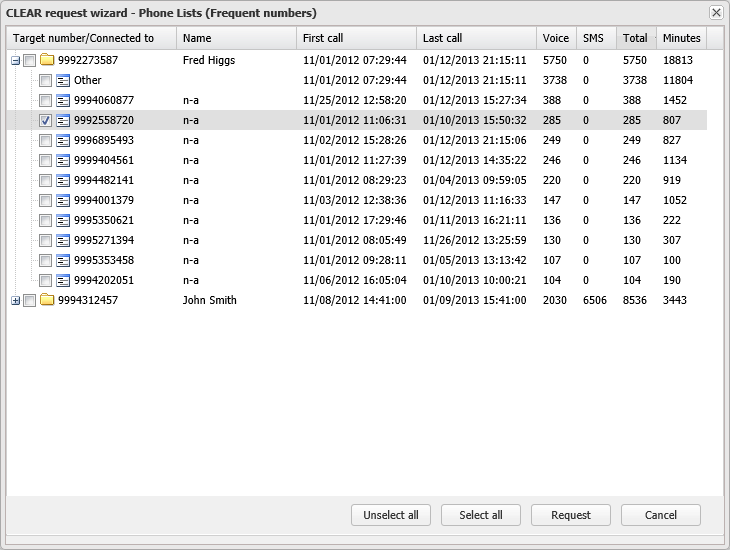
To customize which numbers you want, right-click on any row, then select Open CLEAR request wizard or Open Whooster request wizard. The CLEAR request wizard - Phone Lists (Frequent numbers) or Whooster request wizard - Phone Lists (Frequent numbers) screen opens. Use the check boxes to select the phone numbers you want to do a CLEAR or Whooster match on then click Request.
The Public records tab is automatically updated when a CLEAR or Whooster match request completes successfully. You can also determine if the data has been updated when the State of the CLEAR Match Request or Whooster Match Request analysis on the Case analyses tab displays as Success. To confirm which phone numbers you requested for the CLEAR or Whooster match download and view the Analysis log. The length of time for the CLEAR or Whooster match request to complete is dependent on a number of factors including the number of phone numbers being matched however you will also receive an email when it completes.
-
- Open and configure the ESPA analysis center screen as detailed in Getting started with investigating case data visually.
-
On the Case management view ensure Call analyses is selected.
- Click Common numbers to expand the list.
-
Click
beside a common phone number to display the details of the individual target phone numbers. This allows you to view which of the target phone numbers you have selected were involved with calls to the common phone number. 
-
You can request a CLEAR or Whooster match on: just one number or you can customize which numbers you want.
-
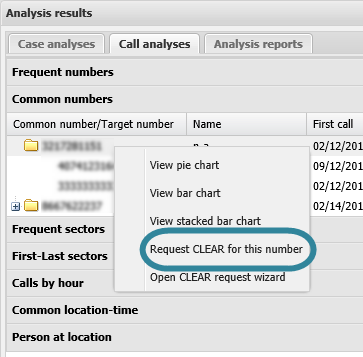
For just one number, right-click the common number you want to investigate further, then select Request CLEAR for this number or Request Whooster for this number. For Whooster, you can further select the type of data you require, for further information refer to Call analyses tab.
-
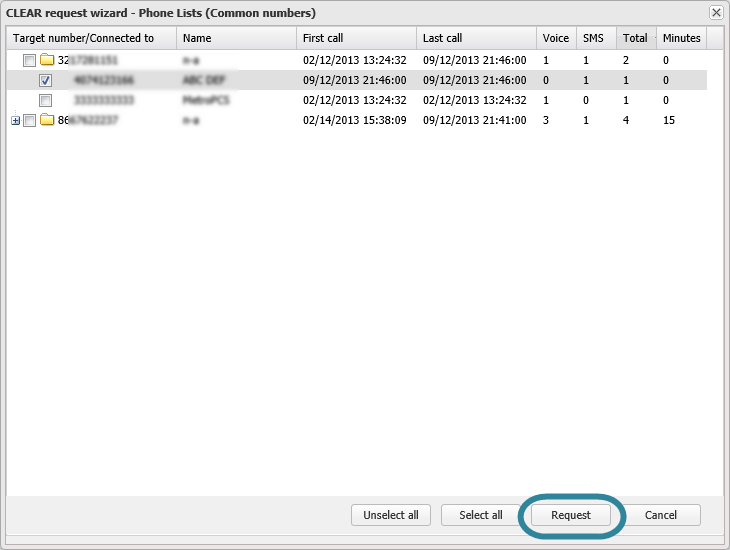
To customize which numbers you want, right-click on any row, then select Open CLEAR request wizard or Open Whooster request wizard.
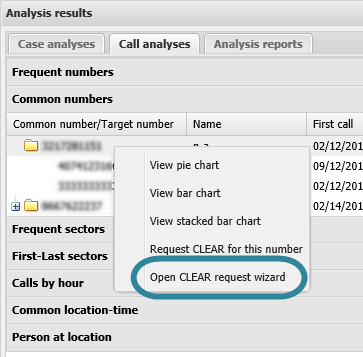
The CLEAR request wizard - Phone Lists (Common numbers) or Whooster request wizard - Phone Lists (Common numbers) opens. Select the target phone numbers you are interested in then click Request.
The Public records tab is automatically updated when a CLEAR or Whooster match request completes successfully. You can also determine if the data has been updated when the State of the CLEAR Match Request or Whooster Match Request analysis on the Case analyses tab displays as Success. To confirm which phone numbers you requested for the CLEAR or Whooster match download and view the Analysis log. The length of time for the CLEAR or Whooster match request to complete is dependent on a number of factors including the number of phone numbers being matched however you will also receive an email when it completes.
-
- Open and configure the ESPA analysis center screen as detailed in Getting started with investigating case data visually.
-
On the CDR data tab click the row containing the phone number detailed in the Associated number column that you want to request a CLEAR or Whooster match on then select Request CLEAR for the destination number or Request Whooster for the destination number. For Whooster, you can further select the type of data you require, for further information refer to Call analyses tab.

The Public records tab is automatically updated when a CLEAR or Whooster match request completes successfully. You can also determine if the data has been updated when the State of the CLEAR Match Request or Whooster Match Request analysis on the Case analyses tab displays as Success. To confirm which phone numbers you requested for the CLEAR or Whooster match download and view the Analysis log. The length of time for the CLEAR or Whooster match request to complete is dependent on a number of factors including the number of phone numbers being matched however you will also receive an email when it completes.
If you have requested a CLEAR or Whooster match
- Build your case as normal then open the ESPA analysis center screen.
- Investigate your case as normal and then set the Date & Time or the Event timeline filters to the required dates or events, select the required phone numbers in Sources, then click Refresh.
- Right-click on the map and select Export phone numbers. All the phone numbers from the filtered CDR records along with their number of calls are exported to a .csv file.
-
Open the .csv and remove any phone numbers you are not interested in then save it.
It is recommended that you only save the phone numbers that are of interest to you as this reduces the cost of a public records search and means irrelevant names and addresses are not imported back into OSS-ESPA.
Determining which phone numbers are of interest to you may be based on a variety of factors. For example, you may be specifically interested in:
- Only the most frequent contact numbers, as detailed in Frequent numbers on the Call analyses tab, and as detailed in the exported .csv file.
- The contact phone numbers that match the time of the crime as detailed on the CDR data tab.
- The common phone numbers associated with specific phone users, as detailed in Common numbers on the Call analyses tab.
- Calls that are being made at unusual hours, as detailed in Calls by hour on the Call analyses tab.
- Enter the phone numbers you are interested in into your public records tool then save the public record file that it generates.
-
Upload the public record file into OSS-ESPA using the Manage files screen. For further information refer to Managing files.
-
Once the public record data has been either imported automatically using the CLEAR or Whooster request feature or manually uploaded then you can view the public records information on the ESPA analysis center screen. To do this either:
- If you have the ESPA analysis center screen open, click Refresh or Refresh data.
- If you do not have the ESPA analysis center screen open then open your case and click
 to open the ESPA analysis center screen.
The Public records tab is displayed below the map and by default it displays all the public records.
-
You must then examine the results on the Public records tab and select which results you want to use, for example you may not want to use results which have older dates or whose addresses are in locations that you are not interested in. To select to use a result click the Use column to ensure a
 is displayed.
 If you only have a small number of results on the Public records tab, for example one page, you may want to analyze each result individually and select which you think are relevant to your case. However, if you have a large number of results, you may want to minimize the number of results displayed on this tab to only display the public records results for specific phone numbers based on what you currently have selected on either the CDR data tab, Timeline tab or the Call analysis tab. To only display the results for selected phone numbers use the following procedure:
- On the Public records tab click Visibility options. The Public records display options dialog box opens.
- Set Show selected phone number records only to Yes.
- Click a row in either the CDR data tab, Timeline tab or the Call analyses tab so that it is highlighted in gray, to display all the public record results associated with the phone numbers in the selected row.
-
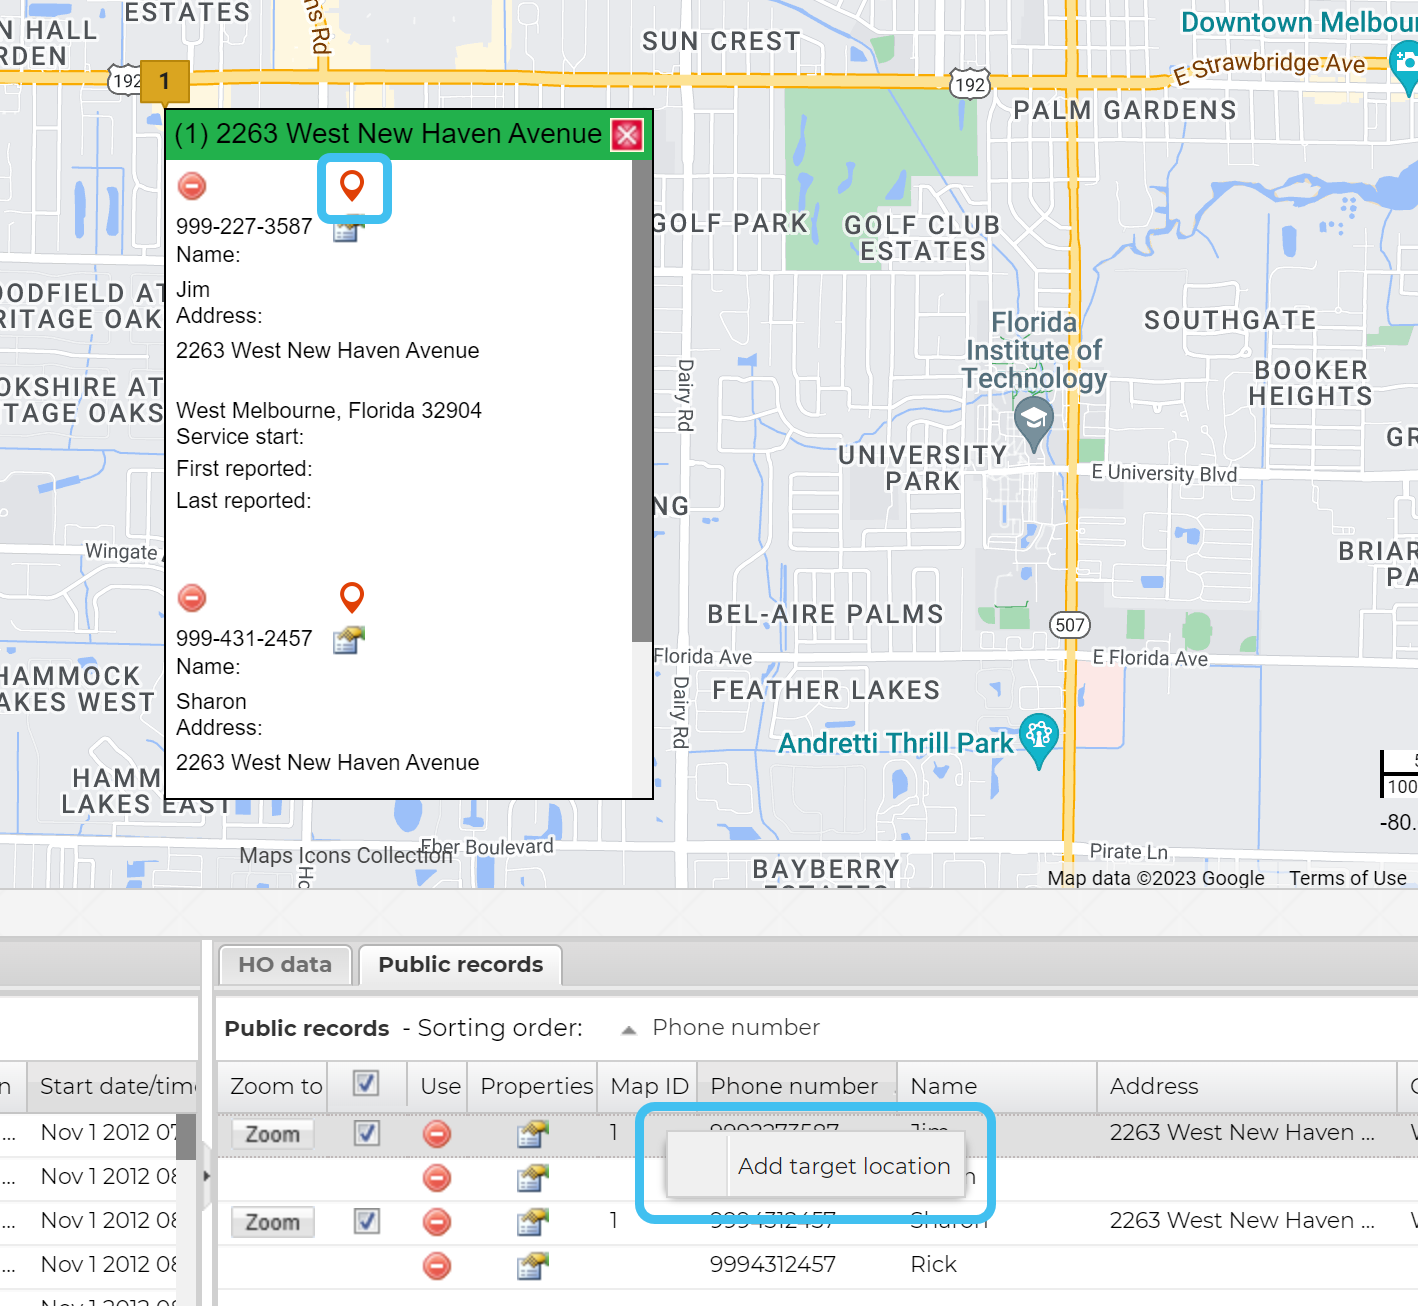
You may also want to examine the map as it displays address markers for all the public records results which contain a latitude and longitude and this may help you determine the most relevant records for your case. For example if there are calls displayed around the address location then it is more likely a relevant record than an address that doesn't have any calls displayed around the address location. Each public record address marker is given a reference number. This reference number is also displayed on the Public records tab in the Map ID column. The same reference number may appear for multiple records if the location is the same.
If there are public record address markers in locations that are of interest to you then click on the public record reference number to open a dialog box which provides an overview of all the records associated with that address. If the phone numbers associated with this location appear on the Call analysis tab's Frequent numbers analysis then the number of calls are also displayed at the start of this dialog box.
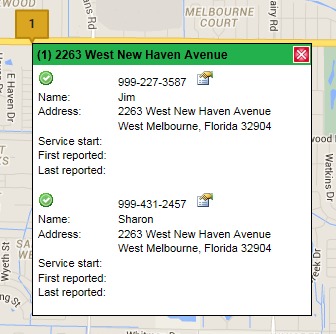
If you have not included this record in the previous step it will be displayed with a
 . Click
  to analyze the location further. If you think this result is relevant to your case then select it by clicking to display .
 -
Click Refresh or Refresh data.
The names from the public records you selected to use are now included where applicable in Name on the Call analyses tab, and in Orig alias and Dest alias on the CDR data tab and the Timeline tab.
The records you selected are saved so that each time you revisit the case the names are automatically populated on these tabs.
- If required you can also use the checkboxes on the Public records tab to select which public record address markers are displayed on the map.
-
You can now continue to investigate your case using your normal process with the added benefit of having the relevant names that were exported from the public records tool displayed on the ESPA analysis center screen.
Remember you can save your map configuration, including all your public record address marker selections. For further information refer to Saving the map view.
You can add a public record location as a case target location from: People and devices, the Public records tab, and the map.
- Open People and devices from either the Manage case screen or the ESPA analysis center.
- From the Manage case screen, in People and devices, click the person of interest, or
- From the ESPA analysis center, select the People and devices tab on the Case management view, then click the person of interest to open the Personal information window.
- If required, click
 , then select Public records. Note, the public records menu item is only displayed when you have at least one public record.
 - Click
 to display the Public records tab.
 -
Click
 for the address you want to add, then from the menu select Save to addresses.
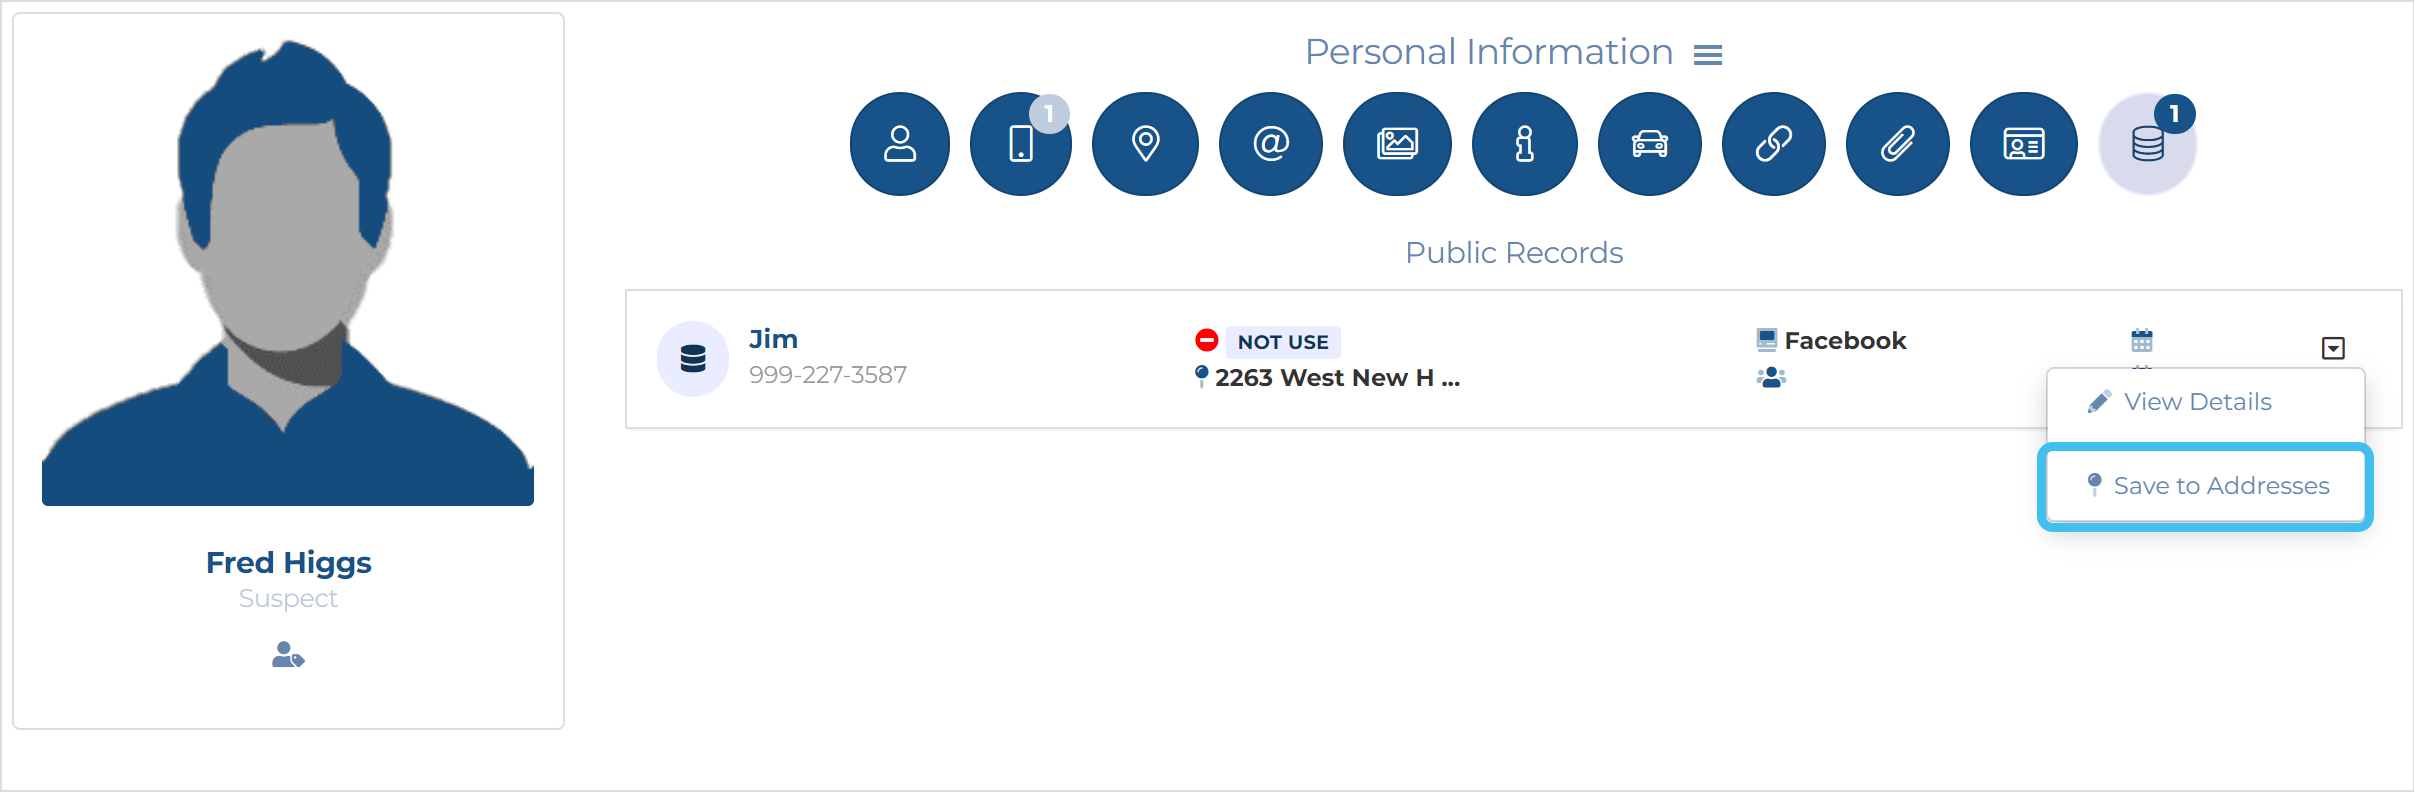
- Select Yes to confirm you want the address added as a target location.
- The Addresses tab opens with the new address listed.
From the:
-
Personal information window, opened by selecting a name on the Case management view's People and devices tab,
-
Public records tab, right-click the record then select Add target location.
-
map, click
 on the public record pop-up.
CLEAR request is not working, what can I do?
In order to use the CLEAR request feature your administrator must first provide Gladiator Forensics with your organization's CLEAR certificate which you can obtain from your Thomson Reuters CLEAR representative. Gladiator Forensics will then apply your CLEAR certificate to your OSS-ESPA account. Your administrator must also enter your organization's User ID and Password on the Public records settings screen as shown below.
![]()