Most recent release information 25.2.0.x
This topic describes the enhancements added to version 25.2.0.x of OSS-ESPA which is the most recent OSS-ESPA release.
There is also a video available discussing some of the new 25.2.0.x release features.
-
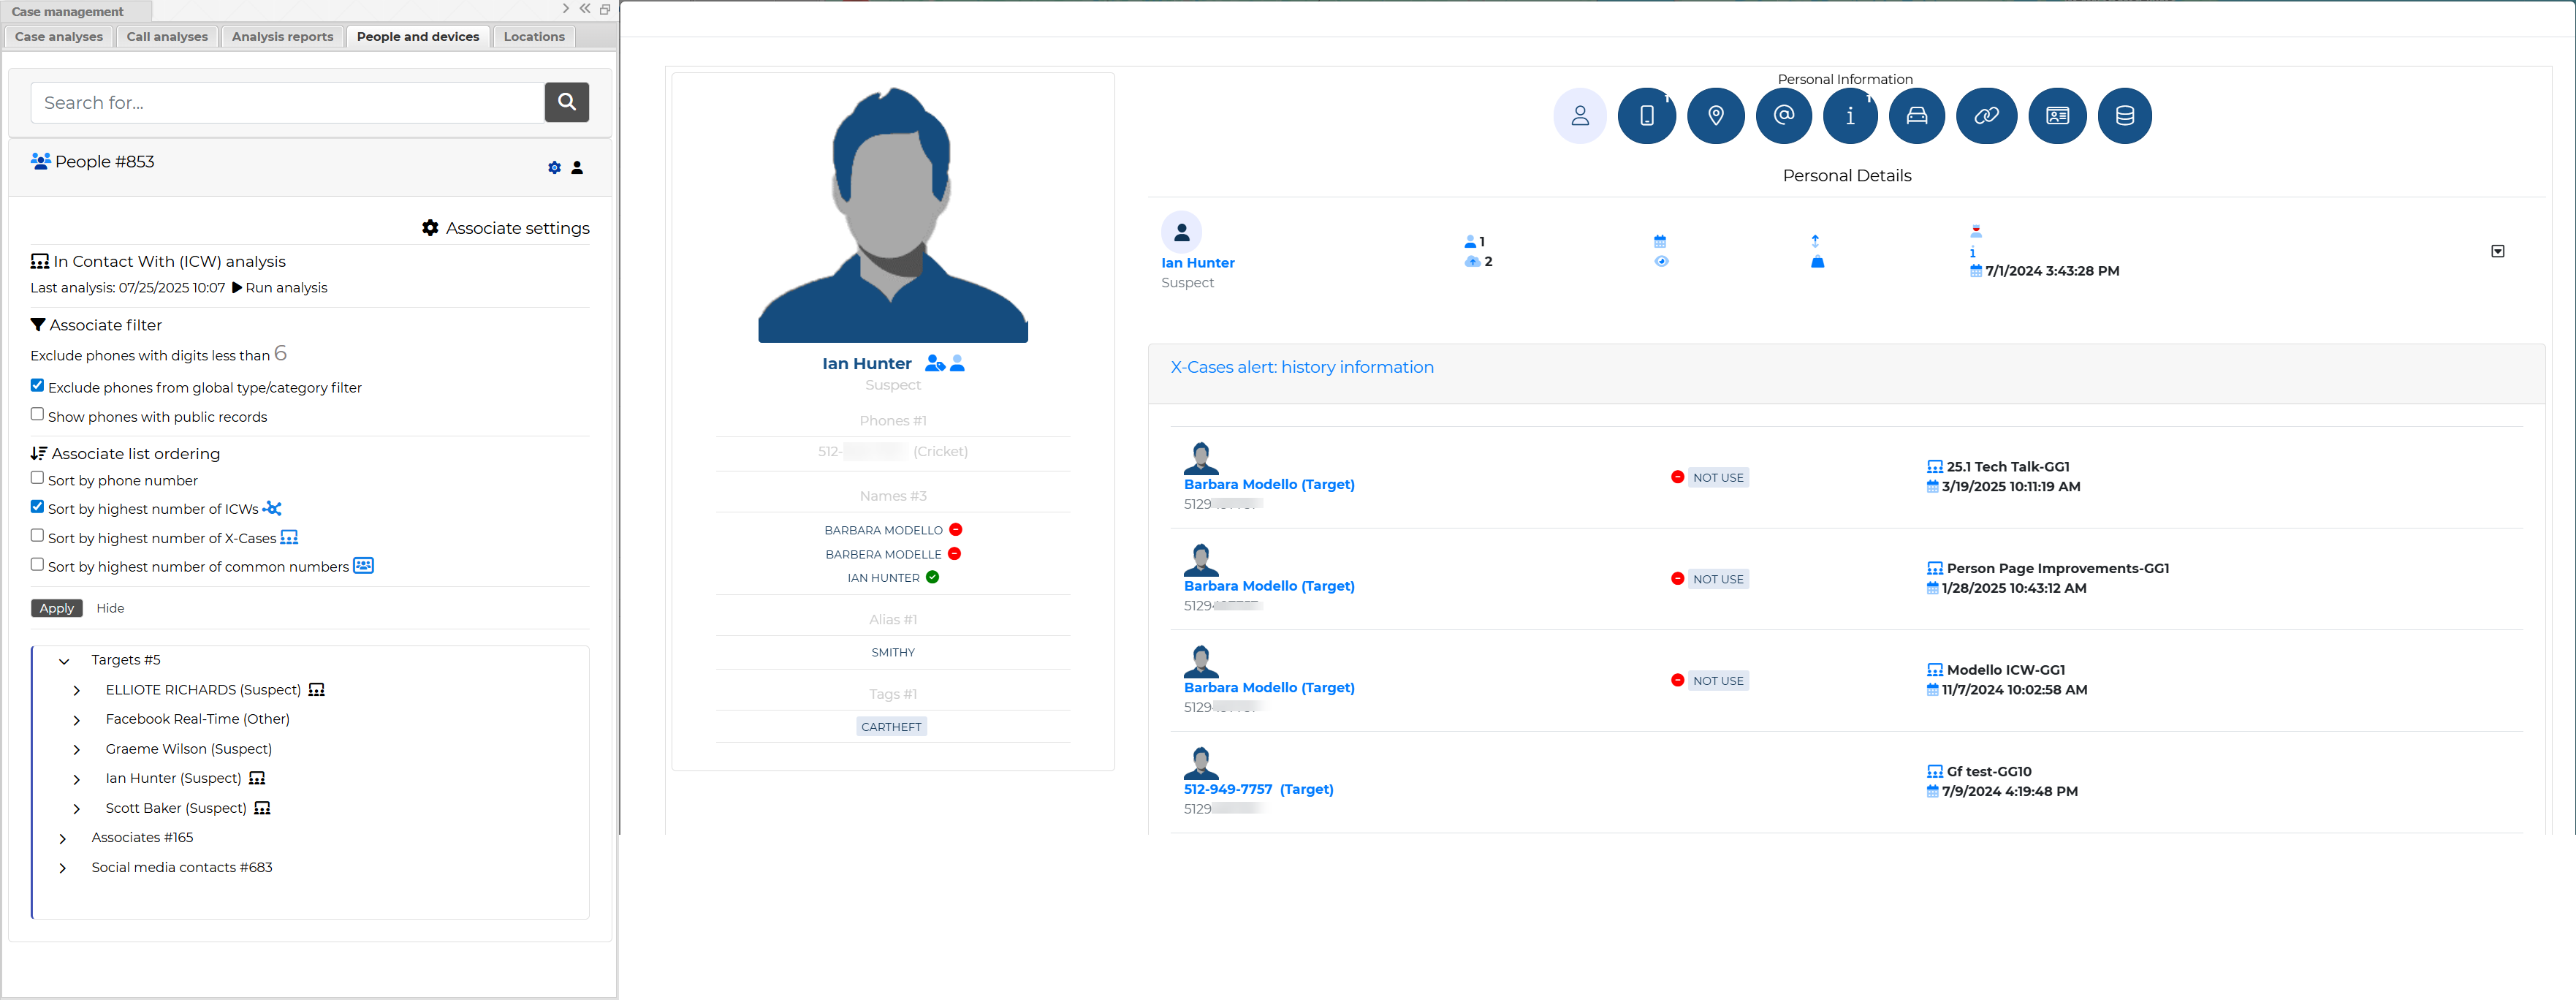
A People and devices tab has been added to what was previously titled the Analysis results view, which has now been retitled the Case management view.
This new tab is coupled with the People and devices screen in Case management. It allows you to view the people in the case, the associate settings, and it allows you to add new people to the case, however currently it does not have all the features which are available on the People and devices screen, such as the ability to delete a person. You can also open the Personal information window, which provides all the same features as on the People and devices screen with the exception of managing pictures and attachments.
For information refer to Using the People and devices tab.
-
A Locations tab has been added to what was previously titled the Analysis results view, which has now been retitled the Case management view.
This new tab is coupled with the Locations of interest screen in Case management. It allows you to view and edit the locations in the case, and add new locations, however currently it does not have all the features which are available on the Locations of interest screen, such as the ability to delete a location and upload a location file. You can also open the Location information window, which provides all the same features as on the Locations of interest screen with the exception of managing pictures and target development files.
For information refer to Using the Locations tab.
-
You can now select to view Global locations on the ESPA analysis center. For further information refer to the new Global locations features.
-
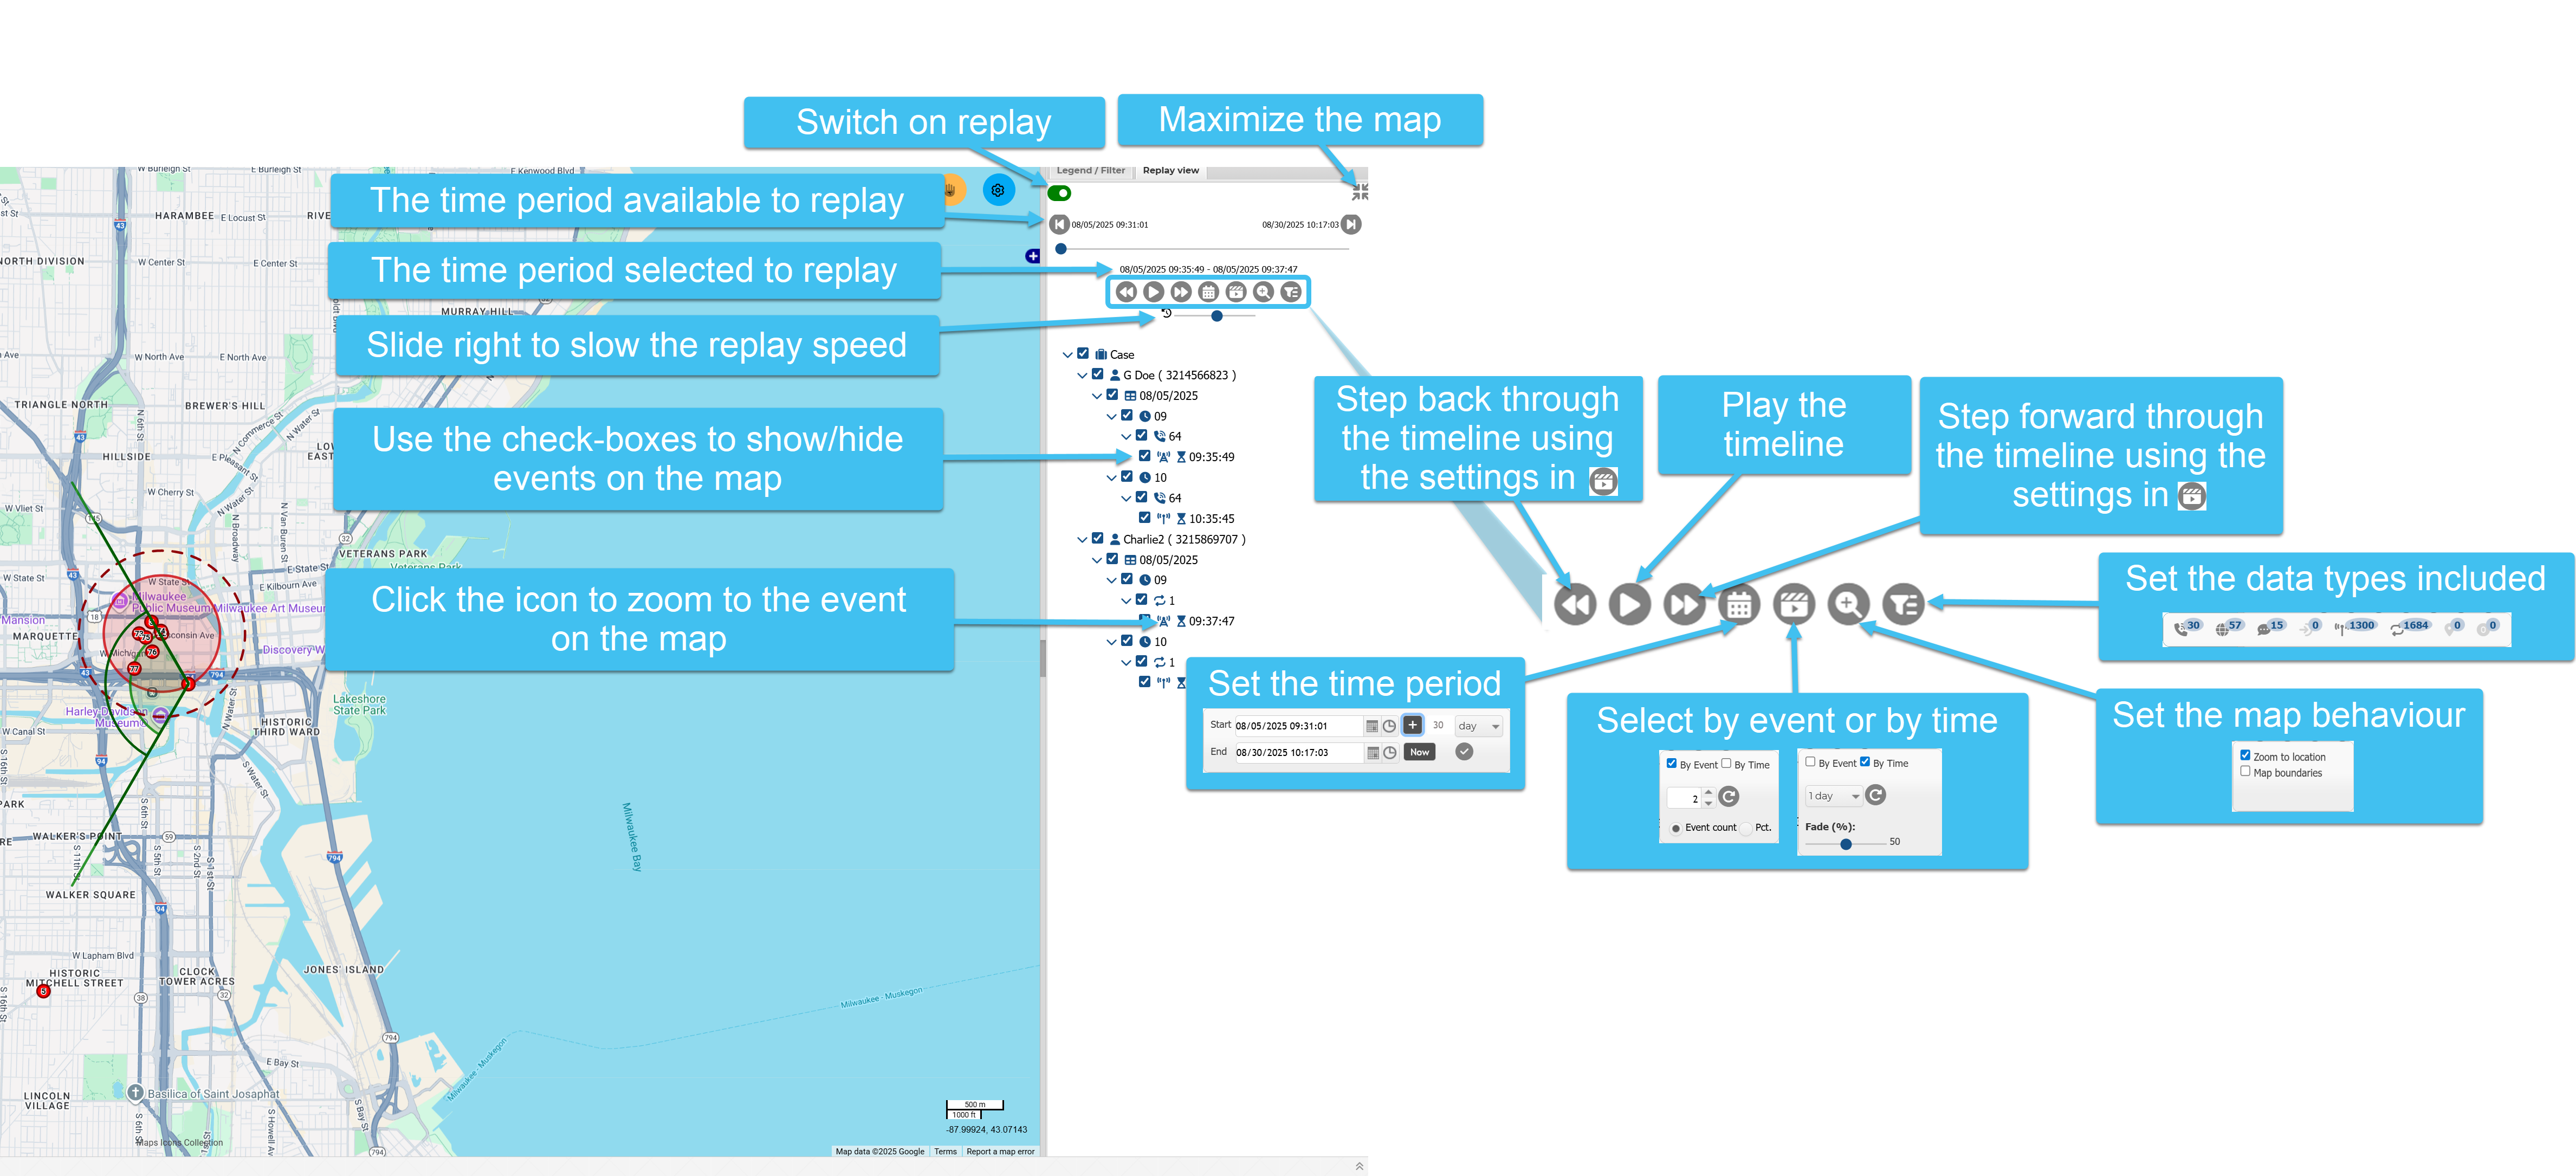
A new Replay view allows you to replay movements on the map of the ESPA analysis center screen. This can be useful if you want to display the movements of people around a specific location and time, for example the crime scene at the time of the crime. This replay feature includes all the events on one view, and provides flexibility on what is replayed, including which people, devices and the type of data. You can define the time period, whether data is loaded by events or time periods, and the speed that it is replayed. You can also select to step through the replay based on your setting configurations.
For information refer to Replaying movements on the Replay view.
-
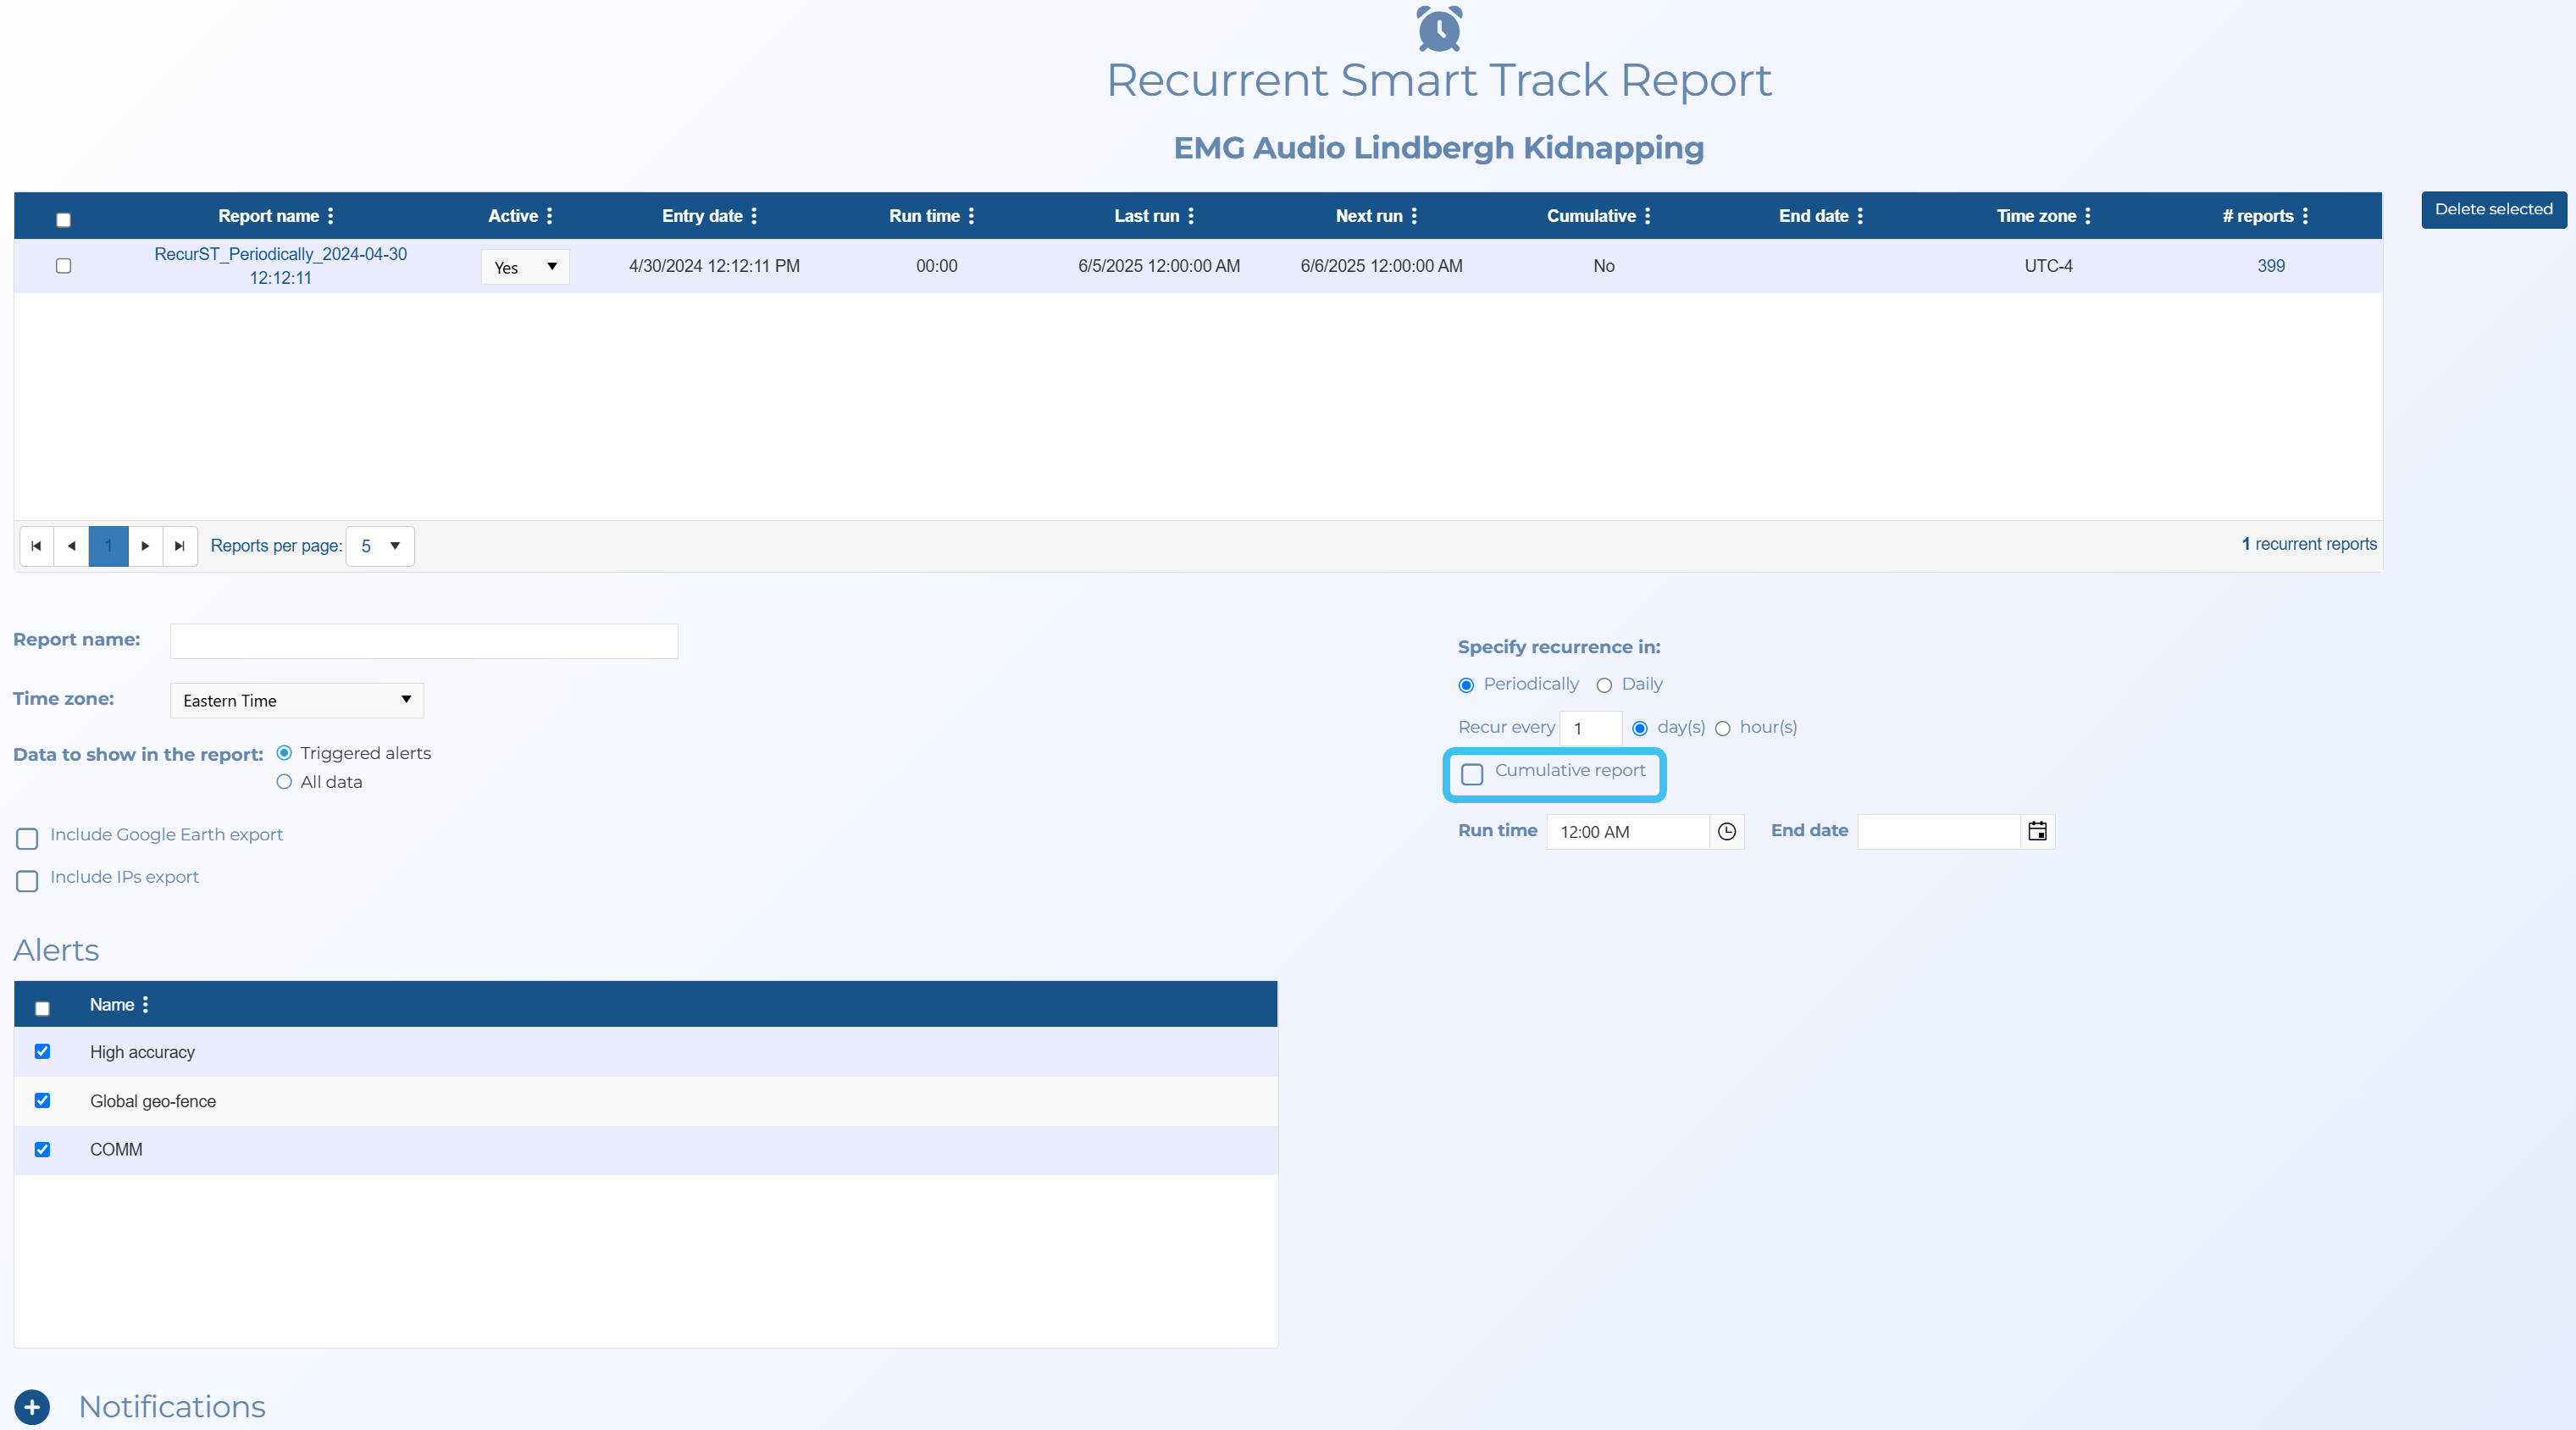
A Cumulative report setting has been added to the Recurrent Smart Track Report screen. Previously these reports contained all the data from when the Smart Track was first created. However this setting allows you to set whether you prefer the incremental data or the cumulative data. This is not selected by default so only incremental data is included in the report which minimizes the amount of processing time; cumulative should only be selected when you specifically require it.
-
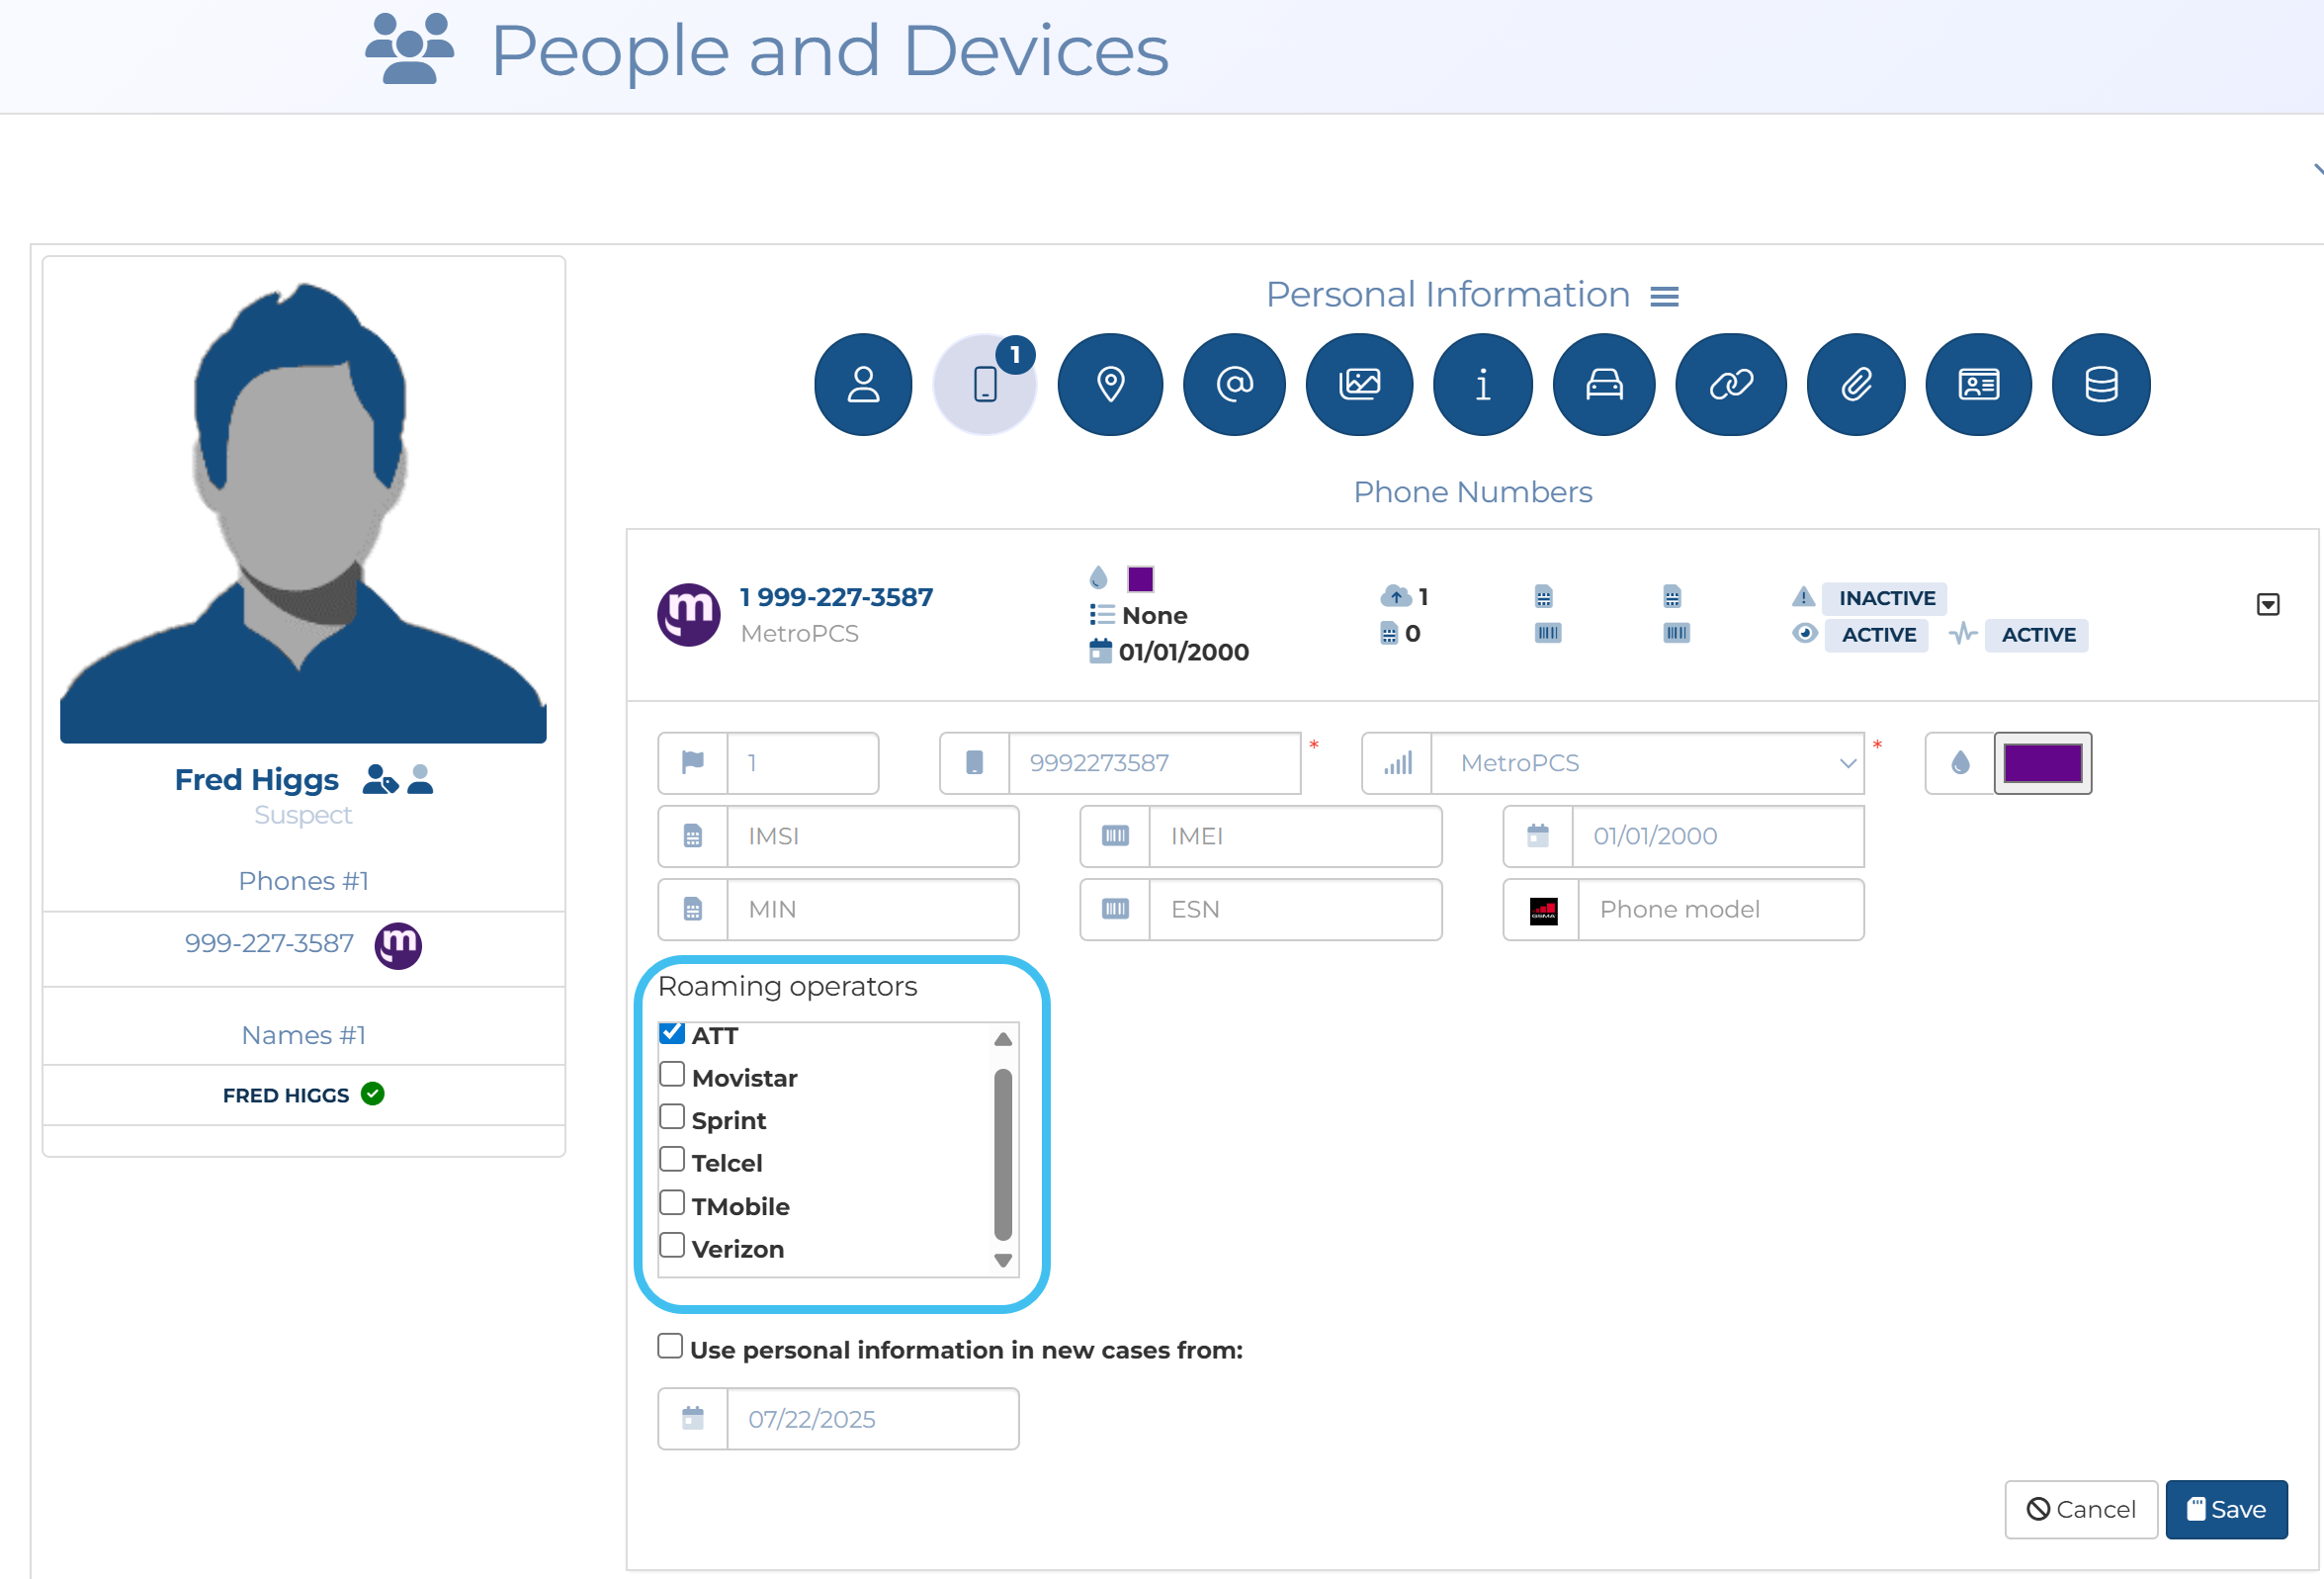
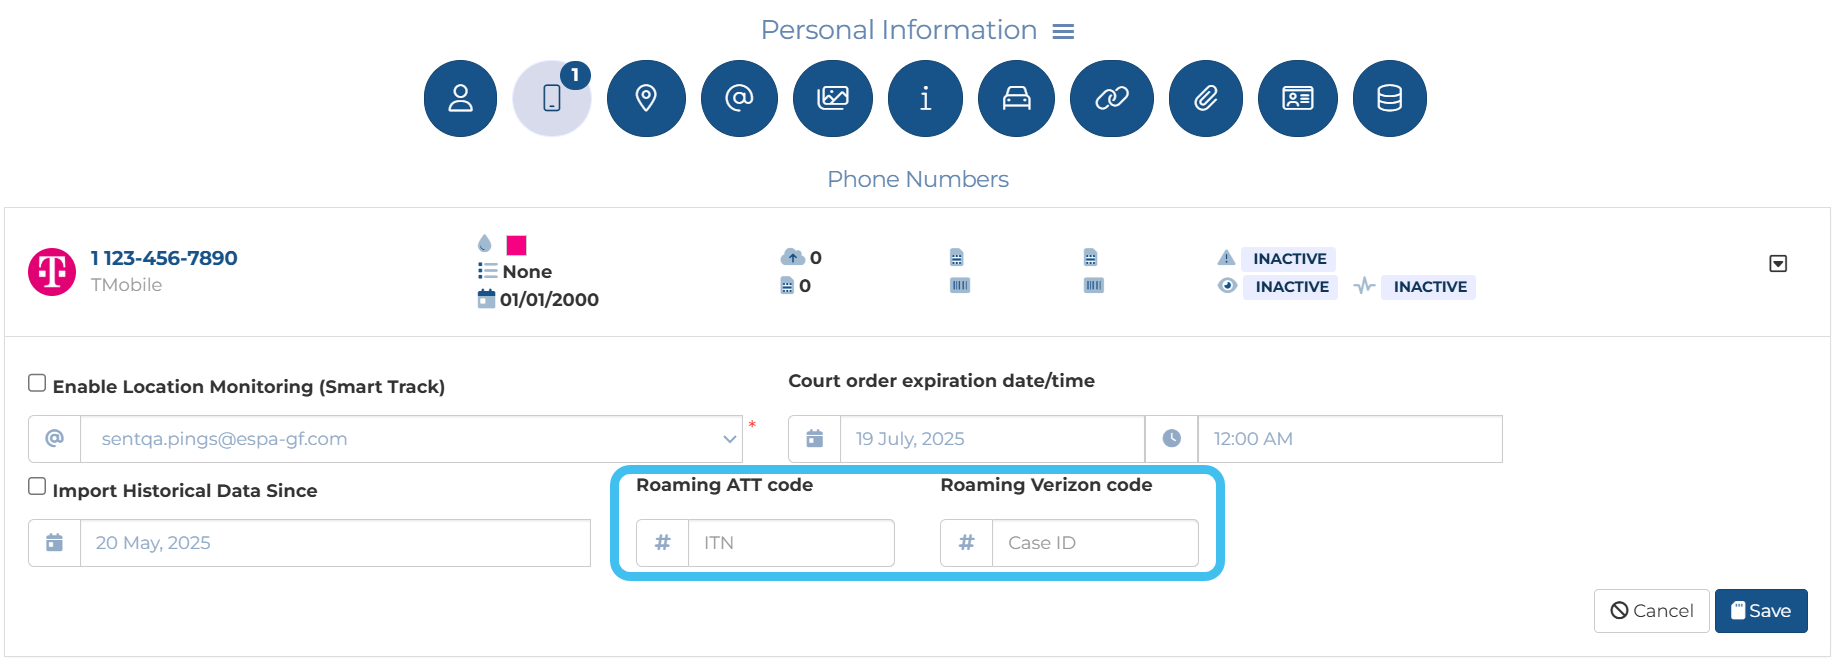
A new Roaming operators setting has been added to the People and devices Phone numbers tab. When an operator is selected:
-
this allows you to use Smart Track on the roaming operators; previously you could only use Smart Track if the phone's normal operator supported Smart Track. This means that when a phone is roaming you can now receive GPS pings and Smart Track alerts from roaming operators. For ATT and Verizon you must also enter the required Roaming <operator> code to the phone's Smart Track settings.
-
this provides you with any selected roaming operators prefix and suffix when you are configuring an intercept.
-
-
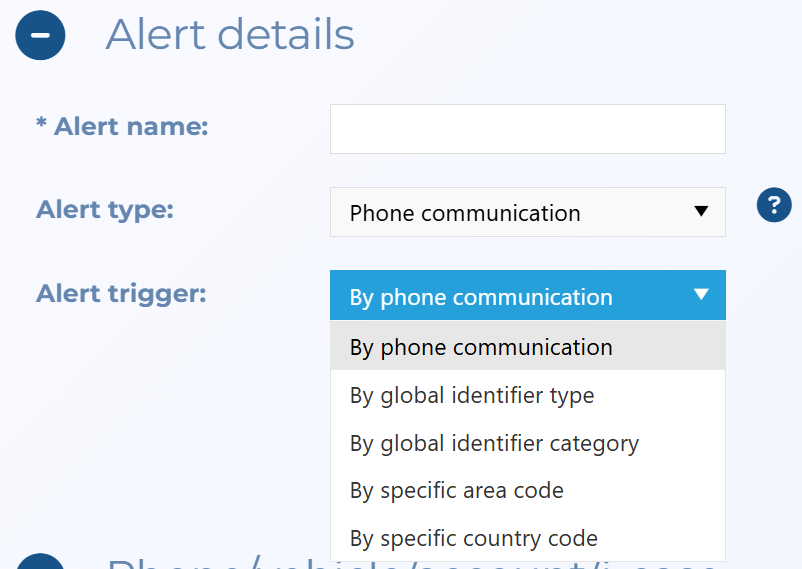
The Smart Track Phone communication alert can now be set to trigger on different event types using the Alert trigger setting.
-
By phone communication: this is the original phone communication alert which is used when you want to monitor when a phone you have an i-case configured for, has communication with any phones that are either entered in the case or are associated with the case.
-
By global identifier type: select if you want to monitor if there is communication between the selected target and a number with the global identifier type you select in Type.
-
By global identifier category: select if you want to monitor if there is communication between the selected target and a number with the global identifier category you select in Category.
-
By specific area code: select if you want to monitor if there is communication between the selected target and a number with the area code you enter in Area code.
-
By specific country code: select if you want to monitor if there is communication between the selected target and a number with the country code you enter in Country code.
-
-
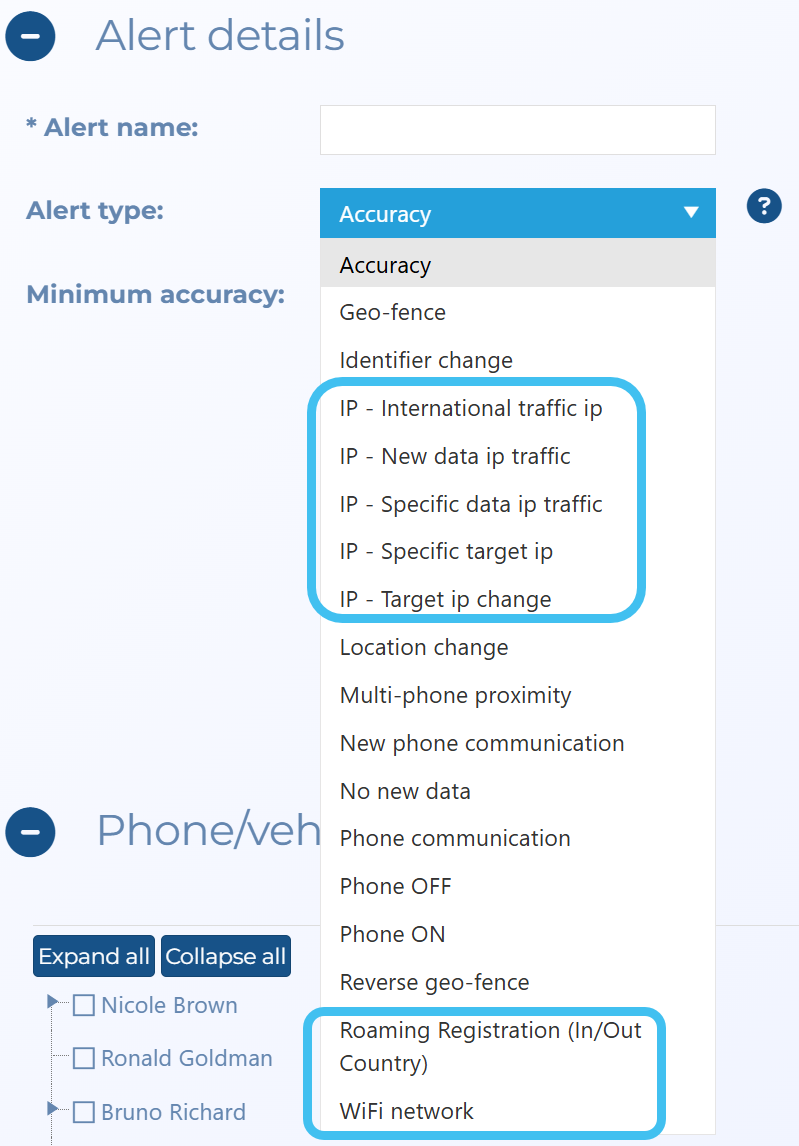
A variety of Smart Track alerts have been added:
-
IP - New data IP traffic: select if you want to monitor when there is new IP traffic. For example, when a target accesses Facebook an alert is triggered, then if they access eBay another alert is triggered.
-
IP - Specific data IP traffic: select if you want to monitor when a target accesses a specific Website, App, or service with the IP addresses you enter in IP address.
You can enter a single IP address, or multiple IP addresses either in a range or in a comma-separated list. For example the following formats are all supported:
99.199.199.10
99.199.199.0/255.255.255.0
99.199.199.10 - 99.199.199.20
99.199.199.10-20
99.199.199.0/16 -
IP - International target IP: select if you want to monitor when a target's IP address is outside of the United States.
-
IP - Specific target IP: select if you want to monitor when a target's IP address matches the IP address you enter in IP address. You can enter a single IP address, or multiple IP addresses either in a range or in a comma-separated list.
-
IP - Target IP change: select if you want to monitor when a target's IP address changes.
-
Roaming Registration (In/Out Country): select if you want to monitor when a target's device connects to a network outside of the US.
-
WiFi network: select if you want to monitor when a target's device connects to a WiFi network.
-
- The People and Devices screen available in Case management has had a number of enhancements. These features also apply to the new People and devices tab and Personal information window that has been added to the ESPA analysis center.
All the names available in OSS-ESPA for a person are now listed under their image, and you can now quickly select which one of these names you want to use in the case.
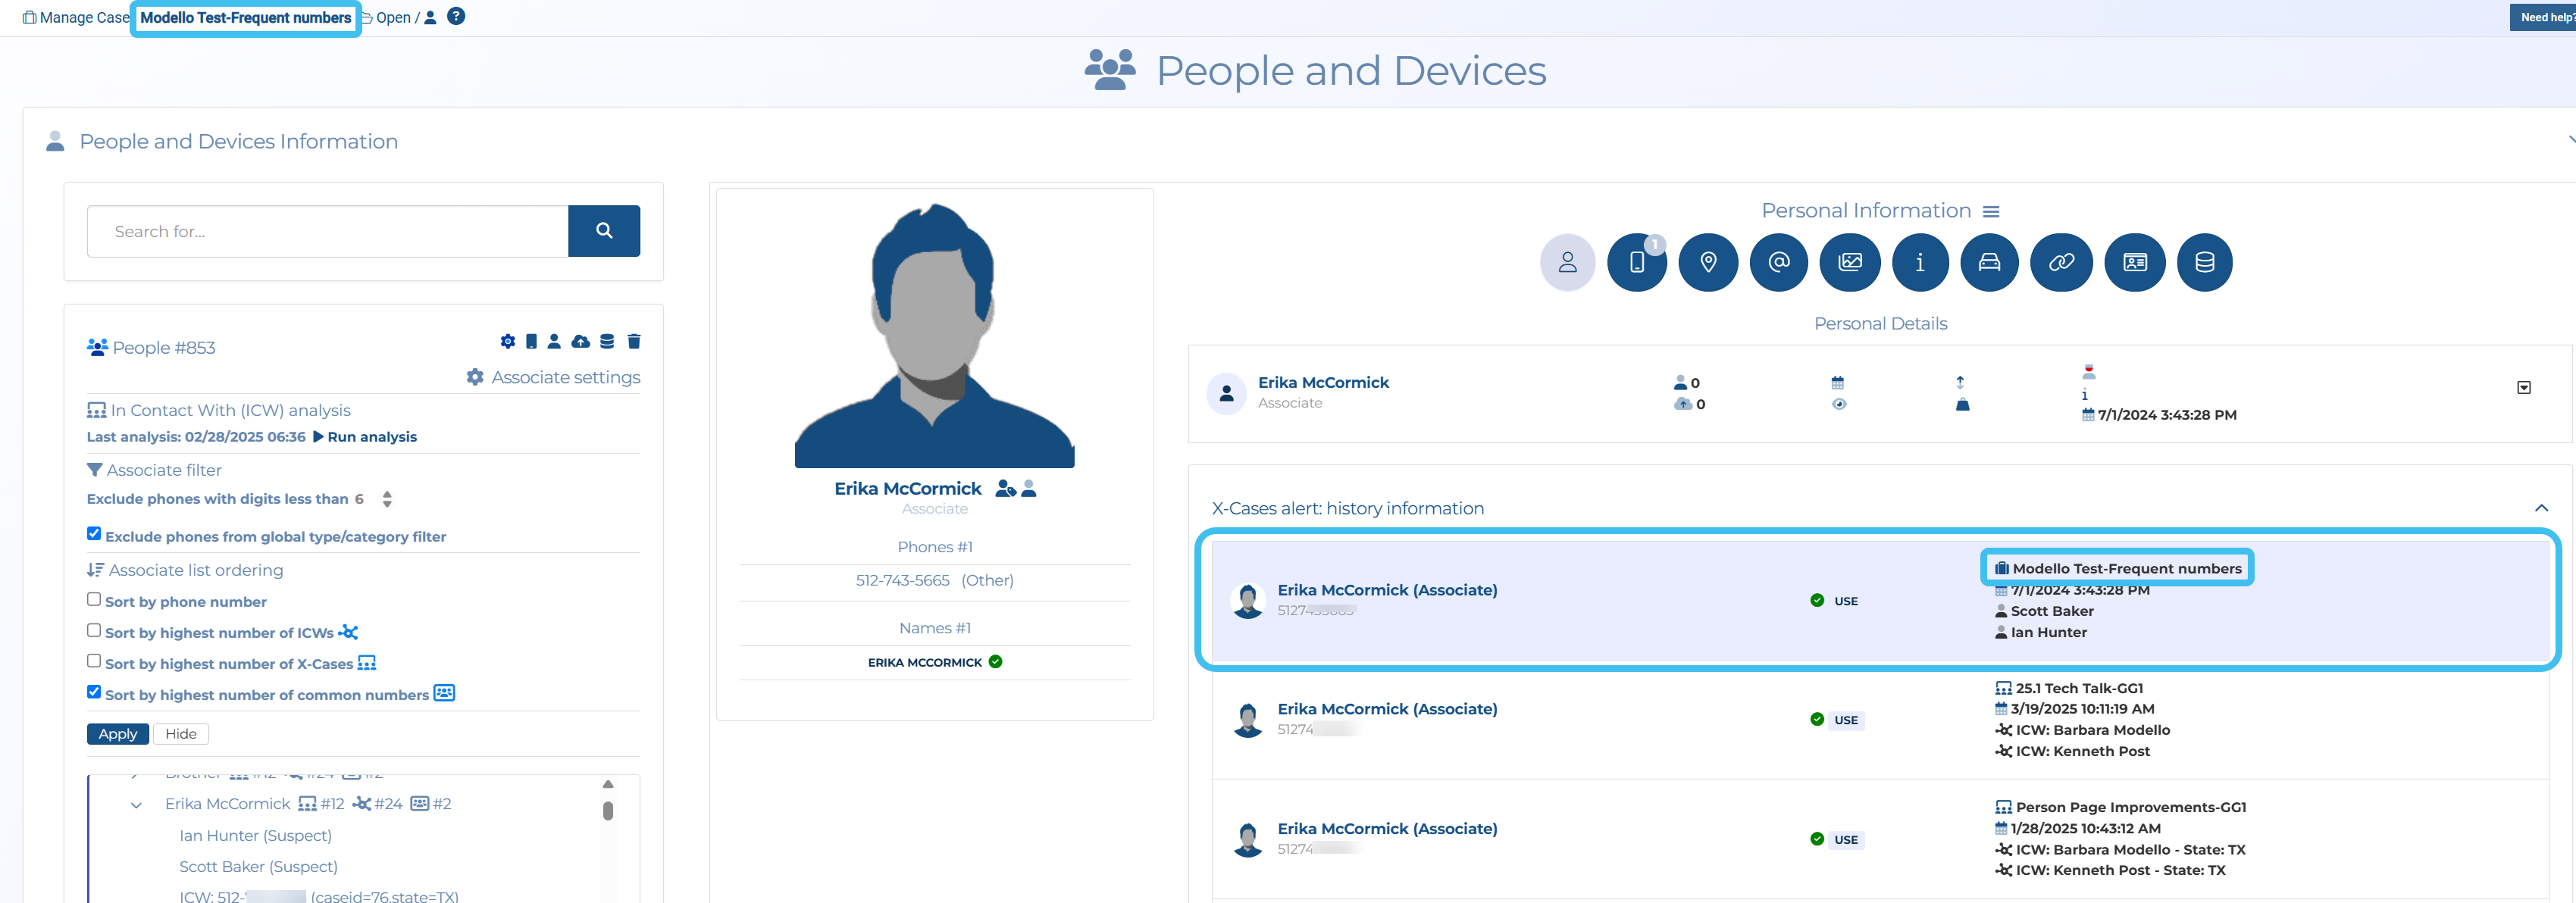
The X-Cases alert: history information section now displays the current case results at the top of the list and highlighted in blue.
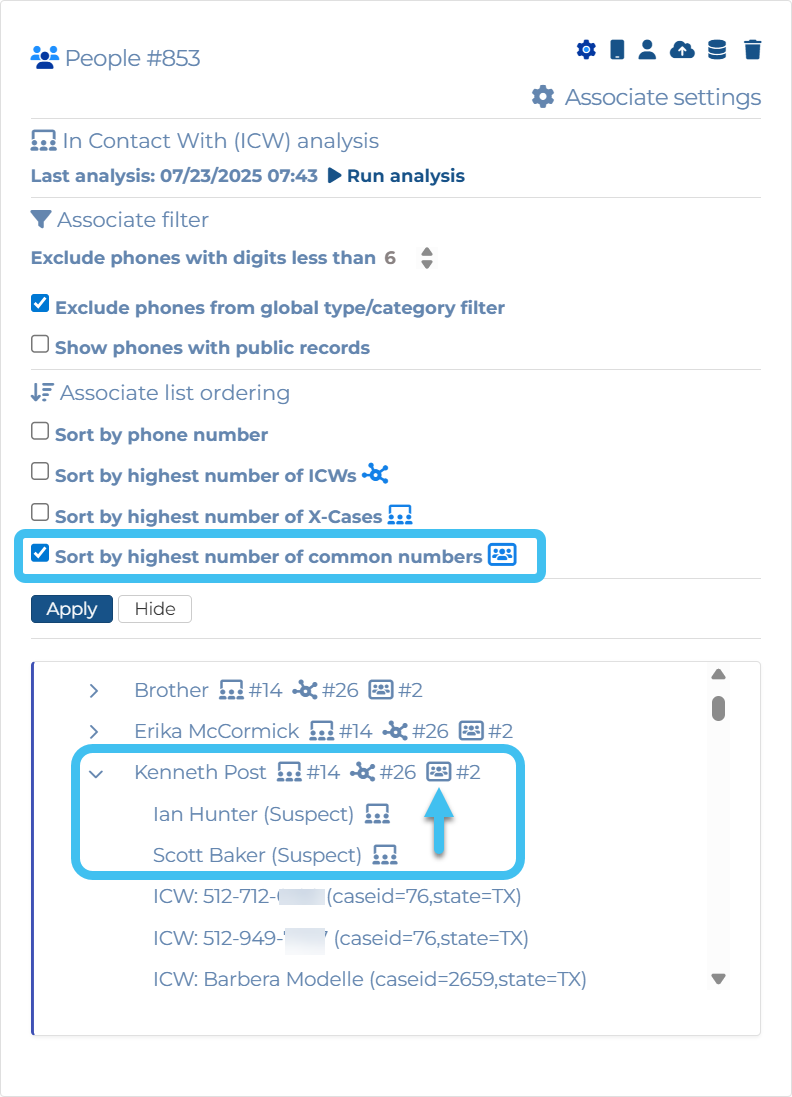
A Sort by highest number of common numbers setting has been added to the Associate settings so that you can now choose for the results to be ordered by the associate with the highest number of common target numbers. The number of common numbers is displayed alongside the associate number.
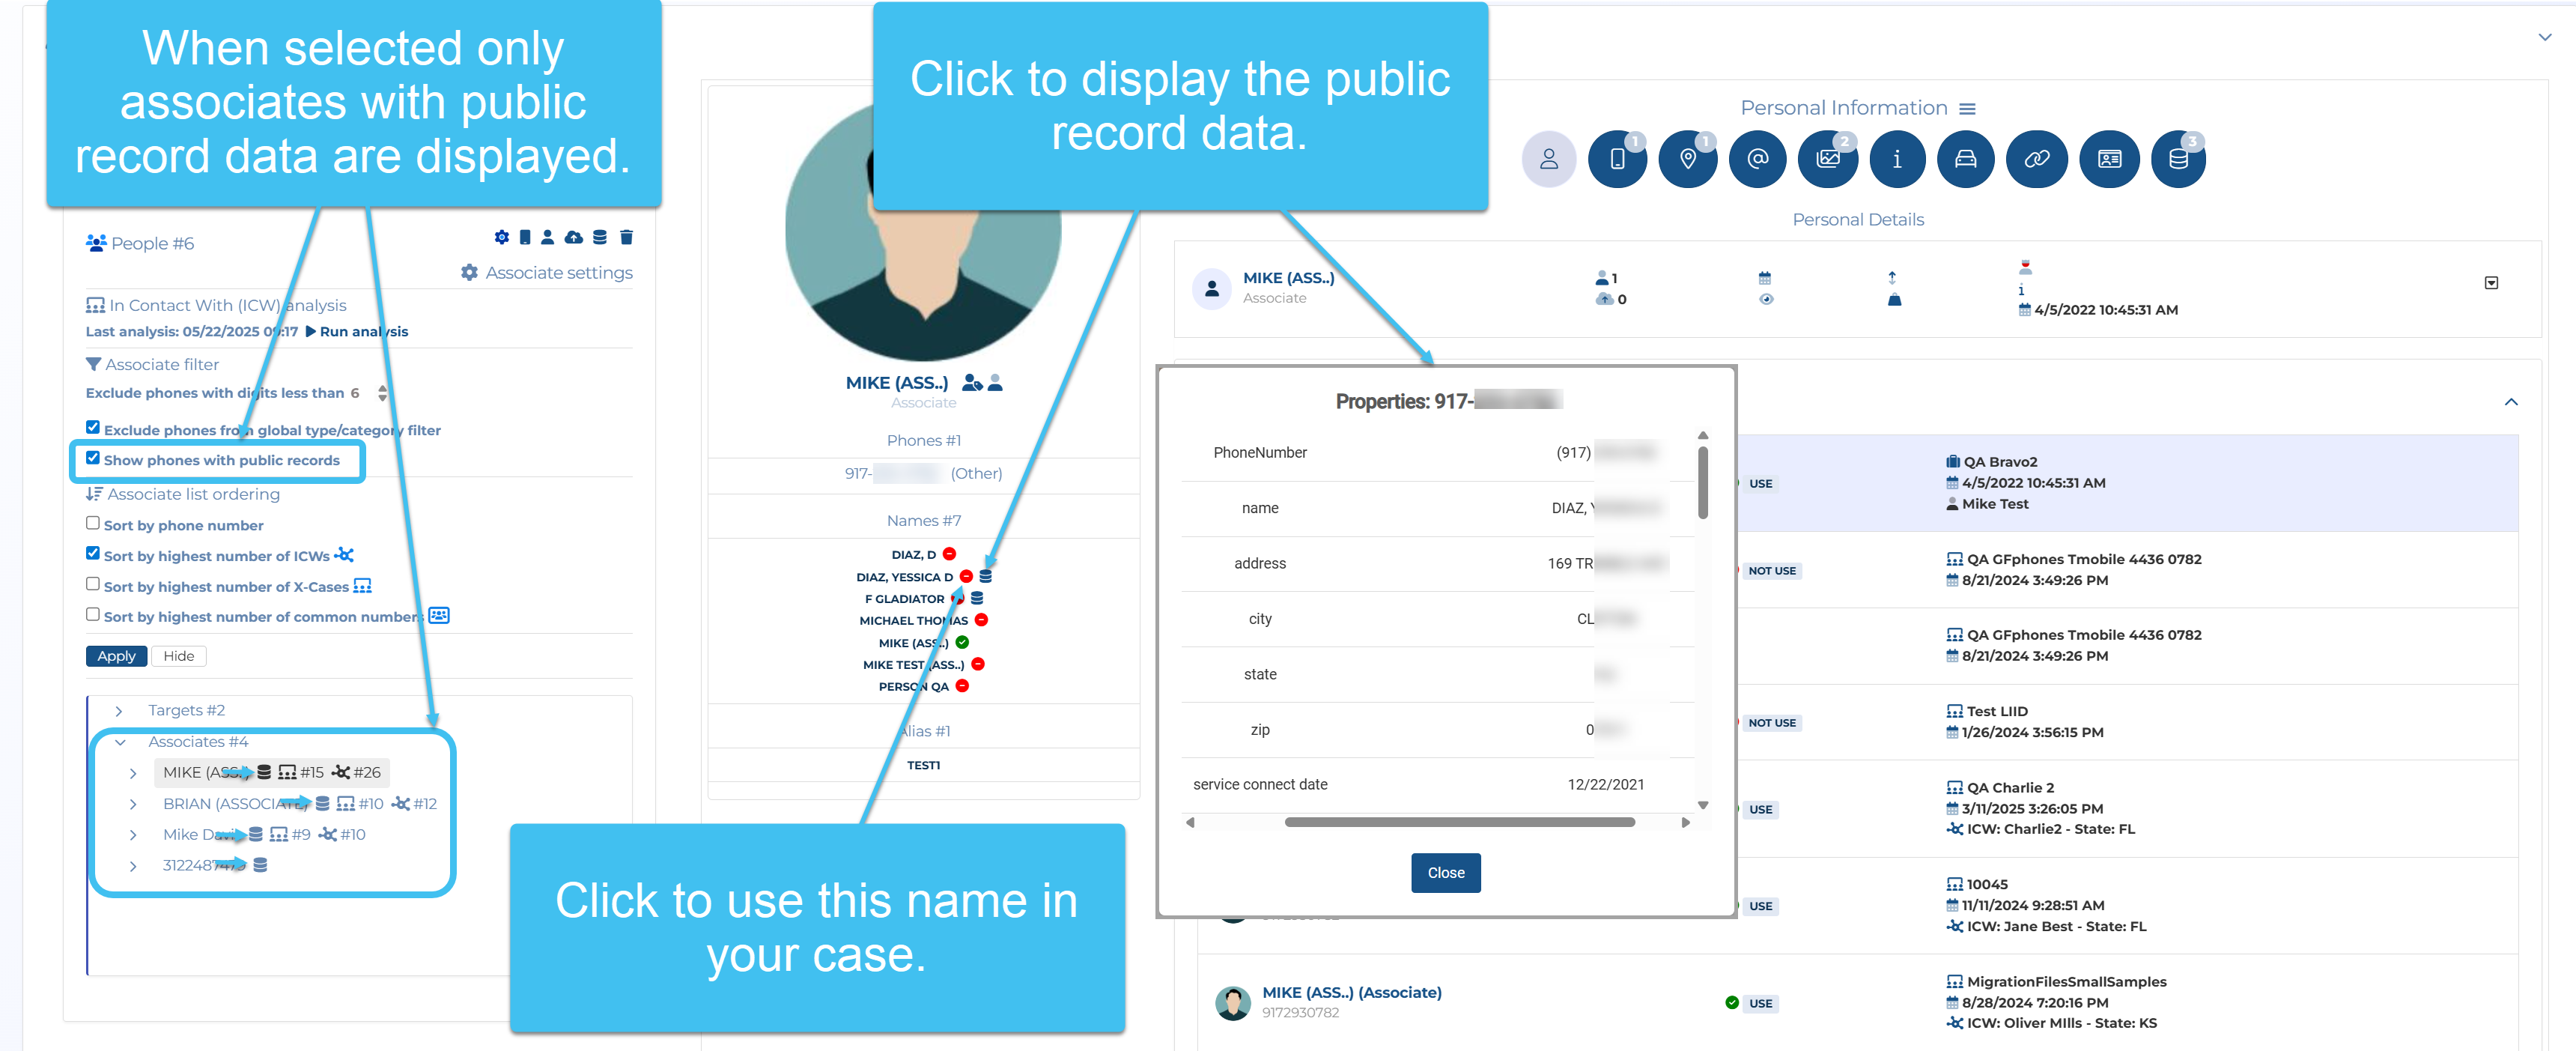
A Show phones with public records setting has been added to the Associate settings. When selected only the associate phones which have public records data are displayed. You can then click on the associate's name, then click on
 to view the public records details, and click on
  to use their name from the public records.
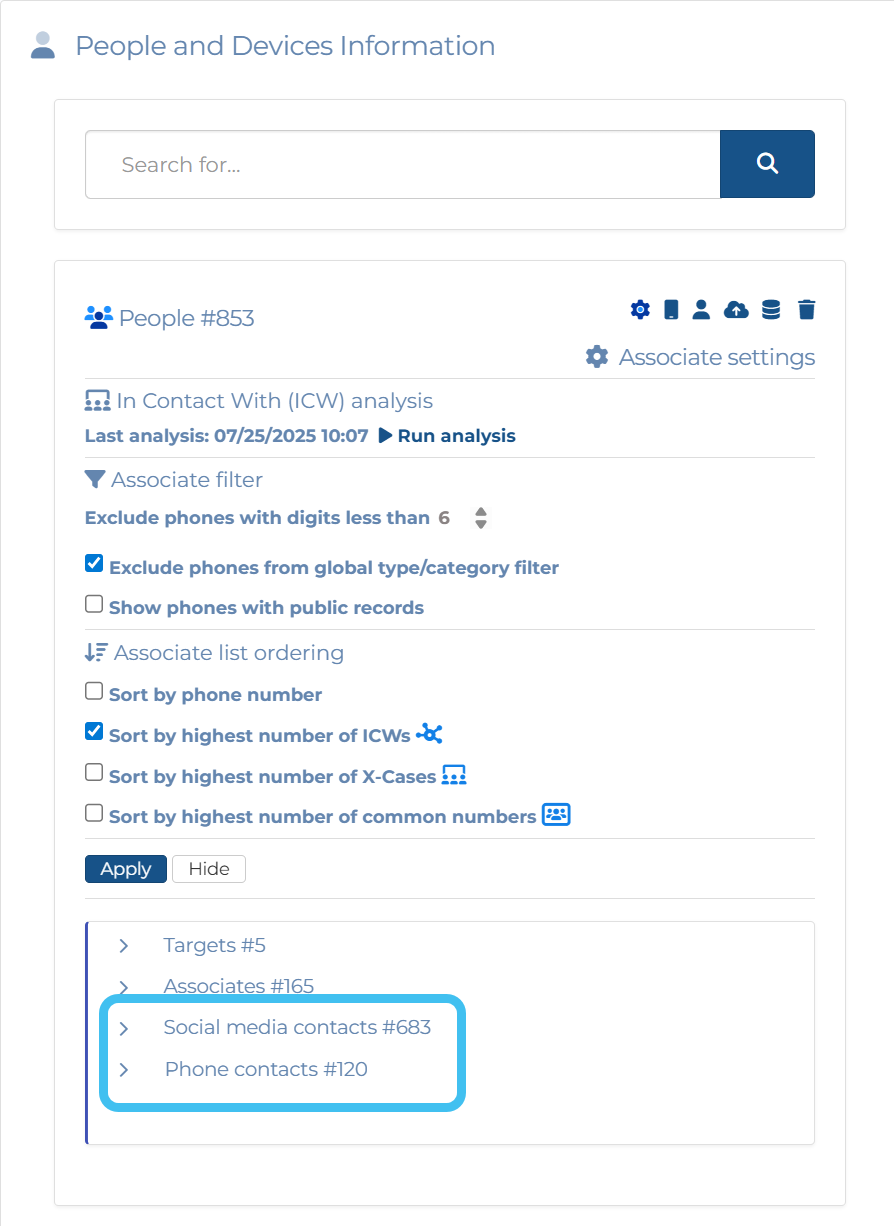
 Two new groups have been created: Social media contacts and Phone contacts. The only contacts that are now listed in Associates are those from the CDR files.
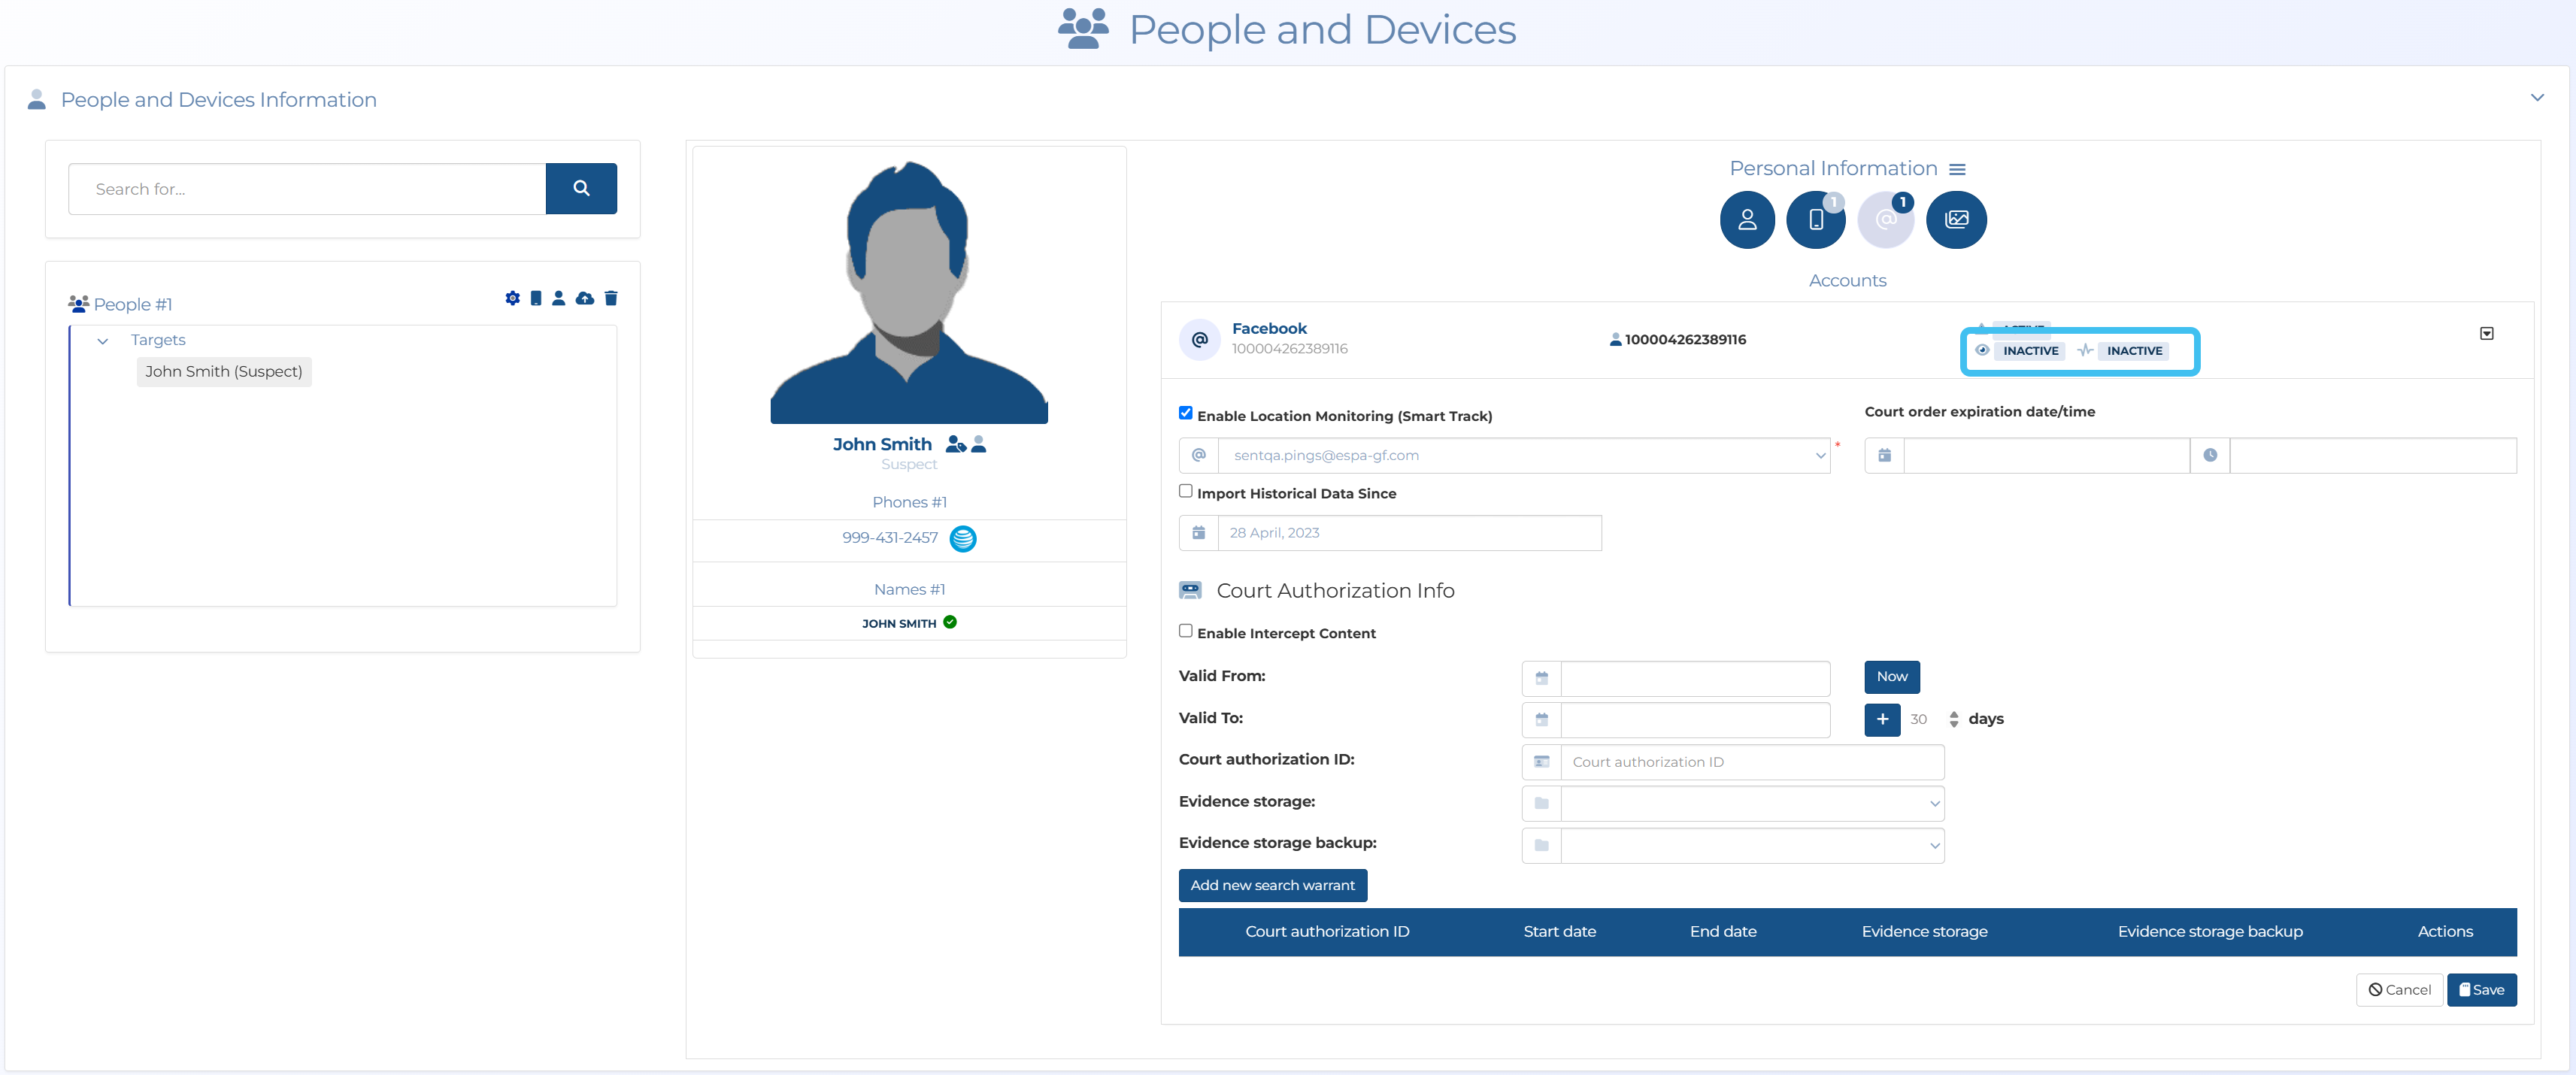
The Accounts tab now allows you to enable intercept monitoring on a social media account, and quickly access the monitoring settings.
- The People and Devices screen's People and devices analysis group has had a number of enhancements:
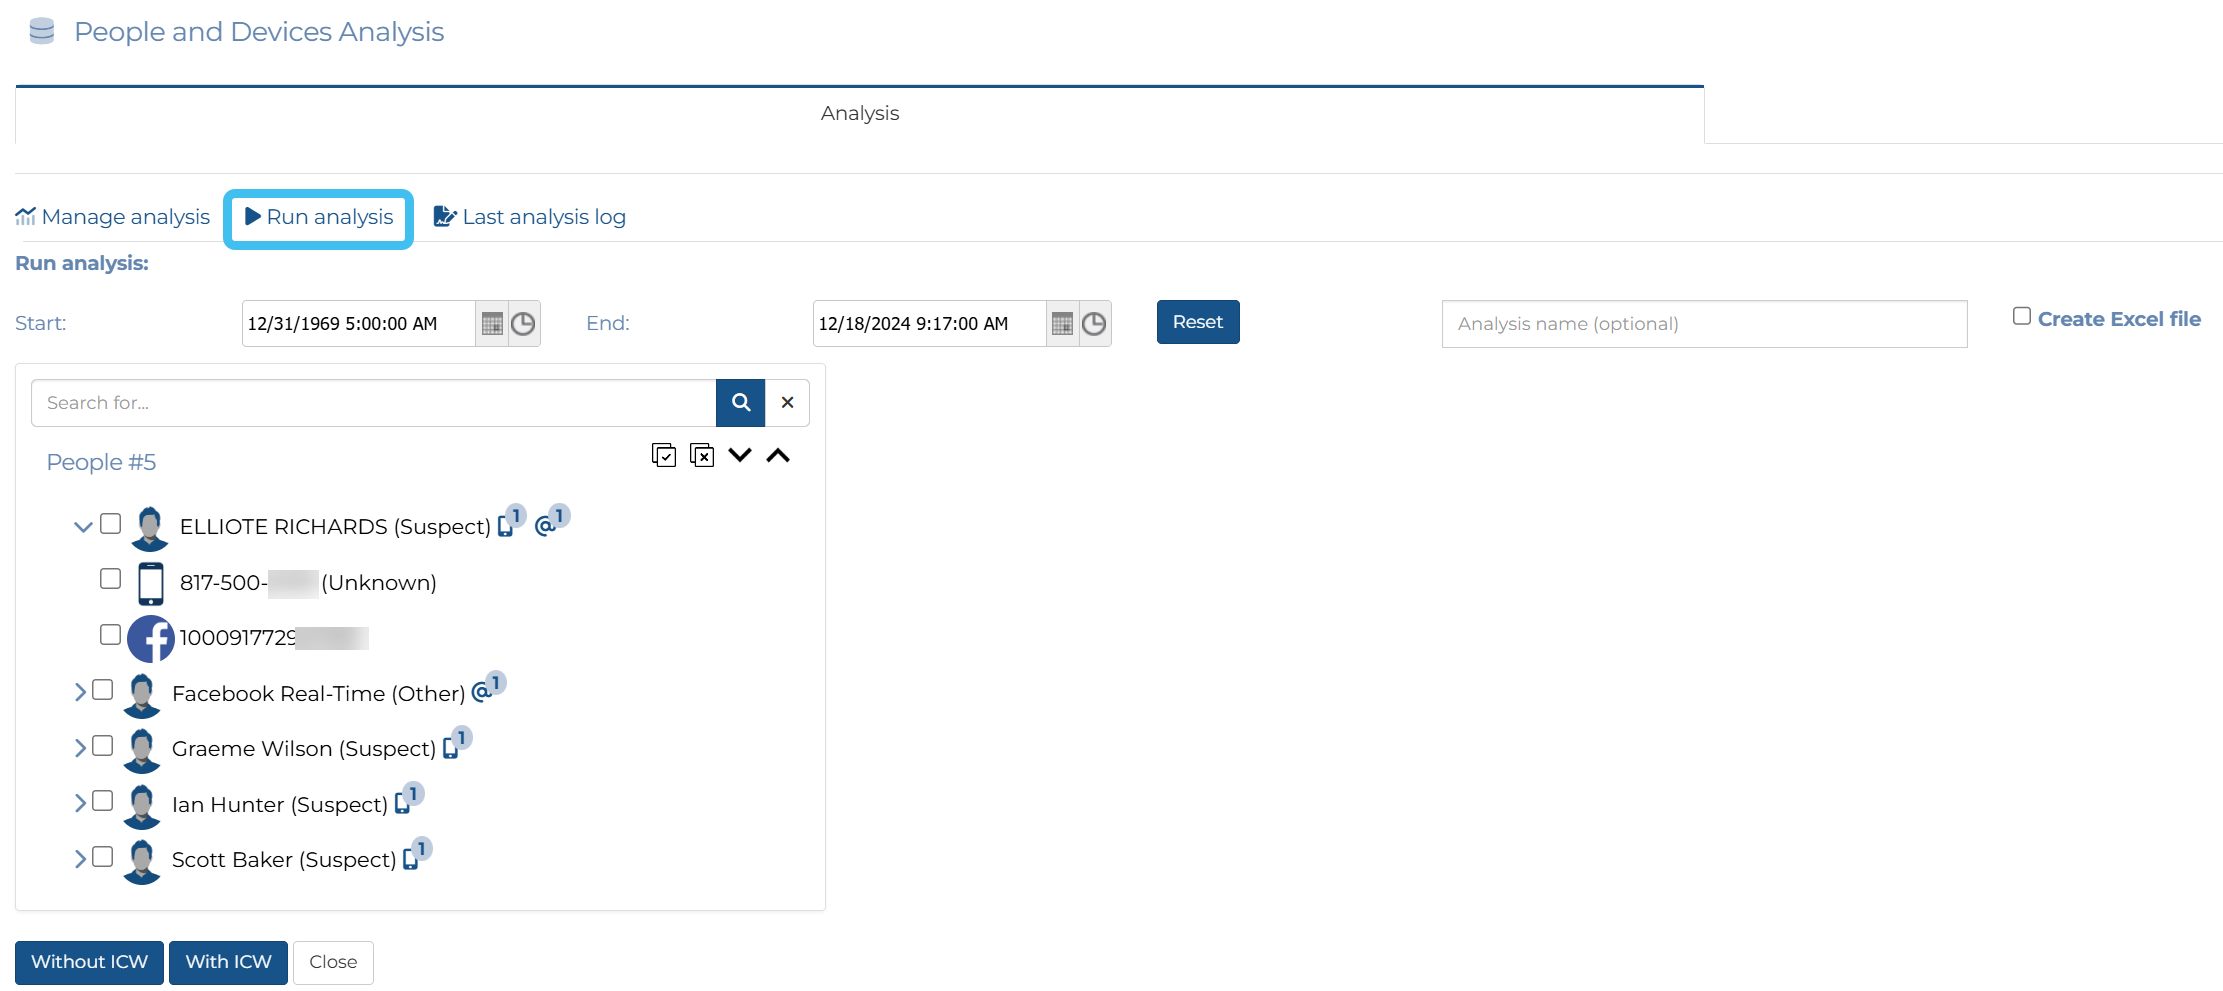
On the People and devices analysis group, when you click Run analysis you can now customize what is included in the analysis. You can select:
the date range.
a name for your analysis.
whether or not you want an Excel output created.
which people and their data is included, for example which of their phones and accounts.
whether to run the analysis with or without ICW (in contact with). If you are not interested in ICW then it is much faster to run the analysis without it.
Previously you could only view the last analysis that was run. Now each analysis is saved and can be selected for viewing, and managed using the new Manage analysis.
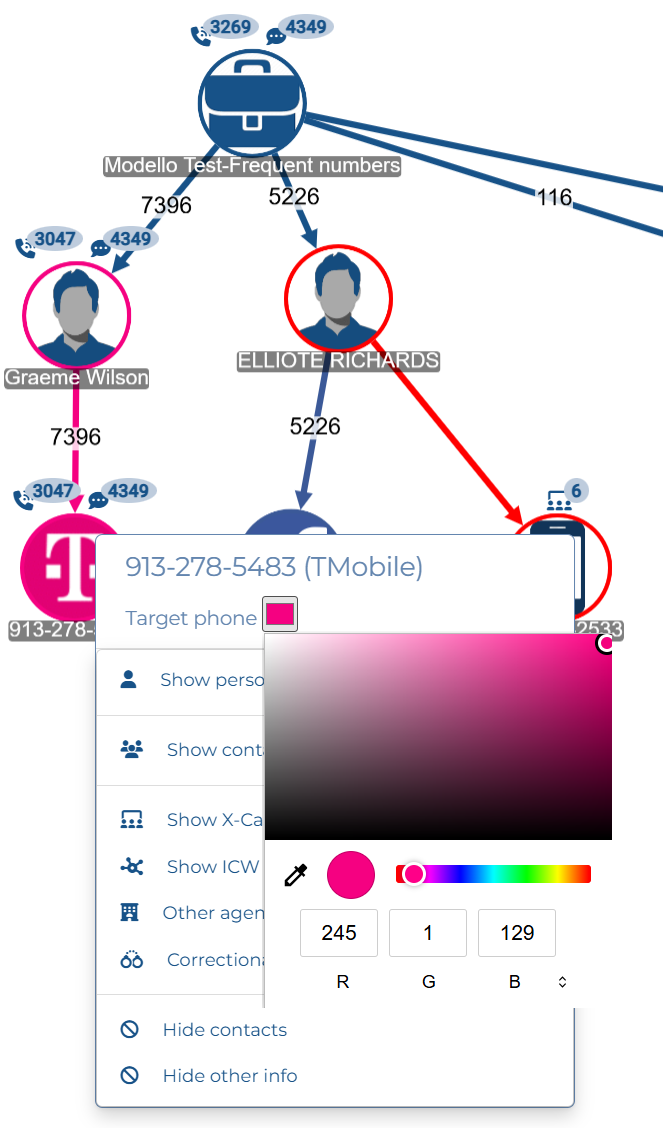
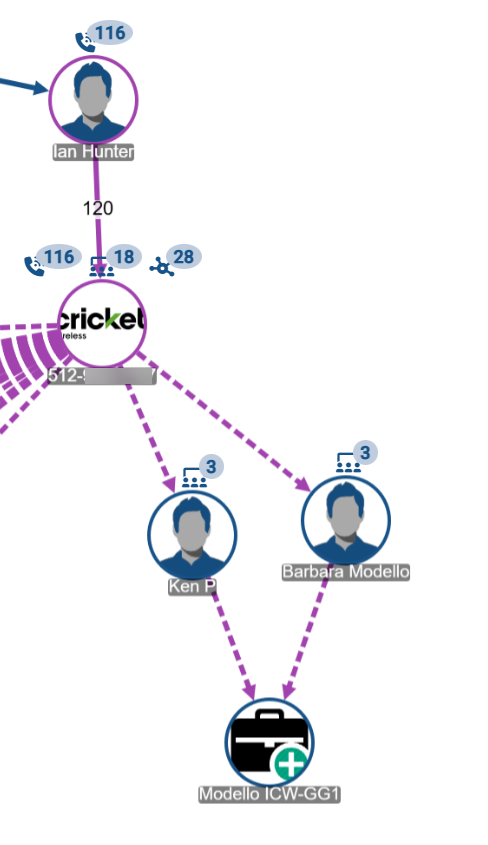
On the Link analysis tab, information icons are now displayed above the nodes providing a summary of for example the number of calls, number of x-cases and number of ICW (in contact with).
On the Link analysis tab, you can now change the color used to represent the target devices.
On the Link analysis tab, the ICW (in contact with) lines are now dashed.
On the Frequent contacts and Common contacts tabs Notes and Other names columns have been added.
On the Frequent contacts and Common contacts tabs you can now open the person info pop-up from the following columns: Target name, Target account, Associate name and Associate account.
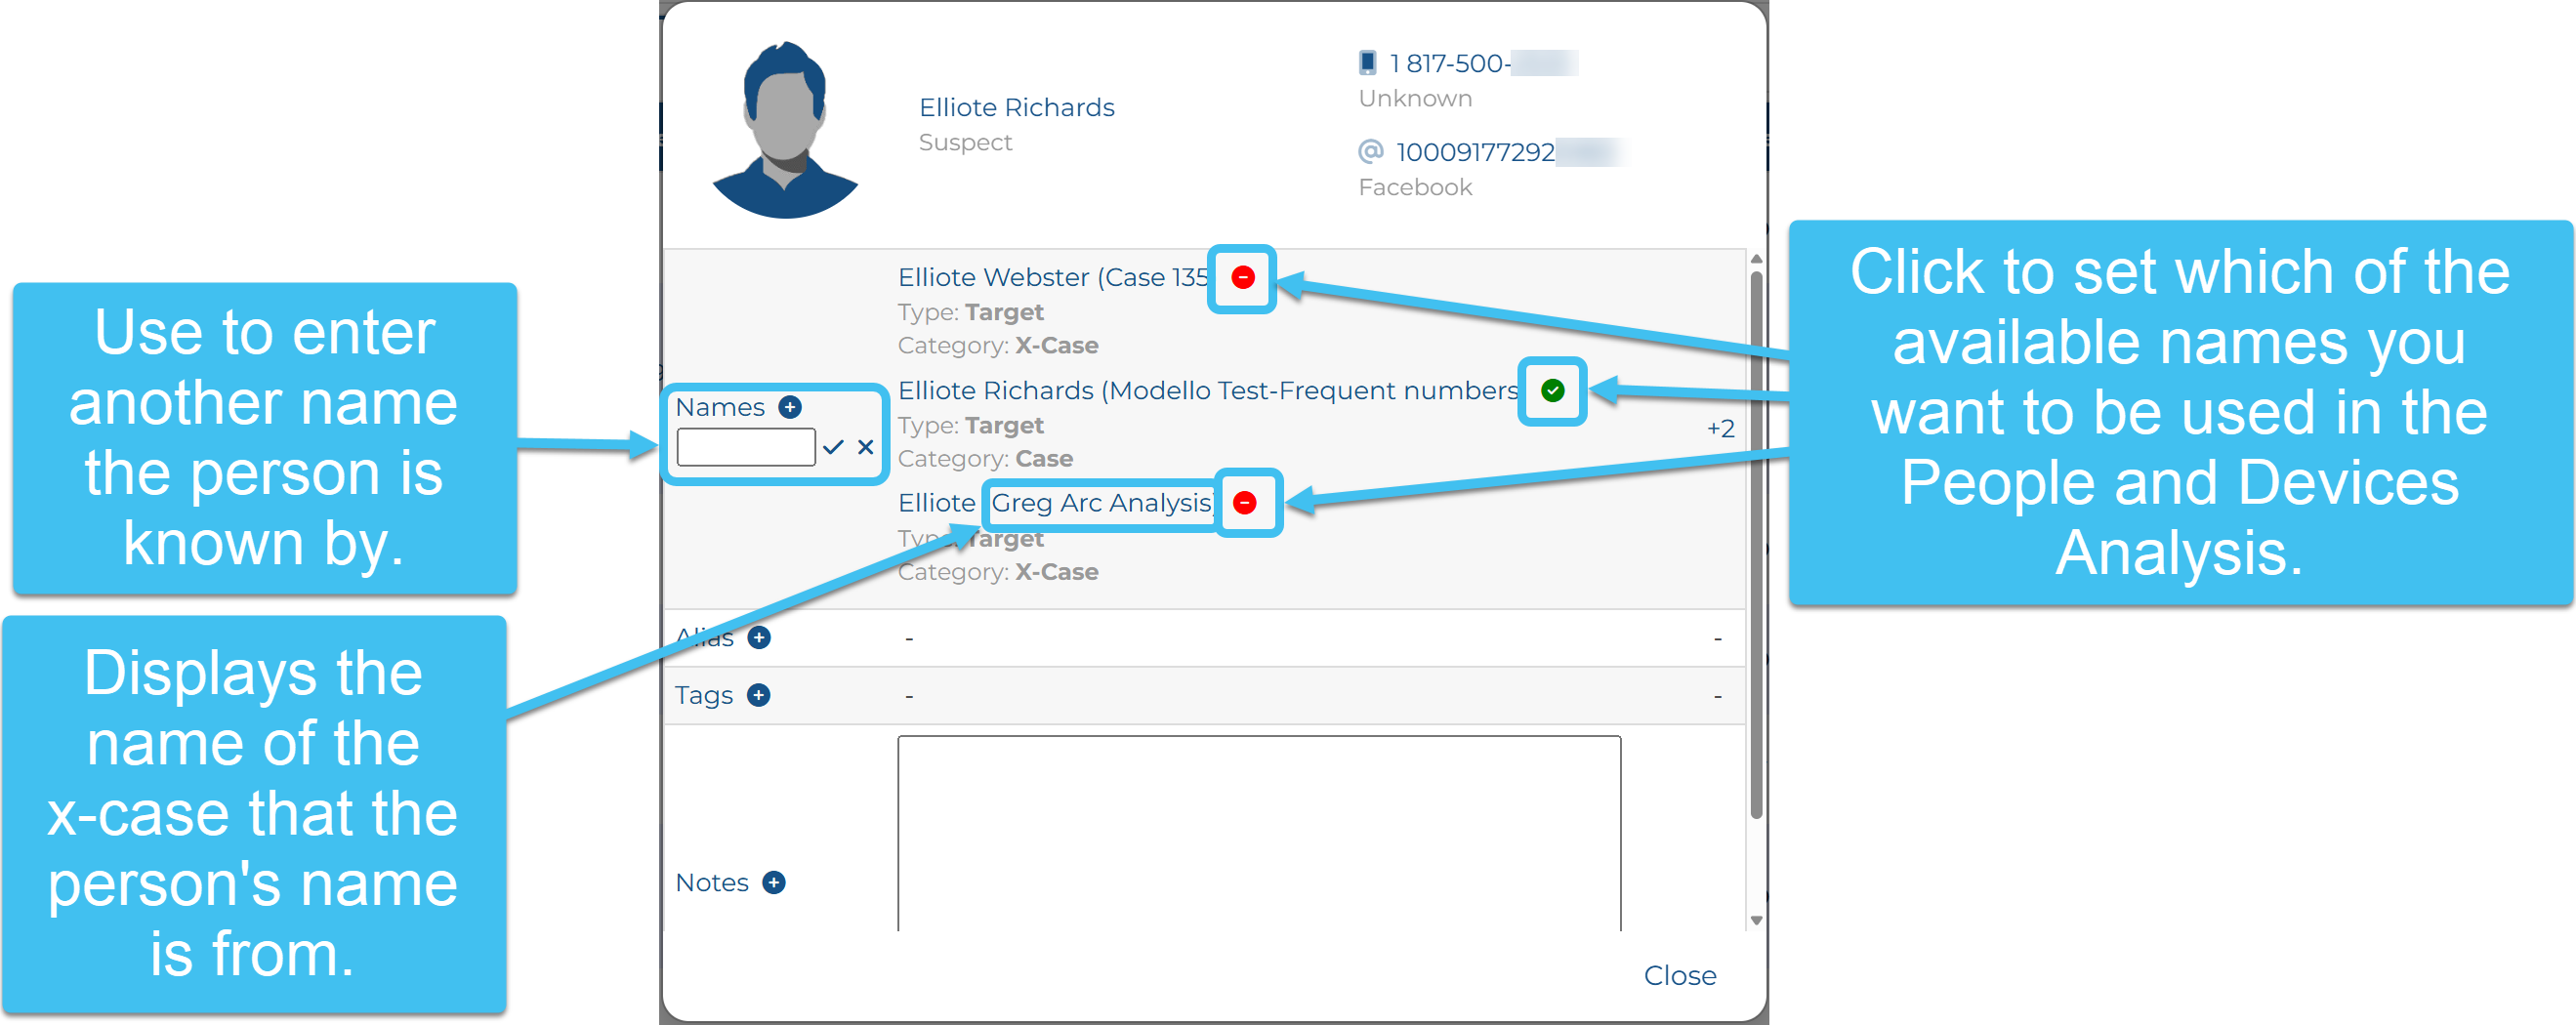
The person info pop-up now:
allows you to add additional names for the person.
displays all the x-case names that the person is in, along with their name in that case.
allows you to set which name is used in the People and devices analysis.
-
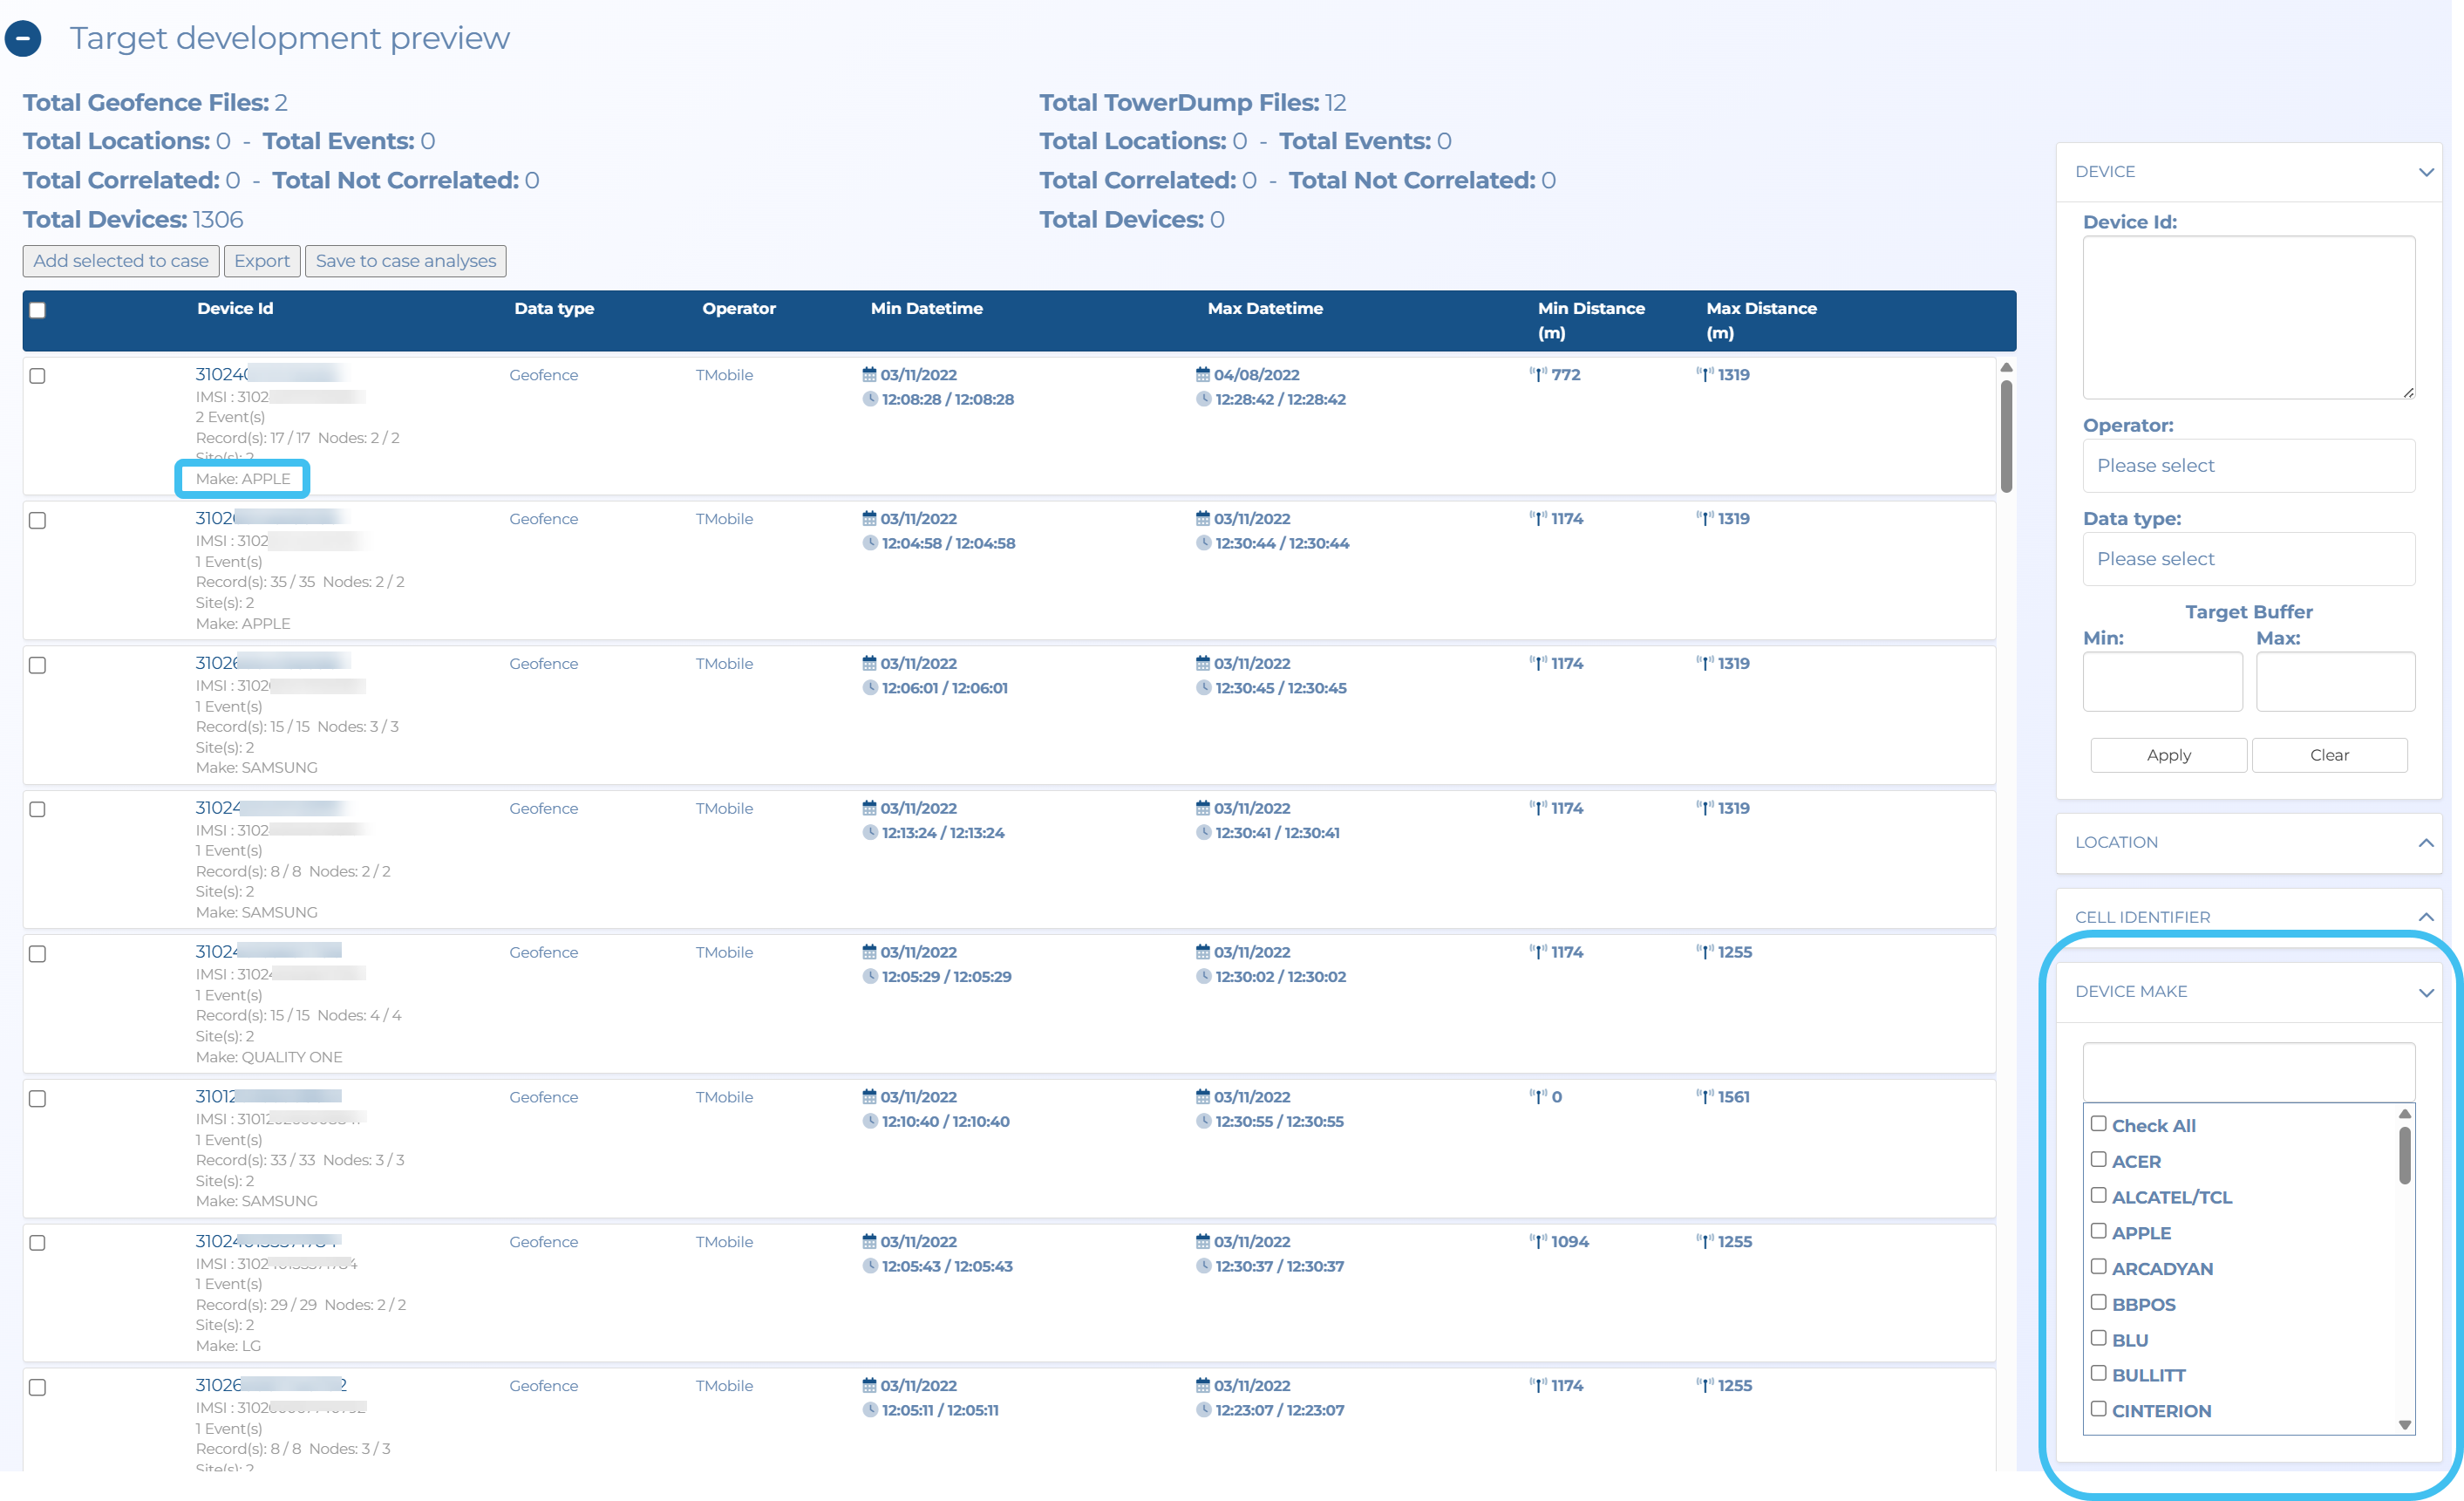
The device's make is now displayed on the Target development preview tab of the Manage files screen. This means that you can now filter the results based on the device type. This can be useful for example if you know the suspect is driving a specific vehicle, such as a Tesla, and you can therefore filter to only see Tesla results.
A Device make column has also been added to the Target Development (Through Geofence/Tower dump) IQ packet.
-
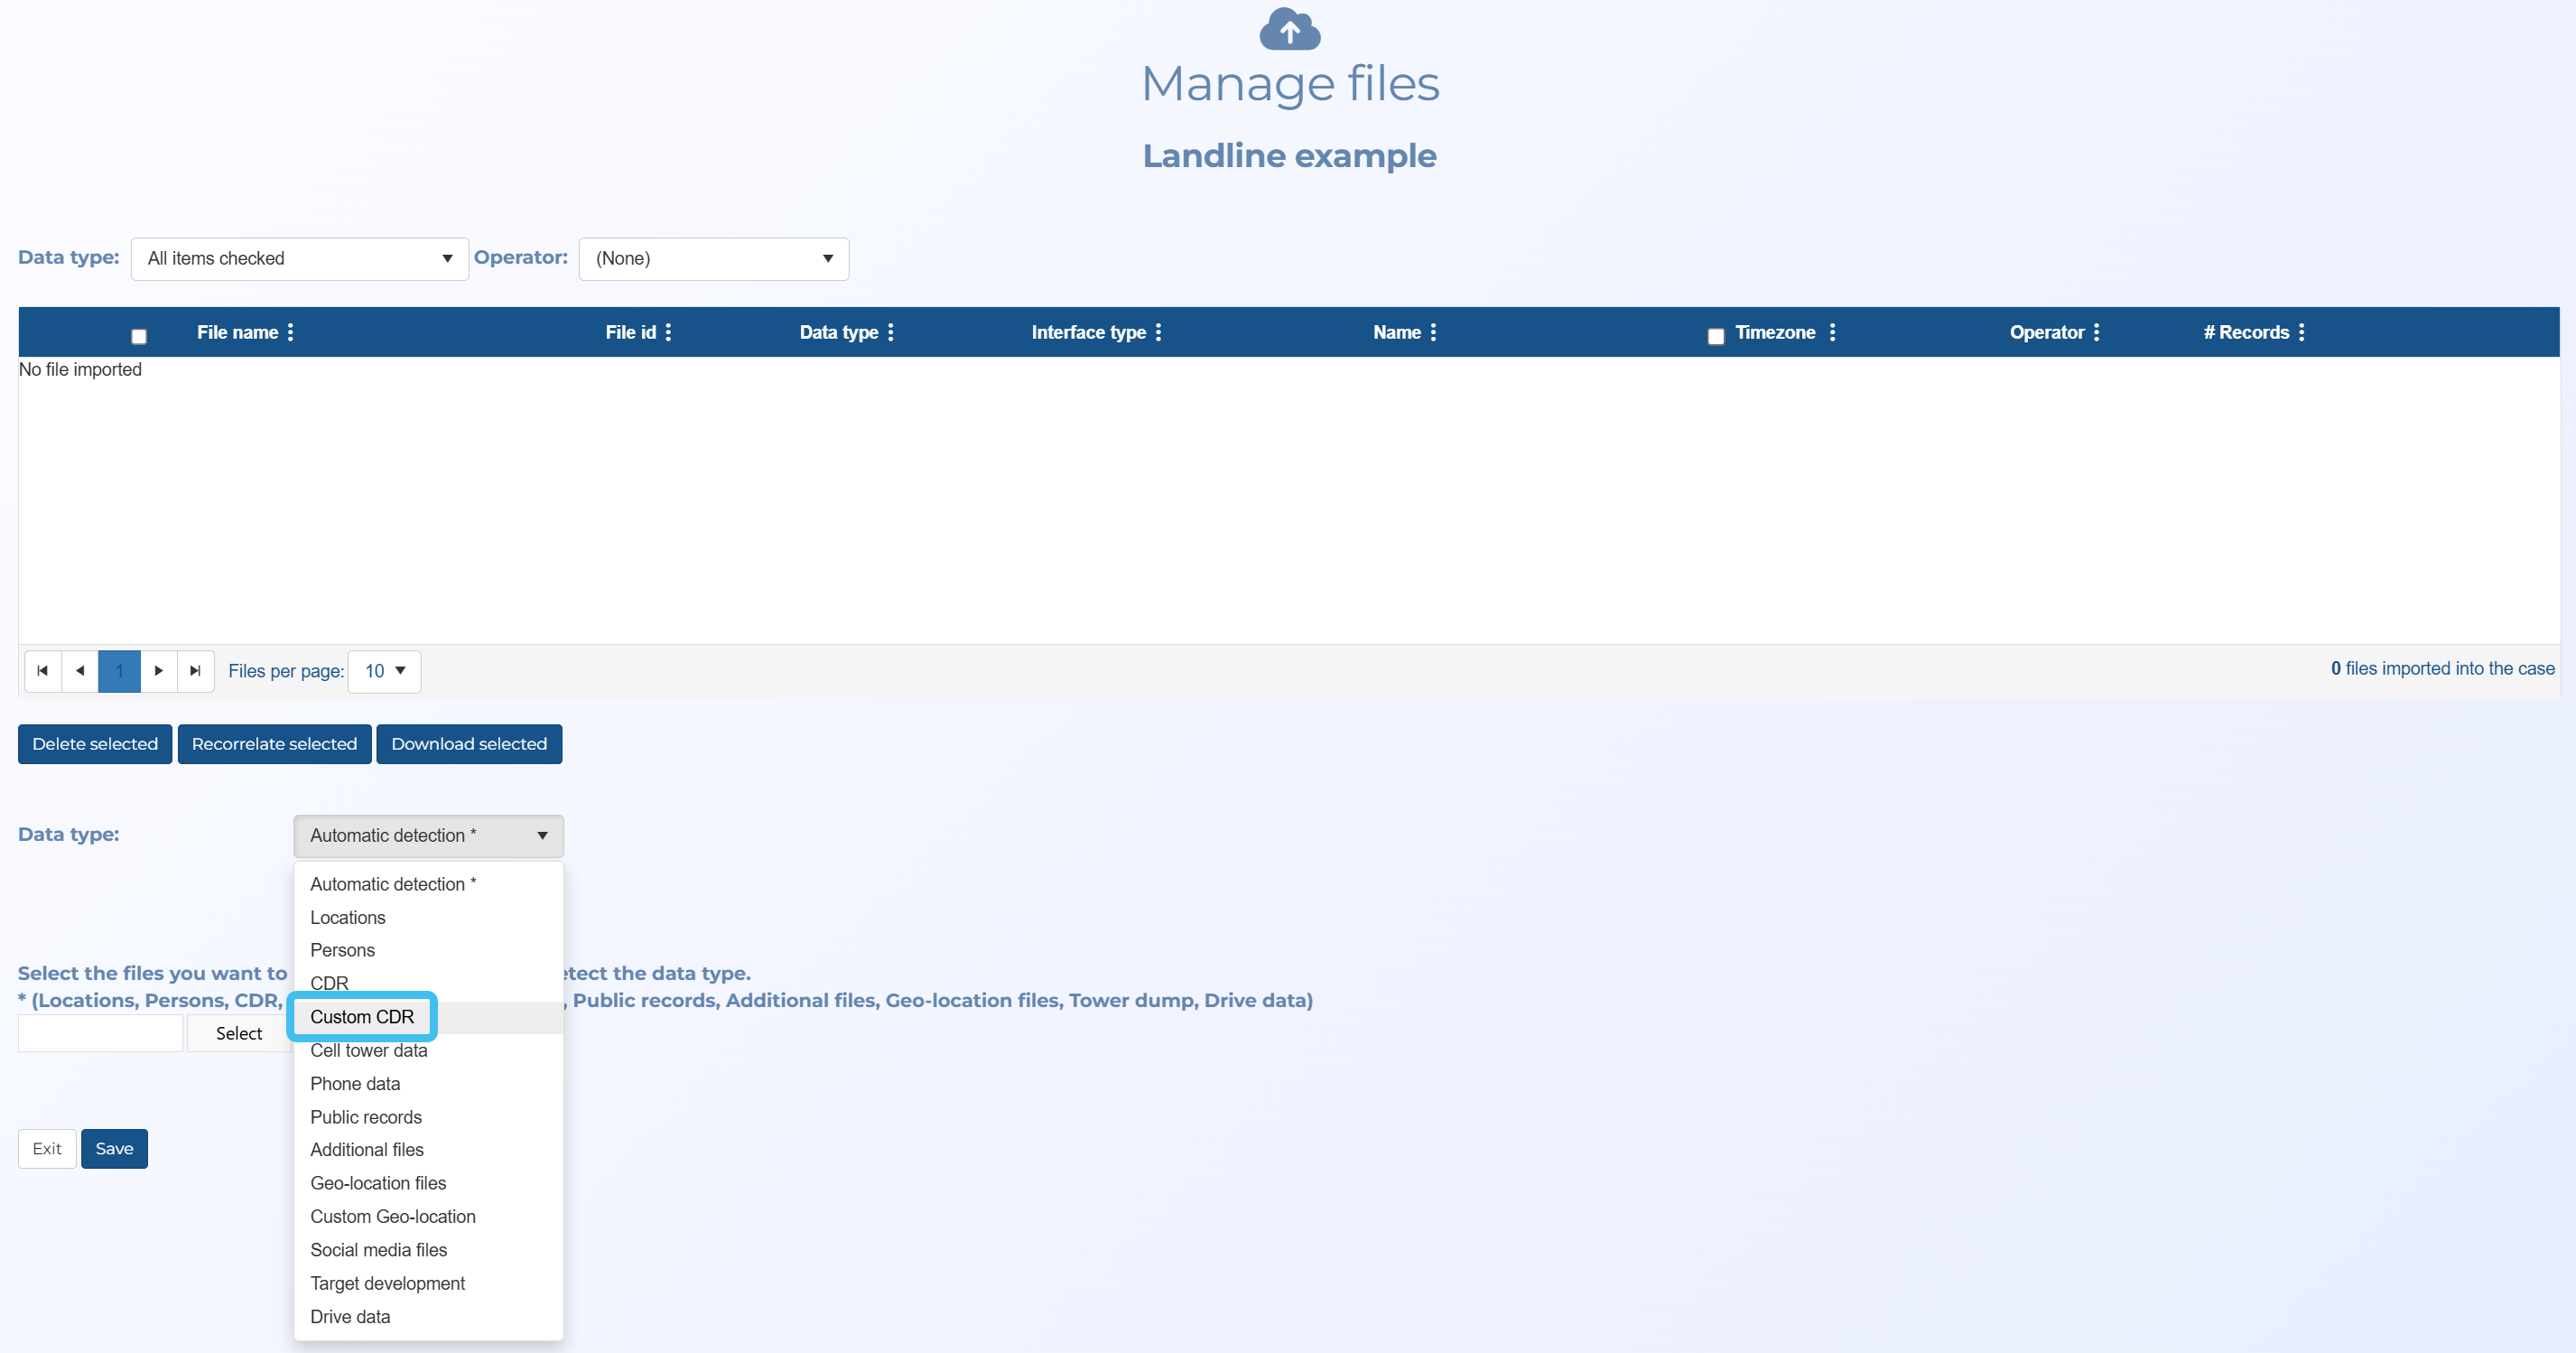
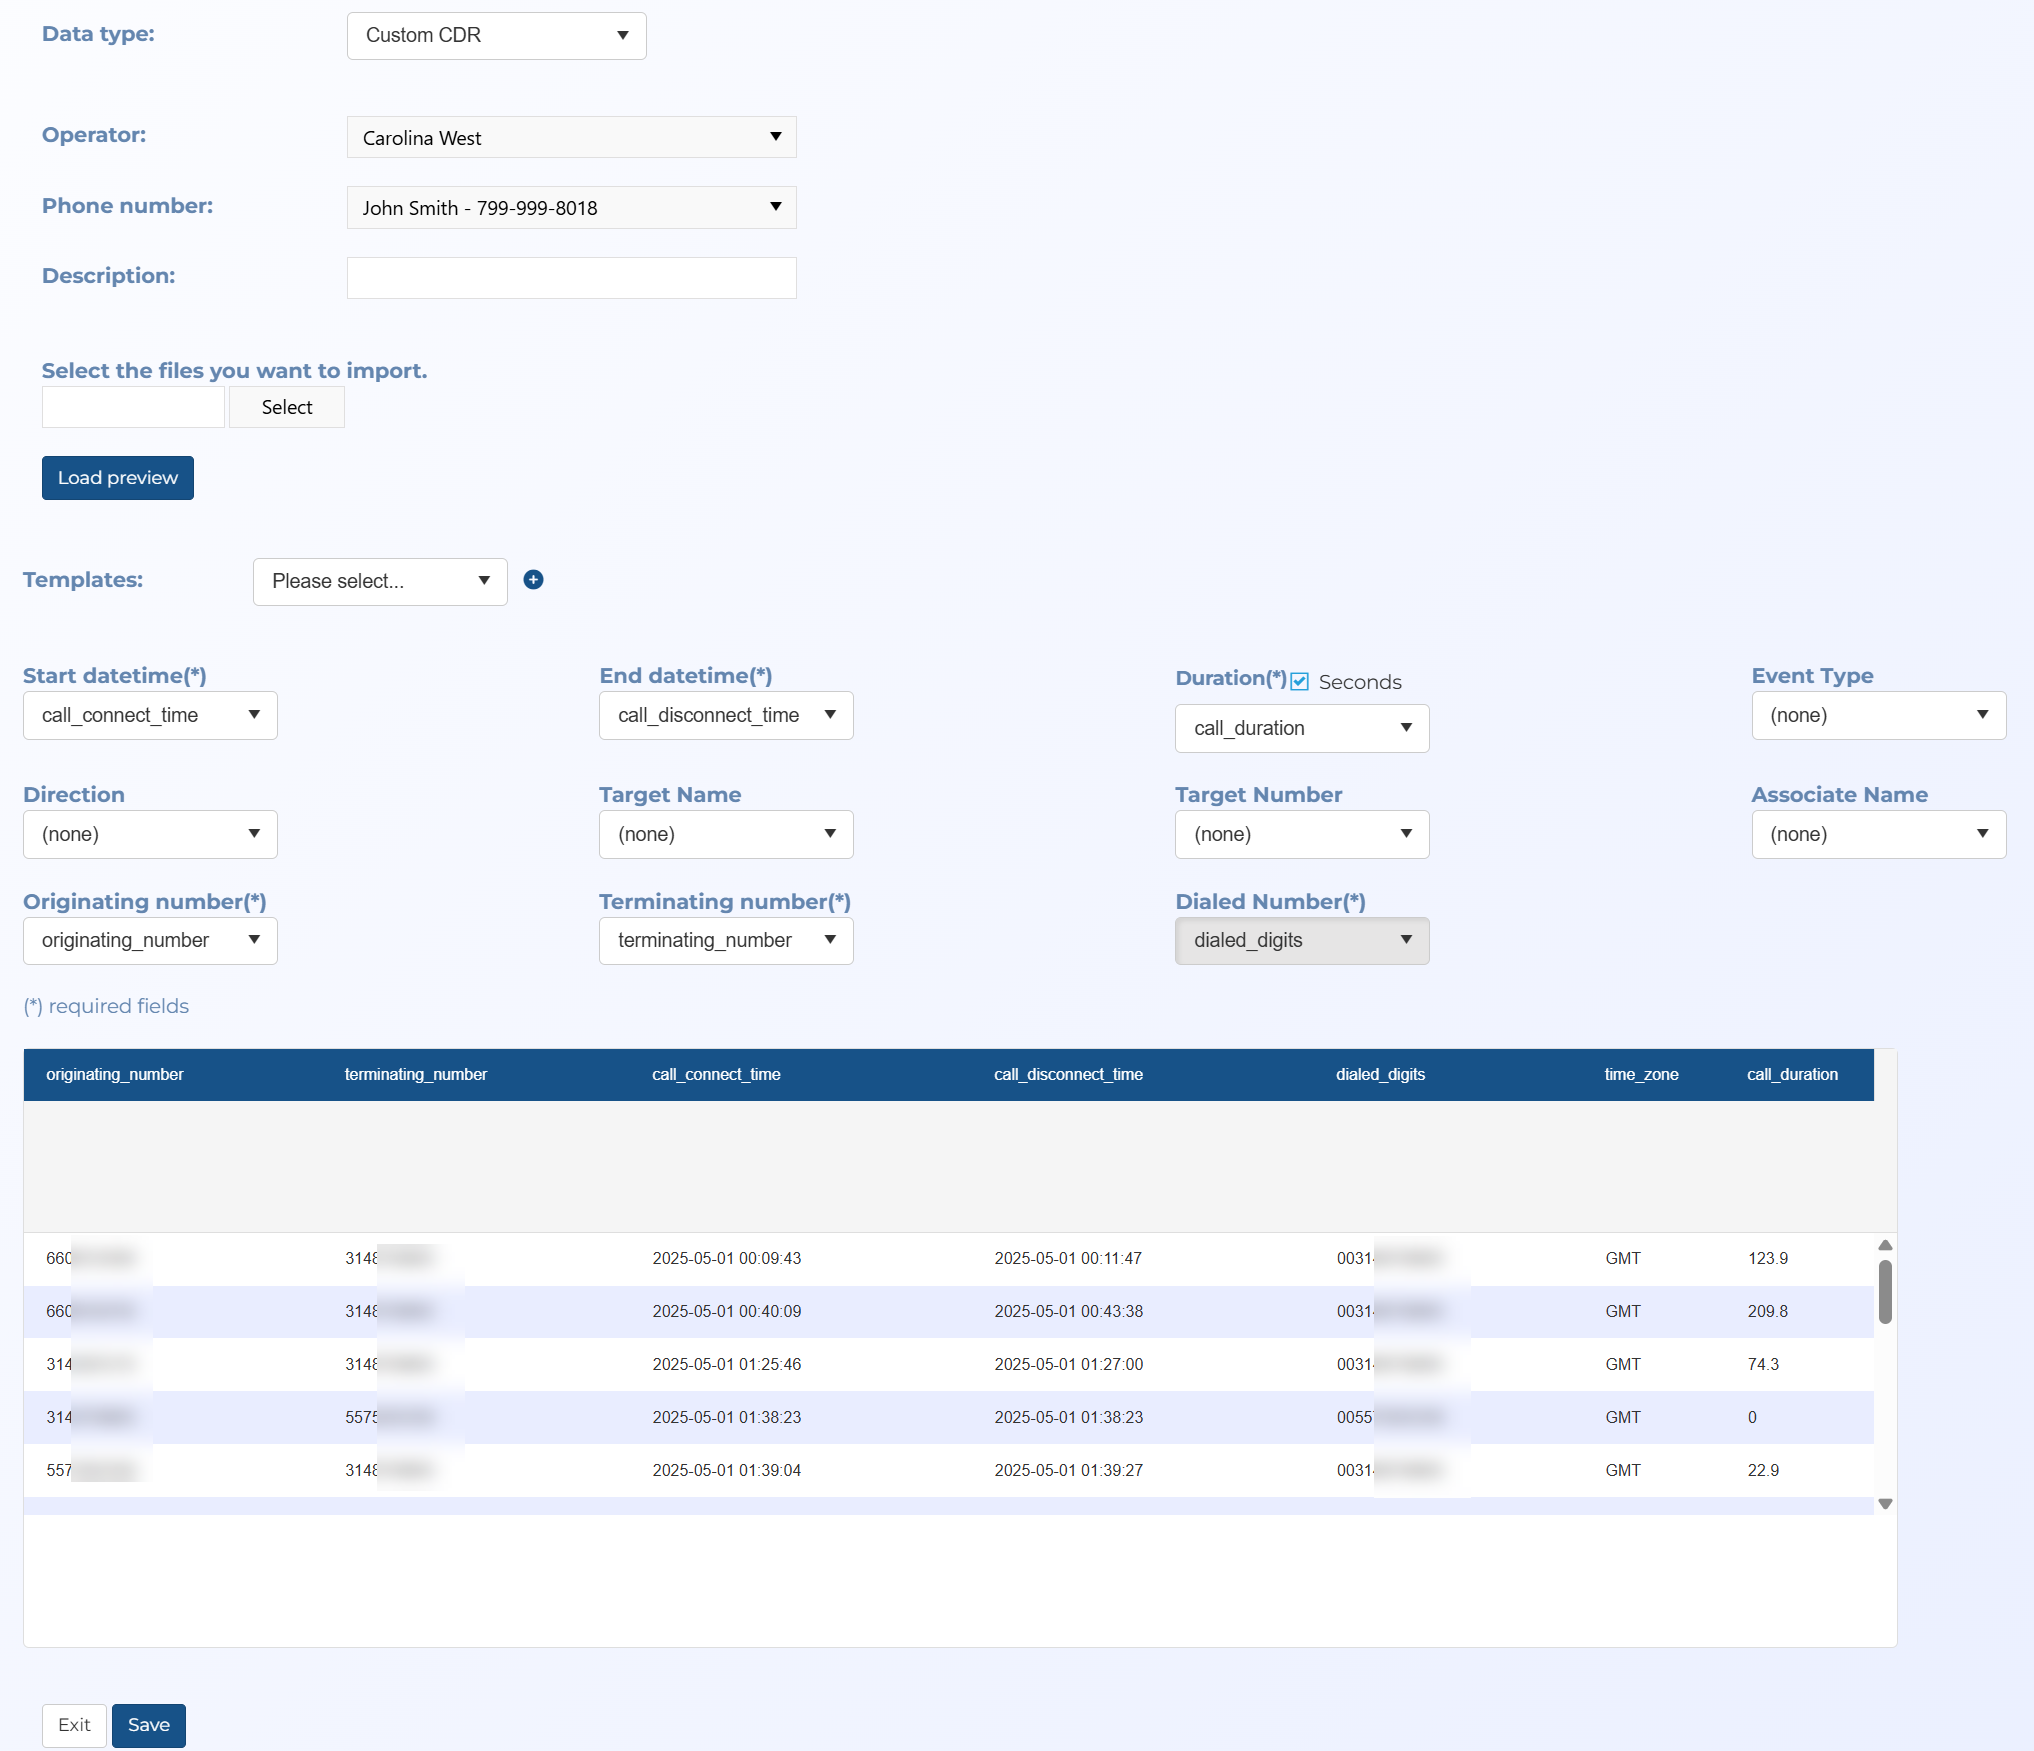
You can now import landline and wireless files which contain no location data using the new Custom CDR option on the Manage files screen. Although these files have no location data they provide you with information on the date/time that people were in contact.
The files are uploaded to a predefined phone number as either file type .xlsx, .xls or .csv. The Manage files screen provides you with a preview of the uploaded landline file and allows you to define which columns map to each of the OSS-ESPA settings. Start datetime, End datetime, Duration, Originating number, Terminating number and Dialed number are mandatory. OSS-ESPA automatically suggests the best mapping but you can change that if required. You can also save this mapping as a template for future use.
The contact information is then available to view on the ESPA analysis center's CDR data tab.
For information refer to How to import and view custom CDR files.
-
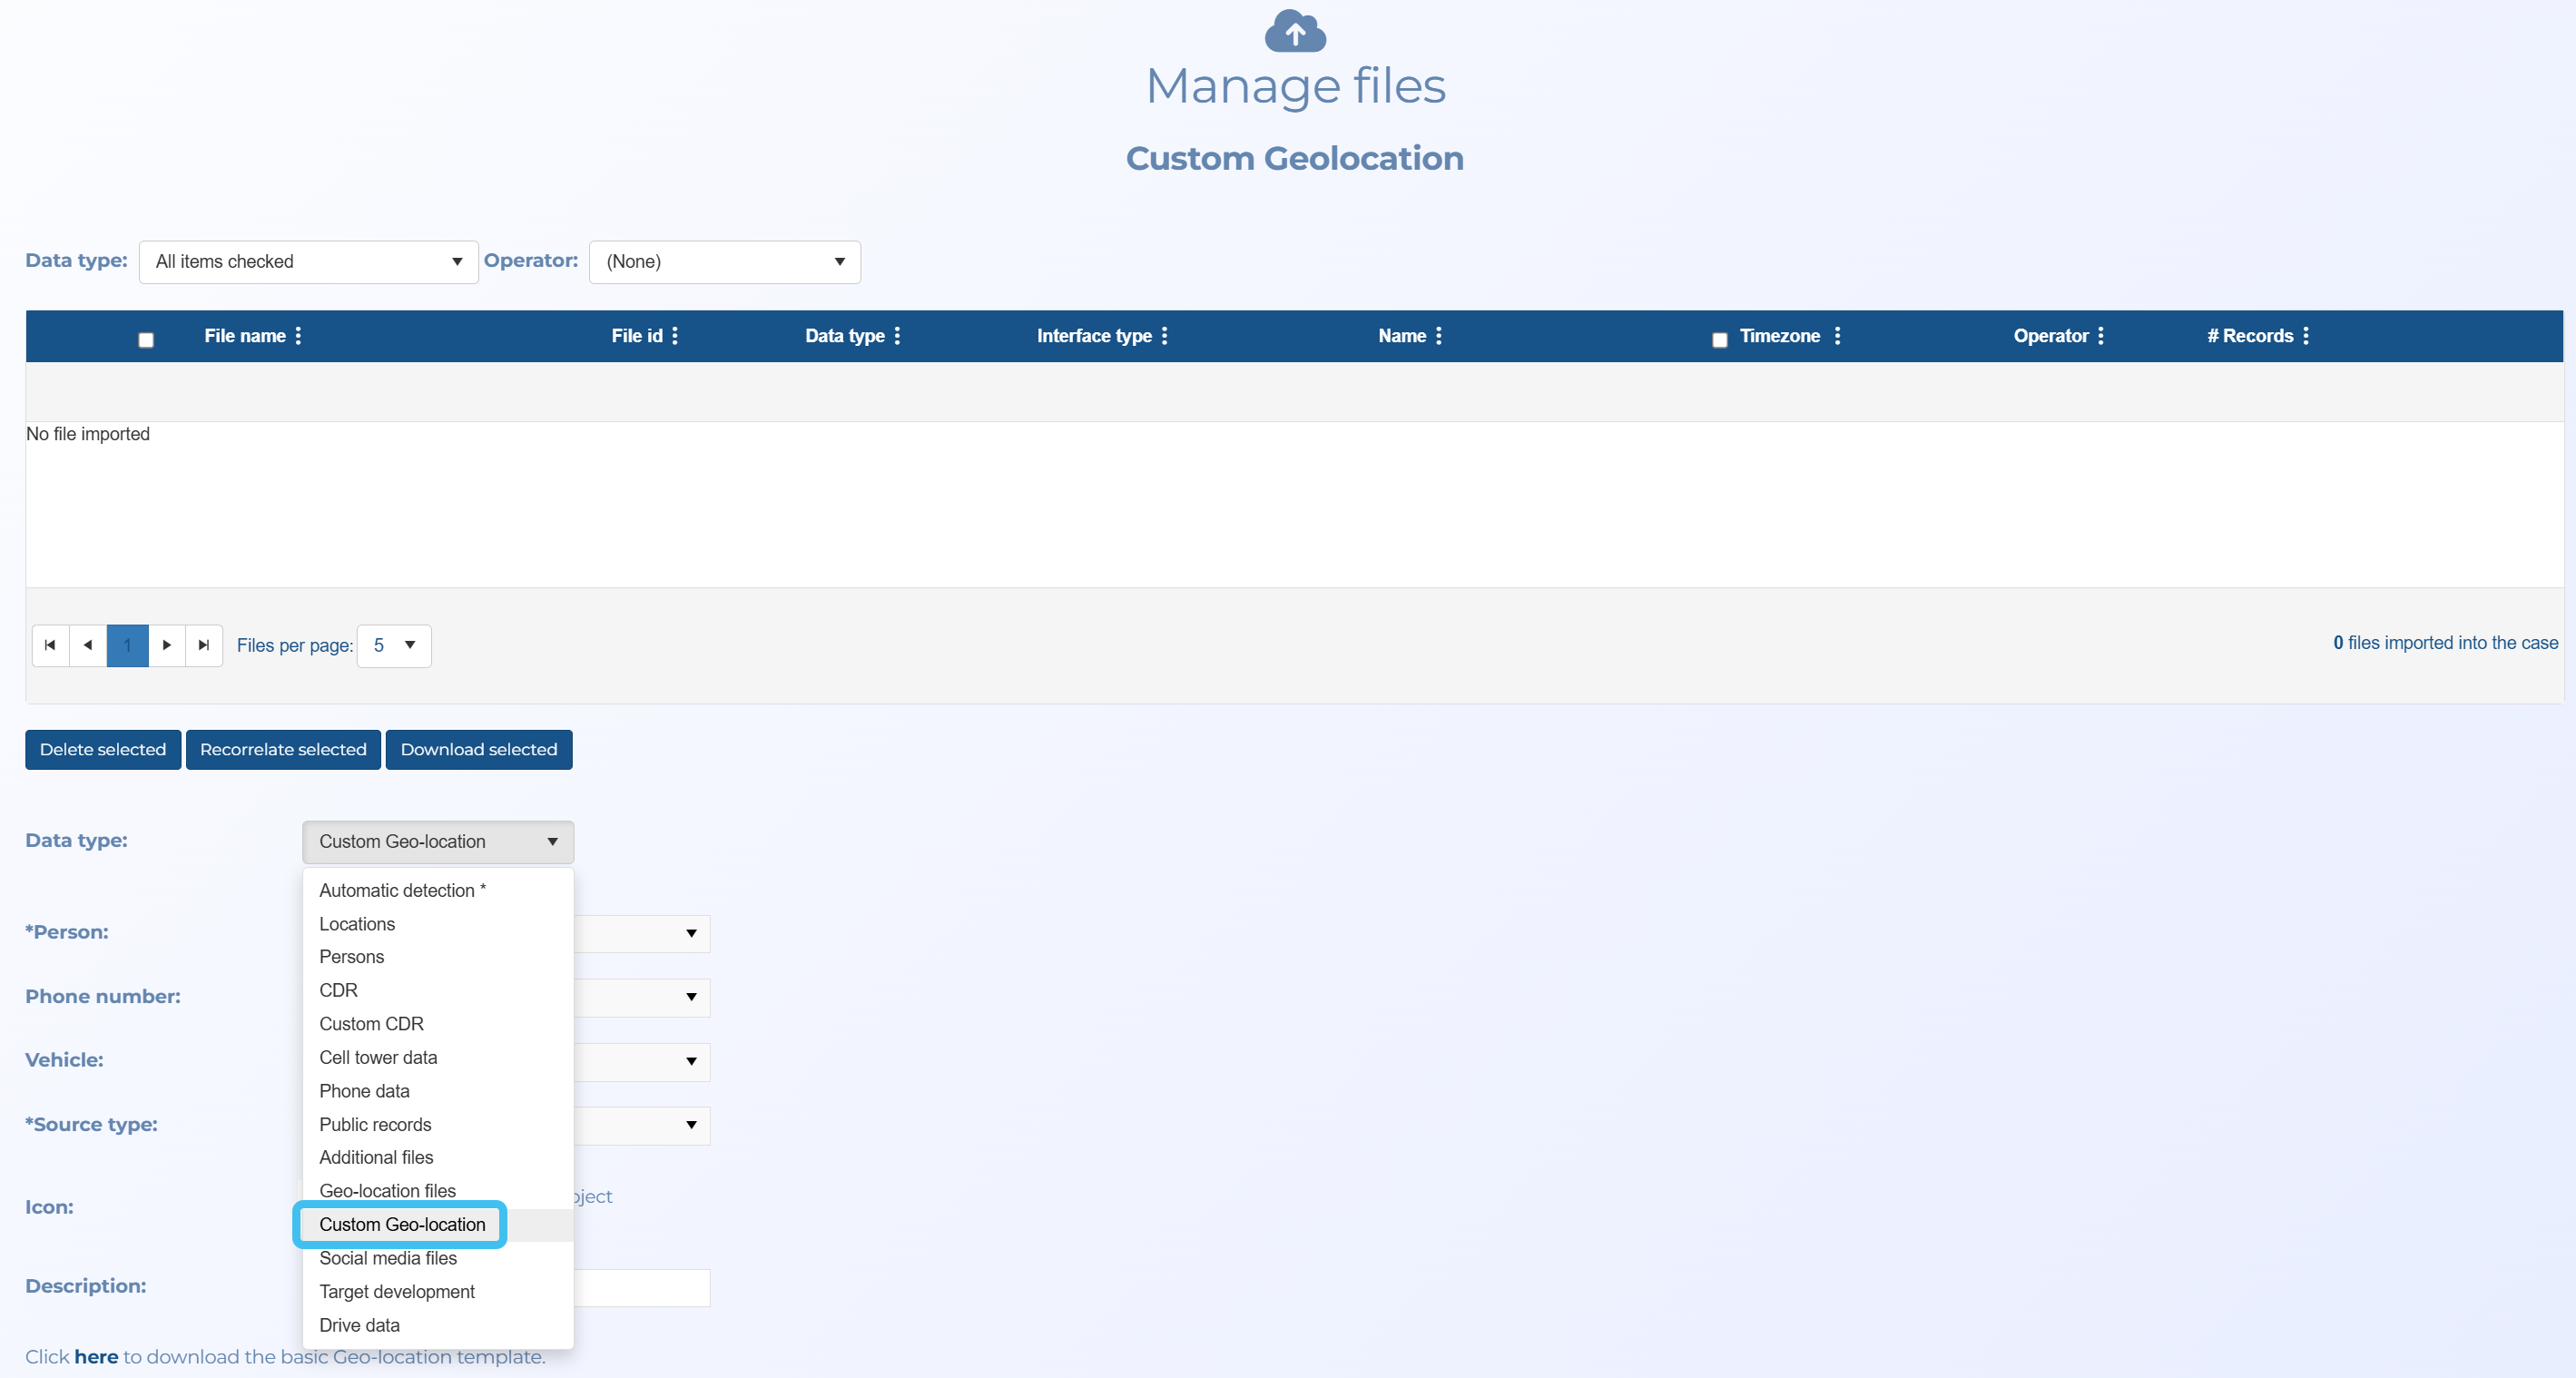
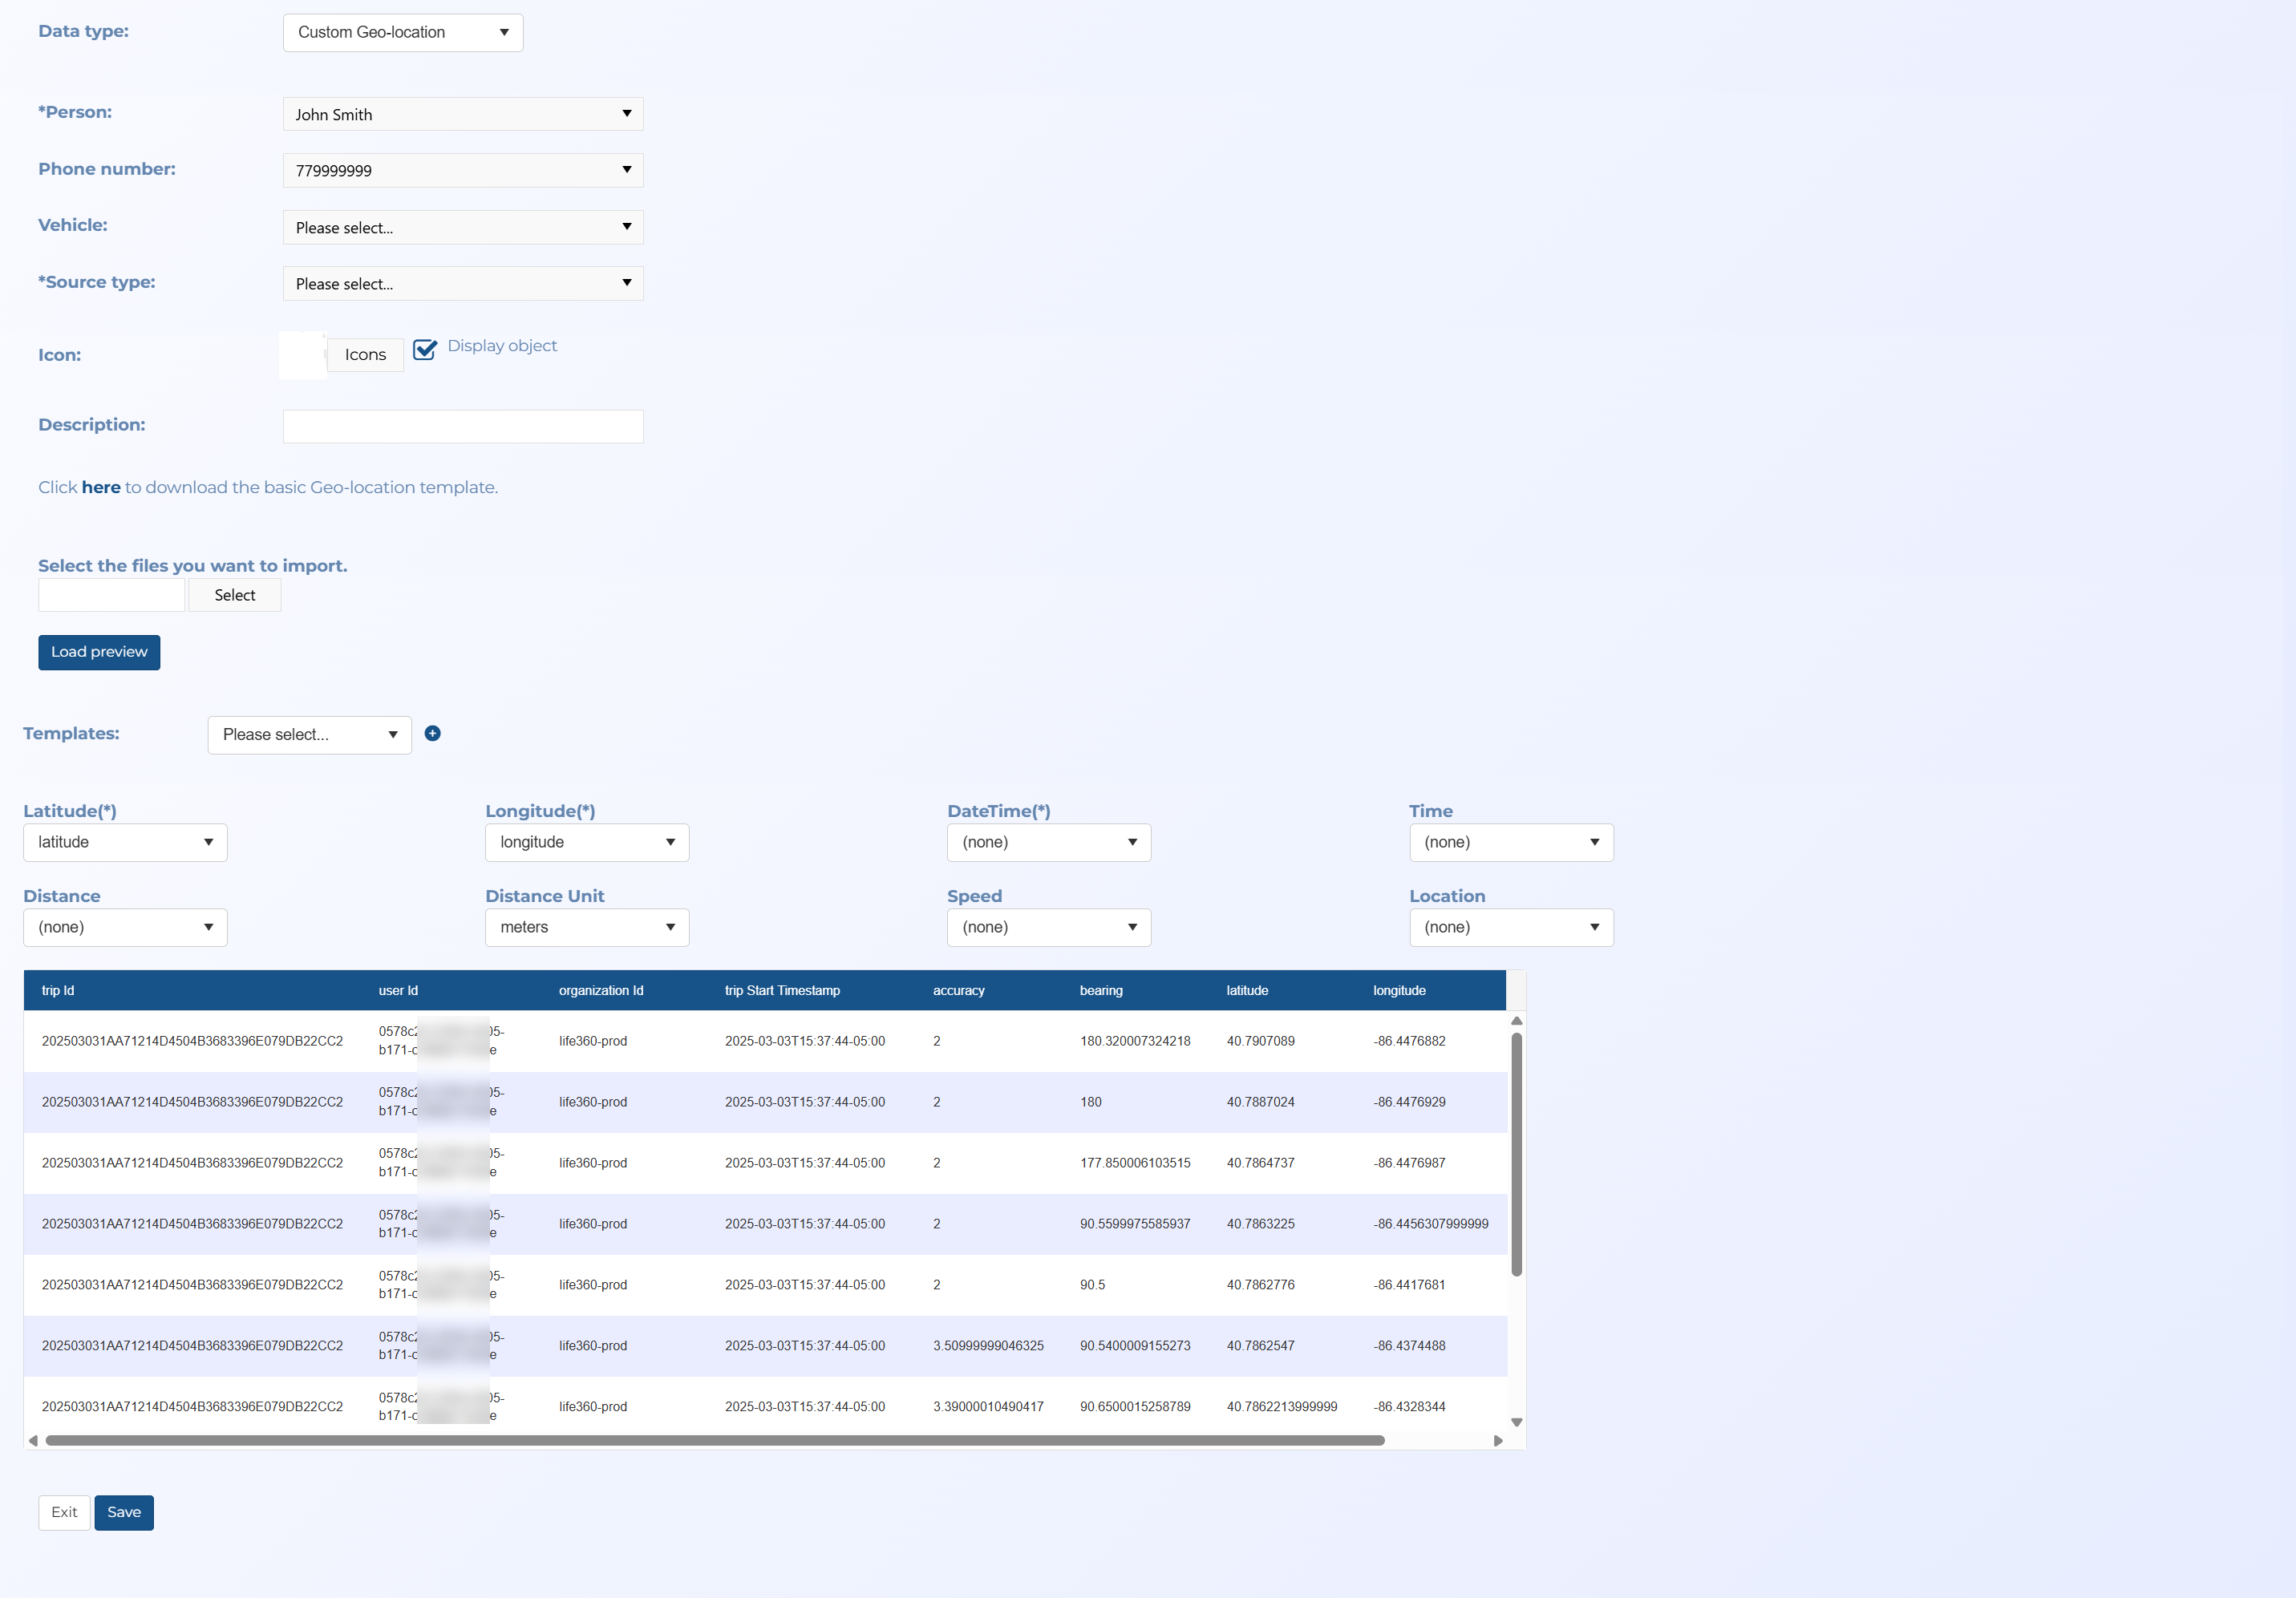
You can now customize your own geolocation imports using the new Custom Geo-location option on the Manage files screen. This is useful as geo-location files come in many different formats, such as from phones, car navigation, notebooks, and smart watches, and this option allows you to customize your own import templates to support the different formats.
The files are uploaded to a predefined person as either file type .xlsx, .xls or .csv. These are the same as geo-location files but with this option your file's column headers can be named whatever you want. When you upload the file, the Manage files screen provides you with a preview of the uploaded file and allows you to define which columns map to each of the OSS-ESPA settings. Latitude, Longitude and DateTime are mandatory. OSS-ESPA automatically suggests the best mapping but you can change that if required. You can also save this mapping as a template for future use.
-
You can now download CDR timing advance pings, and timing advance pings that were ingested through email. The download is a .zip file containing multiple text files.
-
An Events column, listing the name of the events, has been added to the Target development (Through Geofence/Tower dump) IQ packet's Excel download.
-
There has been a number of updates to the Live target summary IQ packet:
-
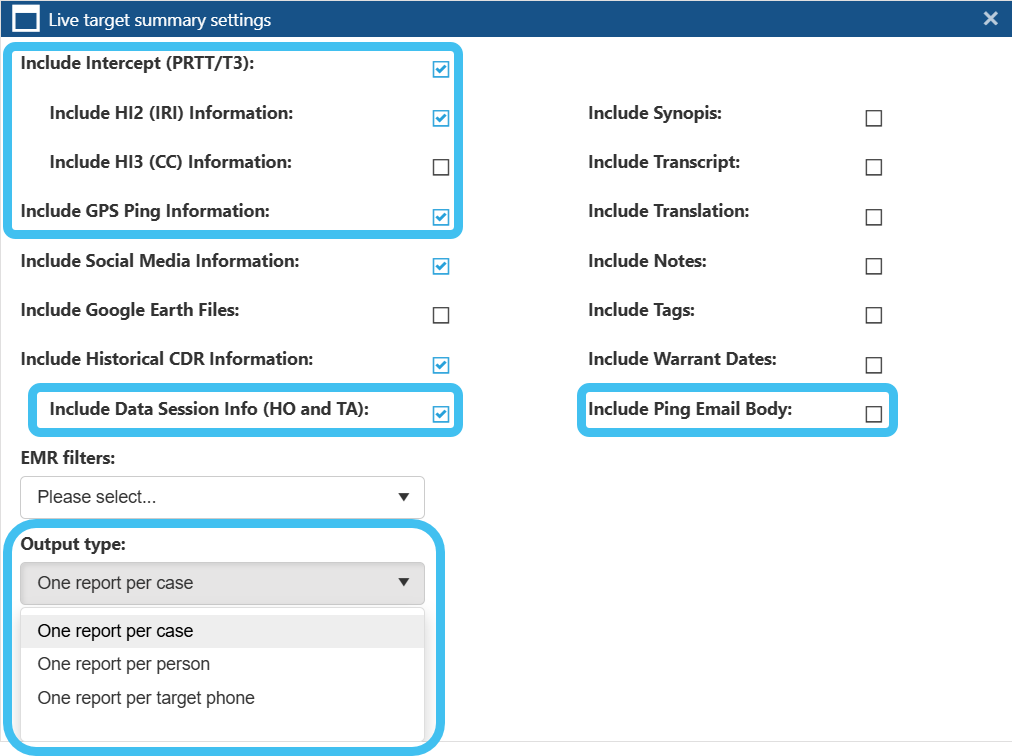
Now you can select to include the GPS ping information without including the PRTT/T3 information. By default the PRTT/T3, GPS ping, social media and CDR information with the data session information is included.
-
For historical CDR information, you can select whether or not to include the HO and TA data session information using the new Include Data Session Info (HO and TA) setting. Not including it reduces the amount of data significantly, resulting in the report completing more quickly, however by default it is selected. This same setting has been added to the Evidence Management and Reporting screen.
-
The new Output type setting allows you to choose what is included in a report either: one report per case, one report per person or one report per target phone. This same setting has been added to the Evidence Management and Reporting screen.
-
The new Include Ping Email Body setting allows you to select whether or not to include the GPS ping email's HTML. Not including it reduces the amount of data significantly, resulting in the report completing more quickly, however by default it is selected. This same setting has been added to the Evidence Management and Reporting screen.
-
-
Select source datatypes has been added to the New IQ packet screen, allowing you to choose which sources of data are included in your report.
-
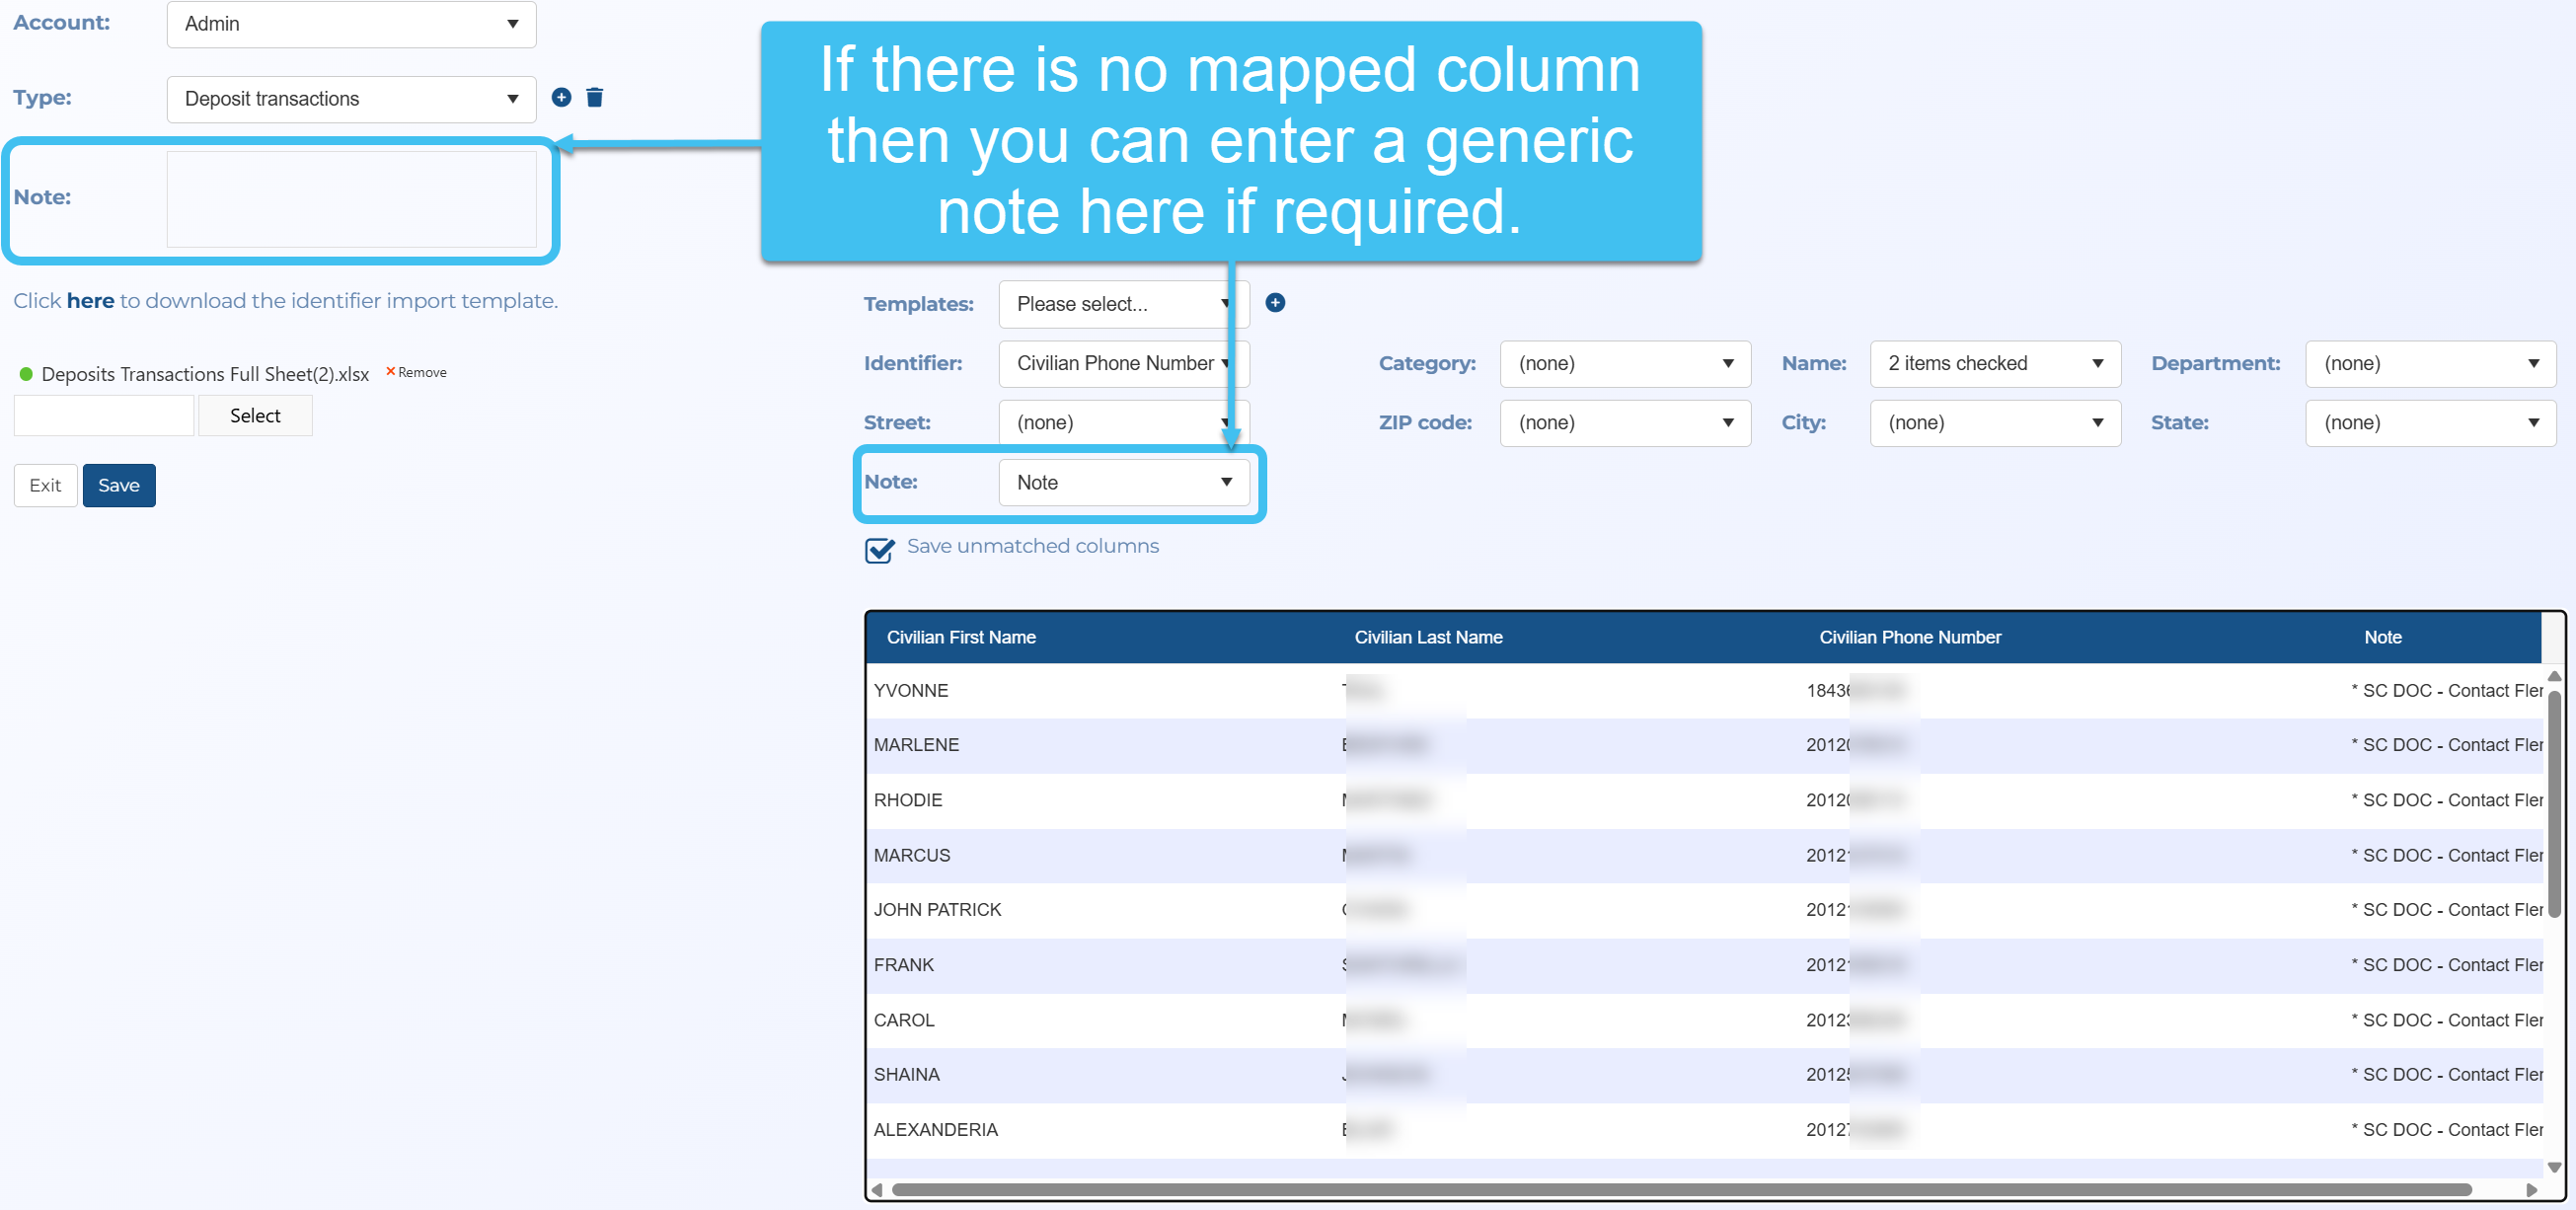
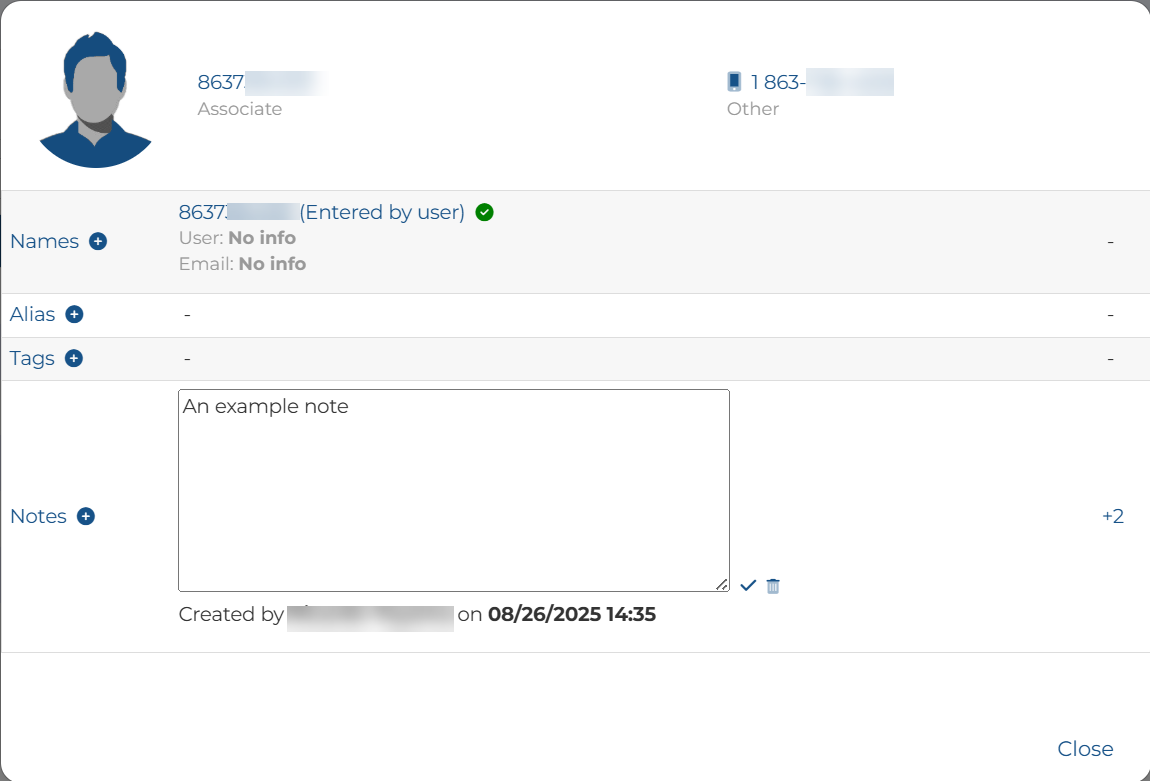
A new Note setting has been added to the Global identifiers upload screen so that you can map to the correct column in the file. Also, if you want the same note for every identifier rather than enter it for each identifier in the upload file, you can simply add it once to Note as shown below.
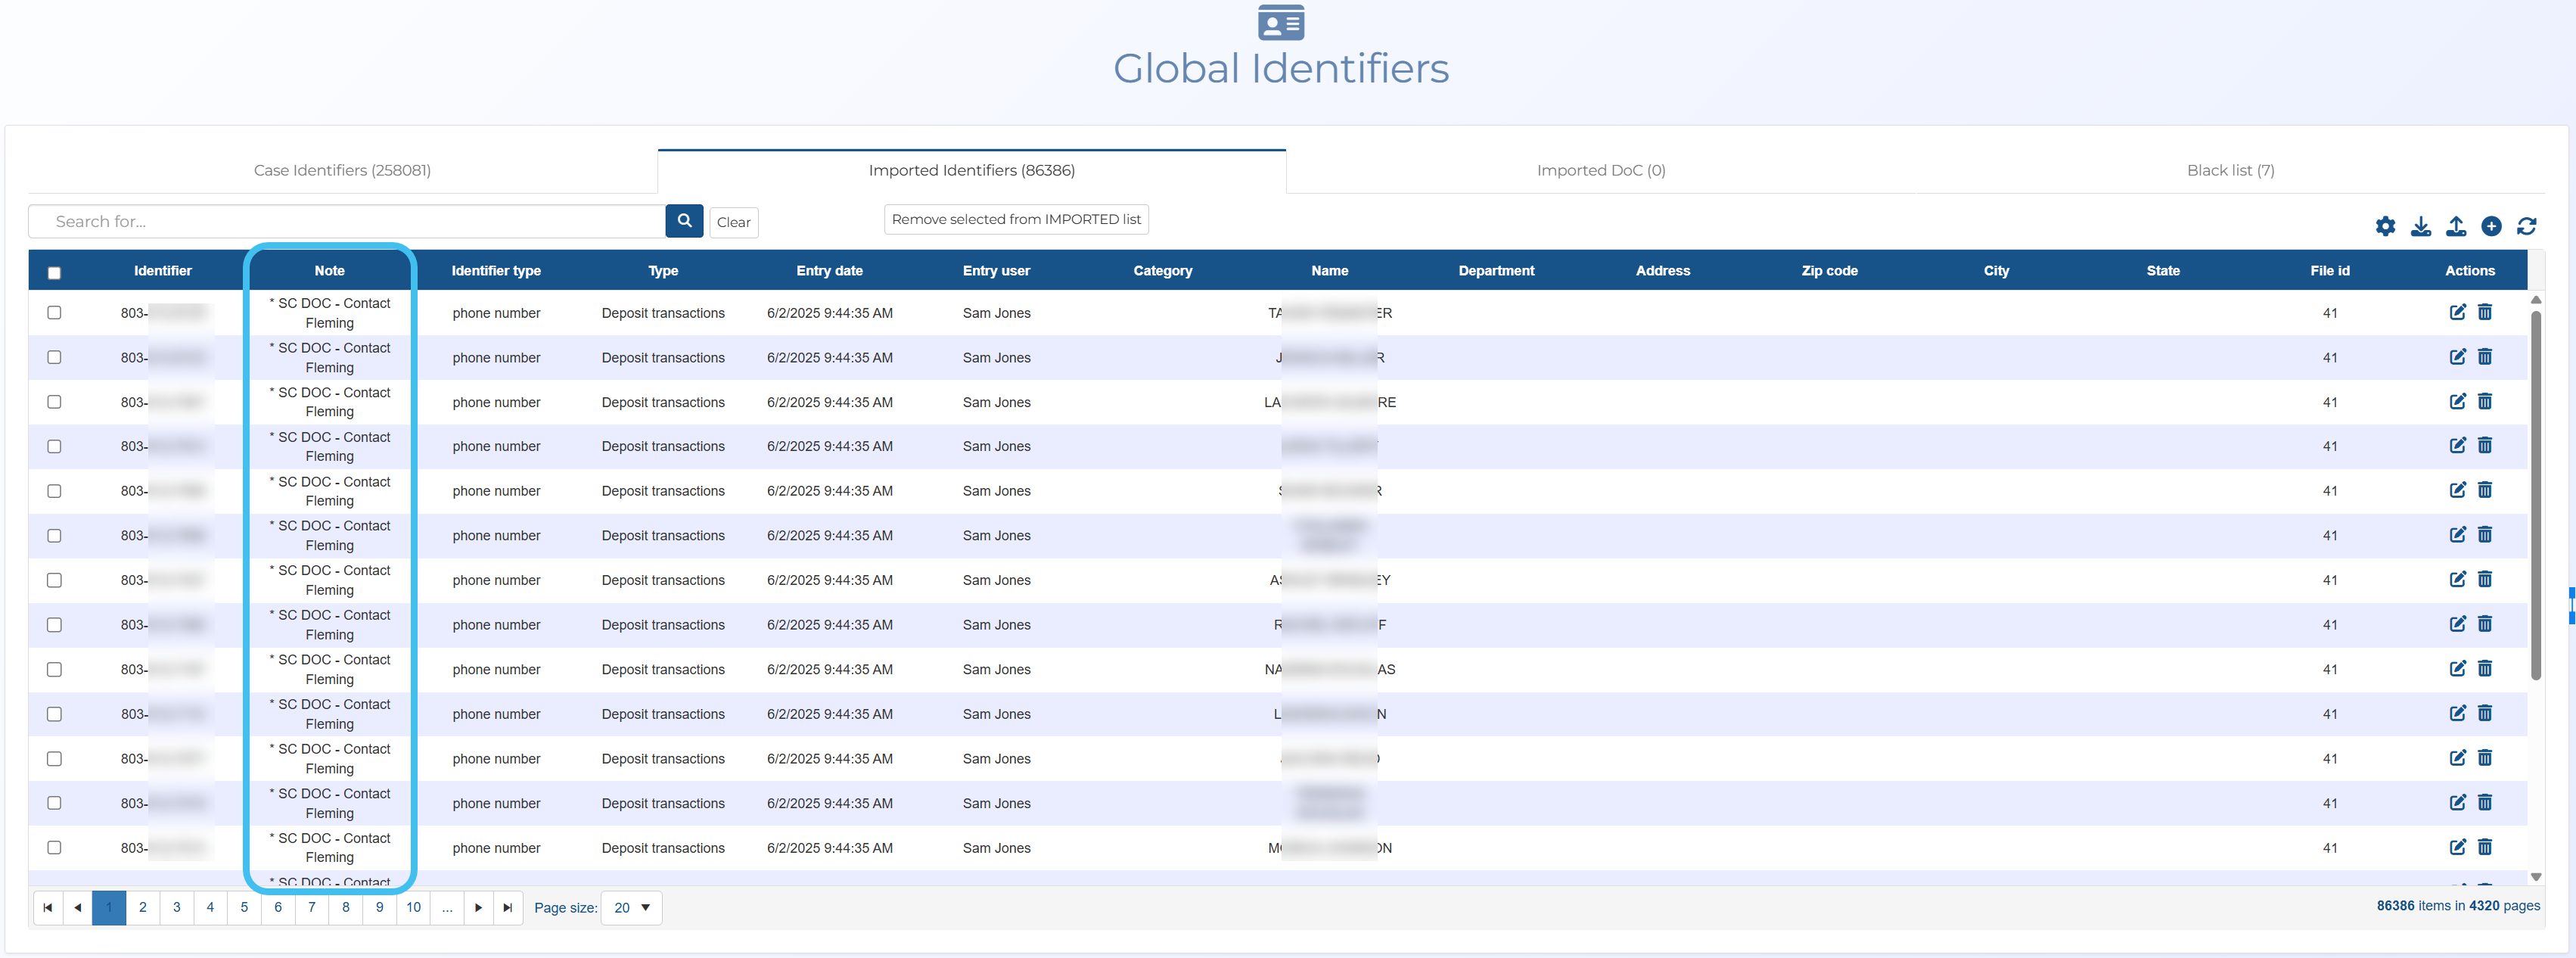
The note data is displayed on the Global identifiers screen's Imported identifiers tab in the new Note column.
-
A new File note setting has been added to the DoC Upload screen. If you want the same note for every identifier, rather than enter it for each identifier in the upload file, you can simply add it once to File note and it is replicated for each identifier.
This note is then displayed when you view each identifier, for example:
-
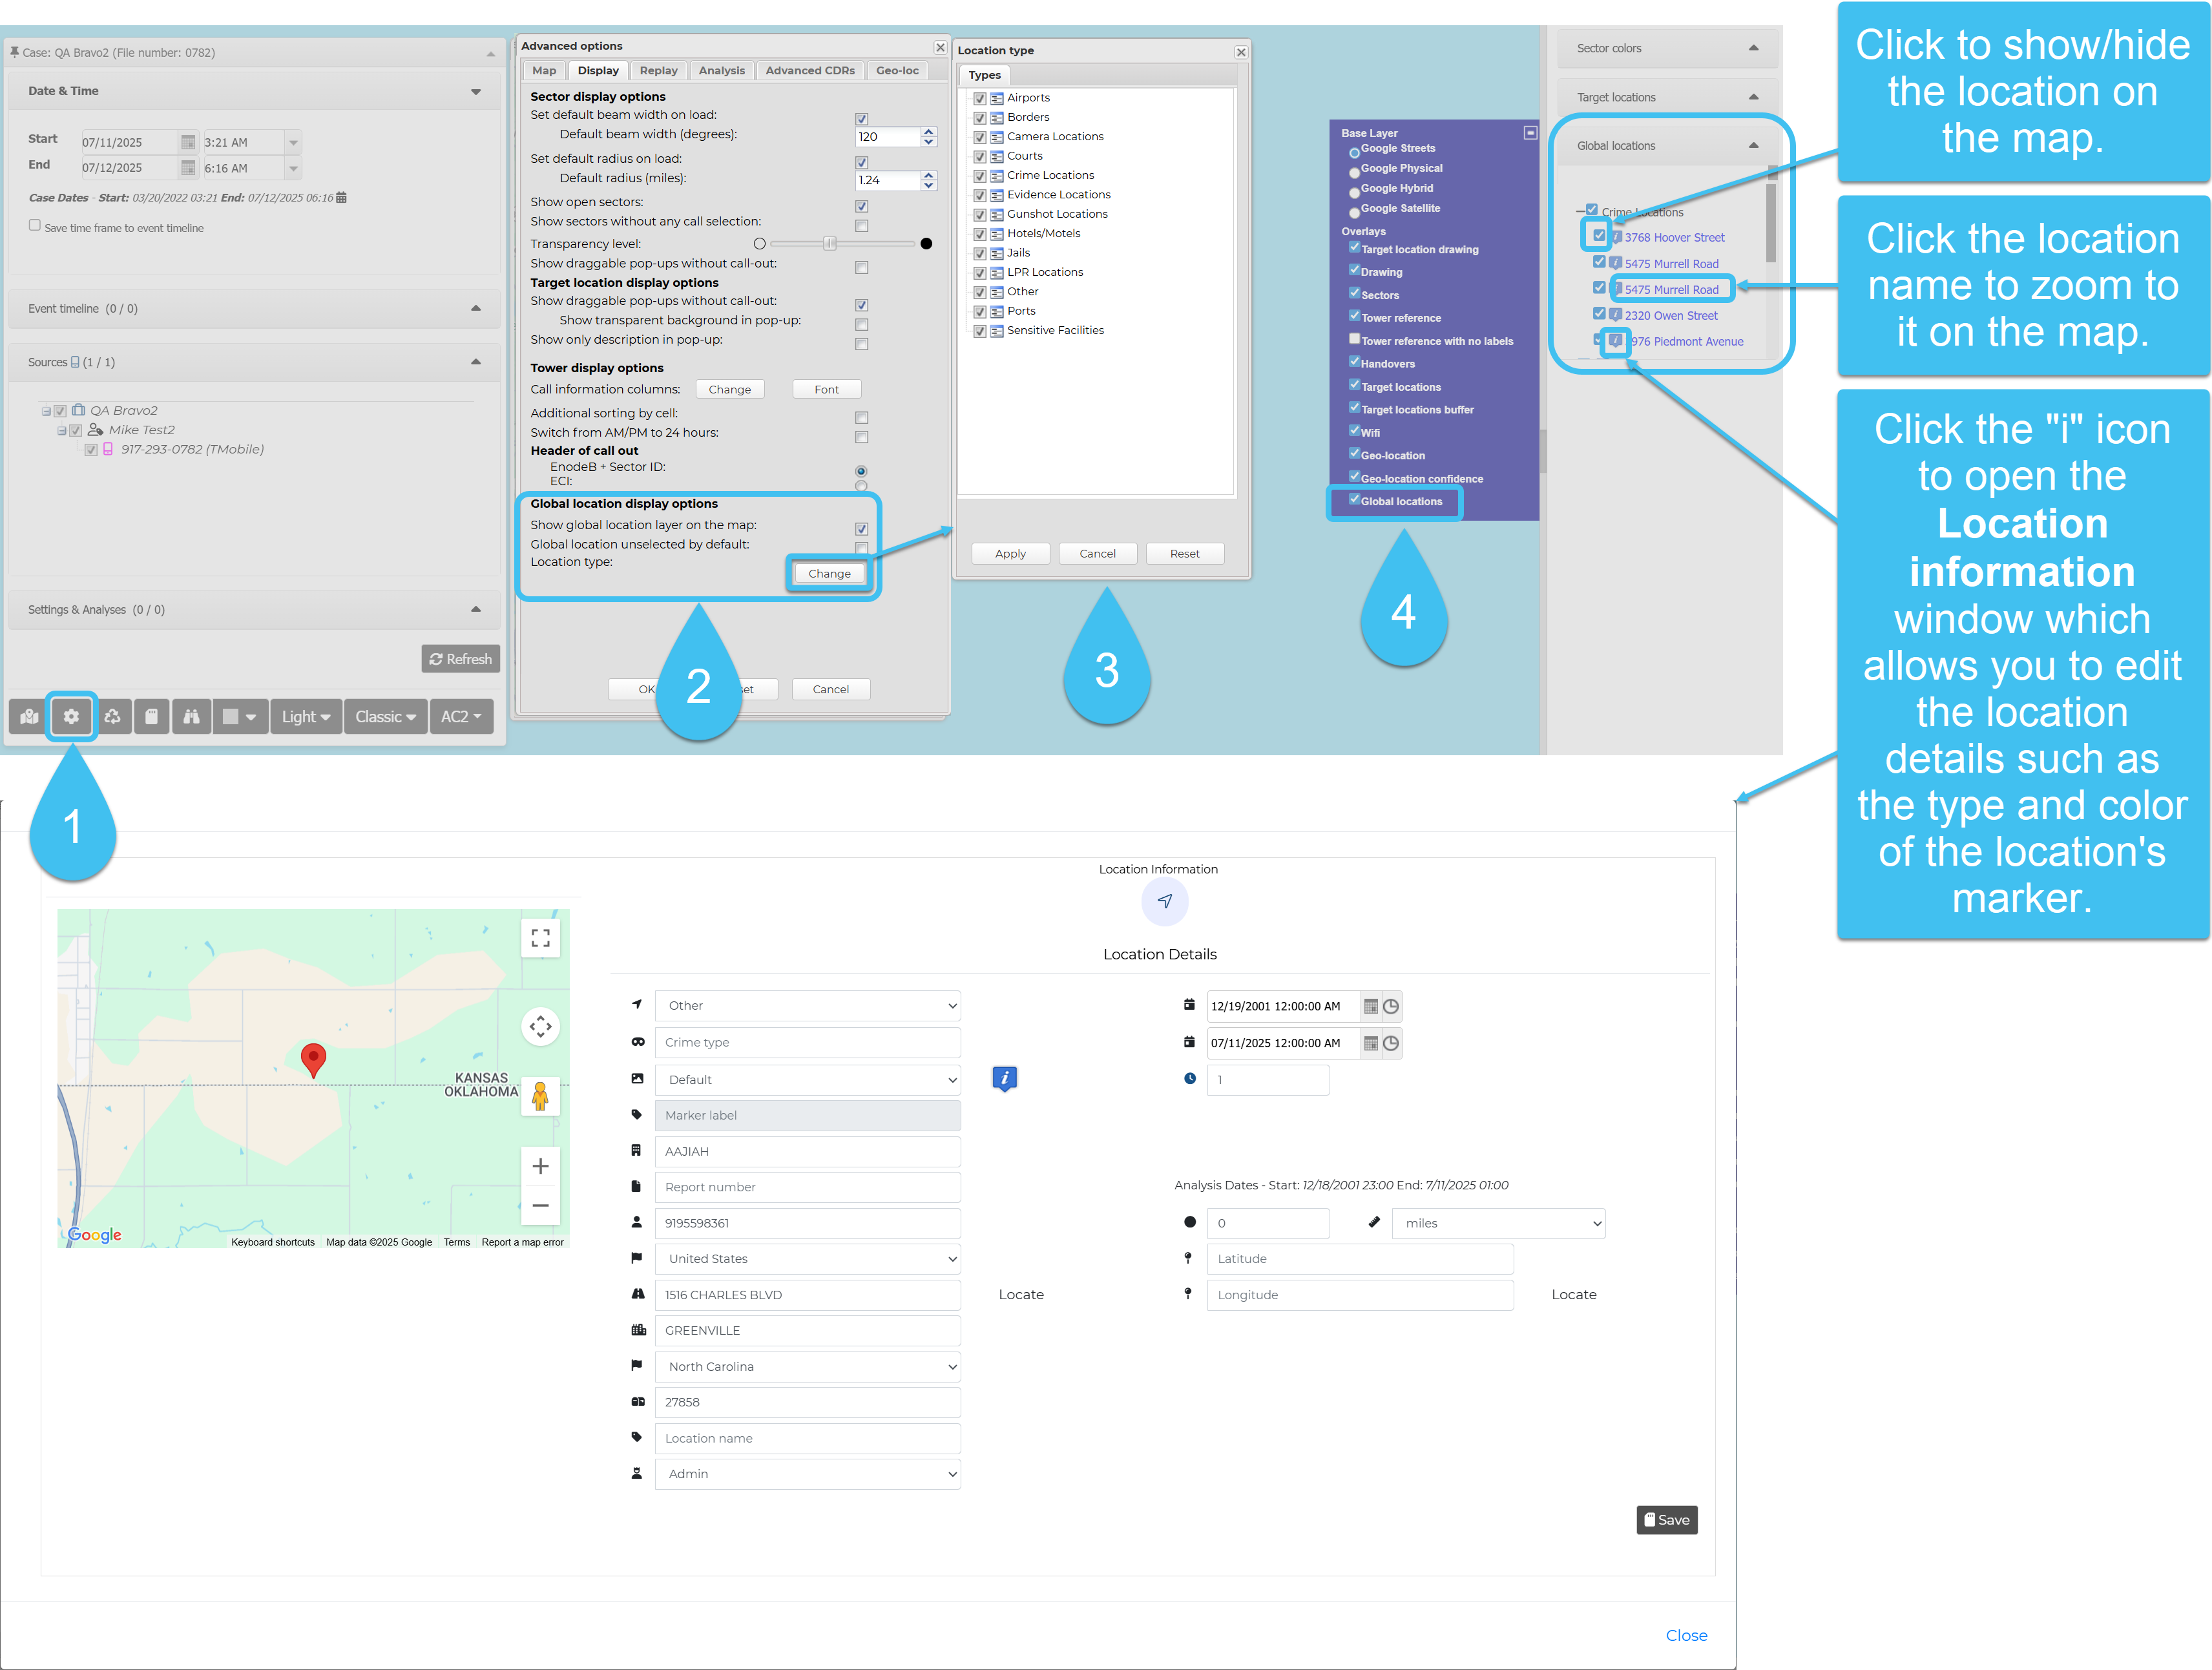
You can now select to view Global locations on the ESPA analysis center. To support this new feature three new Global location display options settings have been added to the Display tab of the Advanced options dialog box:
-
Show global location layer on the map allows you to select to load the global locations on the map.
-
Global location unselected by default allows you to select whether or not the global locations map layer is displayed when the map is loaded.
-
Location type opens the Location type dialog box where you can select which types of global locations you want to load, for example you may not want to load sensitive facilities.
When the global locations are loaded a new Global locations map layer is available to show/hide all global locations on the map. The Legend view allows you to: drill down further to select which global locations you want to show/hide, zoom to a global location on the map, and open the Location information window which allows you to edit the global location details, such as the marker type and color.
You can also export global locations from the ESPA analysis center to the Sentinel screen as described in the Sentinel enhancements.
For information refer to How to display global locations on the ESPA analysis center and the Sentinel screen.
-
-
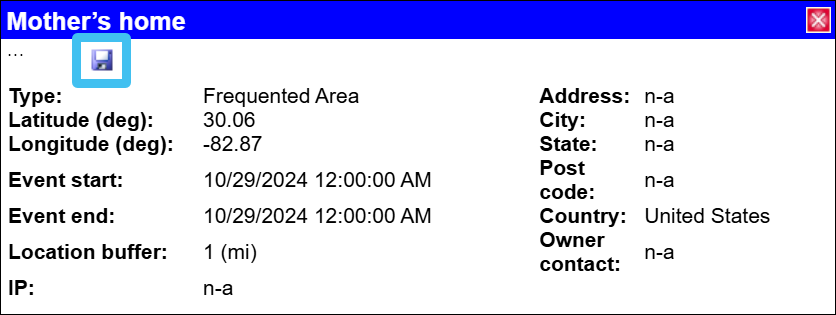
From the ESPA analysis center's map, you can now save a target location as a global location by:
-
right-clicking the map's target location and choosing Save as global location, or
When saved the global location has the Location type saved as Other and can be managed on the Global location management screen.
-
-
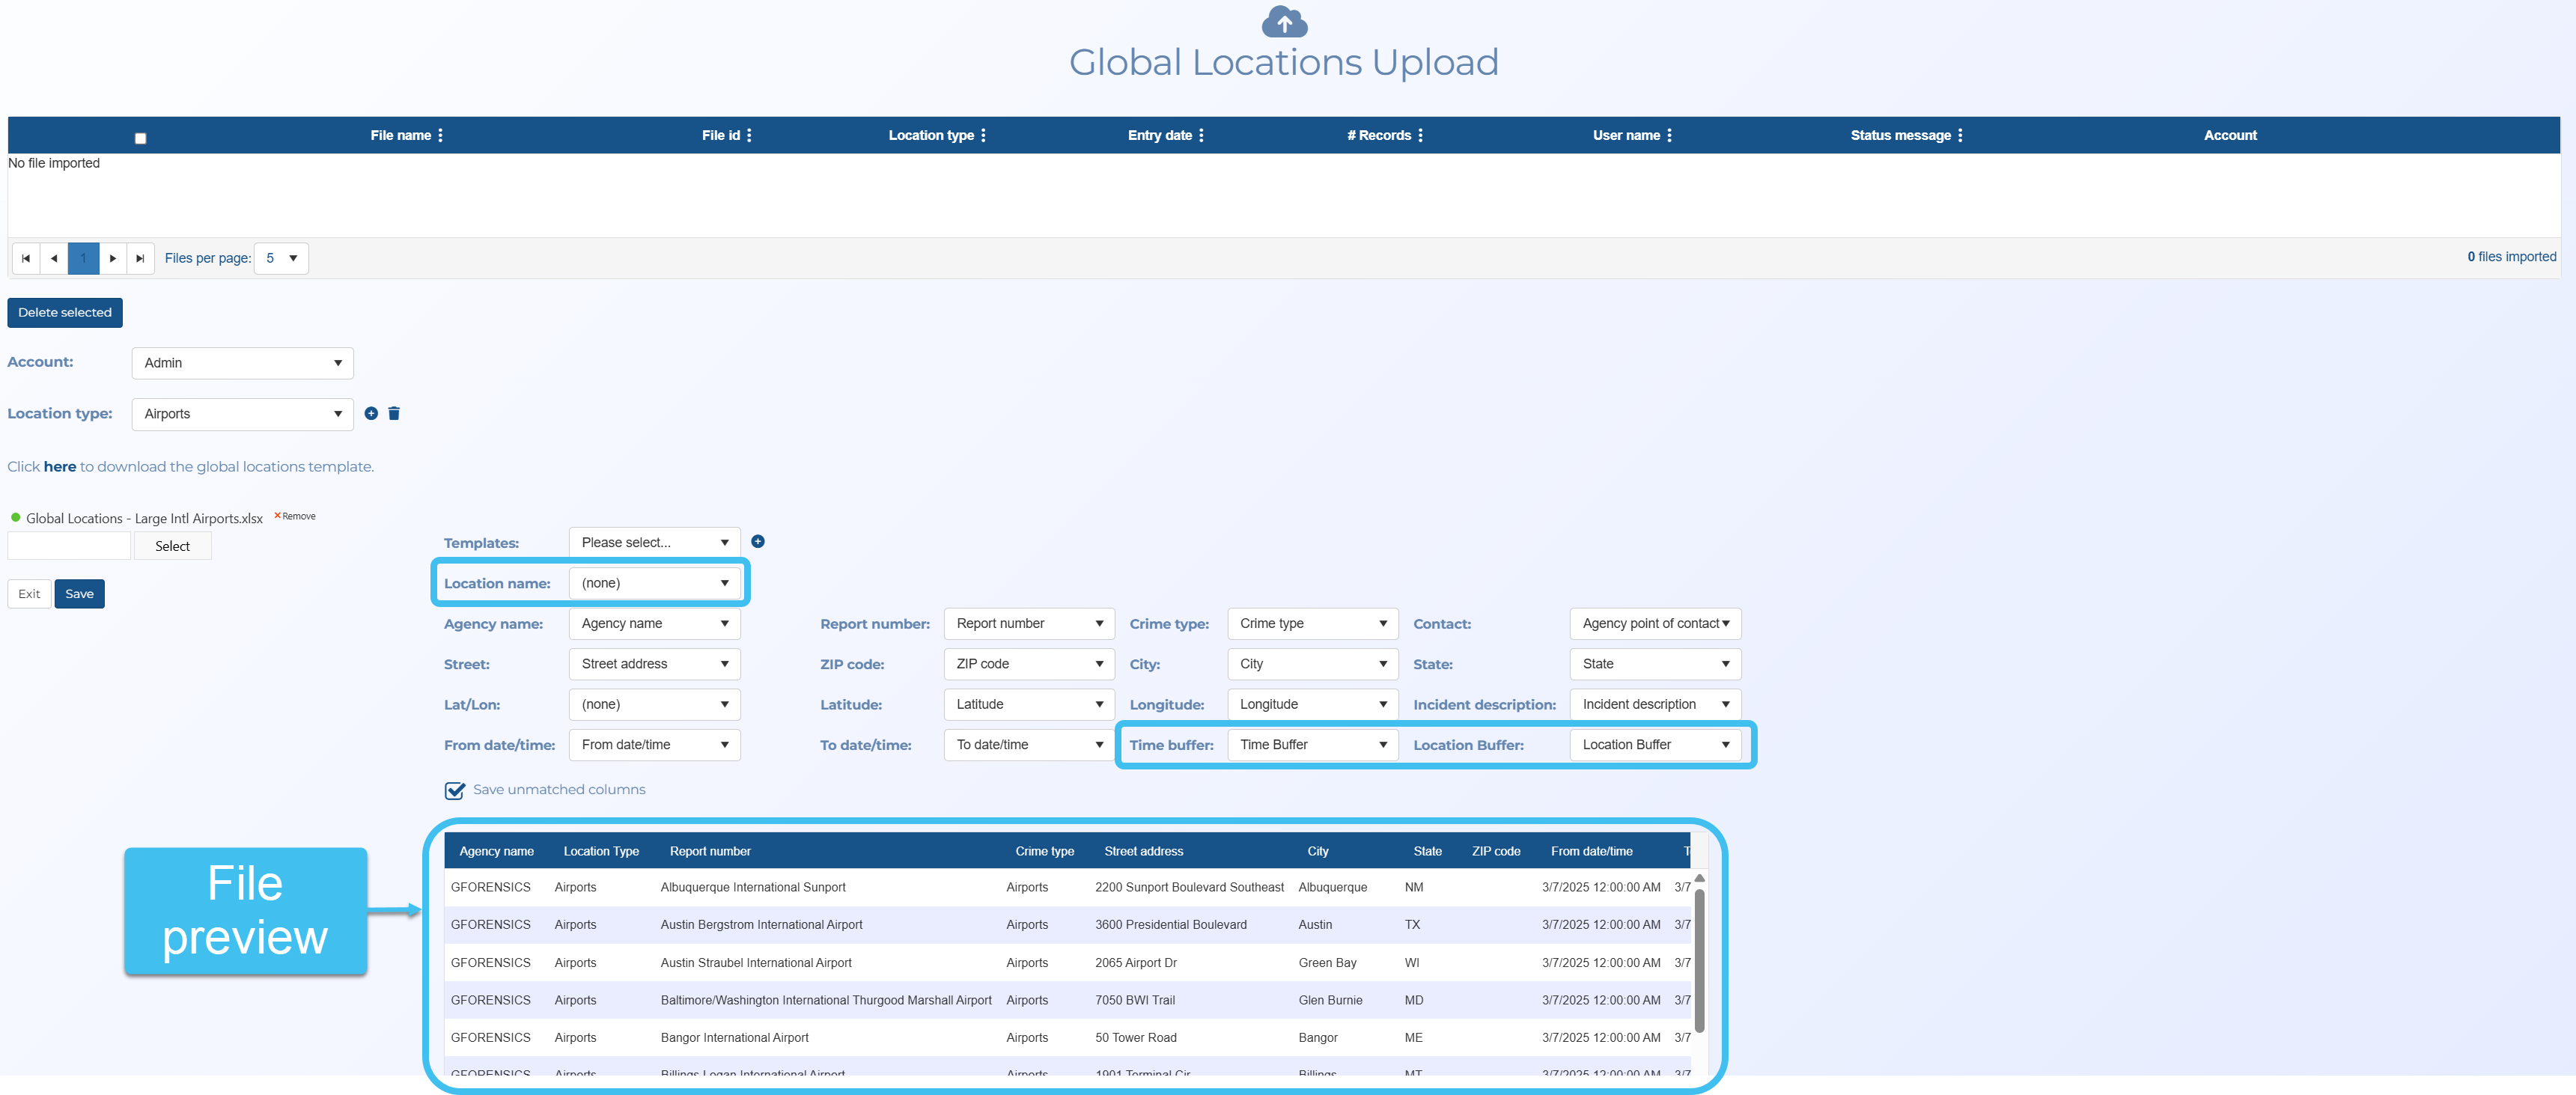
Three new mappings have been added to the Global locations upload screen. These are: Location name, Time buffer and Location buffer. A preview of the data in your selected file is now also displayed.
-
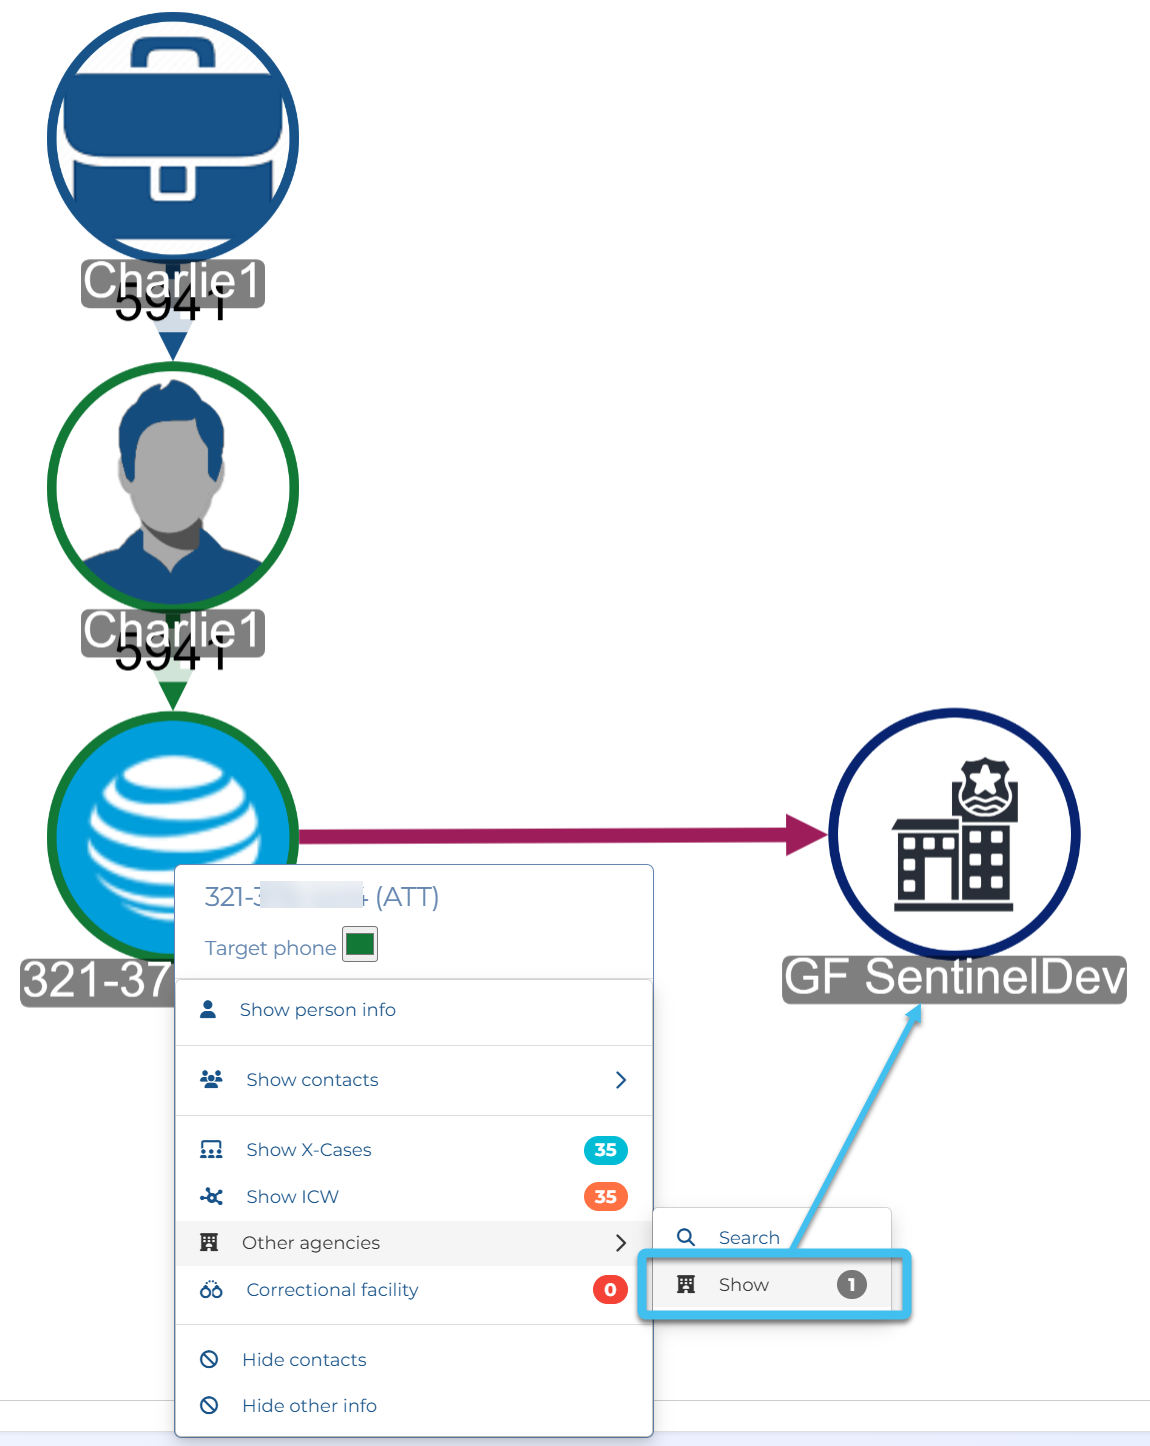
When you perform a search, it now includes results from other agencies such as the SRN Express Portal, and other OSS-ESPA accounts that your administrator has set up Info sharing agreements with. Info sharing agreements allow both the inbound and outbound searches of the data in each others account. These results are available in the:
-
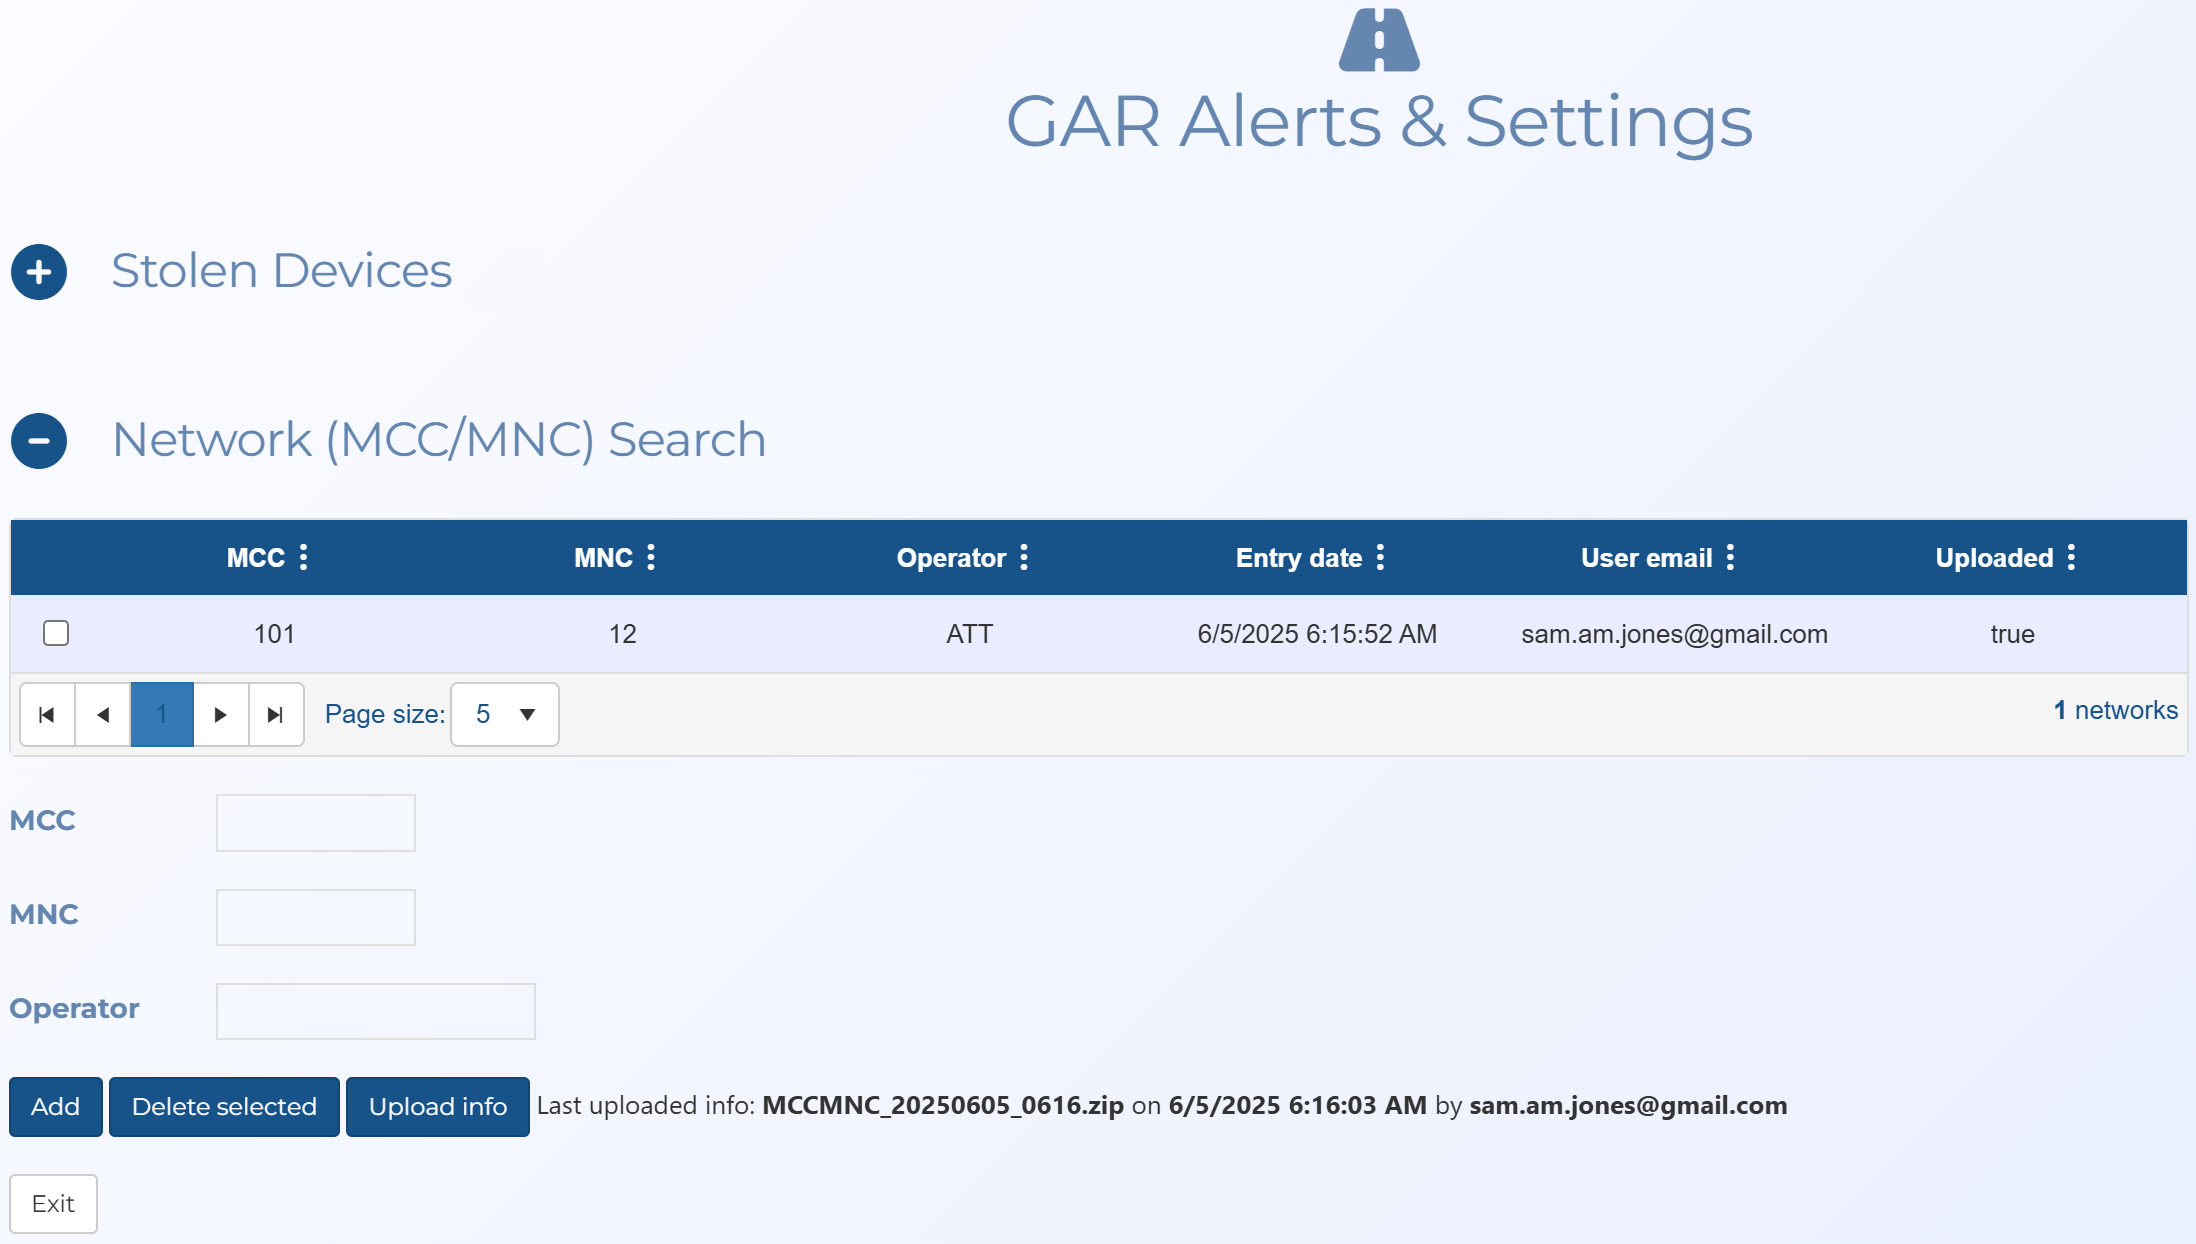
The Stolen device screen, used by administrators, has been renamed GAR alerts & settings. In addition to allowing you to upload stolen device files to GAR units, the screen now allows you to upload network searches based on the Mobile Country Code (MCC), Mobile Network Code (MNC) and the Operator.
-
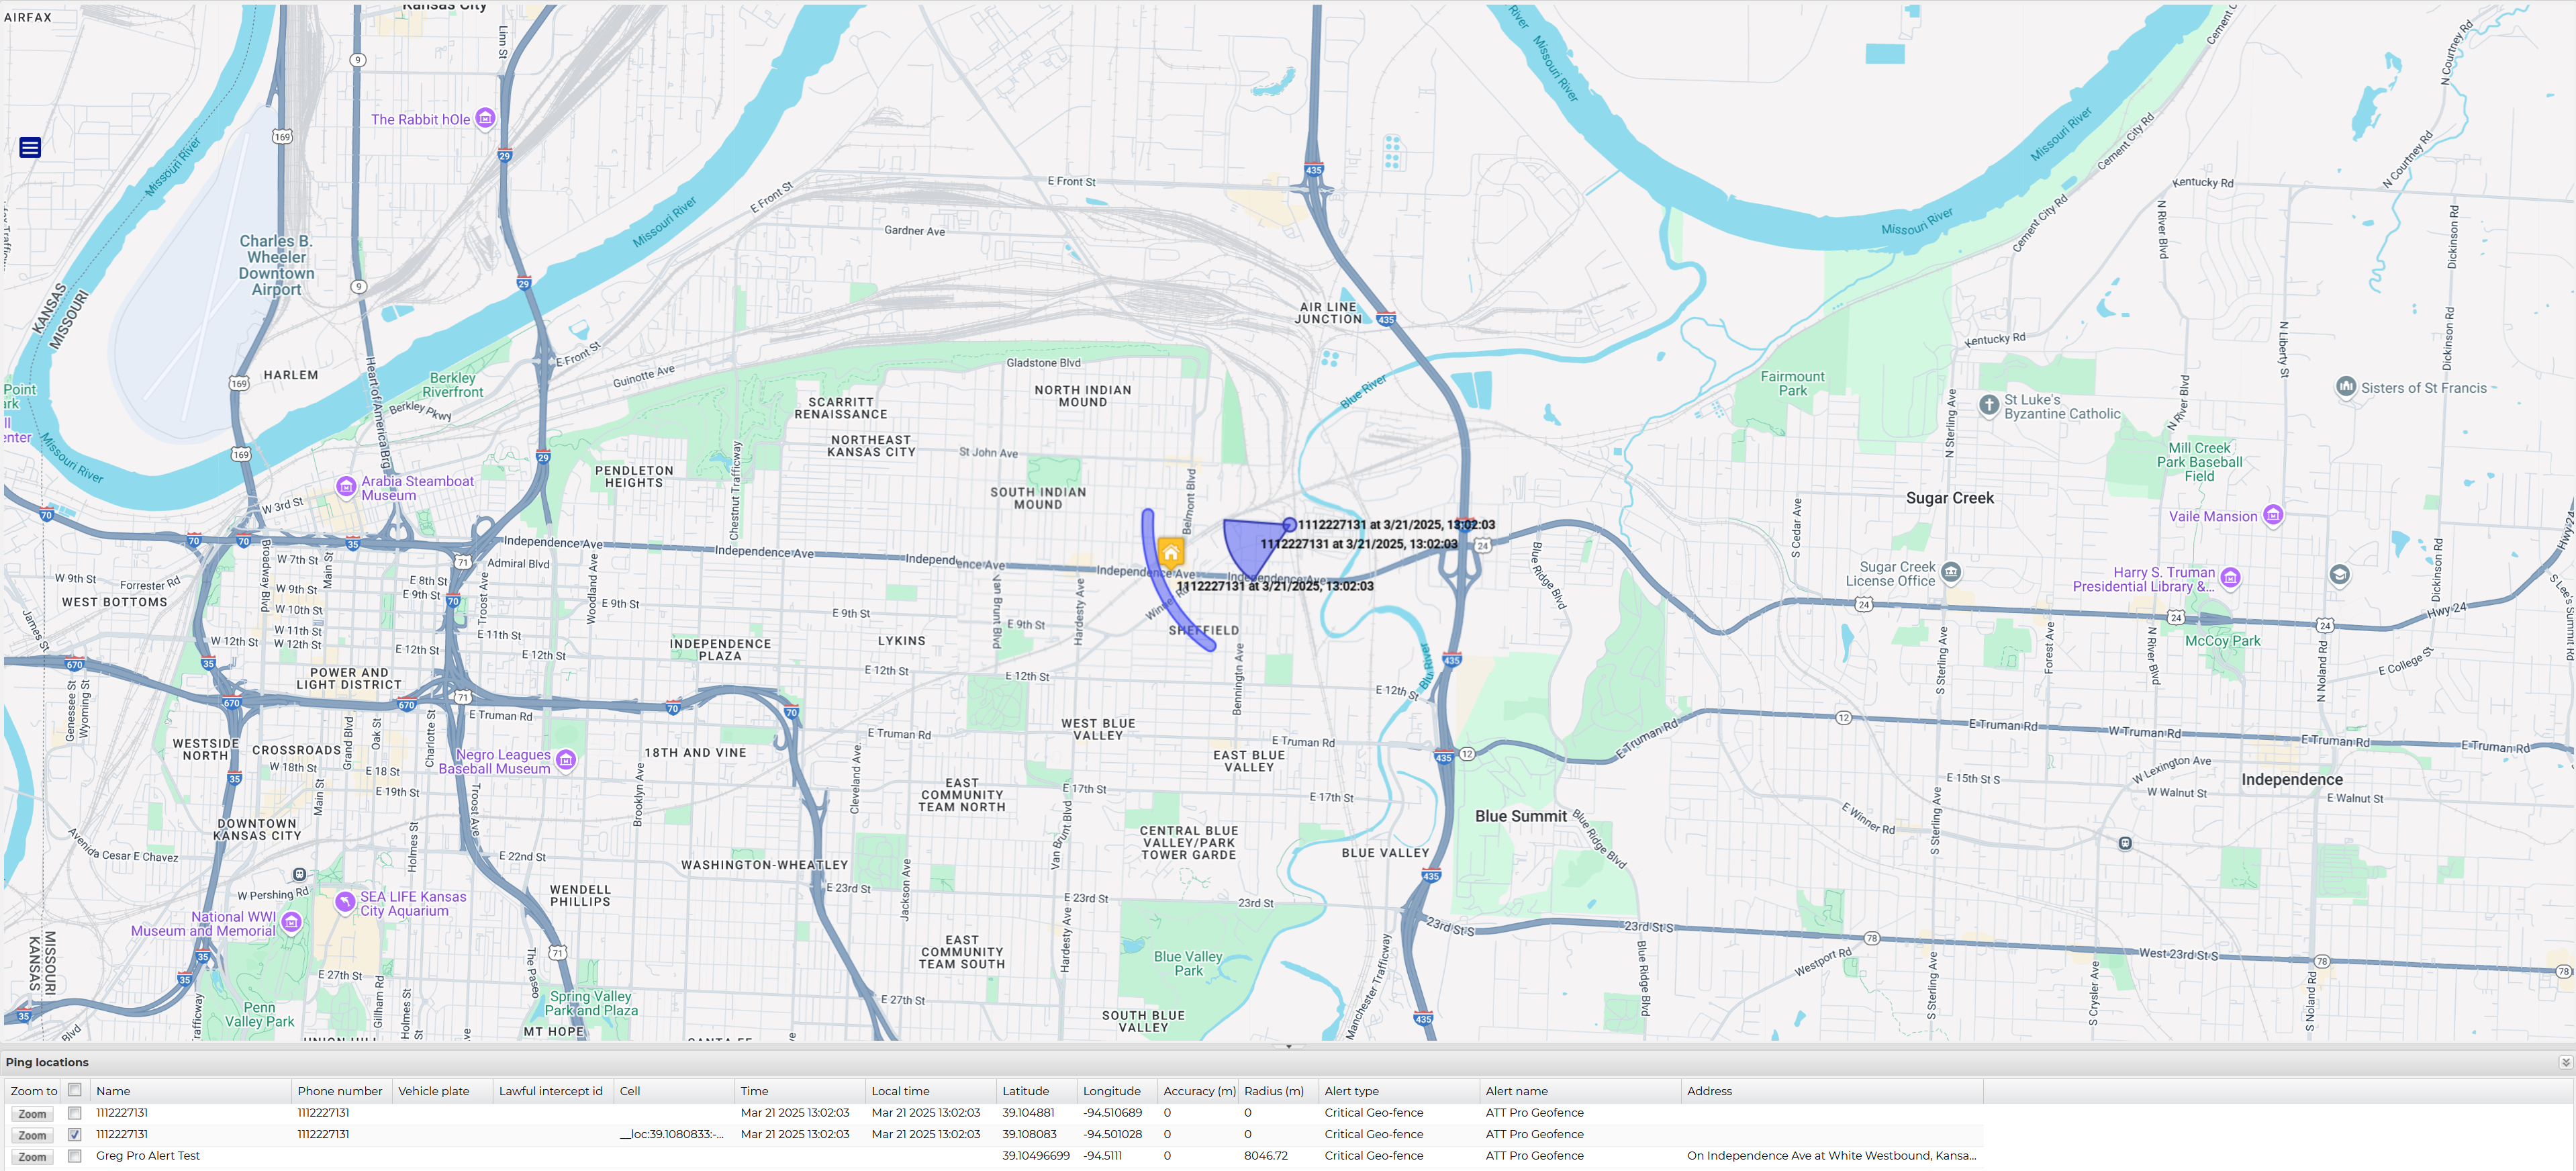
ATT prospective arcs are now displayed on the External locations screen.
-
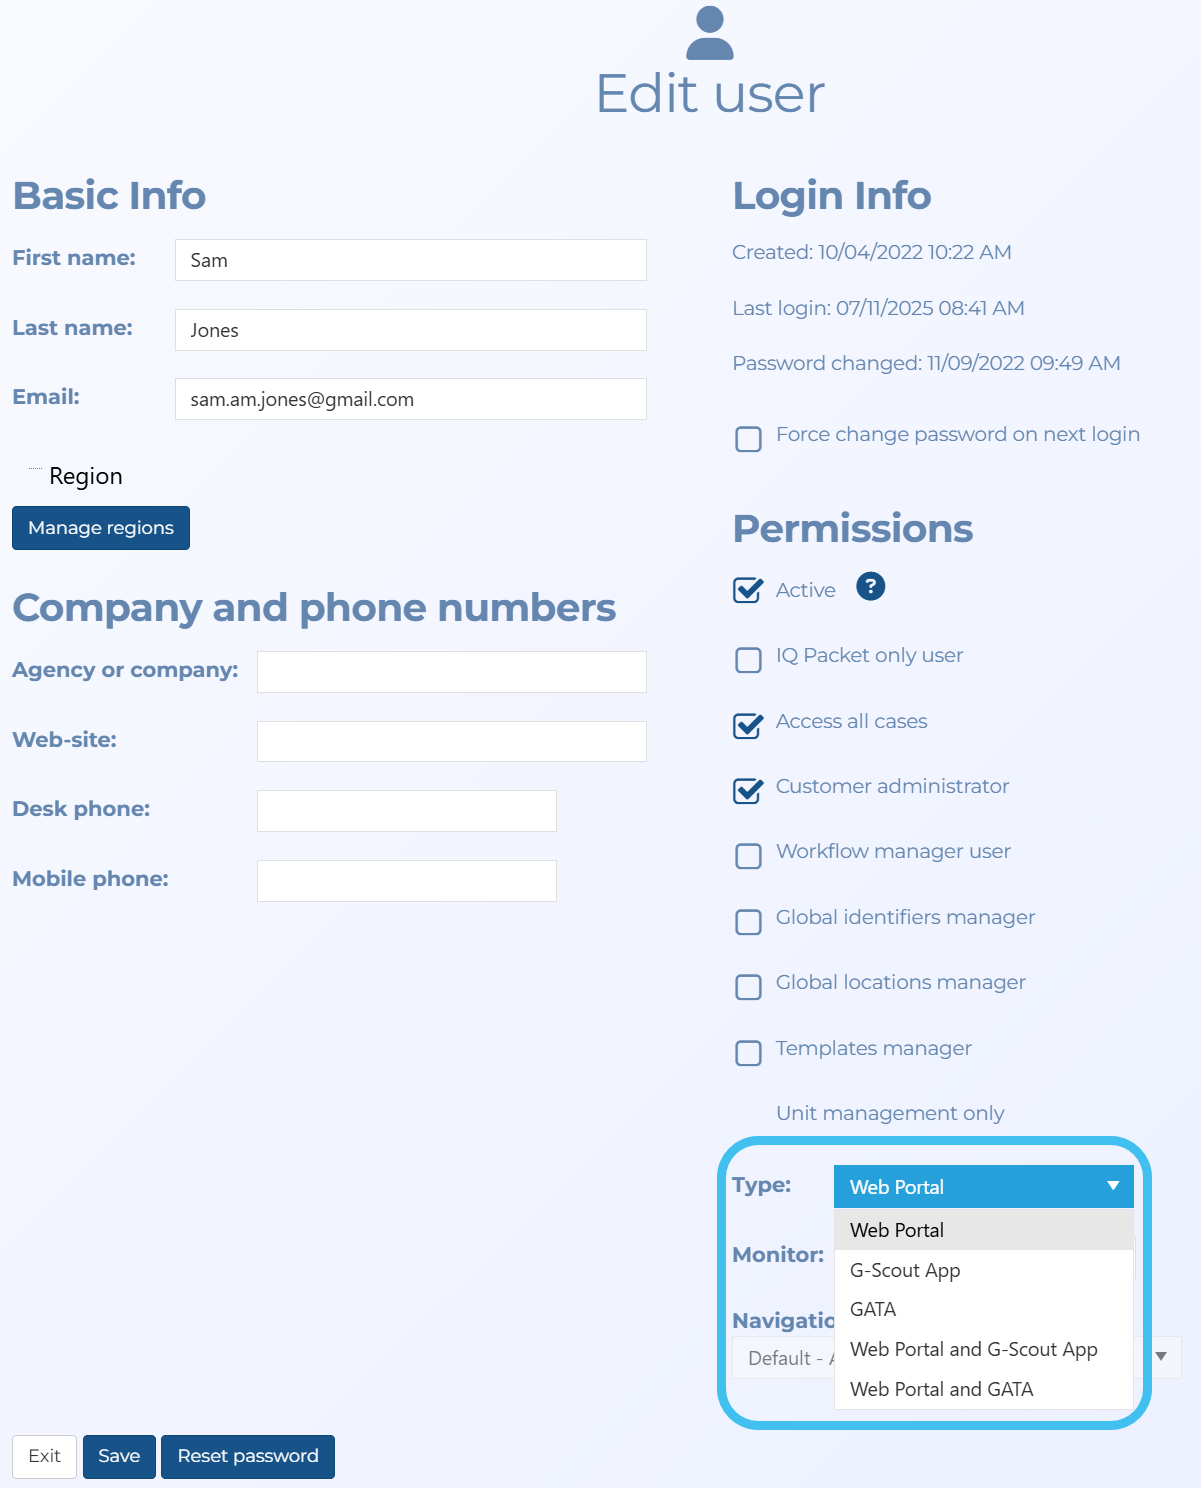
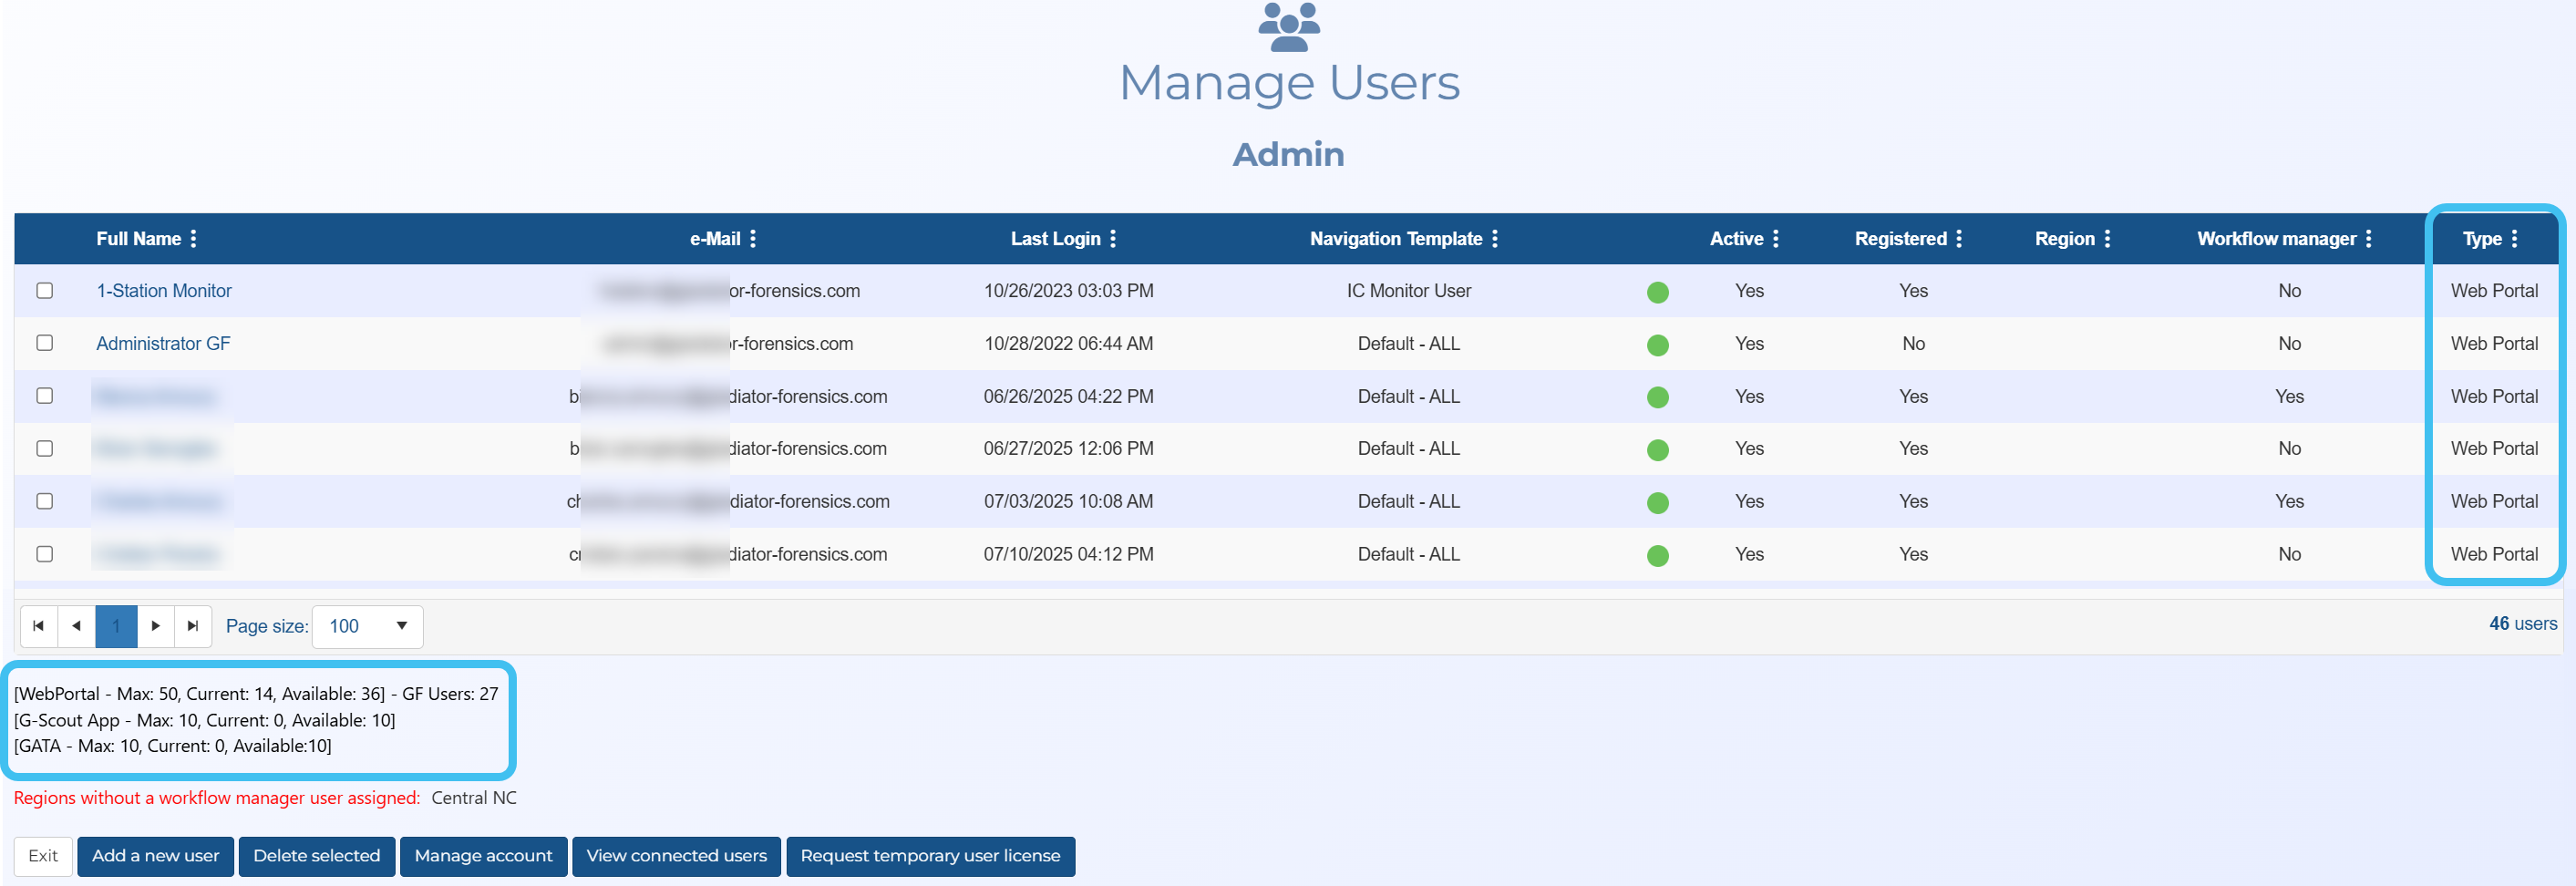
Previously the number of licensed users and concurrent users was shared across the OSS-ESPA Web users, GATA users and G-Scout App users. They are now managed separately. To support this enhancement:
-
Customer administrators can now define in the new Type setting, on the Add/Edit user screen, what products a user is licensed to use.
-
The Manage users screen now includes a new Type column displaying each user's product access. The summary under the table now lists the license usage summary for the three products.
For information refer to To create a new user.
-
-
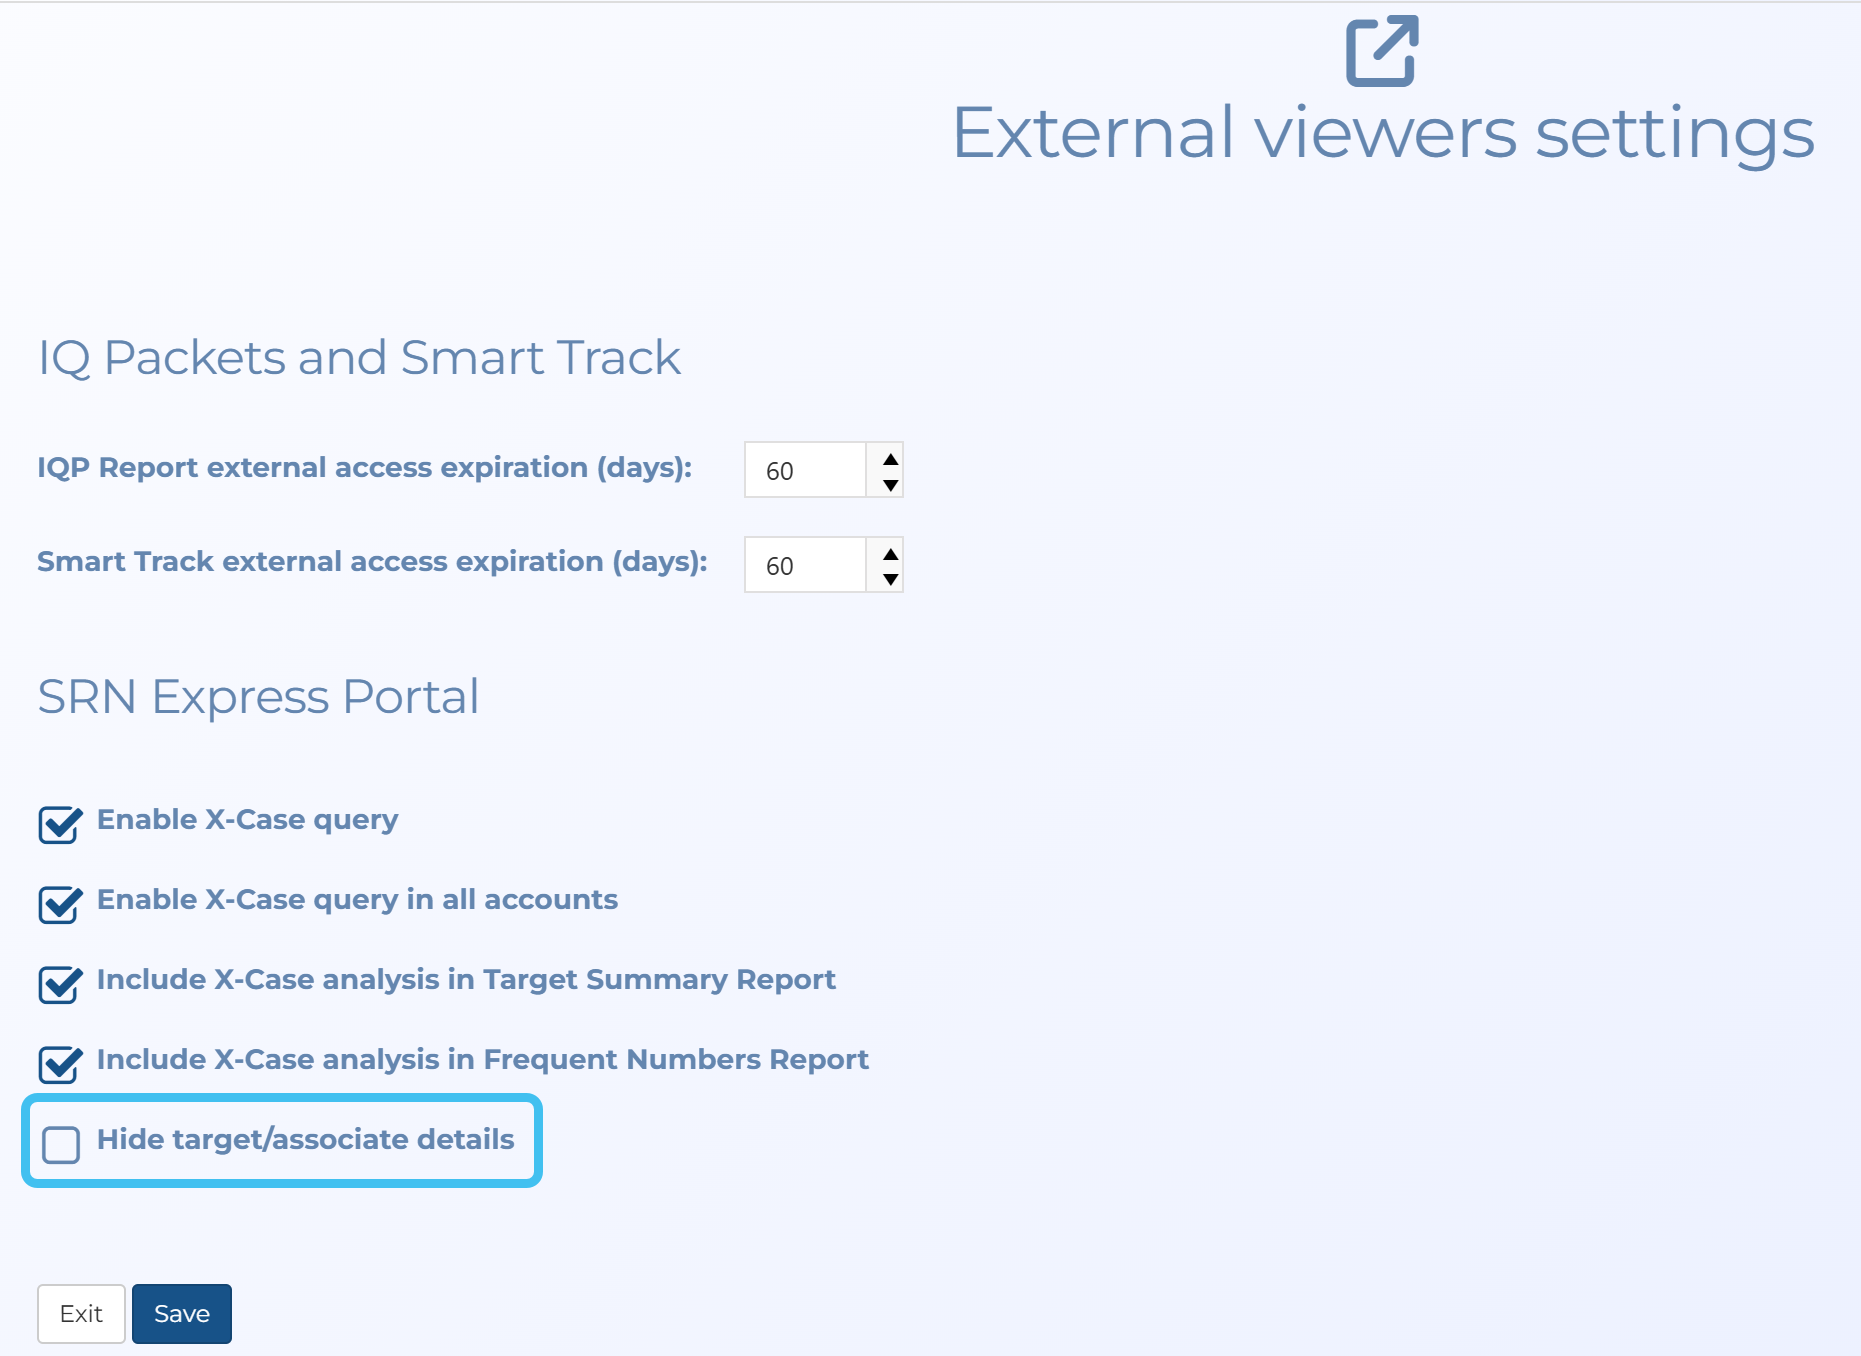
For administrators, a new Hide target/associate details setting has been added to the External viewers settings screen. Select if the only case information you want to include is the name of the case creator, their phone number and their email. If this is not selected then additional case details are provided.
-
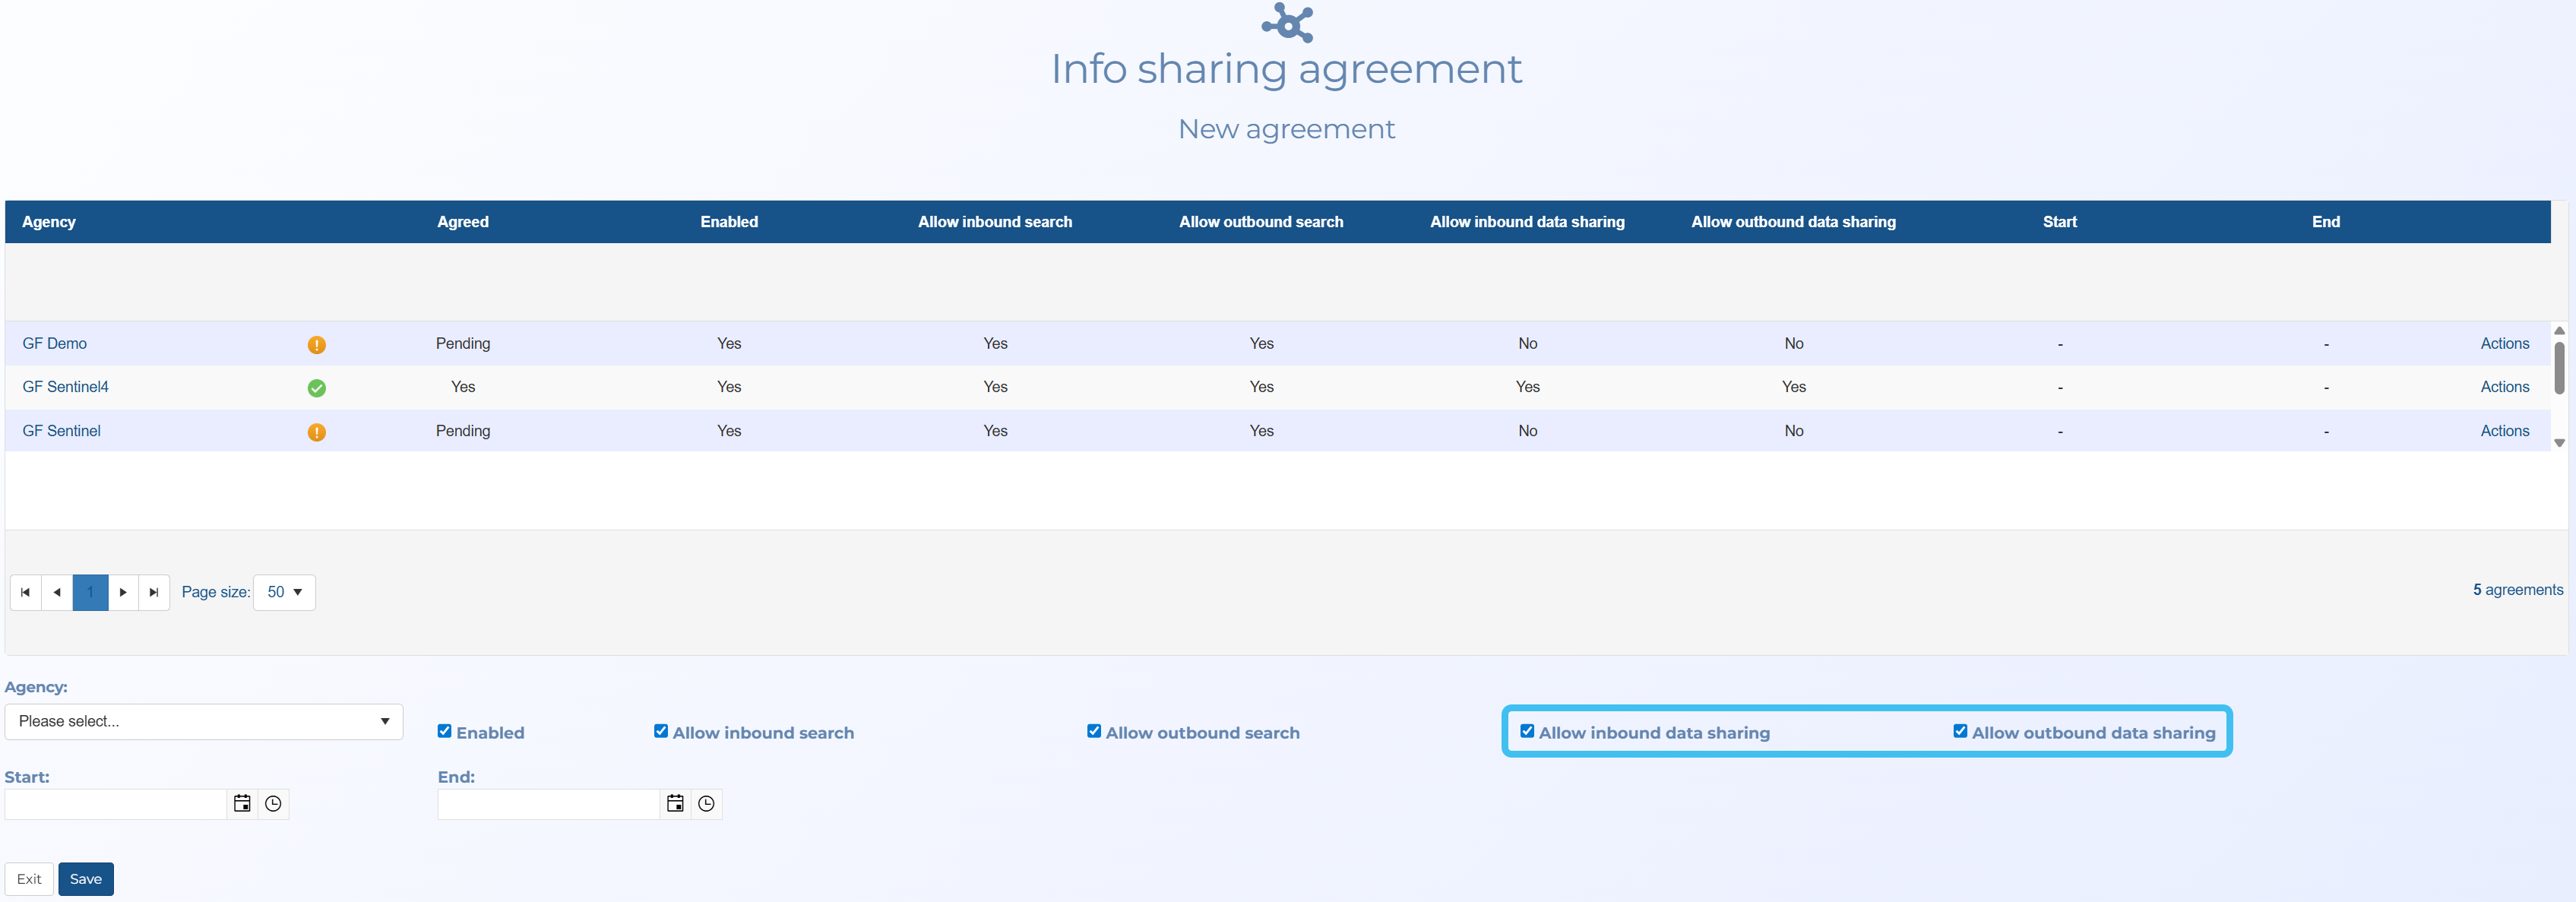
For administrators, new Allow outbound data sharing and Allow inbound data sharing settings have been added to the Info sharing settings screen which allow you to share intercept data and gps tracking data between agencies.
-
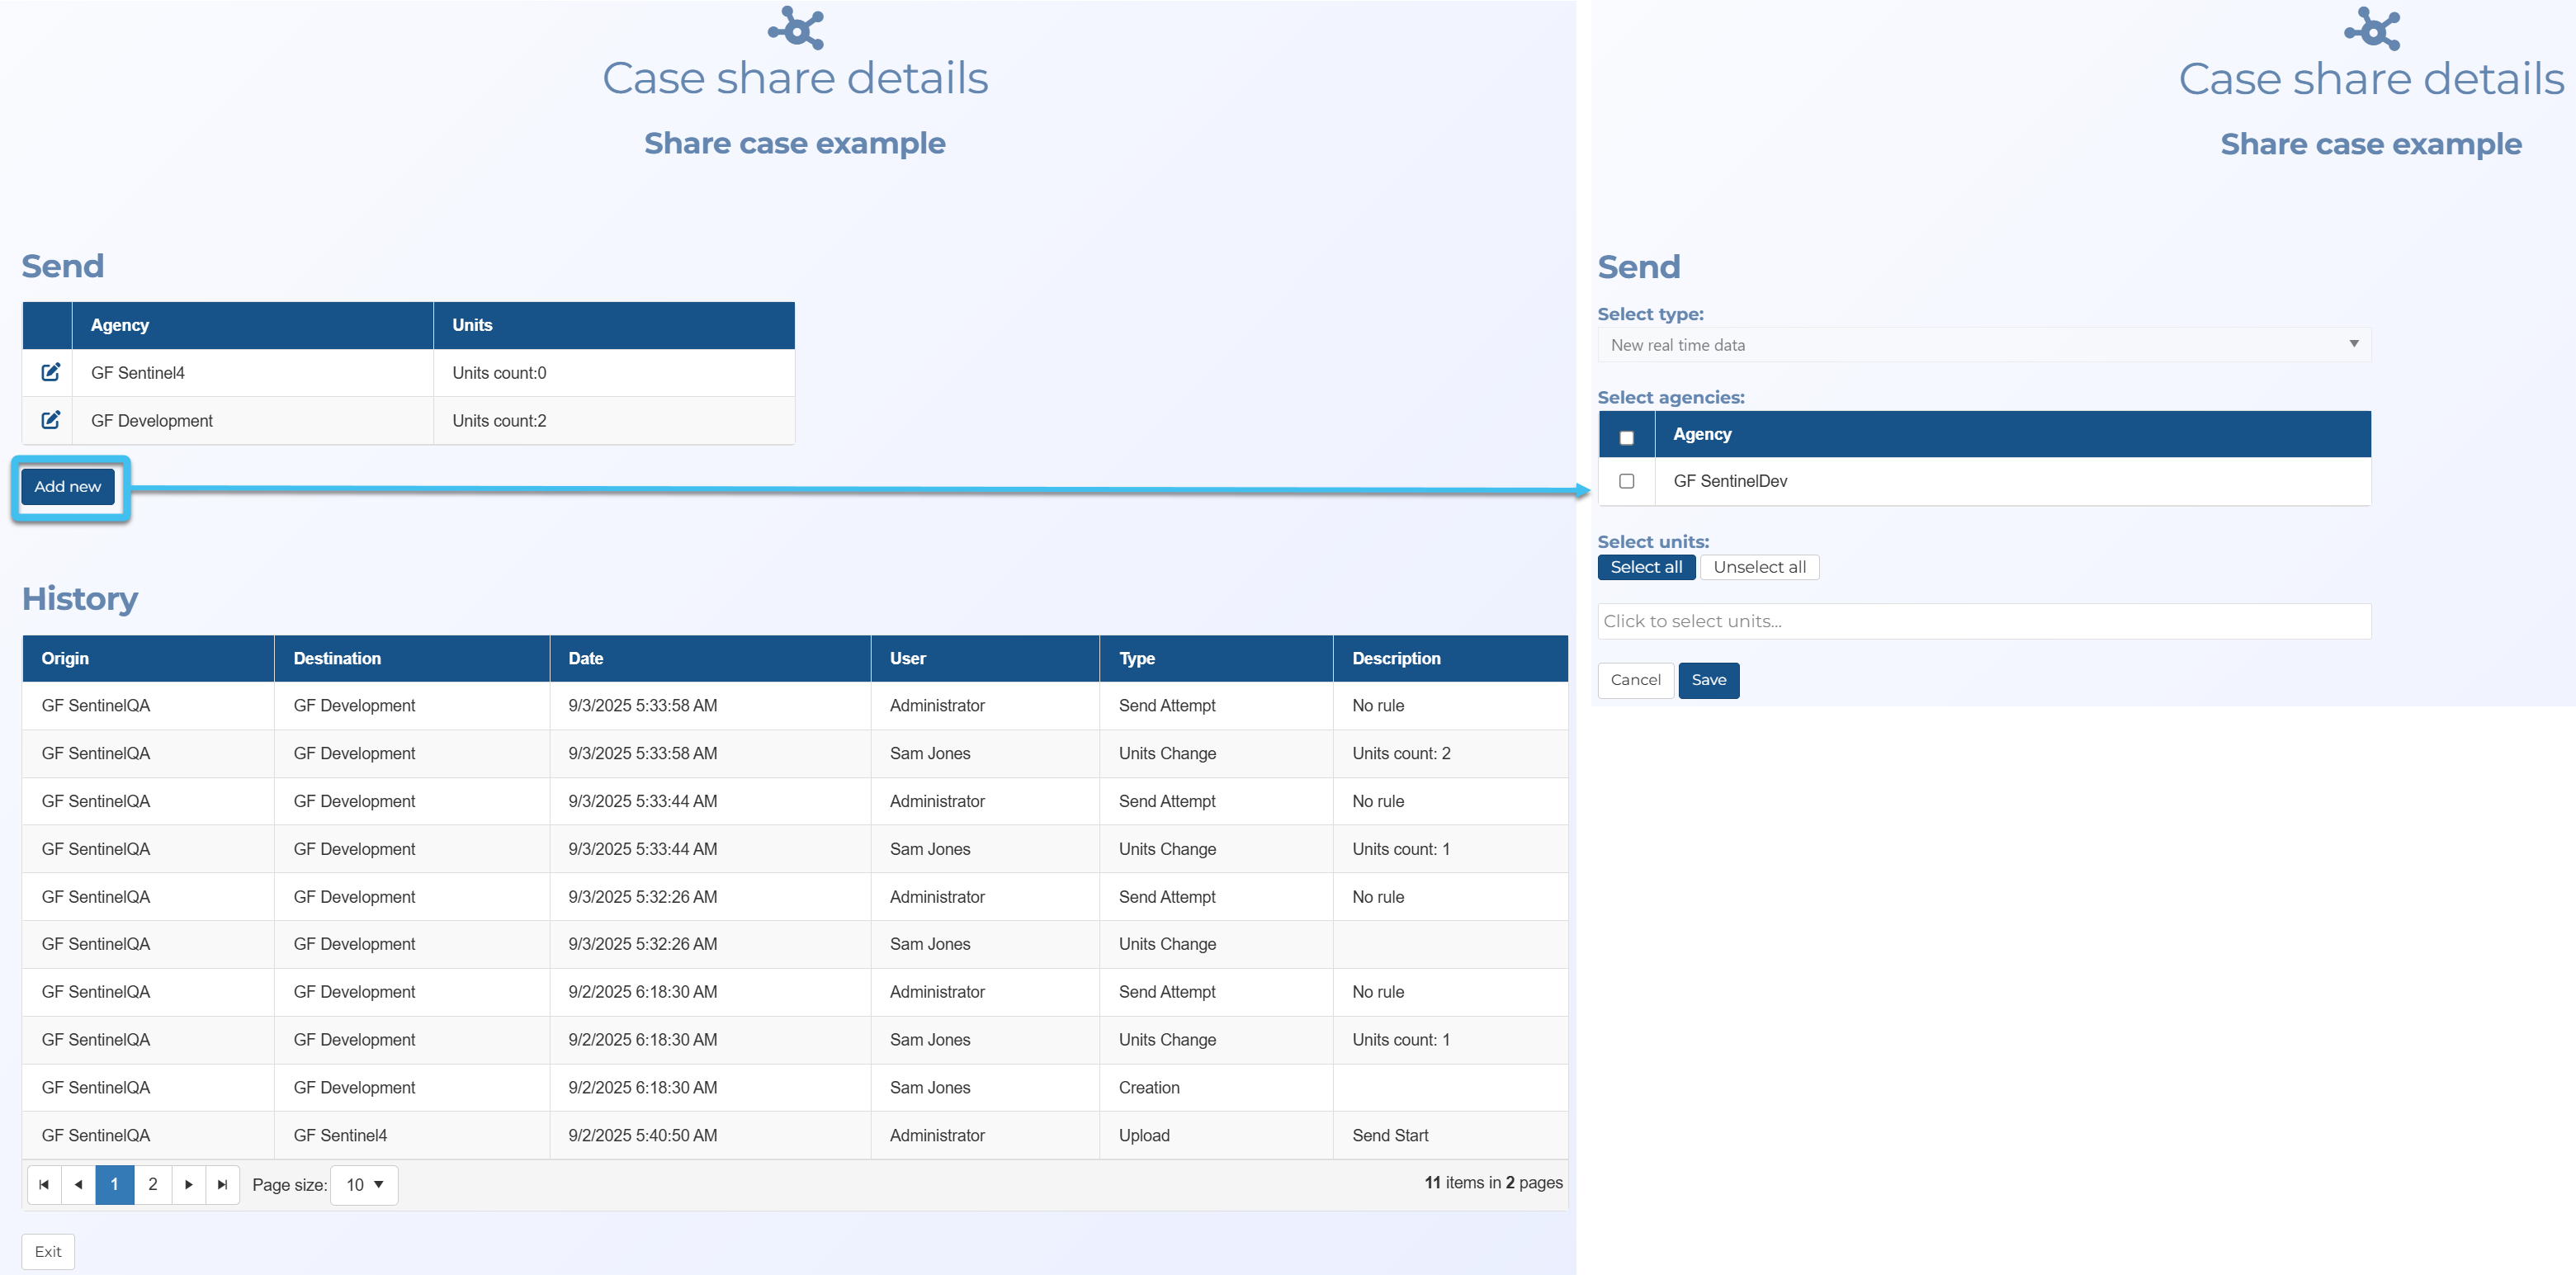
You can now share case data with other agencies or G-Scout units. This is done using the new Case share details screen which is opened by clicking Share on the Manage case screen.
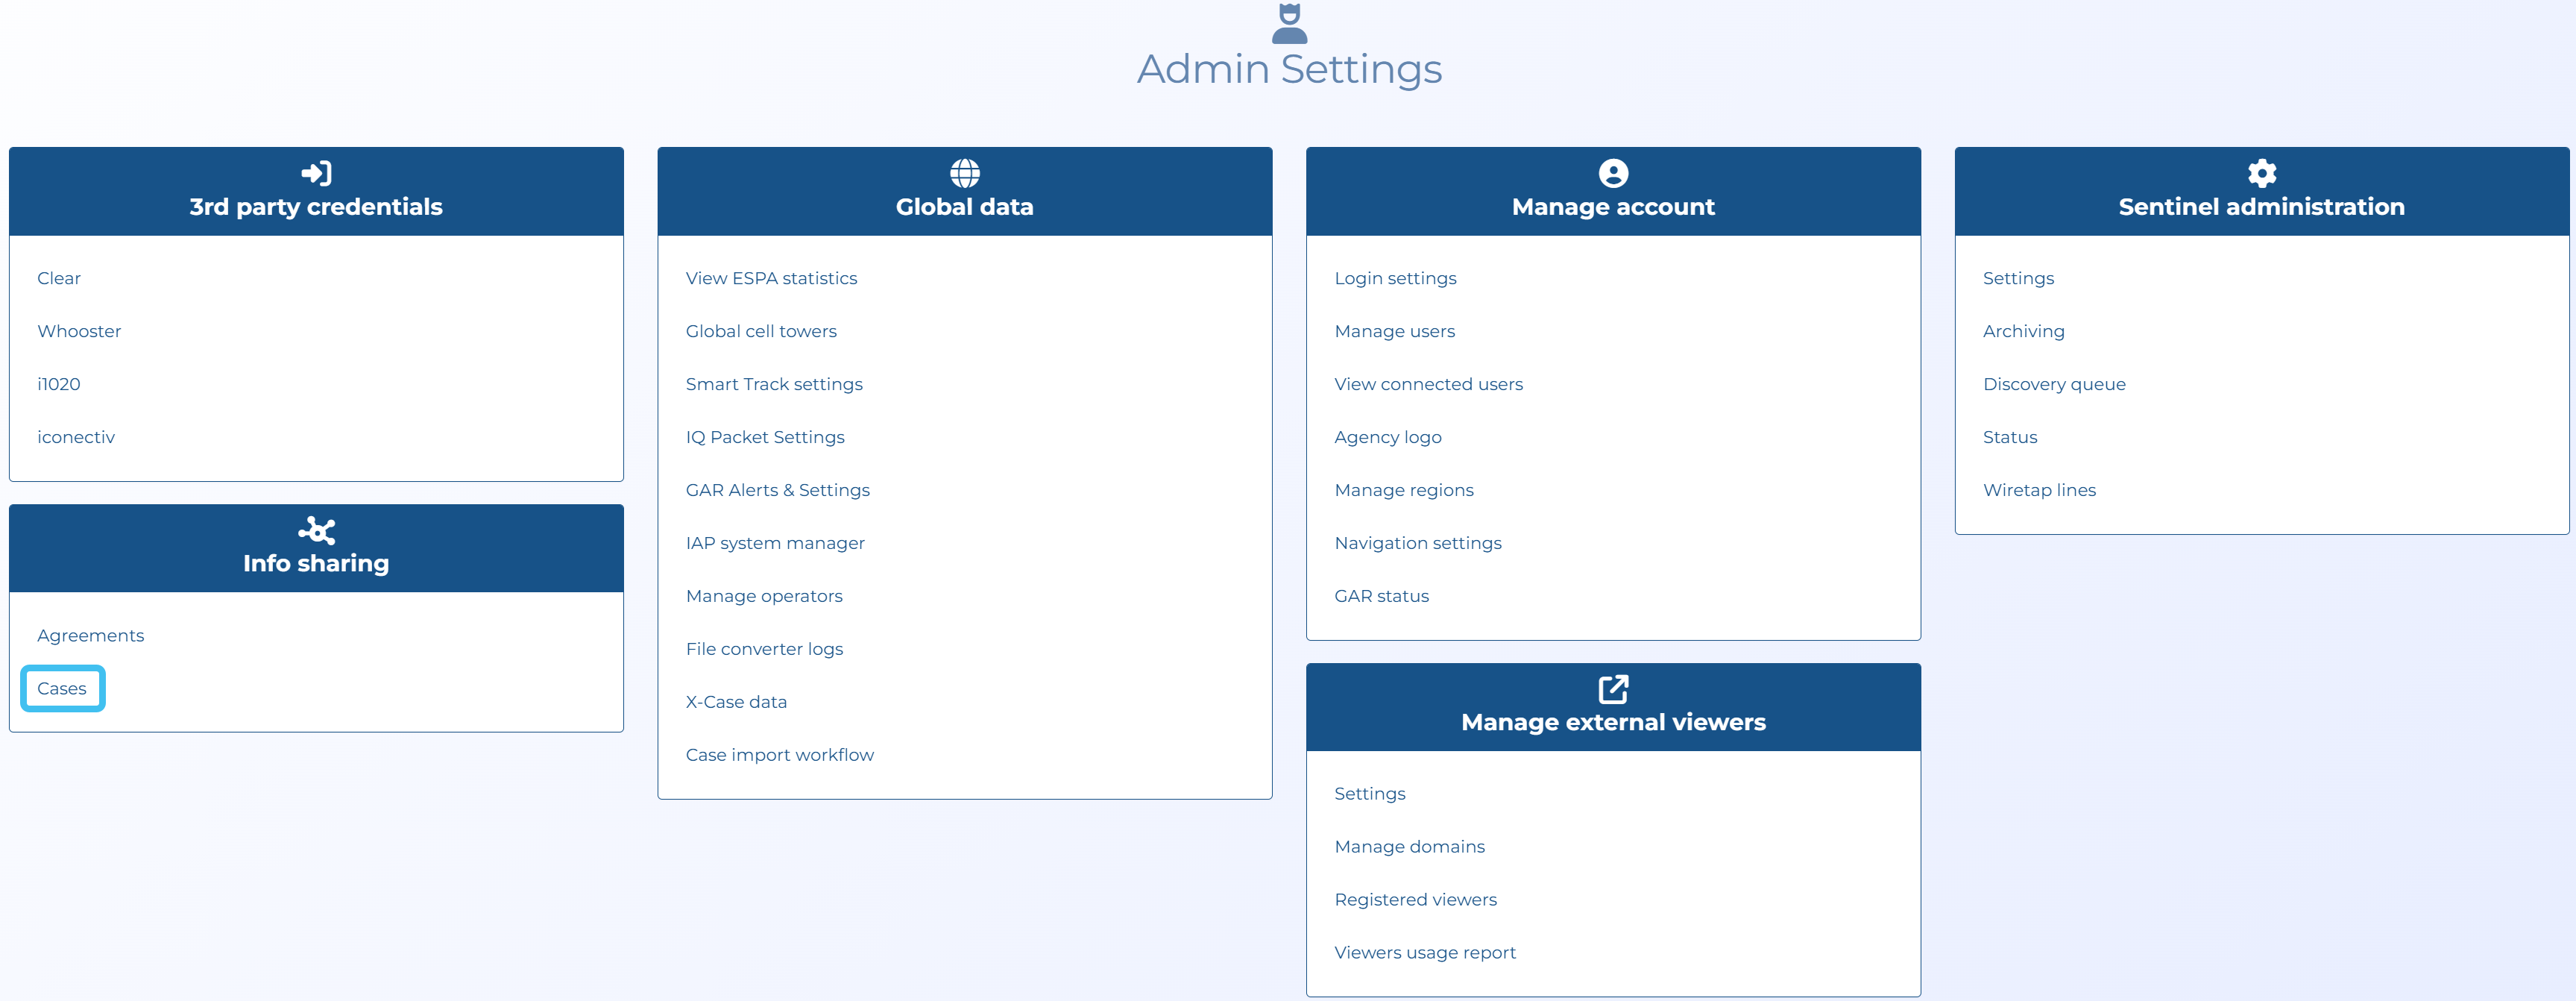
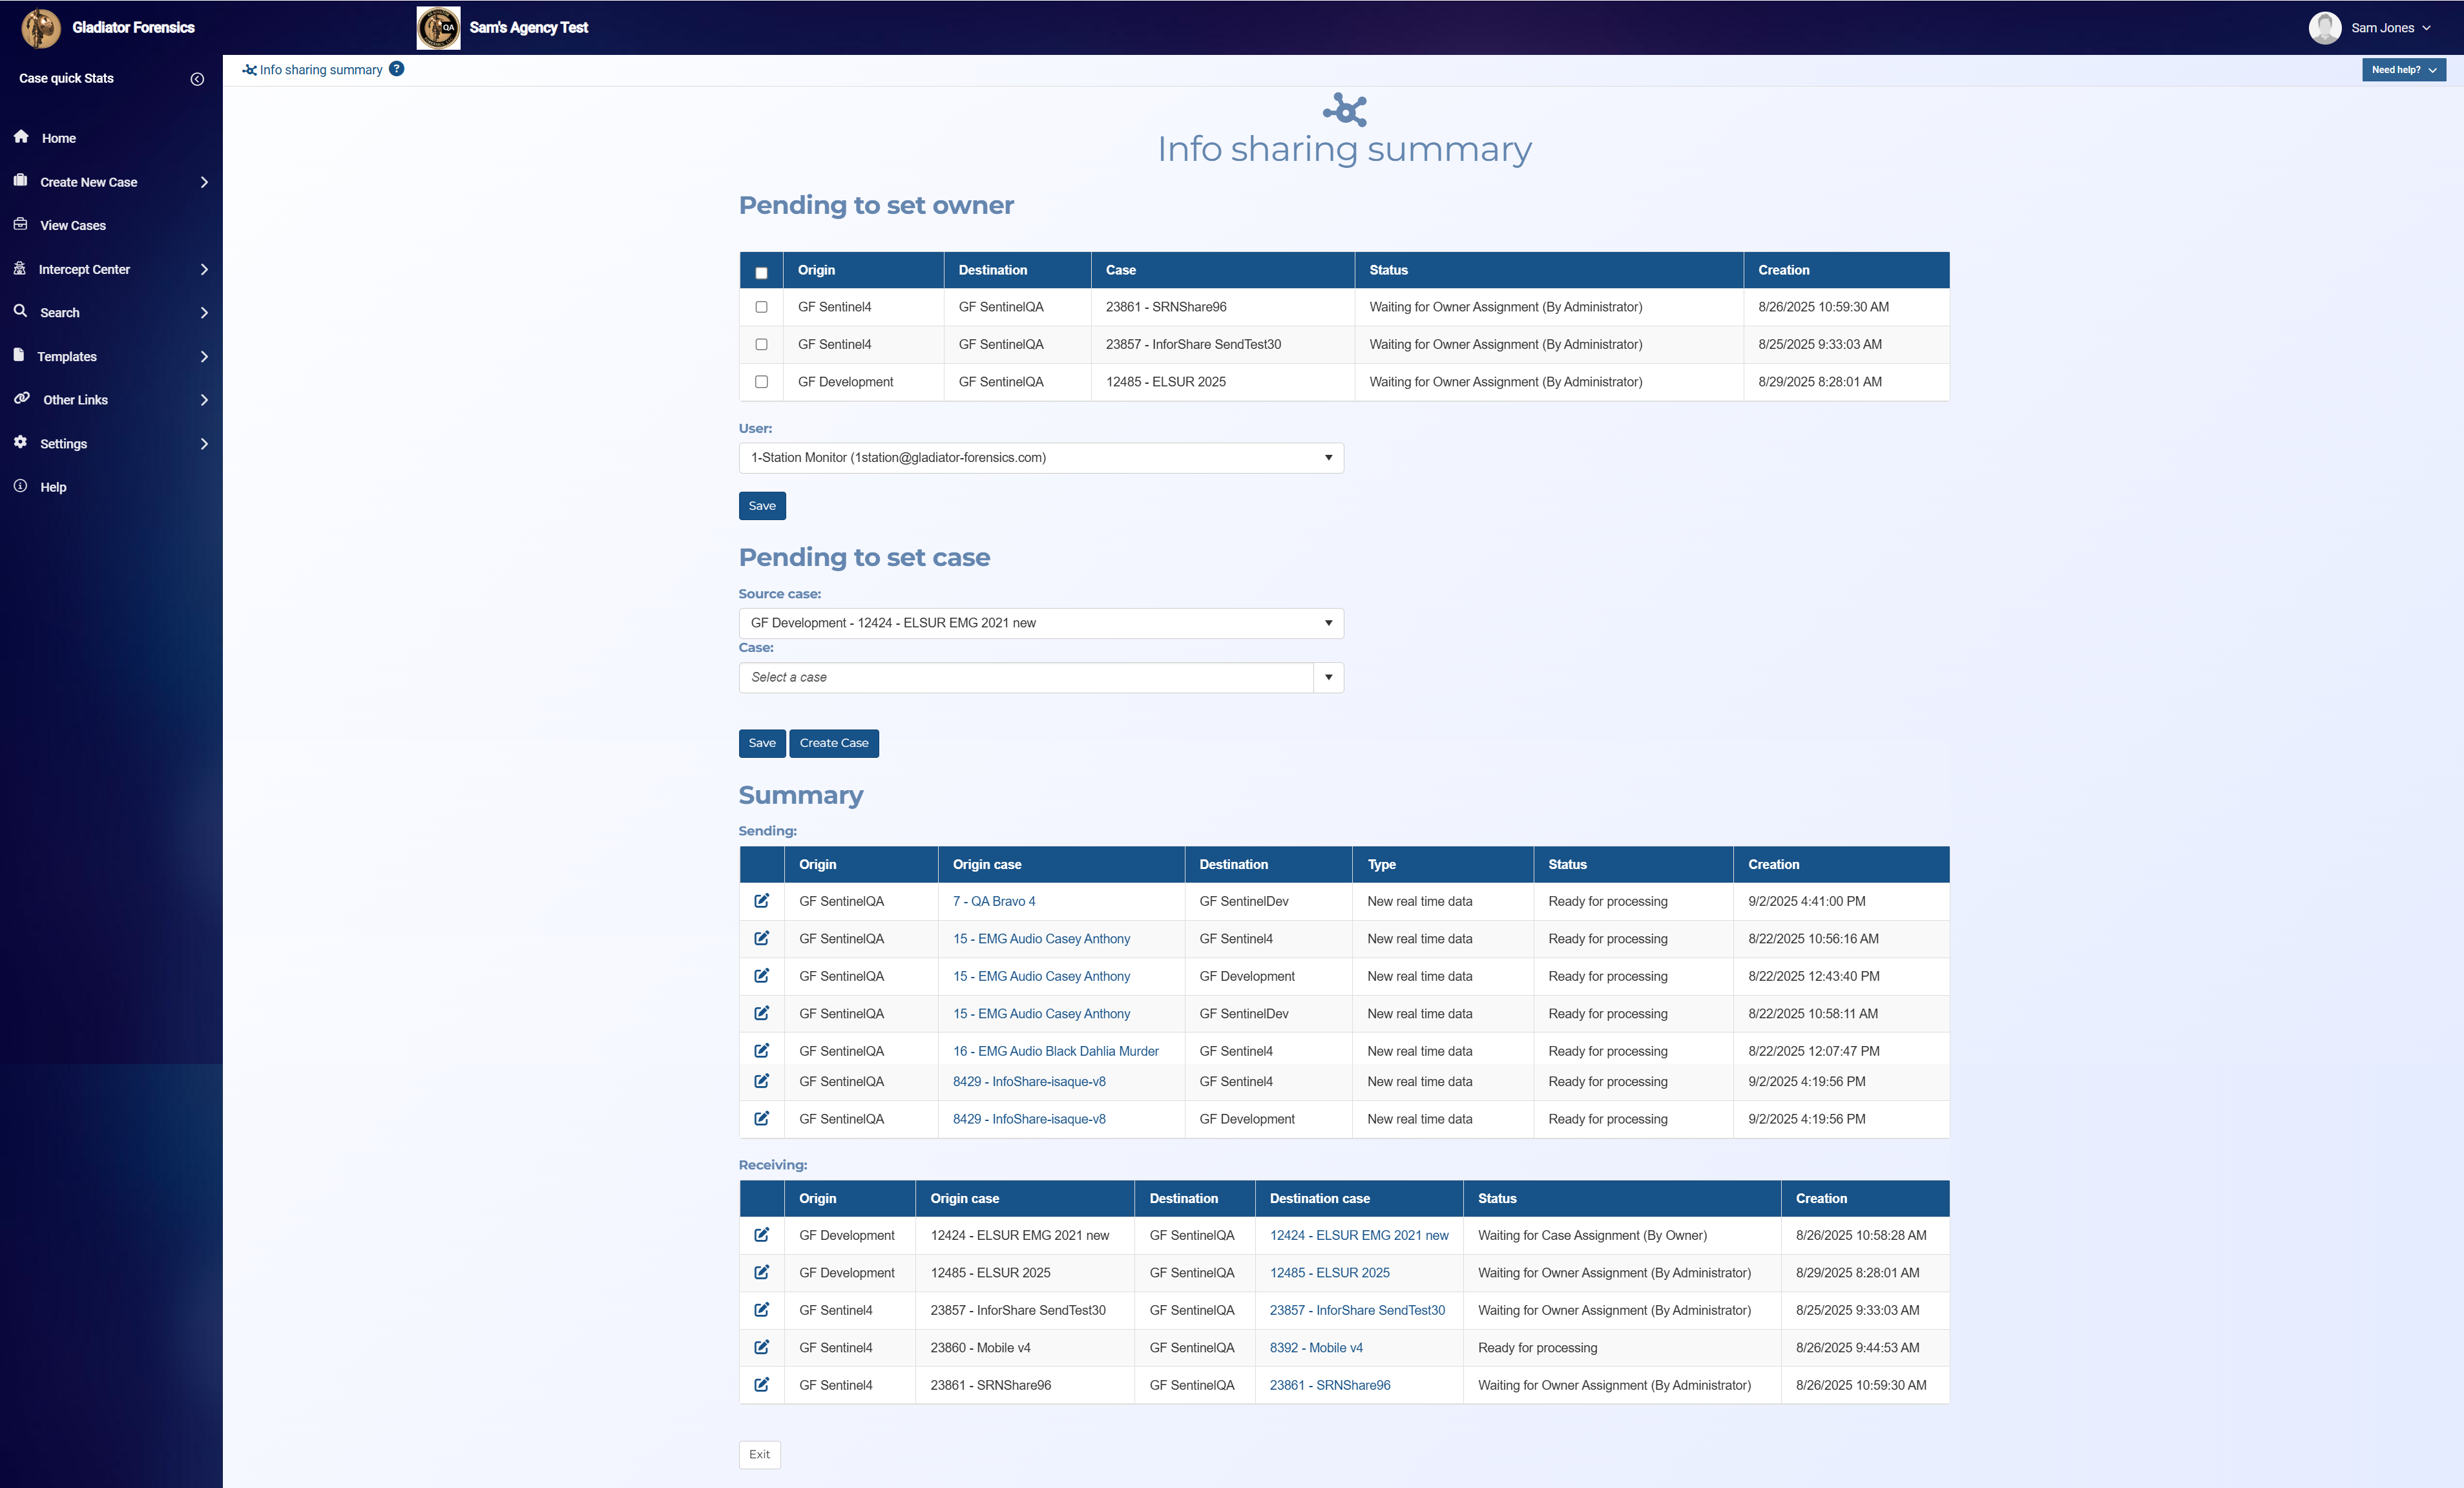
Administrators can manage the data sharing using the new Info sharing summary screen which is opened by clicking Cases on the Admin settings screen.
For information refer to Sharing cases and Managing case data sharing.
-
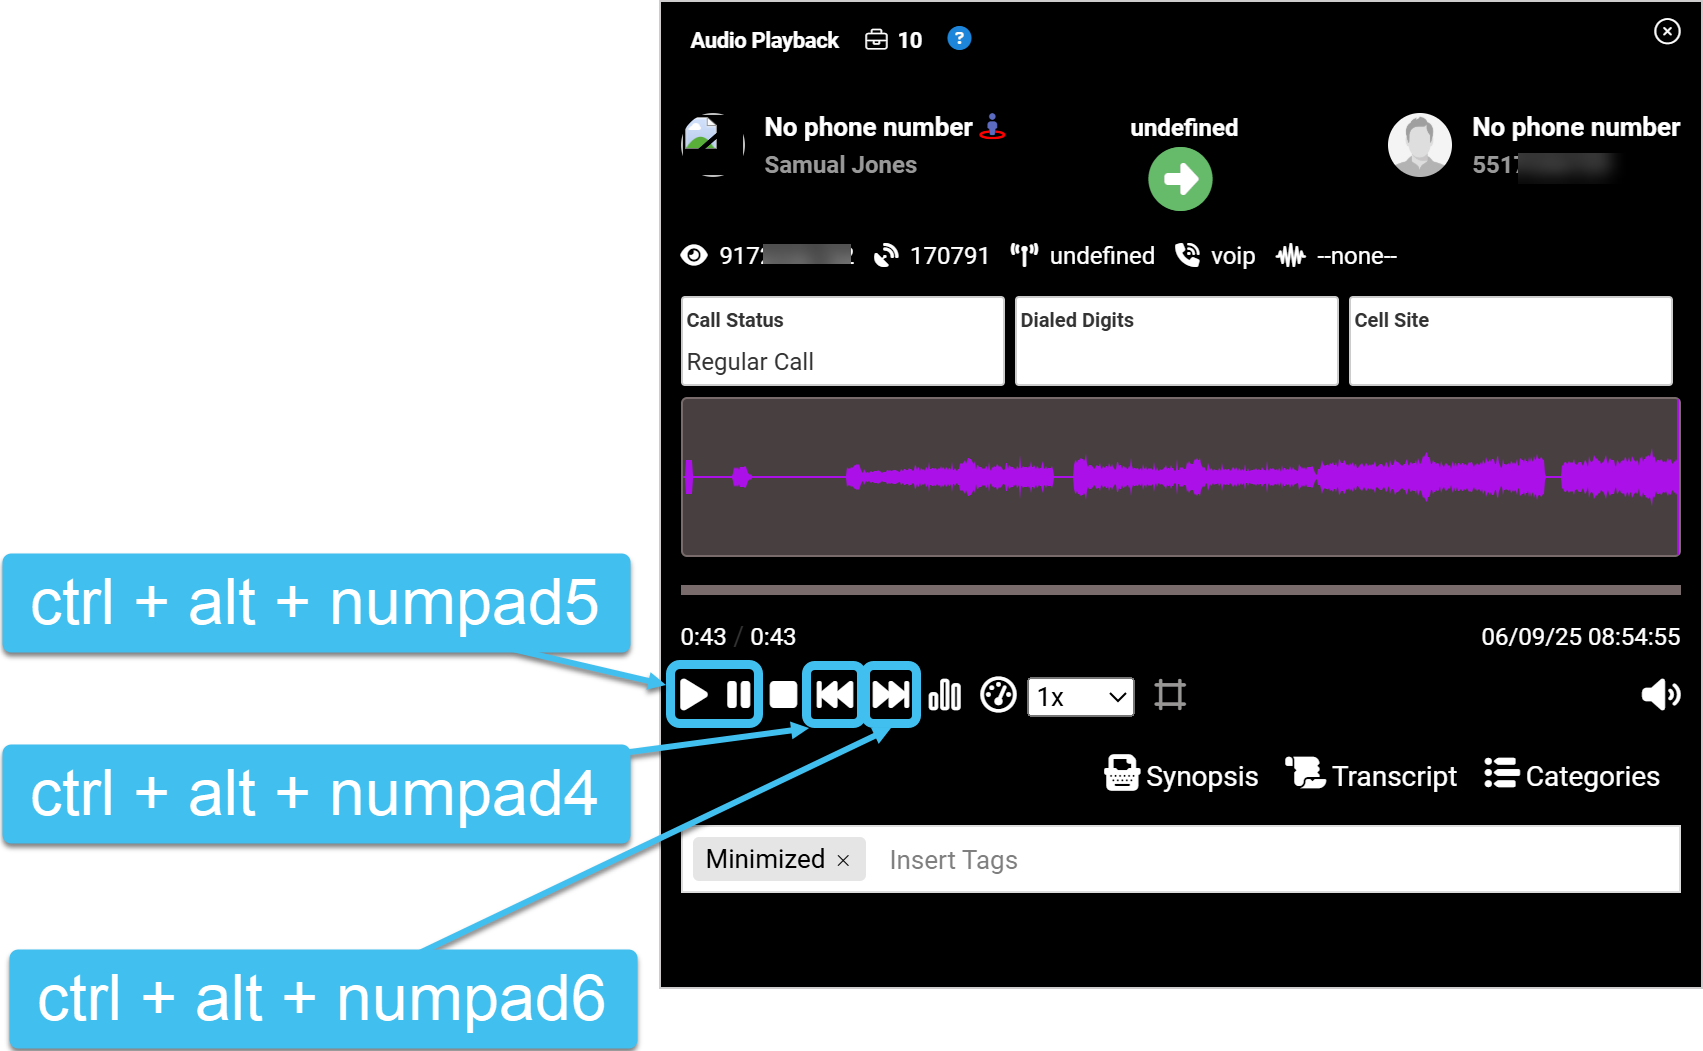
The Audio Playback window now has keyboard shortcuts for the following features:
-
Play/Pause: ctrl + alt + numpad5
-
Rewind 5 seconds: ctrl + alt + numpad4
-
Fast forward 5 seconds: ctrl + alt + numpad6
-
-
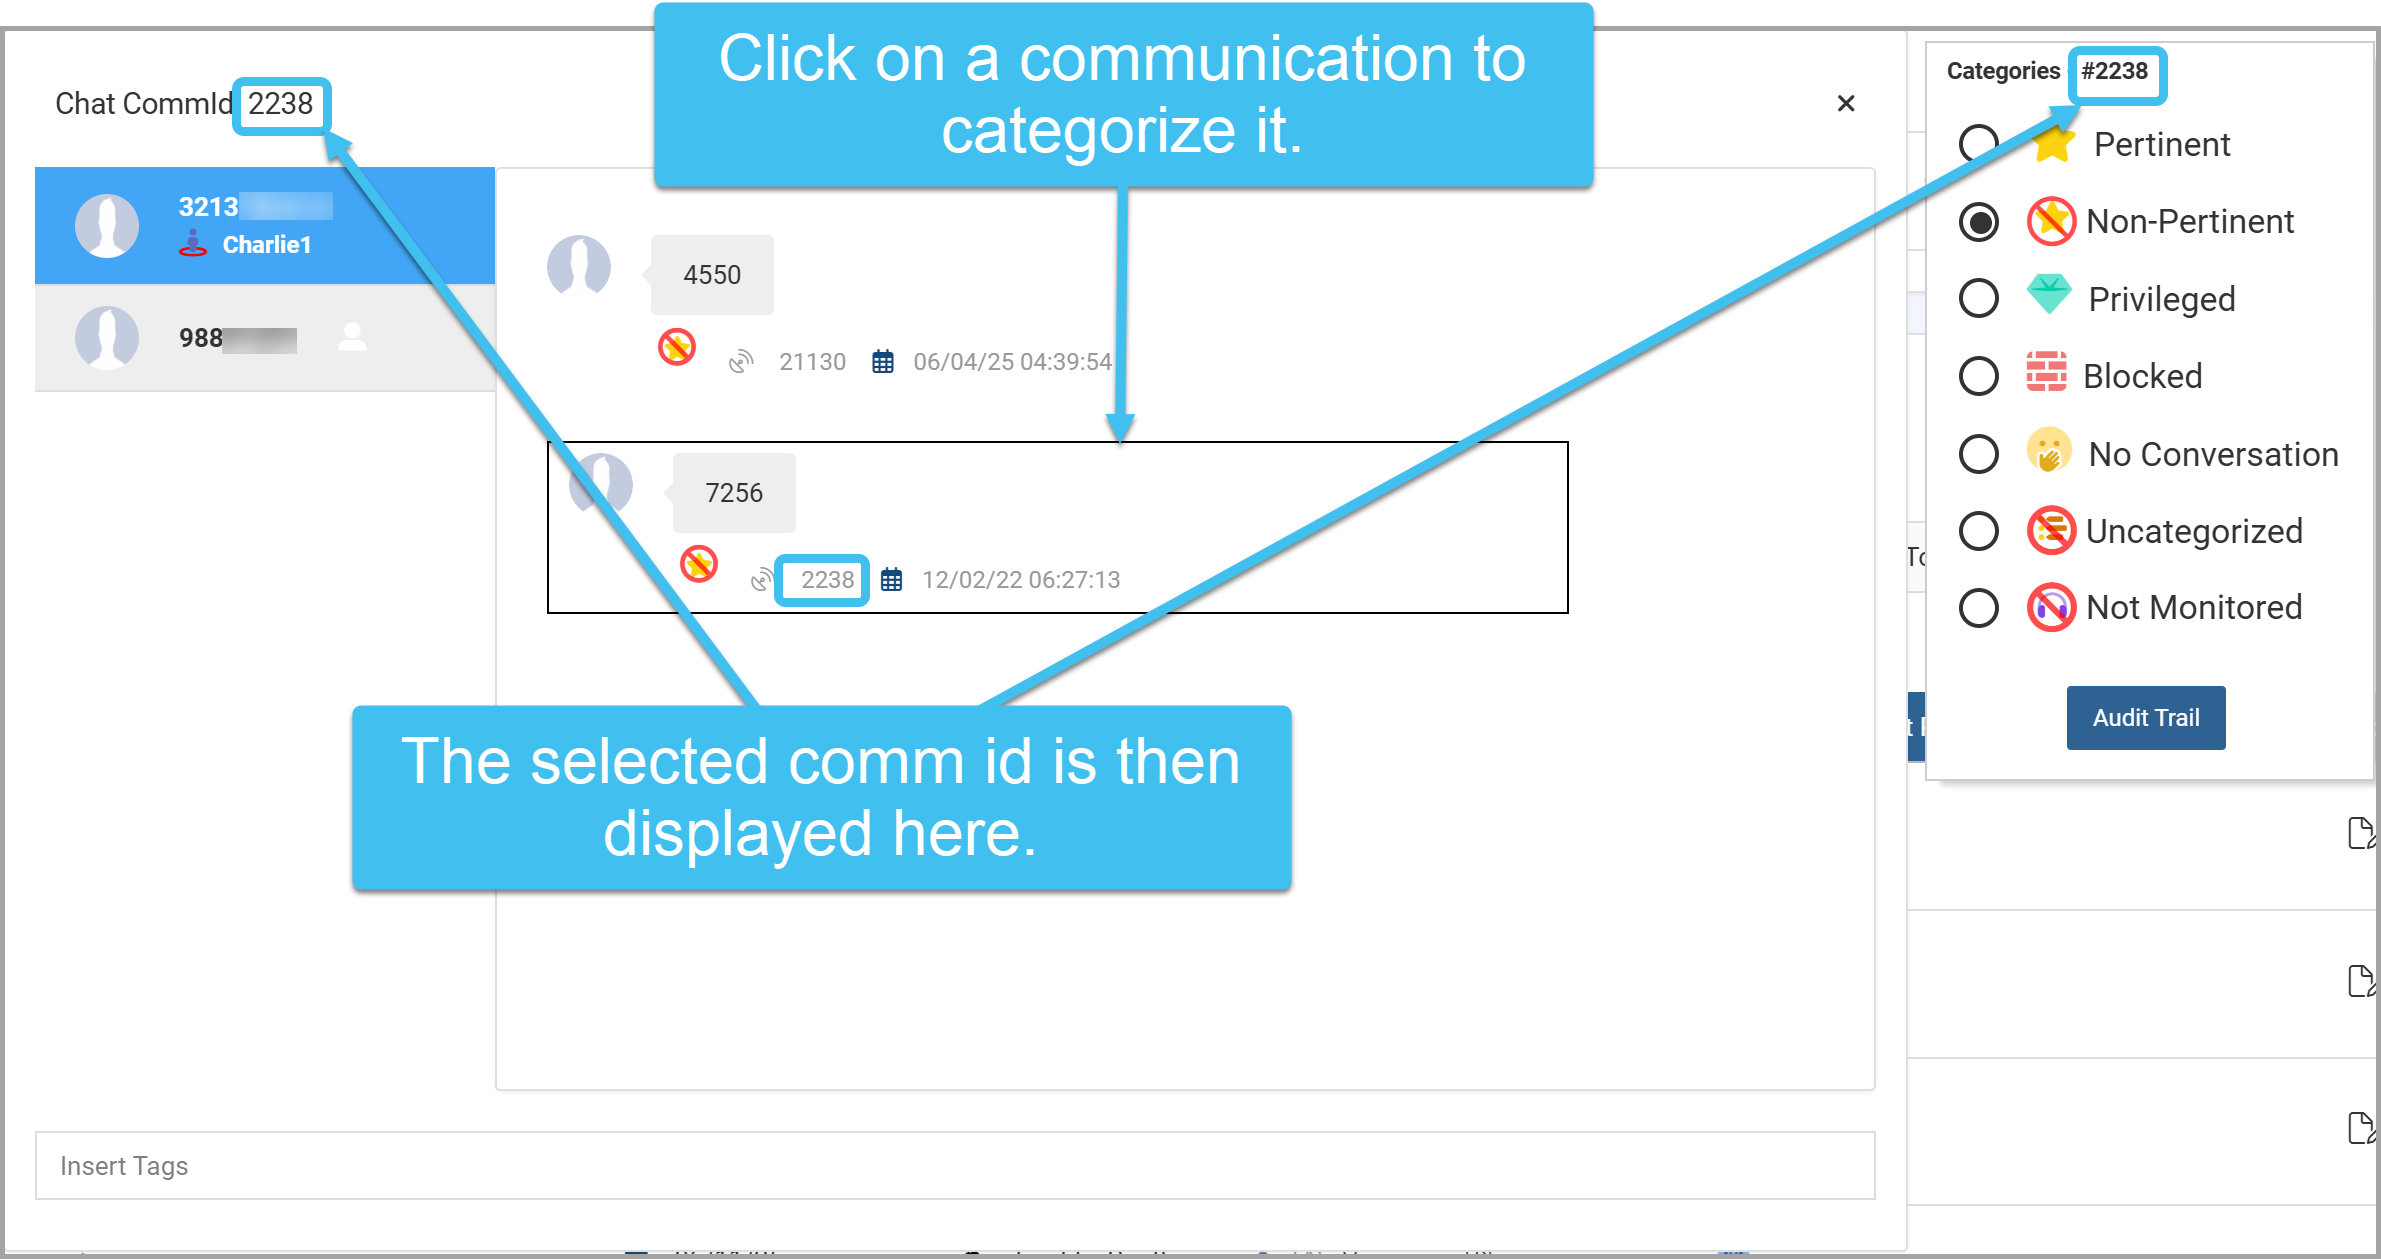
The Chat timeline view, on the Live monitoring and the Evidence Management and Reporting screens, now allows you to categorize each of the comm ids in the timeline, previously you could only categorize the comm id you first opened. To categorize each comm id, click on it; the selected comm id is displayed at the top-left of the Chat timeline view and at the top of the Categories window. You can then categorize it as normal.
-
On the Evidence Management and Reporting screen, if an sms does not contain any content then the sms icon in the Worklist's Content column is now displayed in grey rather than blue. This can occur with notifications from the operator which appear as an sms but contain no content.
-
New settings have been added to the Evidence Management and Reporting screen.
-
For historical CDR information, you can select whether or not to include the HO and TA data session information using the new Include Data Session Info (HO and TA) setting. Not including it reduces the amount of data significantly, resulting in the report completing more quickly, however by default it is selected. This same setting has been added to the Live target summary IQ packet.
-
The new Include Ping Email Body setting allows you to select whether or not to include the GPS ping email's HTML. Not including it reduces the amount of data significantly, resulting in the report completing more quickly, however by default it is selected. This same setting has been added to the Live target summary IQ packet.
-
When you generate the report you can now choose what is included in a report either: one report per case, one report per person or one report per target phone. This same setting has been added to the Live target summary IQ packet.
-
-
The sms event type classifications have been enhanced to help you distinguish between user text messaging and other content types. These new event types are displayed on the Event type column on the Sentinel screen's Event summary view, and the Call type column on the Evidence Management and Reporting screen. While generally the term sms is synonymous with user text messaging, sms is a protocol that can be used to transmit different types of carrier data to the device, including for example voicemail notifications and status, mms notifications, and other carrier-specific background data.
sms is now only displayed to identify sms user messaging and is also used when the protocol description unit (PDU) is unknown. The following new event types are now displayed, and as they contain no content the sms icon is displayed in grey.
-
sms-data: the default event type when the sms PDU contains data that is not defined as user messaging.
-
sms-notify: this identifies an sms PDU notification event such as voicemail, fax, and email.
-
wap-data: the default event type when the sms PDU contains encapsulated wireless application protocol (wap) data.
-
wap-push: the sms data sent to the wap-push port. The wap-push may further be classified if the wap-push data is a known content type:
-
mms-notify: mms notification message. (This message is not new.)
-
syncml-notify: syncml-notification message.
-
-
-
You can now view dialed digits for both PRTT and T3 calls on a number of screens, and in the Live target summary IQ packet; previously they were only available for a monitor to view on the Audio player window when replaying a T3 call. Dialed Digit Extraction (DDE) occurs when the intercept subject dials or signals digits in the VoIP content stream. The dialed digits are now also available on:
-
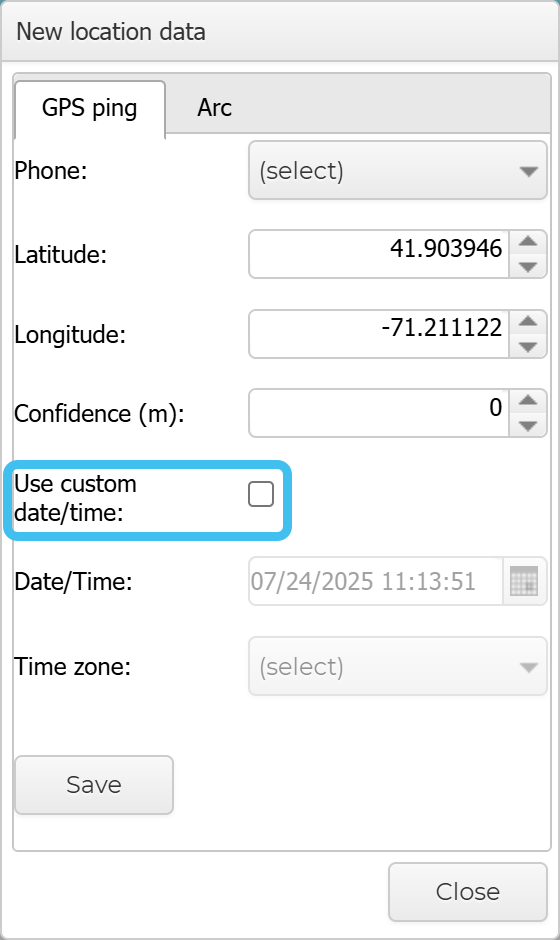
A Use custom date/time setting has been added to the New location data dialog box. This setting allows you to choose whether or not to enter a custom date/time or use the current date/time. If this setting is not selected OSS-ESPA uses the current date/time, allowing the location to be treated and delivered as real time.
-
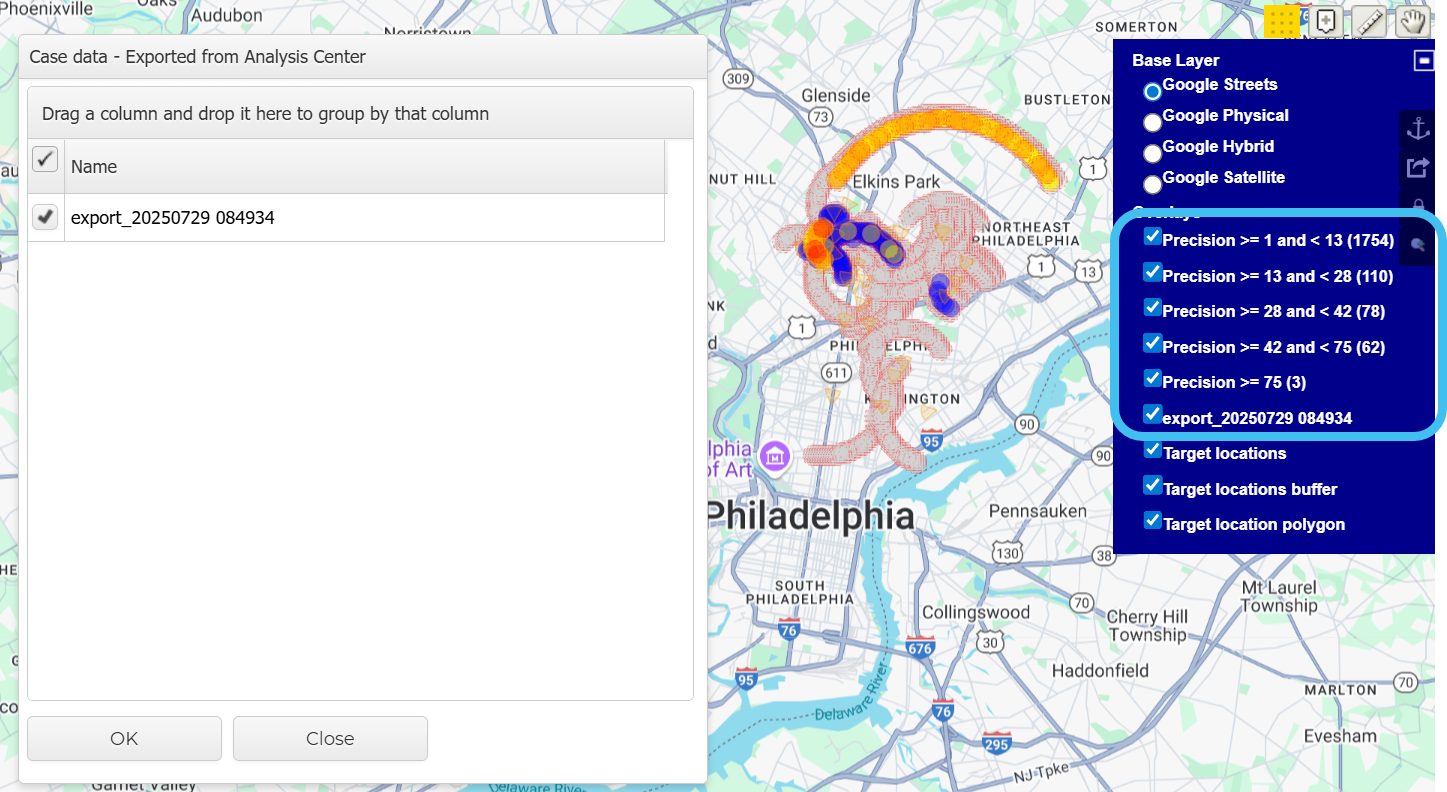
You can now export a precision location analysis from the ESPA analysis center to Google Earth and to the Sentinel screen. To do this, ensure your precision analysis is displayed on the map then select either Export map to Google Earth or Export map to Sentinel.
To view the precision analysis on the Sentinel screen, open the Case data dialog box and select the analysis export. You can then select which layers you want to view using the map layers.
For information refer to Exporting a precision location analysis from the ESPA analysis center to the Sentinel screen.
-
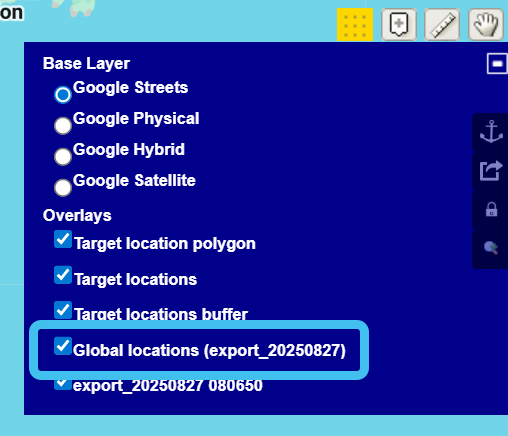
You can now export global locations from the ESPA analysis center to the Sentinel screen. To do this, ensure the required global locations are displayed on the map then select Export map to Sentinel.
To view the global locations on the Sentinel screen, open the Case data dialog box and select the export. You can then select the Global locations (export_<date>) layer to view the global locations on the map.
For information refer to How to display global locations on the ESPA analysis center and the Sentinel screen.
-
The Event summary, Location events and IPs views have been updated to now included a target's alias names and other names.
