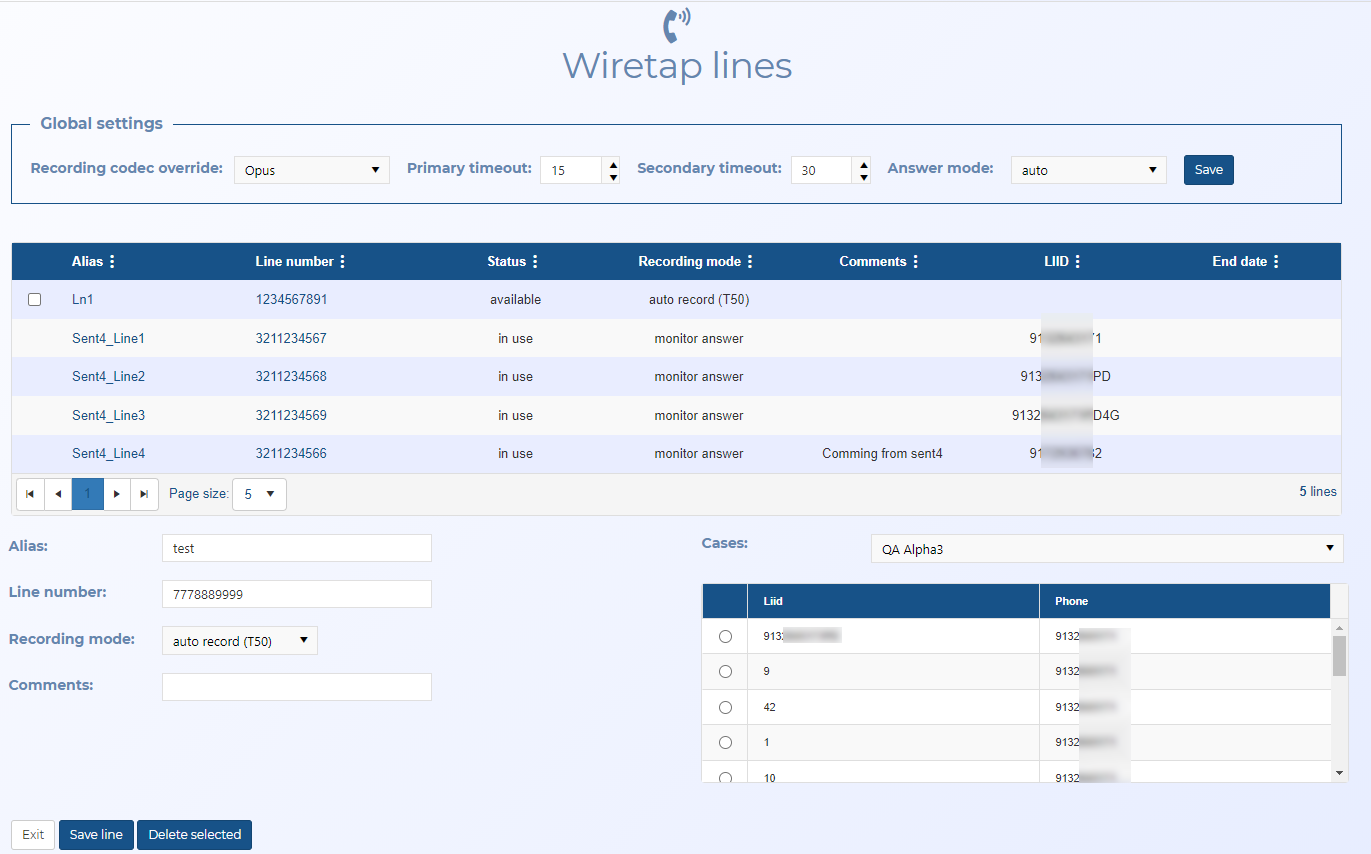
Wiretap lines screen
This topic provides an overview of the Wiretap lines screen and all the settings and buttons on it. However if you require step-by-step procedures on configuring and deleting wiretap lines refer to Managing wiretap lines.
NOTE: This screen is typically only available to administrators.
This feature requires option E19 Sentinel content log. If you do not have this option this feature is not available.
The Wiretap lines screen allows you to manage your wiretap lines which are used for live monitoring. It allows you to view, add, edit and delete the wiretap lines.
The Wiretap lines screen allows you to define the configuration of the lines that are used within the Gladiator Forensics CCVS (Call Content Voice Server). The CCVS is used to manage all the live monitoring voice call content when a new voice call from a subject arrives from the operator with voice content authorized. When such a call arrives the Gladiator Forensics intercept solution detects from the HI2 whether or not the call is a VoIP (Voice over Internet Protocol), and informs the CCVS so it can manage the call accordingly. Both VoIP and PSTN (Public Switched Telephone Network) calls are routed, recorded and managed by the CCSV, however the PSTN calls must have a wiretap linecense associated with it, while the VoIP call does not. You must set up the wiretap line for the i-case using either this screen or the Create new monitoring queue screen and Editing queue screen and provide the same number to the operator to allow the call content to be properly routed.
If required you can use  in the column header to sort or filter items to quickly locate the item you want to select. How to set the filter is shown in the following graphic.
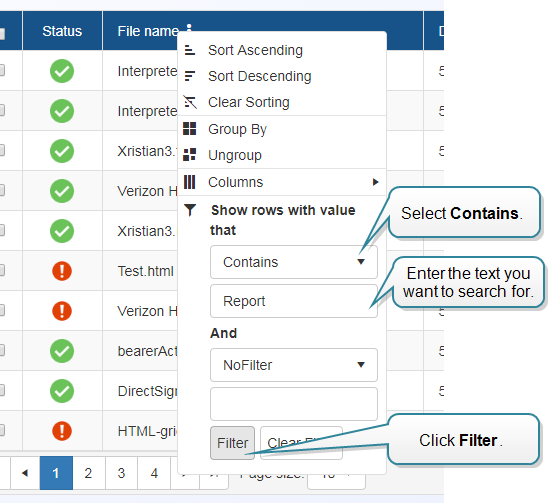
These settings are applicable to all the lines.
Select the format used by the carrier to send the voice call.
Select the timeout period before the call is routed from the primary to backup monitor. The monitors are selected using the Create new monitoring queue screen and Editing queue screen.
Select whether you answer the calls manually or if they are answered automatically.
- auto: when a new call arrives, the T3/T50 Realtime Monitoring window opens automatically on the Live Monitoring screen without you requiring to accept the call.
-
manual: when a new call arrives, a pop-up is displayed on the Live Monitoring screen asking if you want to listen to the call. If you select yes, then the T3/T50 Realtime Monitoring window opens.
This feature is currently not implemented.
Click to save any changes you have made to your global settings.
Enter an alias that is useful to you, to help identify the phone line further. For example, you may want to identify which room the line appears in.
Enter the phone number of the wiretap line.
This setting defines the recording functionality used by Asterisk for the Wiretap line.
- auto record (T50): select if no-one is required to answer the call, and the call is always recorded.
- monitor answer: select if the line requires to be answered by a monitor. If it is not answered by a monitor then it is not recorded.
- fax: select if the wiretap line is for a fax number. This then provides an image of the fax and also awaits a possible voice call after the fax has ended.
Enter a comment that is useful to you.
Select which cases you want to apply the wiretap line to. You can use the search to help locate your case. Cases which contain an i-case are listed before those that do not.
Click to return to the Admin settings screen.
Click to save the line you have either entered or edited.
This button is only displayed when you have a current line selected. Click to enter a new line.
Click if you want to delete the lines you have the check-box selected for in the table above. You can only delete lines that are not being used by an CASEID (LIID), therefore lines that are being used do not have a check-box.