Create new monitoring queue screen and Editing queue screen
This topic provides an overview of the Create new monitoring queue screen and the Editing queue screen and all the settings and buttons on them. However if you require step-by-step procedures on using these screens, refer to How to create a monitoring queue.
This feature requires option E19 Sentinel content log. If you do not have this option this feature is not available.
The Create new monitoring queue and the Editing queue screens are used for configuring live monitoring and allow you to:
- assign monitors to an intercept.
- define if the monitor is a primary or backup monitor. Typically you want to assign one of each to an intercept. If the primary monitor is available, the call is routed to them, but if not the call is routed to the backup monitor. If no monitor answers the T3 mode call, then the voice is not recorded and only the call data will be available.
- assign what type of content: voice, data and text message, that you require the person to monitor. The options that are available to select are dependent on how the intercept has been set up. The intercept can be set on a number of screens, for example i-case Property dialog box and the People and devices screen.
- assign wiretap lines.
- define how certain associate phones numbers are handled by Live monitoring.
- change the intercept's advanced configuration from the default values set using the Queue management settings screen. This includes the timeouts, codec, recording mode and the minimizer timer and behaviour.
Both screens are opened from the Queue management screen:
-
the Create new monitoring queue screen is opened by clicking
 .
. -
the Editing queue screen is opened by clicking
 .
.
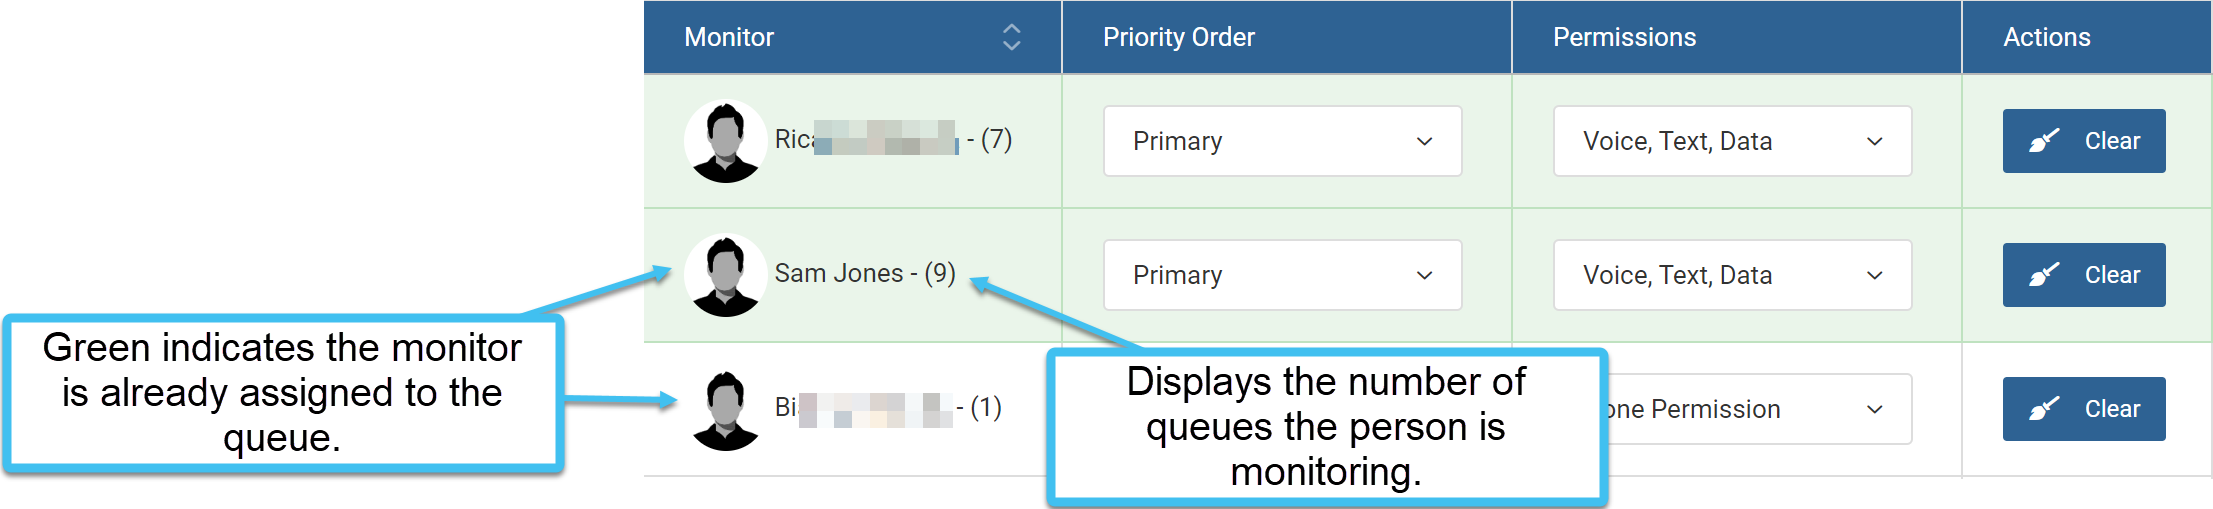
When a monitor is assigned to an intercept their row is displayed in green. The number after their name indicates how many queues they are monitoring.
This setting is only applicable on the Create new monitoring queue screen.
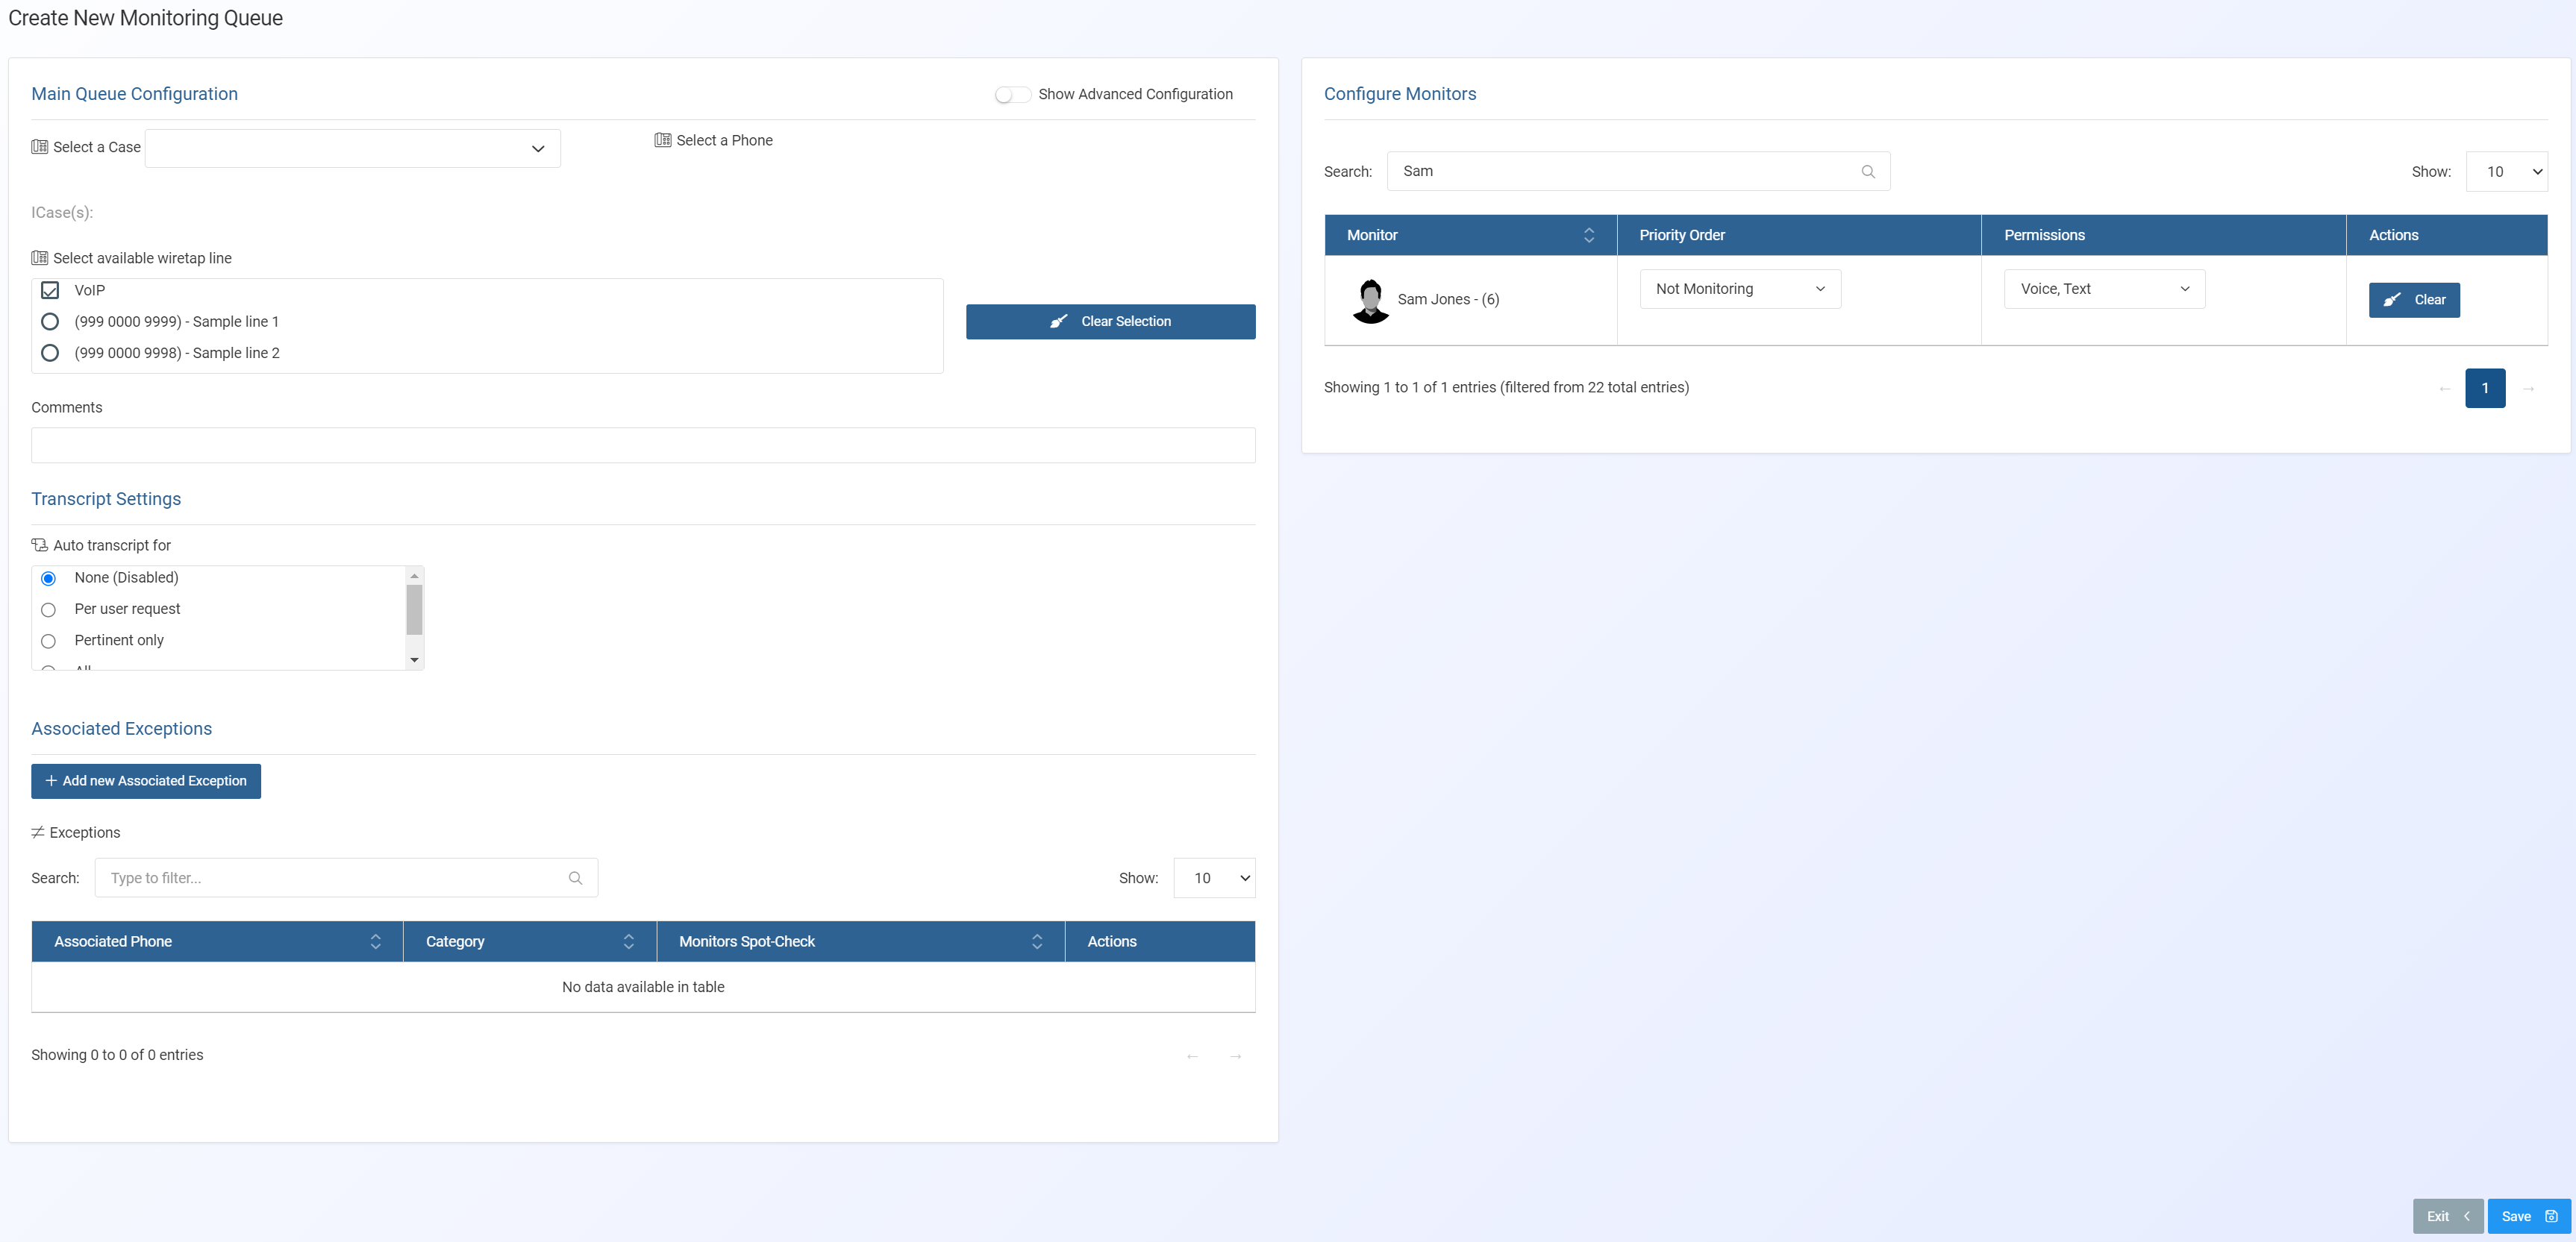
For the case you want to configure the monitors and wiretap line for, enter all or part of the case name then select it from the menu.
This setting is only applicable on the Create new monitoring queue screen.
From the menu, select the phone you want to configure the monitors and wiretap line for.
This setting is only applicable on the Editing Queue screen.
This displays all the i-cases for the intercept.
Select either VoIP (voice over internet protocol) or one of the available lines. The lines are configured on Wiretap lines on the Queue management screen.

Click to remove any selected wiretap lines. Note, the VoIP check-box is not cleared by this button.
Enter a comment that is useful to you to help you identify the case. This comment is displayed on the Queue management screen.
These settings are only displayed if you have option E27 AI.
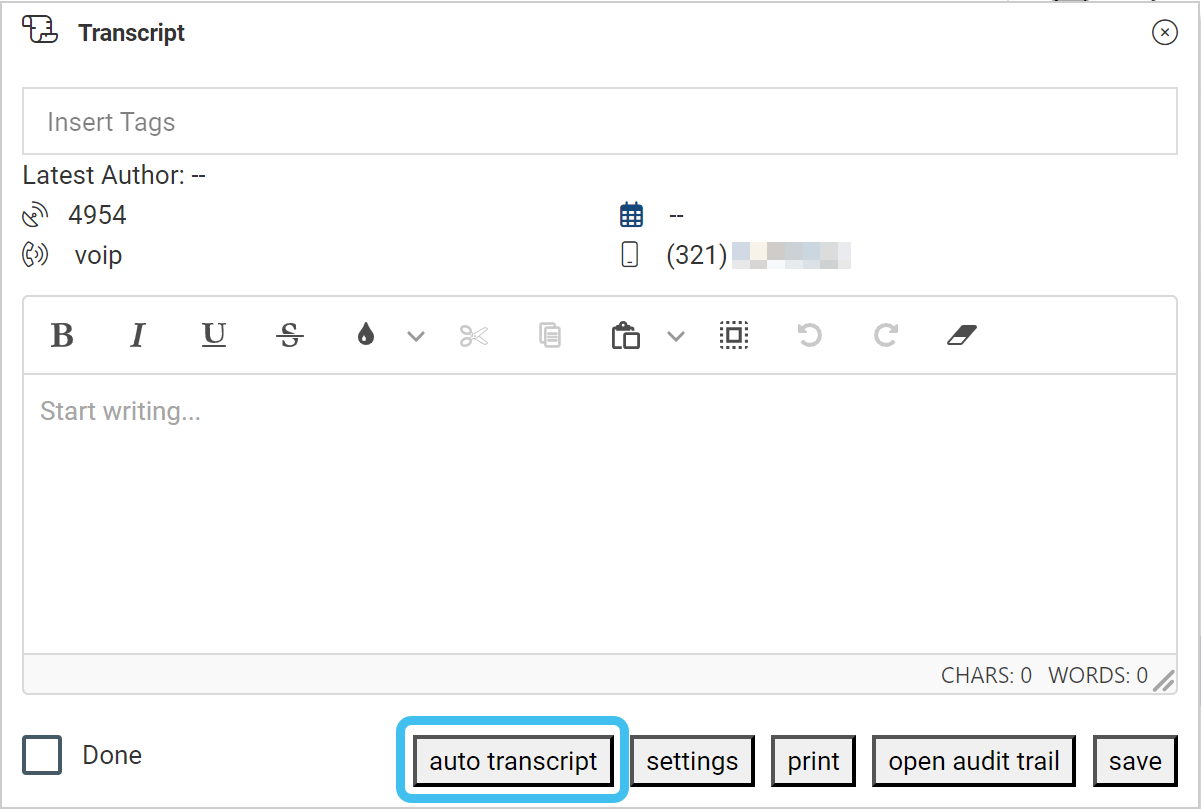
Select the method you want used for the auto transcription of calls once the call has ended. Note, transcription does not occur during a live call.
-
None (Disabled): no calls on the monitoring queue can be auto transcribed. This is the default setting.
-
Per user request: this provides an auto transcript button on the Transcript dialog box which allows the monitor to decide which calls are auto transcribed. This is the most commonly used setting. Note, if the monitor enters a transcription manually then it is no longer possible to request an auto transcription and the auto transcript button does not display.
-
Pertinent only: when the call category is set to pertinent then a transcription is automatically created.
-
All: transcriptions of all calls, including unattended calls, are automatically created. This setting is not commonly used due to the large number of calls, most of which do not contain pertinent information.
Click to enter the details of a new associate phone number and define how communications with that number should be handled.
Enter the associate's phone number.
Select the category you want used for the phone number. The only difference between Blocked and Privileged is that when a monitor is logged into the queue, with Blocked the call is recorded but with Privileged the call is minimized.
-
Not selected: the call is handled as normal.
-
Blocked:
-
the call is automatically categorized as Blocked.
-
the call is recorded, if a monitor is logged into the queue.
-
whether or not a monitor can unminimize the call is dependent on the setting of Monitor can spot-check.
-
only a user with monitor permissions of Administrator can open the communication.
-
only a user with monitor permissions of Administrator can change the communication's classification.
-
-
Privileged:
-
the call is automatically categorized as Privileged.
-
the call is minimized even if a monitor is logged into the queue.
-
whether or not a monitor can unminimize the call is dependent on the setting of Monitor can spot-check.
-
only a user with monitor permissions of Administrator can open the communication.
-
only a user with monitor permissions of Administrator can change the communication's classification.
-
Select whether or not you want to allow the monitor to occasionally listen into the call.
-
if spot check is disabled then the call is minimized and the monitor is unable to unminimize the call. The T3/T50 Realtime Monitoring window does open but the minimize button does not display and although details such as the LIID and tower do display, no-one can listen to the call.
-
if spot-check is enabled the monitor can unminimize the call to listen in but can minimize it if something privileged is being discussed.
Click to add the phone number into the exceptions table. The exception you have applied to the phone number is now configured for the monitoring queue.
Click to search in the exceptions table. The search is performed on all three columns in the table, that is the phone number, category and monitor spot-check.
The exceptions table lists all the associate number you have added an exception for along with the requested configuration. If you want to change the category and monitor spot-check then use the table's drop-down menus. You can also delete the exception using  .
.
The advanced settings allow you to assign a primary and backup queue timeout, codec, the recording mode and the minimize timer behavior to the selected intercept. This overrides the global audio settings on the Queue management settings screen.
 Primary queue timeout
Select the timeout period before the call is routed from the primary to backup monitor.
 Backup queue timeout
Select the timeout period before the call times out after being transferred to the backup monitor.
Select the format used by the carrier to send the voice call.
This setting defines the recording functionality used by Asterisk for the Wiretap line.
- auto record (T50): select if no-one is required to answer the call, and the call is always recorded.
- monitor answer: select if the line requires to be answered by a monitor. If it is not answered by a monitor then it is not recorded.
- fax: select if the wiretap line is for a fax number. This then provides an image of the fax and also awaits a possible voice call after the fax has ended.
Select if you want to specify a time range when you typically do not monitor calls, perhaps over night, and would prefer that the calls were automatically minimized. The benefit of doing this is that it informs the judge and the court, that during a certain period, calls are not monitored so they do not then query the reason for unattended calls. Once selected you must enter a start and end time. Note, if there is a monitor logged into the queue during this time then the call is still currently automatically minimized.
For designated minimized calls, the Live monitoring screen displays the monitor as Unmonitored - DM and a tag of Designated Minimization is applied to the call.
You can also specify this on a global basis using Designated Minimization on the Queue management settings screen. Any specification made on the queue overrides that made using the global setting.
Enter how long the call is minimized for when the monitor clicks Minimize on the T3/T50 Realtime Monitoring window.
Select whether or not the audio returns automatically after the Minimize timer expires.
Select whether or not you want the  button to display for the selected queue. When a monitor clicks this button they are permanently terminating the monitoring of the call. This means it is removed from the live queue and can no longer be monitored by them, or any other monitor. This is different to logging out of the queue, as in this instance the call is then made available to other monitors.
You can also show and hide this button on a default basis using Show Terminate Monitoring button on the Monitor management settings screen.
Select if you require the monitor to always categorize SMS and MMS when they first open a message for the selected queue. If enabled the following message is displayed and the monitor cannot close the chat timeline window without setting a category.
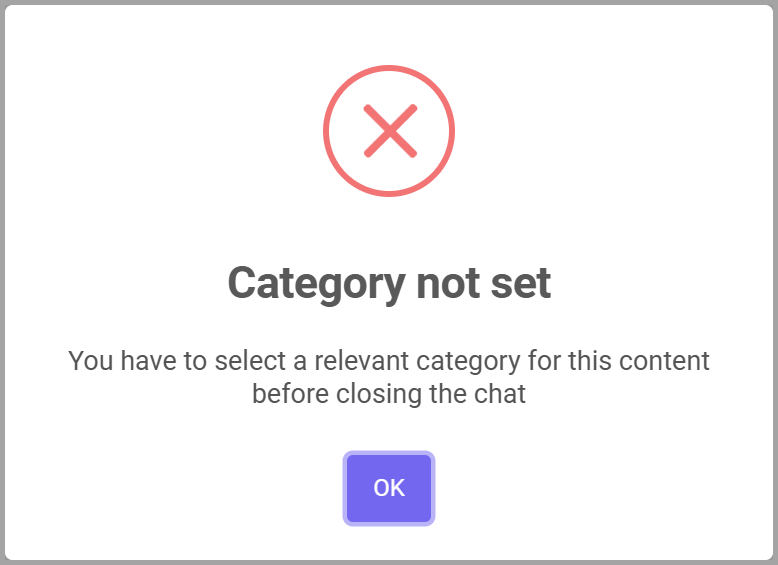
You can also set this on a default basis using Mandatory SMS/MMS categorization in first open on the Monitor management settings screen.
Use the search to locate the monitor that you want to assign. The names that are available to select are those who have been set up to monitor as a User or as a Station by your administrator.
Select whether the monitor is a primary or backup monitor. Typically you want to assign one of each to an intercept. If the primary monitor is available, the call is routed to them, but if not the call is routed to the backup monitor. If no monitor answers the T3 mode call, then the voice is not recorded and only the call data will be available.
Select which types of content you want the selected monitor to have permission to monitor. The only options available for you to select are based on how the intercept has been set up. The intercept can be set on a number of screens, for example i-case Property dialog box and the People and devices screen.
-
Voice: select if you want to give permission to the selected monitor to analyze the voice in the message provided by the operator. If this setting is not selected then the monitor does not receive voice for the intercept.
-
Text : select if you want to give permission to the selected monitor to analyze the actual body of the text message provided by the operator. For example text message content can include text, photos and videos. If this setting is not selected then the monitor does not receive text for the intercept.
-
Data: select if you want to give permission to the selected monitor to analyze the data content in the message provided by the operator. For example, search engine searches, Web sites visited and IP addresses. If this setting is not selected then the monitor does not receive data content for the intercept.
Click to remove the selected monitor from receiving intercepts.

This button is only available to users who have Monitor set to Administrator on the Edit user screen.
Click to log a monitor out of the queue, which may be required if a monitor has forgotten to log out themselves.
Click to close the screen without saving any changes and return to the Queue management screen.
Click to save the updates you have made and return to the Queue management screen.