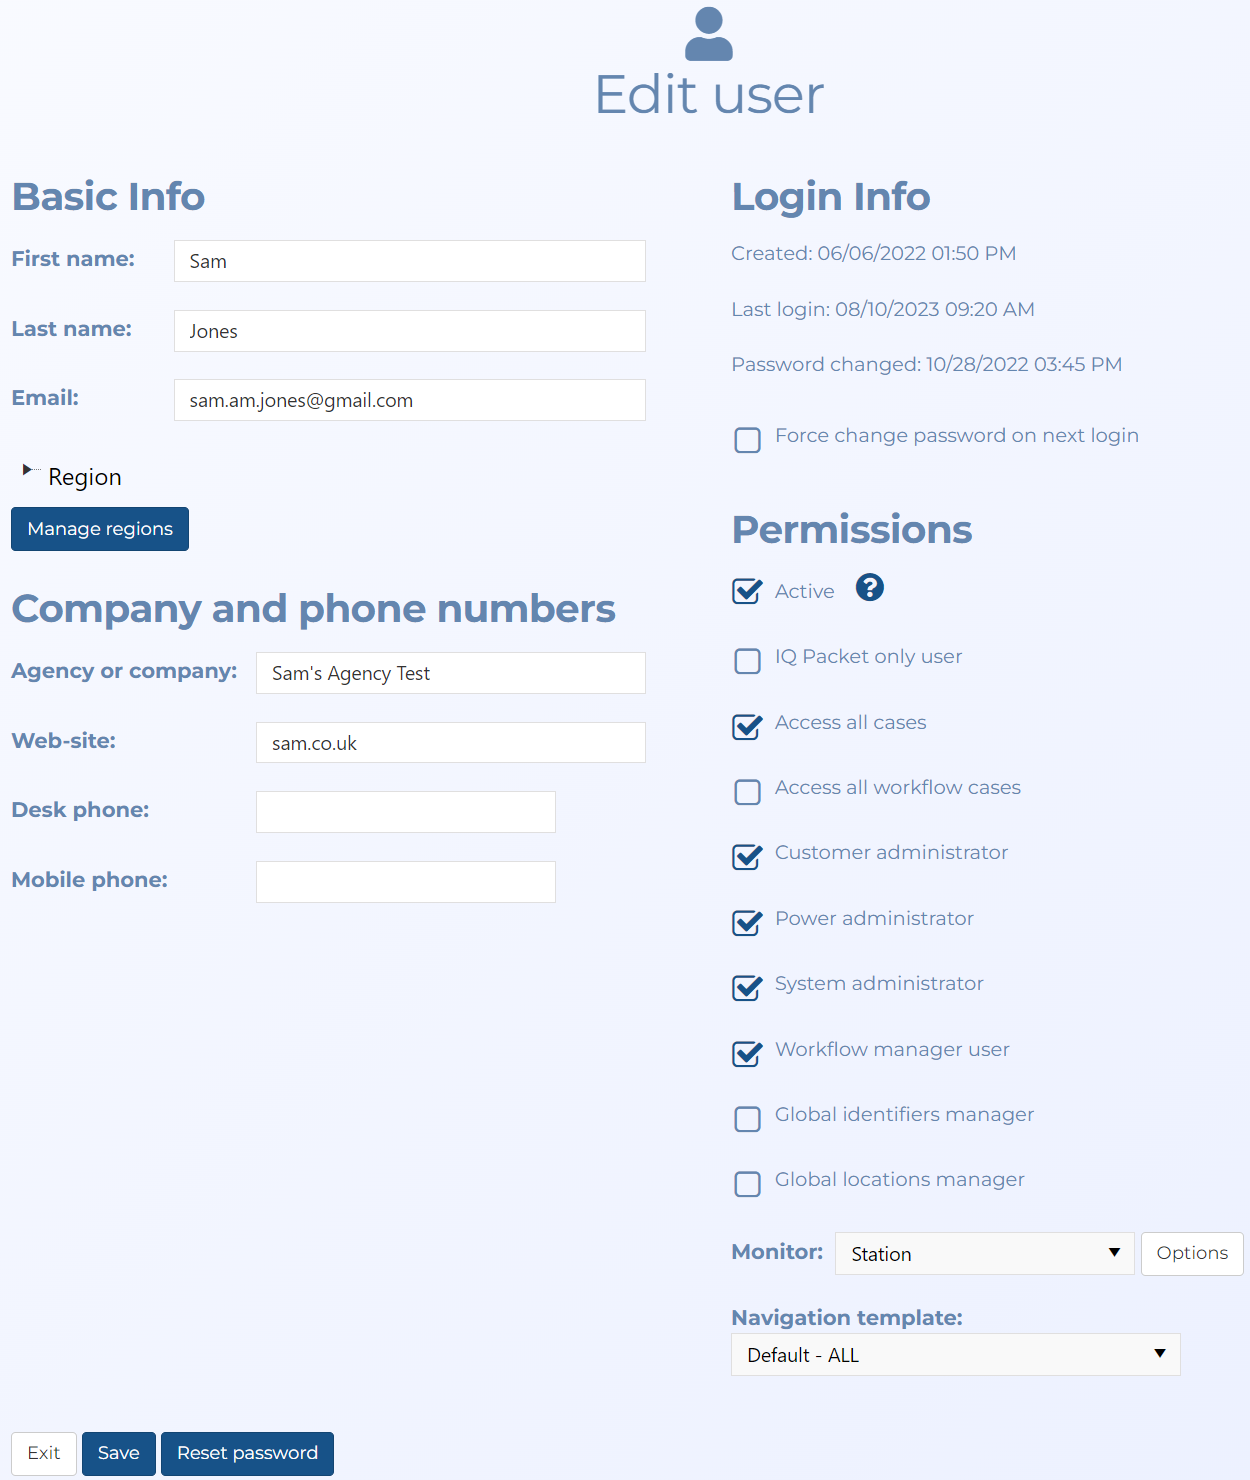
Add/Edit user screen
This topic provides an overview of the Add user and Edit user screens and all the settings and buttons on them. However if you require step-by-step procedures on managing users refer to Managing users.
NOTE: Typically only administrators have access to this screen.
The Add user screen is used to define user details. For a person to use OSS-ESPA they must be set up as a user and their accounts must be both active and registered.
Once you add a user using this screen they are then listed on the Manage Users screen.
NOTE: The number of users you can add to OSS-ESPA is dependent on your support contract. If you attempt to add more users than is in your support contract a message is displayed. Contact Gladiator Forensics if you have reached your maximum number of users and need to update your support contract.
The Edit user screen is used to change the account status of a user, reset their password and view their personal details. The user can also manage their person details using the:
- Edit address and phone screen for their company, address and phone details.
- Edit user information screen for their name and password.
NOTE: A user's email address cannot be edited.
If you require information on managing users refer to Managing users.
This setting is mandatory. Enter the user's first name.
This setting is mandatory. Enter the user's last name.
This setting is mandatory. Enter the user's email address. This setting is required by OSS-ESPA as this is what the user will use to log in.
Note, once a user is added you cannot edit their email address.
Select to make the user's account active so that the user can use OSS-ESPA. Note, this setting is selected by default when you first create a user. New users are automatically sent an email when you use this screen to set them up as a user. When they respond to this email their OSS-ESPA account becomes registered and they are given membership to the customer account. Typically you would only use this setting to either:
- deactivate their account which prevents them from using OSS-ESPA. However it does not remove their account and you can reactivate the user in the future.
- reactivate a user that you previously deactivated. Note, you cannot reactivate a user who has not registered.
Select if the make the user's account an IQ packet only account. This means that the user will see the functionality that allows them to build cases and generate IQ packets. These users will not have access to additional features such as the ESPA analysis center screen.
Select if you want the user to be able to access all cases.
Select if you want the user to be able to access all workflow cases, for example those created by multiple agencies using the OSS-SRN Express Portal.
Select to make the user's account a system customer administrator's account.
Select if you want the user to be a workflow manager for the workflow automation. In Region, you must also select which areas the user manages. A workflow manager is responsible for assigning cases created by workflow automation when the email request does not define the case owner. When this occurs the workflow manager receives an email requesting them to assign a case owner, which they can do in the Case owner column on the Advanced view cases screen.
Select if you want the user to manage imported identifiers and black lists on the Global identifiers screen.
Select if you want the user to have permission to use global locations. For further information refer to Using Global location management.
Select if you want the user to have permission to create templates. For further information refer to Managing templates and keys.
This setting is only displayed when you are using temporary licenses. Temporary user licenses are requested using the Request temporary user license screen.
This allows you to mark the user as a temporary user. When the temporary license has expired the user's account is automatically deactivated. If you request an additional temporary license and want to give a previous temporary user access again, you must reactive their account by selecting Active.
Select which products the user requires a license for. Note, as licenses for each product are managed separately you should only select the products the user will be using so that you are managing your licenses efficiently.
Select to set a user's Live monitoring permissions. The following types of monitors are available:
-
a user with no monitor permissions:
-
you can only view communications for cases you have permission on.
-
you can only access communications (voice, text, data) classified with the following categories: Pertinent, Non pertinent, No Conversation.
-
you are unable to change a communication's category.
-
you are able to create interactive html reports of pertinent monitoring evidence data required for court procedures using the Evidence Management and Reporting screen. For communications classified with categories you have permission to access, the report can include the voice, text and data content of the communications along with the register data such as the comm # and location; for all other categories the report will only include the register data.
-
-
a user with monitor permissions of either User or Station:
-
you can access communications (voice, text, data) classified with the following categories: Not Monitored, Uncategorized, Pertinent, Non pertinent and No Conversation.
-
you are able to change a communication's category for the phones that you are monitoring.
-
you are able to create interactive html reports of pertinent monitoring evidence data required for court procedures using the Evidence Management and Reporting screen. For communications classified with categories you have permission to access, the report can include the voice, text and data content of the communications along with the register data such as the comm # and location; for all other categories the report will only include the register data.
Note, a station user account is configured to work in a station usage model where the user firstly logs on using a station account and then enter their name and badge number and any optional information specified by their administrator.
-
-
a user with monitor permissions of either User supervisor or Station supervisor:
-
you can access communications (voice, text, data) classified with the following categories: Not Monitored, Uncategorized, Pertinent, Non pertinent and No Conversation.
-
you are able to change a communication's category for the phones that you are monitoring.
-
you are able to create interactive html reports of pertinent monitoring evidence data required for court procedures using the Evidence Management and Reporting screen. For communications classified with categories you have permission to access, the report can include the voice, text and data content of the communications along with the register data such as the comm # and location; for all other categories the report will only include the register data.
-
can create queues and listen in to live calls alongside the monitor.
-
you can create global filters.
Note, a station supervisor account is configured to work in a station usage model where the supervisor firstly logs on using a station account and then enter their name and badge number and any optional information specified by their administrator.
-
-
a user with monitor permissions of Administrator:
-
you have the same access to communications and the ability to change call classification as a User, Station, User supervisor, Station supervisor but you can also access communications with any category including Privileged and Blocked.
-
you are able to create interactive html reports of pertinent monitoring evidence data required for court procedures using the Evidence Management and Reporting screen for all cases, even those that you are not a monitor on. For communications classified with all categories with the exception of Privileged and Blocked, the report can include the voice, text and data content of the communications along with the register data such as the comm # and location; for Privileged and Blocked categories the report will only include the register data.
-
can create queues and listen in to live calls alongside the monitor.
-
you can create global filters.
-
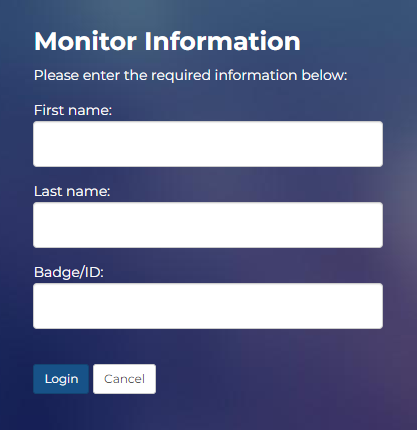
This button is only applicable if Monitor is set to Station or Station supervisor.
Click this button to open the Edit login options dialog box which allows you to configure the details that the user must supply after they log on to the station. These individual user details are then stored by OSS-ESPA in the audit trail so that if required you can trace who was monitoring the subject at any point in time and any actions that they too. The following graphic is an example of the Monitor information screen where only the mandatory details are being requested.
This setting is only applicable if your account supports workflow email cases. The setting performs two features:
-
For all users this defines what regions they appear under in the Case owner column on the Advanced view cases screen. This makes it easier to assign case owners to workflow email cases.
-
For users who are workflow manager users this setting additionally defines which regions the workflow manager is responsible for. A workflow manager is responsible for assigning cases created by workflow automation when the email request does not define the case owner. When this occurs the workflow manager receives an email requesting them to assign a case owner, which they can do in the Case owner column on the Advanced view cases screen.
You can define your own regions by clicking Manage regions.
Click to open the Manage regions screen. This screen allows you to name and manage regions for used for workflow email cases.
Select if you want the user to have access to all cases even if they are not the creator or assignee of the case. This is useful when another user has left your department and you want to give access to the case to another user.
These settings are coupled with settings that the user has on their account on the Edit address and phone screen and the Edit user information screen. Therefore changing them here also changes them on the user's screens.
Select the navigation you want the user to have when they use OSS-ESPA. Administrators can specify the navigation templates using the Navigation settings screen.
Depending on the type of account you have this will either send an email to the user so that they can reset their password or you will need to set the new password for the user.
This button is only displayed for accounts where Multi-factor authentication is set to one of the three options that use app authentication, that is: App Authentication, App Authentication or E-mail, and App Authentication and E-mail.
Select if you want to reset the app authenticator for the user. For accounts which require app authentication, this means that the next time the user logs in, a new QR code is displayed which they must scan to register their new app authenticator.
Select i f you require the user to change their password at their next login.
Click to save any changes you have made.
Click to return to the Manage Users screen.