Advanced view cases screen
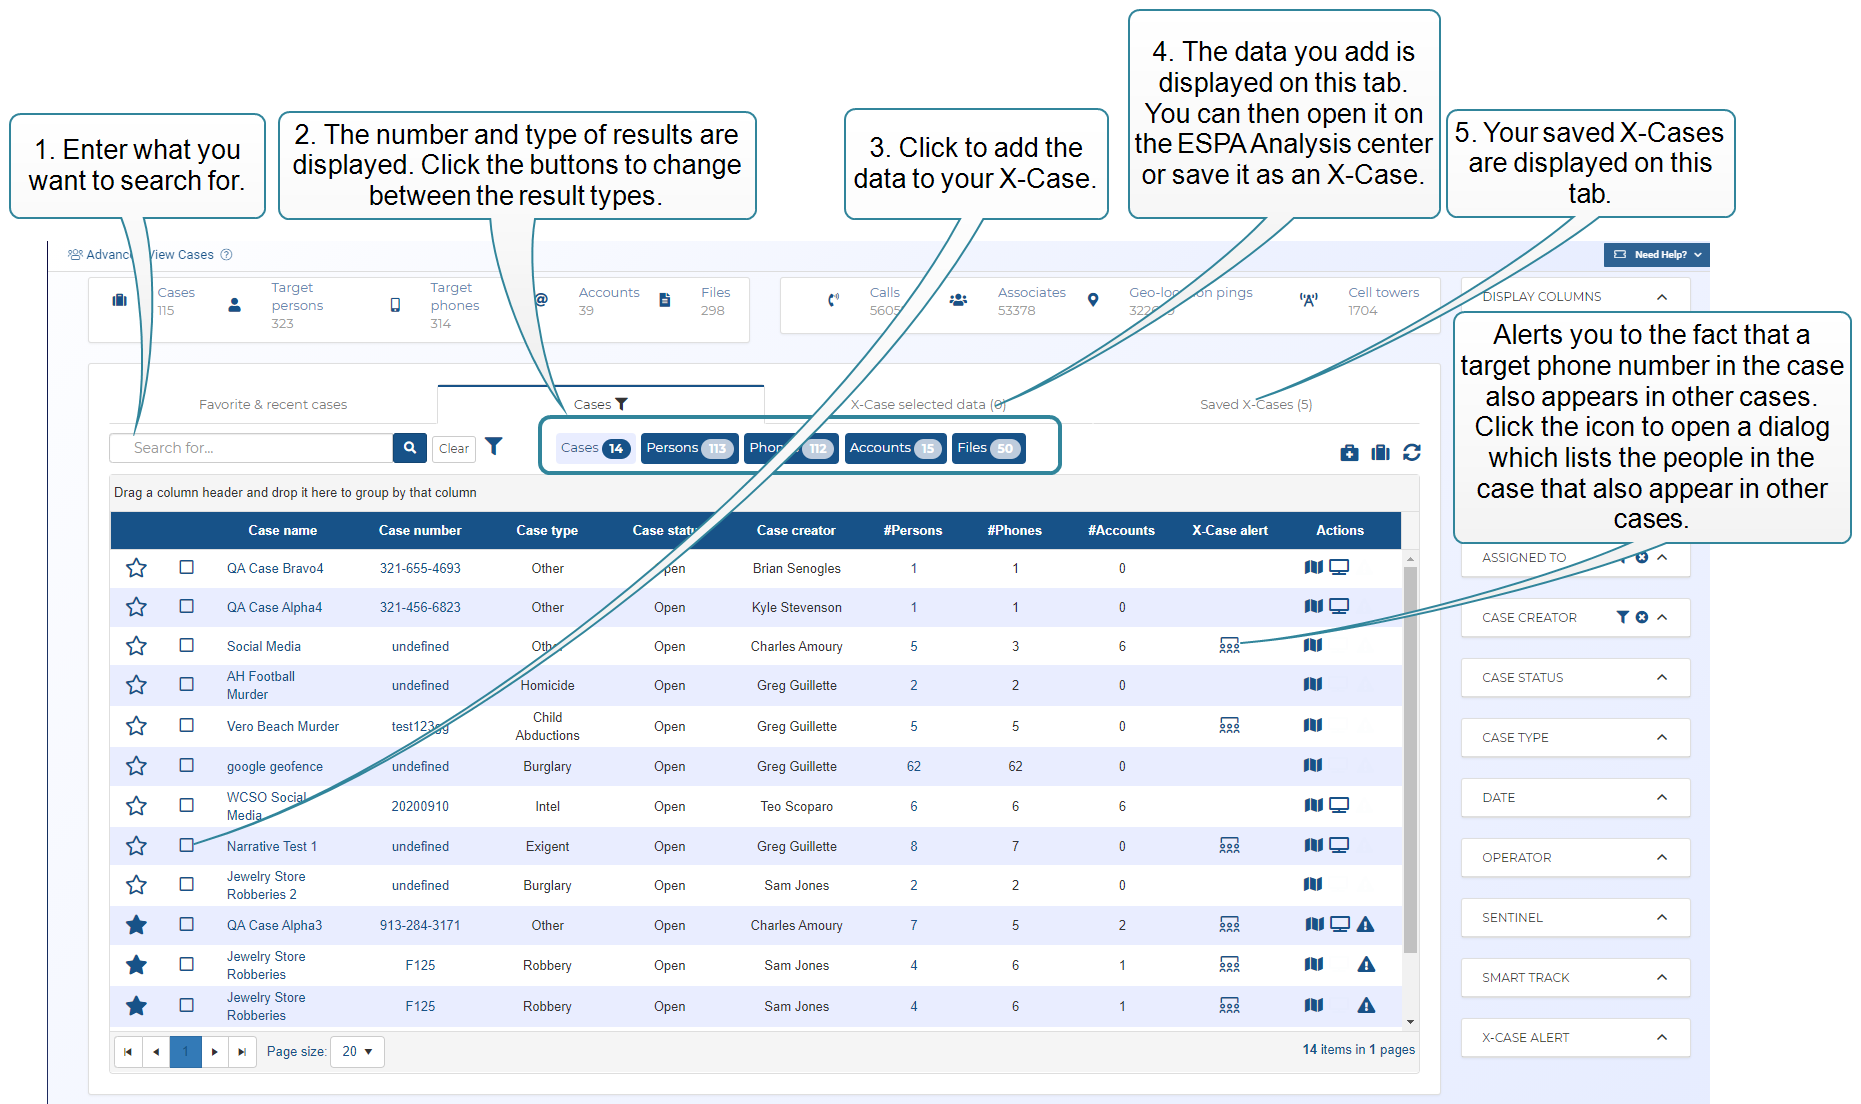
The Advanced view cases screen allows you view and open your cases. It also allows you to combine data from multiple cases making your analysis more informative, these are known as X-Cases.

This topic provides an overview of the Advanced view cases screen and all the settings and buttons on it. However if you require step-by-step procedures on adding, importing, editing or deleting cases or X-Cases refer to Managing cases or Managing X-Cases.
The Advanced view cases screen allows you view and open your cases. It also allows you to combine data from multiple cases making your analysis more informative, these are known as X-Cases.
There are three different screens you can use to view and open your cases: this screen, the View Cases screen and the View i-cases screen. The Advanced view cases screen is the newest and recommended screen to use as it provides you with the most features including allowing you to analyze data from multiple cases. If it is not already set as your default screen for viewing cases, for example the one that opens when you click View cases on the main menu, then you can set it as your default using View cases on the User settings screen.
The Favorite & recent tab lists the cases you've most recently opened or viewed, and also any cases you have added as a favorite from the Cases and Saved X-Cases tabs using 
 . This tab is displayed by default when you first open the screen. From this screen you can quickly open a case's: Manage case screen, ESPA analysis center screen, Sentinel screen and Smart Track alerts & notifications screen. The filters on the table columns allow you to filter which cases are displayed making it easier for you to locate the case you want to work with. So that you can easily identify when a filter is applied, the column title is displayed in italics and underlined.
The Cases tab lists all the cases that have been set up using OSS-ESPA and which you have permission to view. This tab has a FILTERS group, which additionally allows you to define and save filters and specify what you want used as your default filter, for example you may wish to set your default to open cases that you created.
NOTE: Depending on how your administrator has configured your OSS-ESPA you may only be able to view a case if you are the case creator, a case assignee or an administrator.
The top bars on the screen provide you with an overview to what is available in your OSS-ESPA account, for example the number of cases and the number of files.

To combine data from multiple cases you enter a search string that is of interest to you, such as a person's name or phone number, and OSS-ESPA then performs a search through the case files and case details, and displays any results it finds. The screen allows you to search for: person names, phone numbers, IMSI, IMEI, account user/vanity names, vehicle license plates, and Government IDs: SSN, driver license, passport, and arrest ID. Your search strings can be full or partial such as four digits of a number.
Once the results are displayed, which takes only a few seconds, you can select which data you want to include in your analysis. You can then go straight to the ESPA analysis center to analyze the data as normal, or you can save the data to a new case, called an X-Case. These X-Cases are then available for you to select and analyze, and they also allow you to add assignees so that your colleagues can also use them.
The SRN and X-Case alert column may display the following x-case alert icons:
-
 alerts you to the fact that a target phone number in the case also appears as a target phone number in other cases. Click the icon to open a window which lists the people in the case that also appear in other cases and the cases that they are in. You can use the check boxes to add the files from these cases to the X-Case selected data tab, where you can then go straight to the ESPA analysis center or create an X-Case.
NOTE:
 on the People and devices screen alerts you to the phone number being in another case as either a target or an associate.
  on the Advanced view cases screen alerts you to a target phone number being in another case only as a target phone number.
 -
 alerts you to the fact that a target phone number in the case was at a global location event. Click the icon to open a window which lists the people in the case that were at a global location event.
If you require information on adding, editing or deleting X-Cases refer to Managing X-Cases.
This tab lists the cases you've most recently opened using the Cases tab and also any cases you have added as a favorite from the Cases and Saved X-Cases tabs using . This tab is displayed by default when you first open the screen. From this screen you can quickly open a case's: Manage case screen, ESPA analysis center screen, Sentinel screen and Smart Track alerts & notifications screen.

Click to create a new case using the Wizard. The Create new case screen opens.

Click to create a new case without using the Wizard. The Create new case screen opens.

If you create a new case it does not automatically display on this tab. To display new cases you must click this icon.

Click to add or remove a case from being a favorite. If a case is marked as a favorite, , it always appears at the top of the Favorite & recent cases tab making it quick and easy to access.
You can add an X-Case to this tab by clicking on the Cases and Saved X-Cases tab.
If you also use the OSS-SRN Express Portal then any cases marked as a favorite appear on the OSS-SRN Express Portal's My cases screen.
If you want to include the data in the current row in an X-Case then select the check-box to add the data to the X-Case selected data tab. Clearing the check-box removes the data from the X-Cases selected data tab.
Click the name or number of the case to open the Manage case screen. This screen gives you a top-level view of your case, allowing you to manage all the case details.


The SRN and X-Case alert column may display the following icons:
-
If this icon is displayed, it is alerting you to the fact that a target phone number in the case also appears as a target phone number in other cases. Click the icon to open a dialog which lists the people in the case that also appear in other cases. Select the person name of interest, to display a list of all the cases they appear in. You can then select the check-box to immediately add the data to the X-cases selected data tab.
NOTE:
on the People and devices screen alerts you to the phone number being in another case as either a target or an associate. on the Advanced view cases screen alerts you to a target phone number being in another case only as a target phone number. -
If this icon is displayed, it is alerting you to the fact that a target phone number in the case was at a global location. Click the icon to open a dialog which lists the people in the case that were at a global location. Select the person name of interest, to display a list of all the global locations they were at. If you determine the location is of interest to your case then you can add it as a target location, but if not you can dismiss the alert. Global locations help you connect cases across a region without relying on an integration partner, for further information refer to Using Global location management.
-
displays when you are sending case data to another agency. For further information on sharing data refer to Sharing cases.
-
displays when you are receiving case data from another agency.
-
displays when you are both sending and receiving case data with an agency.
-
displays when you have configured to send and/or receive case data with another agency but the configuration is currently inactive.

Click to open the ESPA analysis center screen. For a meaningful analysis it is recommended that the case includes the relevant locations, the people of interest along with their phone numbers and their CDR files. If you are analyzing tower dump or geofence data then the case requires the relevant locations and the files. When the ESPA analysis center screen opens it is automatically populated with the case details. For further information about this screen refer to ESPA analysis center screen.

This is only displayed if your case, person or phone number either contains an i-case, or has Smart track or real-time social media enabled. Click to open the Sentinel screen which allows you to monitor a person's activities on the surveilled network. For further information about this screen refer to Sentinel screen.

This is only displayed if your case contains Smart Track alerts. Click to open the Smart Track alerts & notifications screen which allows you to manage live location monitoring which is based on a GPS ping email interface. For further information about this screen refer to Smart Track alerts & notifications screen.
This tab, by default, lists the cases that have been set up using OSS-ESPA which you are either the creator of or that you have been assigned to. Along the top of the tab there is a list of buttons that display the number of results displayed for the search and filter criteria you have set. Click the button to display all the: cases, persons, phones, accounts, files, ICW (in contact with) and other agencies results. These buttons also change the tab title. The button of the currently selected view is displayed in a lighter blue. If a filter from the FILTERS group is applied to the tab the  icon is displayed on the tab title.

Use the search field to search for specific words and numbers to help you find the cases. You can search for multiple phone numbers by entering them as a comma-separated list. This search field searches for results in:
-
Case files
-
Person name
-
Phone numbers, IMSI, IMEI
-
Account, User/Vanity name
-
Vehicle license plate
-
Government IDs: SSN, driver license, passport, arrest ID
If a case:
- has Enable deconfliction (X-Case data search) selected on the Edit case information screen, then the case data is visible and usable for all account users if they do an identifier search for an identifier that occurs in your case. Identifiers can be phone numbers, IMSI, IMEI, names, license plates, and social media accounts.
- does not have Enable deconfliction (X-Case data search) selected on the Edit case information screen, then only the case creator, case assignees, and administrators can view the identifier search results and add to an X-Case, however the case data cannot be used in other cases as associate data.
- has been deleted and OSS-ESPA has not yet removed the files from the system then any files that were uploaded to it are searched and if any results are found they are displayed. If a file is a deleted file then it is displayed as "Deleted" in the Case status column. Typically cases and their files are permanently deleted after a week but this timing can be changed by administrators.
NOTE: If you find data within another case, you must ensure you have the proper legal authority to utilize the data in conjunction with another investigation.
Click to include the results of associates in your search. If you do not select this then the search only displays the results from the case targets.
Click to clear the search field and update the results displayed on the tab.
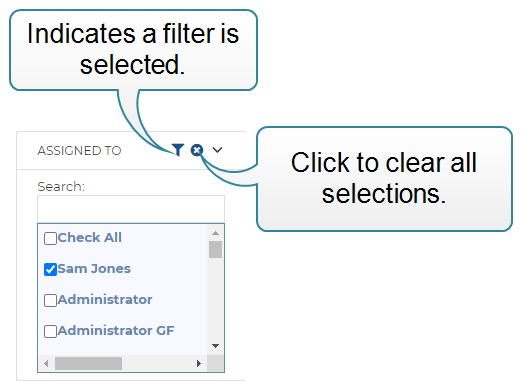
Click to show and hide the filters. These filters allow you to display on the screen the cases that are of interest to you. There are already predefined filters set for you but you can also save your own filter settings that you commonly use, such as open cases that you created. You can select to filter based on: the creator, the assignees, the operator, the case date, type and status, and also on cases that are configured with intercept monitoring (Sentinel) or live location monitoring (Smart Track), and those cases with an X-Case alert. If your account supports a specific format of workflow automation and you have set Case filter to "(Workflow cases)" then you can additionally filter using the workflow configuration, workflow manager, workflow region and workflow requester.
To allow you to quickly identify if a filter has been applied, the group has displayed in the title bar. Any items you have selected in the filters are displayed at the top of each list.
Select which columns you want displayed on the Cases, Persons, Phones, Accounts, Files, ICW, Other agencies tab.
Use to filter which cases are being displayed or used in the search. The following predefined filters are available but you can also save your own. You cannot edit, rename or delete the predefined filters.
- My cases displays all cases that you created and that you are assigned to.
- All cases displays all the cases in OSS-ESPA irrespective of whether you have permission to view the case details.
- Workflow cases displays all the cases that have been created automatically by OSS-ESPA when it received the case data by email.
Click to clear all the filters and set the Case filter to All cases. Note, this only clears the filters in the FILTERS group, it does not clear the search field on the tab.

Click to create a new filter.

Click to save the current configuration of the filters under a new name.

To edit a filter, select it in Case filter, then select the required configuration of the filters, then click this icon. Note, you cannot edit the predefined filters, which are My cases, All cases and Workflow cases.

Click to rename the filter currently selected in Case filter. Note, you cannot rename the predefined filters, which are My cases, All cases and Workflow cases.

To delete a filter, select it in Case filter, then click this icon. Note, you cannot delete the predefined filters, which are My cases, All cases and Workflow cases.
If you want to include the data in the current row in an X-Case then select the check-box to add the data to the X-Case selected data tab. Clearing the check-box removes the data from the X-Cases selected data tab.
Click a name to open the person's Personal Information screen with the Personal details tab displayed. This screen allows you to view and manage the person's information such as their phones, vehicles, accounts and government IDs. For further information refer to the People and devices screen.
Click the name or number of the case to open the Manage case screen. This screen gives you a top-level view of your case, allowing you to manage all the case details.
Click a phone number to open the person's Personal Information screen with the Phone Number tab displayed. This screen allows you to view and manage the person's information such as their phones, vehicles, accounts and government IDs. For further information refer to the People and devices screen.
Click an account identifier or service name to open the person's Personal Information screen with the Accounts tab displayed. This screen allows you to view and manage the person's information such as their phones, vehicles, accounts and government IDs. For further information refer to the People and devices screen.
This column is only displayed when Case filter is set to Workflow cases. These are cases that have been created automatically by workflow automation, typically to support external users. If the person who initiated the workflow email case did not define the case owner initially then this setting allows the workflow manager responsible for assigning cases to select the case owner.
This column allows you to quickly change the status of a case without the need for you opening the Edit case information screen. In addition, selecting the check-boxes allows you to change the status of more than one case at a time.
If this icon is displayed, it is alerting you to the fact that a target phone number in the case also appears in other cases. Click the icon to open a dialog which lists the people in the case that also appear in other cases. Select the person name of interest, to display a list of all the cases they appear in. You can then select the check-box to immediately add the data to the X-cases selected data tab.
Click to open the ESPA analysis center screen. For a meaningful analysis it is recommended that the case includes the relevant locations, the people of interest along with their phone numbers and their CDR files. If you are analyzing tower dump or geofence data then the case requires the relevant locations and the files. When the ESPA analysis center screen opens it is automatically populated with the case details. For further information about this screen refer to ESPA analysis center screen.
This icon is only displayed on this tab when the tab is displaying Cases, Persons and Phone numbers.
This is only displayed if your case, person or phone number either contains an i-case, or has Smart track or real-time social media enabled. Click to open the Sentinel screen which allows you to monitor a person's activities on the surveilled network. For further information about this screen refer to Sentinel screen.
This icon is only displayed on this tab when the tab is displaying Cases, Persons and Phone numbers.
This is only displayed if your case, person or phone number contains Smart Track alerts. Click to open the Smart Track alerts & notifications screen which allows you to manage live location monitoring which is based on a GPS ping email interface. For further information about this screen refer to Smart Track alerts & notifications screen.

Click to perform an X-Case search on multiple identifiers at once. The Deconfliction search screen opens. For information on performing a search refer to How to perform a deconfliction search using the Batch search tab.
Click to create a new case using the Wizard. The Create new case screen opens.
Click to create a new case without using the Wizard. The Create new case screen opens.
If you create a new case it does not automatically display on this tab. To display new cases and for example the people you added to the new case you must click this icon.
This tab lists all the currently selected X-Case data. The tab allows you to open the ESPA analysis center so that you can analyze the data. The tab also allows you to save the selected data for future use.
You can display data on this tab either by:
-
selecting to include it in an X-Case using the check-box on the tabs, or
-
clicking an X-Case name on the Saved X-Cases tab.
Along the top of the tab it displays the number of each items included in your X-Case, such as the number of phones and accounts. If the X-Case has previously been saved it also displays the name.

Click the name of the case to open the Manage case screen. This screen gives you a top-level view of your case, allowing you to manage all the case details.
Click a name to open the person's Personal Information screen with the Personal details tab displayed. This screen allows you to view and manage the person's information such as their phones, vehicles, accounts and government IDs. For further information refer to the People and devices screen.
Click a phone number to open the person's Personal Information screen with the Phone Number tab displayed. This screen allows you to view and manage the person's information such as their phones, vehicles, accounts and government IDs. For further information refer to the People and devices screen.
Click to open the ESPA analysis center screen. For a meaningful analysis it is recommended that the case includes the relevant locations, the people of interest along with their phone numbers and their CDR files. If you are analyzing tower dump or geofence data then the case requires the relevant locations and the files. When the ESPA analysis center screen opens it is automatically populated with the case details. For further information about this screen refer to ESPA analysis center screen.
Click to clear all the data currently displayed on the tab so that you can create a new X-Case.
Click to save the data currently displayed on the tab as a X-Case. The X-Case is now displayed on the Saved X-Cases tab.
Click to save the currently selected data under a new X-Case name.
Click to rename the X-Case.
Click to delete the X-Case.

In a row, click to delete the selected data.
This tab displays all the X-Cases that you created and saved using the X-Cases selected data tab.
Click to add or remove a case from being a favorite. If a case is marked as a favorite, , it always appears at the top of the Favorite & recent cases tab making it quick and easy to access.
Click to create a new X-Case. The Cases, Persons, Phones, Accounts, Files, ICW, Other agencies tab opens allowing you to search for and add the data you want included in your new X-Case. Any data you do add is then displayed on the X-Case selected data tab where you can click  to save it as a new X-Case.
If you want to manage the data included in the X-Case, then click the X-Case name to open it on the X-Case selected data tab. From this tab you can then delete data that you no longer want to include. You can also add new data from the Cases, Persons, Phones, Accounts, Files, ICW, Other agencies tab and the Favorite & recent cases tab.
Click to open the ESPA analysis center screen. For a meaningful analysis it is recommended that the case includes the relevant locations, the people of interest along with their phone numbers and their CDR files. If you are analyzing tower dump or geofence data then the case requires the relevant locations and the files. When the ESPA analysis center screen opens it is automatically populated with the case details. For further information about this screen refer to ESPA analysis center screen.
Click to rename the selected X-Case.
Click to delete the selected X-Case.