Preparing WiFi footprint analysis evidence
This topic describes how to run a WiFi footprint analysis using the information in the drive data file to prepare evidence.
Running a WiFi footprint analysis requires option E12 WiFi data/analytics. If you do not have this option, you cannot select to run a WiFi footprint analysis from the ESPA analysis center screen.
For further information on the results available from a WiFi footprint analysis refer to The different types of WiFi coverage maps and their uses.
-
After you have viewed your case data as described in Getting started with investigating case data visually set the map to display the geographical area of interest.
NOTE: It is important that you ensure the geographical map shows the area of interest as this determines what drive data files are available to you in the following steps. If the area you have selected is too large then an error is displayed advising you to zoom to a smaller area of interest.
-
 On the WNF analysis center
In Analysis select WiFi footprint analysis then click Run analysis.
 On the ESPA analysis center
- Hover over
 on the top-right of the map.
 -
Click
 then select WiFi footprint analysis from the menu.
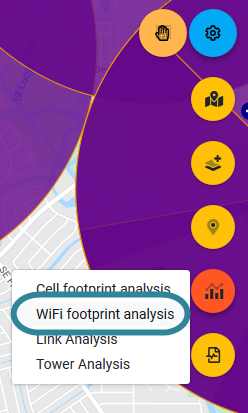
The WiFi footprint analysis dialog box opens.

- Hover over
-
This step is optional. If you want the analysis results to match with:
- the case's target locations, then select Match by target location, then click Select locations to open the Select locations dialog box and select the locations of interest. For further detail on the outputs this generates refer to Target location matches.
- WiFi networks that you are specifically interested in then select what identifier in your file you want to use to match with the drive data, then click Select file. Windows Explorer opens. Navigate to the folder and select the required .csv, .xls or TAB file file that lists the WiFi networks of interest. For further detail on the outputs this generates refer to Filtered networks.
-
Enter the Device type, Start date and End date to filter the drive test devices that are available to select in the applicable drive data files then click Get devices. All available drive data files are displayed.
For further information on the settings on this tab refer to Inputs tab.
-
Select the devices you want to use. For example, if the drive took place over multiple days you may need to select multiple devices.
NOTE: If there are no drive test devices available within the acceptable time period you must do a drive test and upload the file into OSS-ESPA. For further information on uploading drive test files refer to Managing drive data files.
If you have done a drive test and uploaded the files but they are not appearing ensure that you have approved the drive data files. For further information refer to To approve a drive data file. - In Report name enter a name for your analysis.
- Click the Advanced tab if you want to edit settings associated with the output grids, signal coverage threshold and bands, or to generate a downloadable Google Earth output. For further information on the settings on this tab refer to Advanced tab.
-
Click Run to start the analysis.
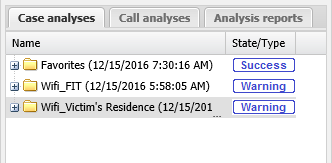
Your analysis report is listed in the Case analyses tab of the Case management view. Once the analysis is completed the state is updated. You can use the analysis results if the state is either Success or Warning.
When your analysis is complete you are automatically notified by email and then you can view the analysis results. For further information refer to Viewing WiFi footprint analysis results.