Geo-loc data tab
This topic describes the Geo-loc data tab on the Data view, which by default is located at the bottom of the ESPA analysis center screen.
This feature requires your account to be configured with the ESPA analysis center screen.
This tab displays all the geo-location data for the sources you selected and retrieved by clicking Refresh or Refresh data.
By default the data is listed in date/time order with the earliest data listed first. You can select to display different types of geo-location data on this tab as shown in the graphic below.

By default the ESPA analysis center map does not displays the geo-locations listed on the Data view's Geo-loc data tab. However to allow you to investigate more easily the geo-locations you can select which ones you want displayed. The check box immediately beside the Zoom to column allows you to select which geo-locations you want displayed on the map.
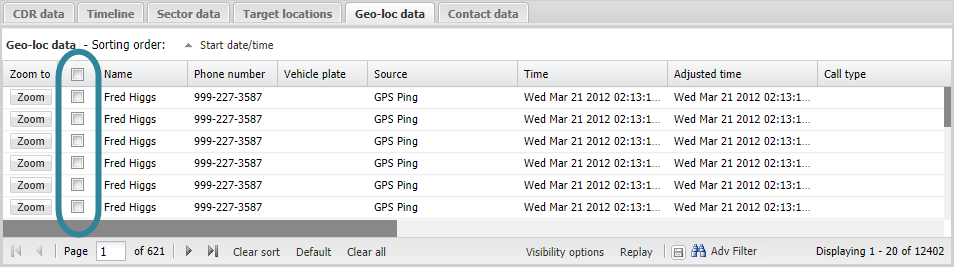
You can also select, by clicking Visibility options, to show only the records based on your selection on the Geo-loc data tab. For further information refer to Geo-loc active options.
The following graphics indicate how the different types of geo-location data is displayed on the map:
-
For license plate reader data an icon is displayed on the map. By default the following icon is used but you can upload your own icon on the Manage files screen.

-
For GPS tracker data the drive route is displayed on the map using the color you selected for the license plate using the Display color on the People and devices screen or the color selector for the vehicle's license plate on the ESPA analysis center screen. When you zoom to GPS tracker data on the map the start of the drive route is centered on the map.

-
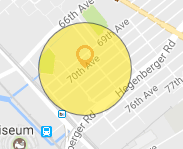
For GPS ping data an icon is displayed on the map. By default the following icon is used but you can upload your own icon on the Manage files screen. You can also select to display the confidence area which is displayed using the color you selected for the phone number using the Display color on the People and devices screen or the color selector for the vehicle's license plate on the ESPA analysis center screen.
-
For social media data the "@" symbol is used on the map.

If you select or deselect the check box in the table title then all the geo-location's are selected or deselected respectively. Note, if you have any filters applied to the Geo-loc data tab then the selection or deselection only applies to the filtered calls. For example if you have a filter applied to the Source column so that you are only displaying GPS Pings on the Geo-loc data tab then selecting the table title check box only selects the GPS Ping data and not the Vehicle License Plate or GPS Tracker data.
There are three columns related to time:
- Time: this details the time of the geo-location data. This time is applicable to all types of geo-location data. If the data is for a GPS tracker then this time is the start time of the drive route. The time displayed is when the geo-location event occurred at the location it occurred in. For example, for live location monitoring the time displayed is that from the GPS ping email; that is, the time of the GPS ping in the location the GPS ping occurred.
- Adjusted Time: this details the time of the geo-location data in your local time, which is calculated based on the time zone adjustment you have set using the Phone properties dialog box. If you are in a different time zone to that in which the geo-location event occurred then this time is useful in allowing you to know how current the data is based on your time zone. This time is applicable to all types of geo-location data.
- End time: this details the end time of the end of a drive route and is therefore only applicable for GPS tracker data. For other data types this field is empty.
Click  to export a .csv file of the geo-location data. This .csv file is not identical to the geo-location files you uploaded using the Geo-location files screen, the differences are that this one only contains the geo-location records for the time period set in the Date filter.
Click Replay to step through the records that are selected on the current page of this tab. The replay feature is available on the CDR data, Timeline, Geo-loc data and HO data tabs. When selected on the:
- CDR data tab, the sectors used for each call selected on the current page of this tab are then stepped through and highlighted one at a time on the Map view.
- Timeline tab, the events selected on the current page of this tab are then stepped through and highlighted one at a time on the Map view. The events are: sectors for CDR events, stars for phone data events, and location icons for any locations you entered which had associated times.
- Geo-loc data tab, the geo-locations selected on the current page of this tab are then stepped through and highlighted one at a time on the Map view.
- HO data tab, the originating, terminating and handover sectors selected on the current page of this tab are then stepped through and highlighted one at a time on the Map view.
To stop during the sequence click Replay again. This feature allows you to easily view the location of the calls and events over time giving you an idea of the phone user's movements. If you want to change the speed of the replay feature use the Pause time (seconds) on the Replay tab of the Advanced options dialog box.
Click to open the Advanced filter dialog box which allows you to filter the content of the tab using multiple filters. When an advanced filter is applied to a tab, the column title on the tab is displayed in blue font and the
  button is displayed with a box around it.
 For further information on using the zooming, filtering, grouping and sorting features refer to Using basic features of the data view.
If you have previously changed the tab's: column visibility settings, column order, column filters, sorting, and grouping then these are saved for the next time you open the ESPA analysis center screen. To restore them to their default condition click Default.