CDR data tab
This topic describes the CDR data tab on the Data view, which by default is located at the bottom of the ESPA analysis center screen.
This feature requires your account to be configured with the ESPA analysis center screen.
This tab displays all the CDR data for the sources you selected and retrieved by clicking Refresh or Refresh data.
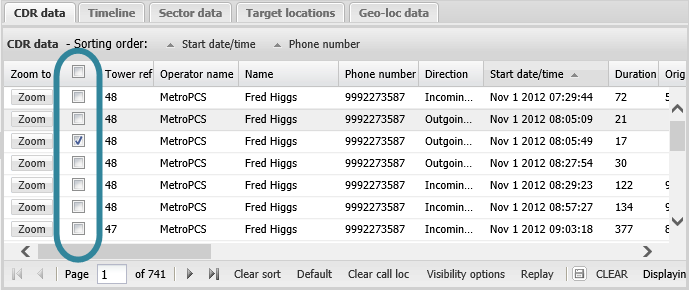
By default the data is listed in start date/time order with the earliest data listed first. You can select to display different types of CDR data on this tab as shown in the graphic below.

By default the ESPA analysis center map displays all the sectors used by the calls listed, on the Data view's CDR data tab. However to allow you to investigate more easily the locations of specific calls you can select which calls you want the sectors displayed for. The check box immediately beside the Zoom to column allows you to select which calls you want displayed on the map.
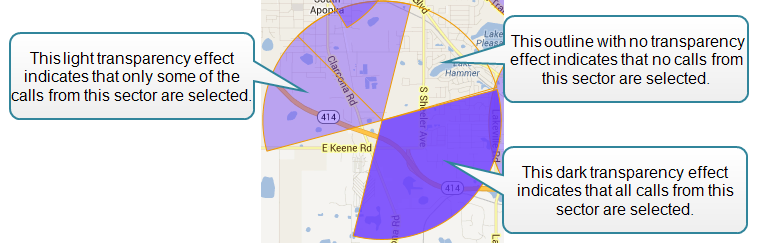
The following graphic indicates the three effects used to display a sector:
You can also select, by clicking Visibility options, to show or hide unselected calls or calls which do not correlate with the cell tower data file.
- on the map, the call's originating and terminating sectors (only if Exclude terminating towers is not selected) are displayed in either a dark transparency or a light transparency effect. The transparency effect used is dependent on the sector's state: the dark transparency effect indicates that all calls from the sector have been selected; and the light transparency effect indicates that only some of the calls from the sector have been selected.
-
on the Data view's Sector data tab, the originating and terminating sectors (only if Exclude terminating towers is not selected) of the call are selected or partially selected. The check box immediately beside the Sector data tab's Zoom to column indicates the sector's state: partially selected (gray check) indicates that some of the calls from the sector are selected; or selected (dark check) indicates that all calls from the sector have been selected.
-
on the Data view's CDR data tab, the CDR you selected is selected (dark check) in the check box immediately beside the Zoom to column.
-
on the map, the call's originating and terminating sectors (only if Exclude terminating towers is not selected) are displayed in either a light transparency effect or as an outline with no transparency effect. The effect used is dependent on the sector's state: the light transparency effect indicates that some of the calls from the sector are still selected; and the outline with no transparency effect indicates that all calls from the sector have been deselected.
- on the Data view's Sector data tab, the originating and terminating sectors (only if Exclude terminating towers is not selected) of the call are either deselected or partially deselected. The check box immediately beside the Sector data tab's Zoom to column indicates the sector's state: partially selected (gray check) indicates that some of the calls from the sector are still selected; or deselected (unchecked) indicates that all calls from the sector have been deselected.
-
on the Data view's CDR data tab, the CDR you deselected is deselected (unchecked) in the check box immediately beside the Zoom to column.
If you select or deselect the check box in the table title then all the call's are selected or deselected respectively. Note, if you have any filters applied to the CDR data tab then the selection or deselection only applies to the filtered calls. For example if you have a filter applied to the Direction column so that you are only displaying originating calls on the CDR data tab then selecting the table title check box only selects the originating calls and not the terminating calls.
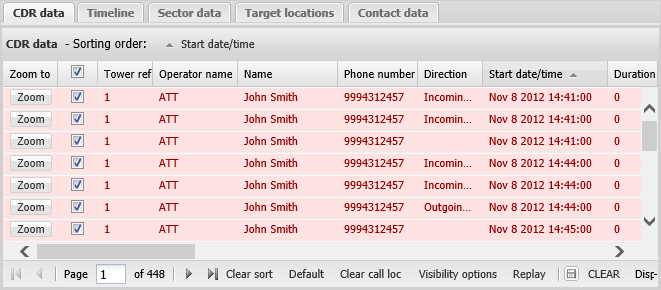
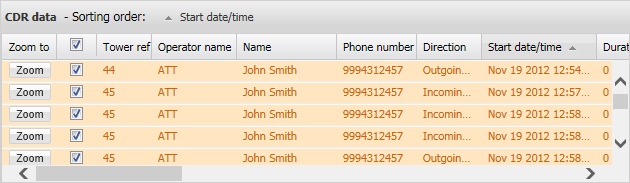
Some rows in the CDR data tab may appear in a different color. If a row appears:
-
pink with red text, it is because the location information for the call record could not be found in the cell tower data file. If a significant amount of the cell tower data is displayed in pink it means your investigation is less detailed and therefore less valid and you should consider sourcing and uploading new cell tower data files.
-
orange, it is either because the sector orientation (azimuth) was not available in the cell tower data file or the call is a data call and may not provide accurate location information. If you select one of these rows a message is displayed on the map detailing which of these issues is applicable.
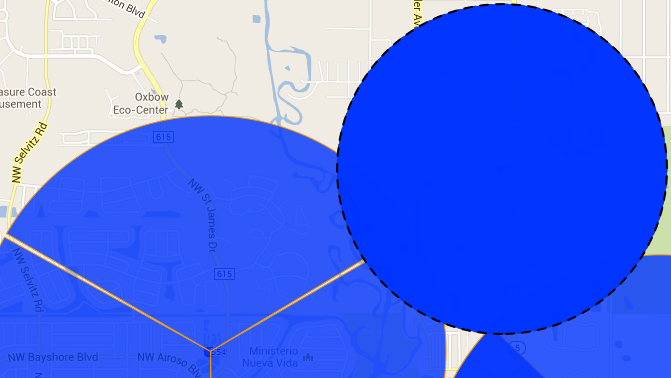
If the issue is due to missing sector orientation the sector is still displayed on the map. However it is displayed on the map as a complete circle since the orientation is not known. It is also displayed with the radius of the circle 70% smaller than the radius used by default for a normal sector as shown in the following graphic.
Data calls are only displayed if Use data call records is selected on the Map tab of the Advanced options dialog box. Typically an analysis is done using only voice and SMS calls and not data calls.
Note, a data call where the location information for the call record could not be found in the cell tower data file is displayed in pink with red text.
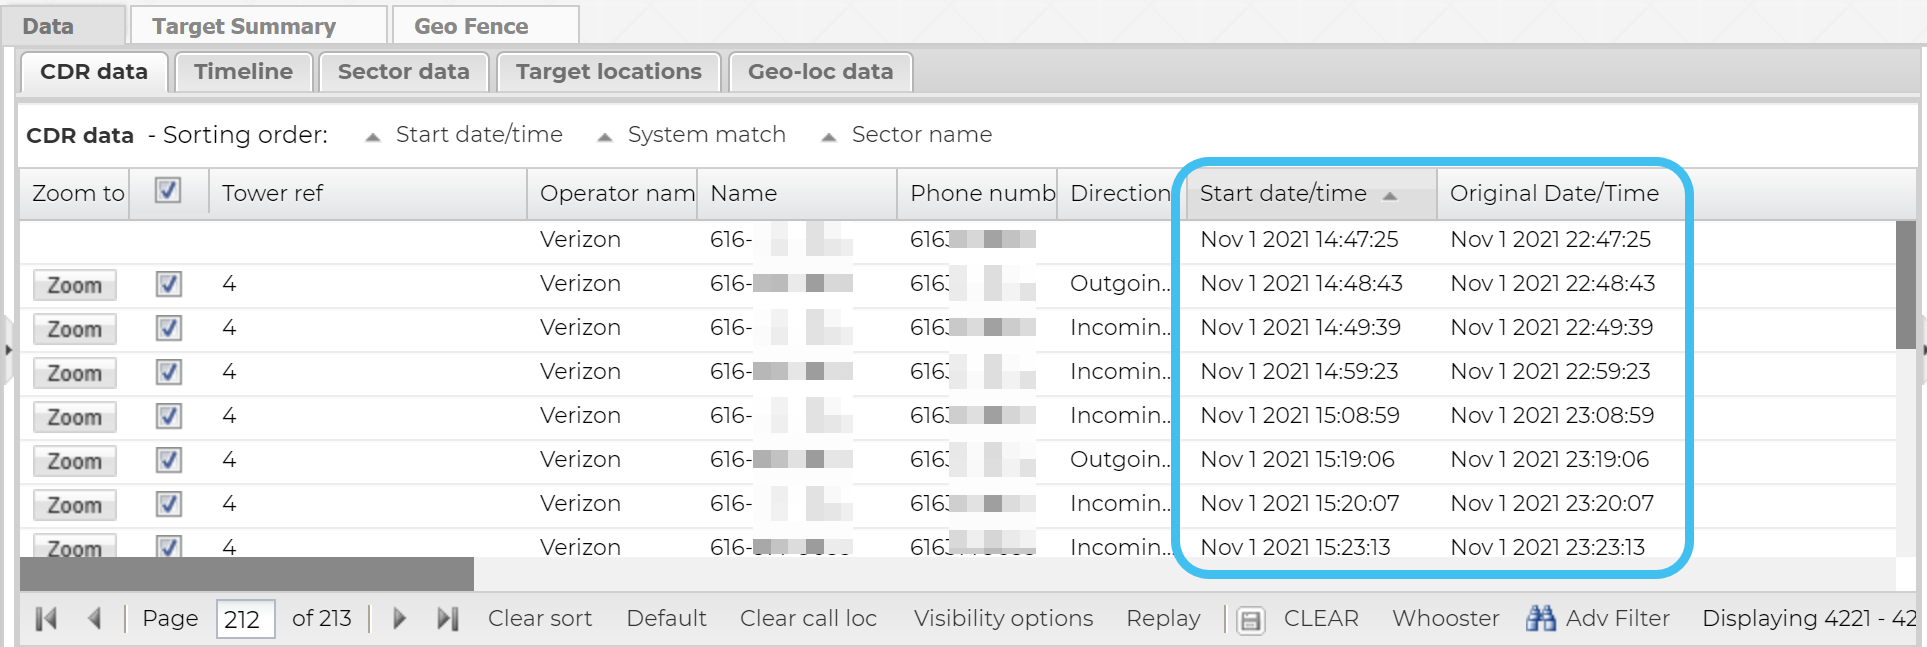
There are two date/time columns on the tab, Start date/time and Original date/time. The Start date/time column displays the date/time using the local time of the tower and also includes any manual timezone adjustments you have applied, but if the location information for the call record could not be found in the cell tower data file and you have not applied a manual timezone adjustment then the UTC time is displayed. The Original date/time always displays the time in the imported CDR file.
Click  to export a .csv file of the CDR data. This.csv file is not identical to the CDR file you uploaded using the Upload file CDR screen, the differences are that this one:
- only contains the call records for the time period set in the Date filter.
- does not contain data calls unless you have selected to include them in the Advanced options dialog box.
- includes an Active column which is equivalent to the check box on the CDR data tab. A 1 indicates that the check box is selected.
-
includes an ErrorCode column which indicates if there is any issue with the CDR record:
- 0 indicates there is no issue.
- 1 indicates the originating sector orientation (azimuth) was not available in the cell tower data file.
- 2 indicates the location information for the call record could not be found in the cell tower data file.
- 4 indicates the terminating sector orientation (azimuth) was not available in the cell tower data file.
- 8 indicates the time zone of the switch could not be determined from the cell tower data file.
This is identical to clicking Export CDRs to CSV in the map view to export the .csv file.
Click Replay to step through the records that are selected on the current page of this tab. The replay feature is available on the CDR data, Timeline, Geo-loc data and HO data tabs. When selected on the:
- CDR data tab, the sectors used for each call selected on the current page of this tab are then stepped through and highlighted one at a time on the Map view.
- Timeline tab, the events selected on the current page of this tab are then stepped through and highlighted one at a time on the Map view. The events are: sectors for CDR events, stars for phone data events, and location icons for any locations you entered which had associated times.
- Geo-loc data tab, the geo-locations selected on the current page of this tab are then stepped through and highlighted one at a time on the Map view.
- HO data tab, the originating, terminating and handover sectors selected on the current page of this tab are then stepped through and highlighted one at a time on the Map view.
To stop during the sequence click Replay again. This feature allows you to easily view the location of the calls and events over time giving you an idea of the phone user's movements. If you want to change the speed of the replay feature use the Pause time (seconds) on the Replay tab of the Advanced options dialog box.
Click CLEAR or Whooster to open the CLEAR request wizard and Whooster request wizard which allows you to select which CDRs you want to request a CLEAR or Whooster match on. You can also right-click a row then select Request CLEAR for the destination number or Request Whooster for the destination number to request a CLEAR or Whooster match on the number detailed in the Associated number column. Note, that you cannot request a CLEAR or Whooster match on data calls. For further information refer to Using public record files when investigating a case.
Click  to open the Advanced filter dialog box which allows you to filter the content of the tab using multiple filters. When an advanced filter is applied to a tab, the column title on the tab is displayed in blue font and the
  button is displayed with a box around it. If the CDR contains TA or handover data then any advanced filter applied on the CDR data tab is also applied to the TA data and HO data tabs.
For further information on using the zooming, filtering, grouping and sorting features refer to Using basic features of the data view.
If you have previously changed the tab's: column visibility settings, column order, column filters, sorting, and grouping then these are saved for the next time you open the ESPA analysis center screen. To restore them to their default condition click Default.