Analysis reports tab
This topic describes the Analysis reports tab on the Case management view, which by default is located at the left of the ESPA analysis center screen.
This feature requires option E9 Analysis report. If you do not have this option this tab is not available.
The Analysis reports tab allows you to create and manage advanced analysis reports for your case.
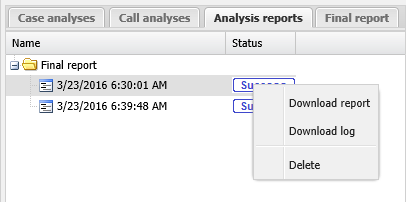
When a report has run successfully it creates the following outputs:
- Download report: which provides your report output. It contains the contents that you included and formatted on the <Reports name> tab. Select it to download and view your report. The file format is dependent on what you selected when you run the report.
- Download log: which details any warnings or errors that occurred during the running of the report.
The following graphics display the menus available on this tab:
-
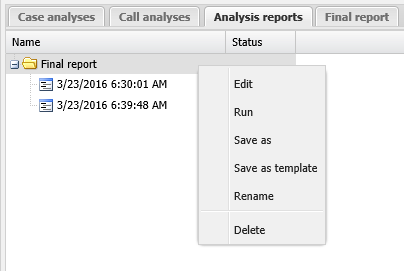
Click a folder to display this menu:
-
Click an item within the report folder, these are revisions of the report that you have previously run, to display this menu:
For further information refer to Using advanced analysis reports.

Click to open or close the view. You can also click and drag the view border to change the view size.

Click to add a new report. The New report dialog box opens which allows you to name and select the document structure template for your new report. Once your report is added a folder is displayed which you can right-click to display a menu that allows you to manage the report.


Click to expand the view of the Case management view so that it displays the total width of the contents of the currently selected tab. If the view is expanded click to restore it to its previous size.

Click to display a list of all the tabs that are currently open on the Case management view. This is useful if you have a lot of tabs open as it provides an alternative method to select that tabs rather than locating them by scrolling along them.
The Name column displays the report name you entered on the New report dialog box. Note, you can rename the report by right-clicking it and selecting Rename.
The Status is displayed for each of the report versions you run and is either:
- Requested: indicates that you have requested the report and your request has been logged but not yet been placed in the queue for processing. The amount of time before it enters the queue is dependent on the number of previous requests being processed.
- Queued: indicates that your report is in the queue for processing.
- Running: indicates the report is currently running but is not yet available for use.
- Success: indicates that the report has completed successfully.
- Error: indicates that the report was unable to complete. For further information on the errors, right-click the report revision and select Download log.
- Warning: indicates that the report completed but there were some issues. For further information on the warnings, right-click the report revision and select Download log.
Right-click on a blank area of the tab to display a a menu which contains New report. Click to add a new report. The New report dialog box opens which allows you to name and select the document structure template for your new report. Once your report is added a folder is displayed which you can right-click to display a menu that allows you to manage the report.
Right-click a report folder to display a menu which contains Edit. Click to open a new tab that allows you to add content to your report. The new tab is titled with the report name, for further information refer to <Report name> tab.
Right-click a report folder to display a menu which contains Run. Click to run a report based on the contents of the report that you included using the <Report name> tab.
Right-click a report folder to display a menu which contains Save as. Click to create a duplicate revision of the report. You may require a duplicate version of the report to edit independently from an earlier version you wish to keep. For further information refer to To save an additional copy of a report.
Right-click a report folder to display a menu which contains Save as template. Click to create a report structure template based on the structure used in the selected report. This template can then be selected for use in all cases and by all users when creating new reports using the New report dialog box. For further information refer to To create a new Microsoft Word report template that defines the report structure.
Right-click a report folder to display a menu which contains Rename. Click to rename the selected report folder. For further information refer to To rename a report.
Right-click an individual item within a report folder to display a menu which contains Download log. Click to download a text file which contains the results from running a report. This is useful to view if when you run a report you receive a status of error or warning.
Right-click a report folder or an individual item within a report folder to display a menu which contains Delete. Click to delete the selected report folder or a specific report revision. A Delete report or Delete output dialog box opens to confirm that you want to delete the selected item. When you click OK a delete confirmation message is displayed temporarily on the map and then the item is removed on your tab.
Click to navigate to the previous page of reports.
Click to navigate to the next page of reports.