Creating a case based on live location monitoring using the wizard and mission sets
This topic describes how to create a case based on live location monitoring using the wizard and mission sets.
Mission sets are optional and are only available if your account is configured with the required licenses.
In this procedure you use the Real-Time location monitoring through GPS Track mission set which helps you to locate and monitor the current location of a person.
This procedure is written for the purpose of new users. There are other buttons and settings that you can use when you are creating your case that are not mentioned as this procedure focuses on the ones most likely used if you are new to OSS-ESPA. Note, all the settings you select and the information that you enter can also be managed once the case is created.
-
Click here to create a new case.
Alternatively on the main menu click Create new case and select With Wizard. The Create new case screen opens.
-
This step is only applicable if your account has option E14 Sentinel. Click Select Folder to open the Select a Folder dialog box and define which folder you want your case created in. These folders are defined by your administrator.
- In Case type select the type of case. This selection simply helps you filter cases in the future making them easier to locate. It does not change any subsequent settings.
-
In Case name, although it is optional it is recommended that you enter a name for the case so that the name means something to you, for example "John Smith Search". However if you don't, OSS-ESPA will automatically create one which is titled using the format "Case <n>", where <n> is a number which increments each time a user on your OSS-ESPA account selects to automatically generate a case name.
- This setting is only applicable if your account is configured to include mission sets. In Mission set select Apprehension (Real-Time location monitoring through GPS Track).
-
Ensure Enable deconfliction (X-Case data search) is selected if you want the case data to be visible and usable for all account users if they do an identifier search for an identifier that occurs in your case. Identifiers can be phone numbers, IMSI, IMEI, names, license plates, and social media accounts. For further information refer to Enable deconfliction (X-Case data search) .
- Click Next. The Mission setup screen opens.
-
In Location monitoring select what it is you want to track. You can select either Phone, Vehicle or both.
-
If you selected Phone then:
-
In Person name enter the name. Note, there is nothing available in the drop-down menu until you have added the first set of phone information.
- In Phone number enter the number for the phone you want to track. Note, there is nothing available in the drop-down menu until you have added the first set of phone information.
- In Operator select the service provider for the phone number. Note, the only operators that support real-time monitoring are ATT, T-Mobile, Sprint and Verizon.
- Optionally, if the operator is:
- Sprint or Verizon then in Case ID enter the Case ID supplied by them for this phone number.
- ATT then in ITN enter the ITN supplied by ATT for this phone number.
- Click Add. The details appear on the screen.
- Repeat these steps to add as many phones as required. Note any previous names or phone numbers can now be easily selected using the drop-down menus.
-
-
If you selected Vehicle then:
-
In Person name enter the name. Note, there is nothing available in the drop-down menu until you have added the first set of phone information.
- In License plate enter the number for the vehicle you want to track.
- In Manufacturer select the manufacturer of the vehicle. This setting is optional but if entered then the information is included in live location monitoring notification emails.
- In Model enter the model of the vehicle. This setting is optional but if entered then the information is included in live location monitoring notification emails.
- In Color enter the color of the vehicle. This setting is optional but if entered then the information is included in live location monitoring notification emails.
- Click Add. The details appear on the screen.
- Repeat these steps to add as many vehicles as required.
-
-
In Configure alerts and reports:
- Select Notify when location accuracy is less than 200 meters if you want to monitor when a call location is of a high enough accuracy that it could help you physically locate the phone or vehicle. If a live location monitoring event occurs for a call location within the defined 200 meter minimum accuracy then OSS-ESPA will send an ACCURACY ALERT email.
- Select Notify when phone location is ON if you are monitoring one or more phones and want to monitor when a phone is switched on.
- Select Notify when phone location is OFF if you are monitoring one or more phones and want to monitor when a phone is switched off.
- Click Next. The Locations of interest screen opens.
-
Click Add/Edit location. The Locations of interest screen opens.
- Complete the information on the screen as required. If you require a description of any settings refer to Locations of interest screen (Case management). Note, you must enter a minimum of Name and Location type, for example "Victim's home" and "Crime scene" respectively.
- To use the location in geo-fence and reverse geo-fence alerts, which allow you to determine if a person is entering or leaving the location, you must enter the Latitude and Longitude. If you do not know them enter the street address and click Locate and use the Located results dialog box which automatically determines the latitude and longitude based on the address details.
-
If you want to set alerts for a person or vehicle entering or leaving this location then select the alert in Activate alert for this location.
-
The default buffer zone used around a location for the geo-fence and reverse geo-fence alerts is 2 miles. If required you can enter a new value in Location buffer.
All the other settings are optional and you can include more details later if required as described in To edit an existing location.
-
After adding the location details click Save. The location is added to the available locations table at the top of the screen.
- If you want to create additional locations click New location and repeat the previous two steps.
-
Once you have created all your locations click Next. The People and devices of interest screen opens.
-
If you want to edit the details of the people or vehicles you created earlier, such as uploading pictures of them and their vehicles then click Add/Edit persons' devices, edit the details as required then click Save, then Next to open the Smart Track alerts & notifications screen.
You can also include more details later if required as described in To edit the information of an existing person.
-
Click Add/Edit alert. The Add Smart Track alerts & notifications screen opens.
All the alerts you created earlier are displayed in the available alerts table. These may include High Accuracy, Phone OFF and Phone ON alerts which you selected on the Mission setup screen; and Geo-fence and Reverse geo-fence alerts you selected on the Locations of interest screen. You can select and edit these alerts if required.
-
You can add new alerts if required, for example you may want to add a multi-phone proximity alert which was not possible on the previous screens. To create a new alert:
- In Alert name enter a name for the alert. It is useful to enter a name that gives you a clear indication of what the alert is for, for example, "Fred Higgs away from home", "Smith near victim's home" or "Suspects meeting".
- Ensure Alert enabled is selected.
- Ensure Send notifications is selected so that live location monitoring event emails are automatically sent.
- In Alert type select which type of alert is required. For information on the types refer to Alert name.
-
The other settings displayed are dependent on what alert type you selected.
 The Phone ON and Phone OFF
- In Phone/vehicle/account/i-case select the check box for each item you want to track.
Accuracy
-
In Minimum accuracy enter the distance of the call location's minimum accuracy.
- In Phone/vehicle/account/i-case select the check box for each item you want to track.
Geo-fence or Reverse geo-fence
- In Phone/vehicle/account/i-case select the check box for each item you want to track.
-
Select Forward messages when no alert is triggered if you want to receive all live location monitoring events even when no alert is triggered.
- If you want to set a call location's minimum accuracy then select Minimum accuracy and set the distance.
- In Target locations select which target locations you want to receive alerts for.
-
In Location buffer enter the distance around the target location you are interested in.
For example, if you have Geo-fence selected and you enter a buffer of one mile, then when live location monitoring data is received from within a one mile radius surrounding any selected target location then an email is sent. Or, if you have Reverse geo-fence selected and you enter a buffer of one mile, then when live location monitoring data is received from outside a one mile radius surrounding any selected target location then a notification is sent. For information on notifications refer to Smart Track notifications.
NOTE: If a selected target location has a distance set using its own Location buffer using the Locations of interest screen (Case management), then that is the distance used and not the one specified by this setting.
Multi-phone proximity
-
In Phone/vehicle/account/i-case select the check box for each item you want to track.
- In Location buffer enter the minimum distance between phones that you are interested in.
- In Alert trigger enter the number of phones required to be within the location buffer and time window before an email is sent.
-
In Time window enter the time period for the selected number of phones to be within the location buffer before an email is sent.
For example, if you enter a location buffer of one mile, a multi-phone proximity alert of all and a time window of 60 minutes, then for a notification to be sent all the selected phone numbers must be within a one mile radius of each other, within a 60 minute time period. For information on notifications refer to Smart Track notifications.
Location change
- In Distance select the distance that the device must have moved by before an alert is triggered.
-
In Phone/vehicle/account/i-case select the check box for each item you want to track.
-
If your account has option E14 Sentinel, you also have an additional three alerts you can configure:
Identifier change and New phone communication
- In Phone/vehicle/account/i-case select the check box for each item you want to track.
Phone communication
-
In Alert trigger, select the event type that triggers the alert, either:
-
By phone communication: select if you want to monitor when a phone you have an i-case configured for, has communication with any phones that are either entered in the case or are associated with the case. You can select which phone number communications you want an alert triggered for using Creating a case based on live location monitoring using the wizard and mission sets and Creating a case based on live location monitoring using the wizard and mission sets. OSS-ESPA will send a PHONE COMMUNICATION email if this alert is triggered.
-
By global identifier type: select if you want to monitor if there is communication between the selected target and a number with the global identifier type you select in Type.
-
By global identifier category: select if you want to monitor if there is communication between the selected target and a number with the global identifier category you select in Category.
-
By specific area code: select if you want to monitor if there is communication between the selected target and a number with the area code you enter in Area code.
-
By specific country code: select if you want to monitor if there is communication between the selected target and a number with the country code you enter in Country code.
-
-
In Phone/vehicle/account/i-case select the check box for each item you want to track.
-
If the alert trigger you selected is By phone communication then in Associates:
-
in Sent to any communication by, select which methods of communication you want included in your alert.
-
select which of the phones that are associated with the case phones you want included in your alert.
-
- Your case is created and the Manage Case screen is displayed. This screen allows you to manage all your case details.
-
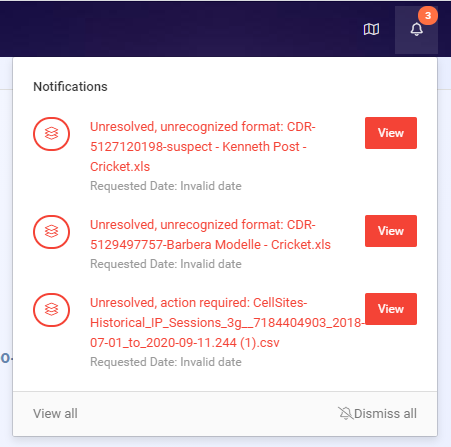
View the top-right of the screen, if a red bell is displayed as shown in the following graphic then there are notifications that need resolved. Some notifications will resolve automatically however notifications in red and prefixed with "Unresolved, action required" will require you to resolve them. Click on each notification and resolve the action it prompts you to make. For further information refer to Resolving notifications.
- If required click Preview mission set to get a high level overview of the analysis results.
- Click Add IQ packet. The New IQ packet screen opens.
- Select the time period, output format, phones and locations you want included in your IQ packet then click Request IQ packet. The IQ packet status screen is displayed.
- Your IQ packet may take a number of minutes to complete depending on the amount of information that is included in it. Once it is complete it is displayed as "IQ packet completed" and you can click the file name to download it. The file name is structured <case name><date><time>.