Managing persons
This topic describes how to create, edit and delete persons along with their known phone numbers in OSS-ESPA cases. It also describes how you can add additional information associated with the person, such as addresses, pictures and vehicles.
NOTE: Depending on how your administrator has configured your system, you may only be able to create, edit and delete persons if you are the case creator, a case assignee or an administrator.
If you require an overview of the use of persons in a case or a detailed description of the settings refer to People and devices screen.
You can also click here for a short video on the People and devices screen which includes how to enter and manage a person's data.
This procedure firstly details how you can manually add a person to a case. However if you are uploading CDR, phone data files and geo-location files to the case OSS-ESPA can automatically create persons using the data in the files to complete the mandatory settings. You can then edit person details as described in this procedure.
-
For the case you want to add a person to, open the Manage case screen.
 Need help finding your case?
On the main menu click View cases. The screen that opens depends on your setting of View cases. If it is set to:
- Advanced view, then the Advanced view cases screen opens.
- If your case is listed on the Favorite & recent cases tab, click the case name to open the Manage case screen.
- If it is not listed on the Favorite & recent cases tab, then click the Cases tab. Use the search filters to help locate your case. You can also click
 to open the FILTERS group which allows you to set your own default filter defining what is displayed on this tab, for example you may wish to set it to cases that you created which are currently open.
For further information refer to Searching for a case.
- Grid view, then the View cases screen opens.
- If your case is listed under My recent cases click it to open the Manage case screen.
- If it is not listed under My recent cases then select your case from the table, using the search filters to help locate it if required. Note, by default the search is set to only display cases that you created; if you are not the original creator but an assignee then ensure you set Case filter to Assigned cases before clicking Search.
- Tree view, then the View i-cases screen opens.
- Click
 at the top-right of the screen to open either the View Cases or Advanced view cases screen and follow the above description.
- Click
- Advanced view, then the Advanced view cases screen opens.
-
On the Manage case screen click New person.
The People and devices screen opens.
If you prefer to use the wizard to manage all your case details then on the Manage case screen, click Go to wizard, click People and devices of interest and then click Add/Edit persons' devices.The People and devices screen opens. Click
 to start adding the new person.
 -
Complete the information on the screen as required. If you require a description of any settings refer to the People and devices screen.
-
For the Personal details, it is recommended that you complete the following settings but they are not mandatory. If you do not enter these settings but instead enter a Phone on the Phone numbers tab or License plate on the Vehicles tab then those values are used to automatically populate either First name or Description.
Complete First name, Last name, and Person type then click Save. However, if you have changed Display person as to "Description" then use Description and not First name and Last name.
The person you just added is now displayed in the People list.
-
Click
 , to display the Phone numbers tab. If the settings for entering a new phone number are not already displayed, then click New.
 -
In Phone numbers complete Phone and Operator then click Save.
The phone number you just added is now displayed in the Phone numbers tab.
-
Click
 to the right of the phone number details, to display a menu which allows you to manage the phone details.
-
If you are conducting live location monitoring on the phone number, then from the menu select Smart track, configure the Smart Track settings, then click Save. For further information refer to Using Smart Track for live location monitoring tracking and alerts.
-
If you are conducting intercept monitoring on the phone number, then from the menu select Intercept monitoring, click Create i-case, configure the i-case settings, then click Save. For further information refer to Using Smart Track for live location monitoring tracking and alerts.
-
If you also have CDR, phone data or geo-location files you want to upload whilst you are editing the phone number, then from the menu select Upload files for this phone, select the files, then click Upload files.
-
-
-
You can also click
 , then select from the menu to display settings that allow you to include further person details as shown in the following list.
 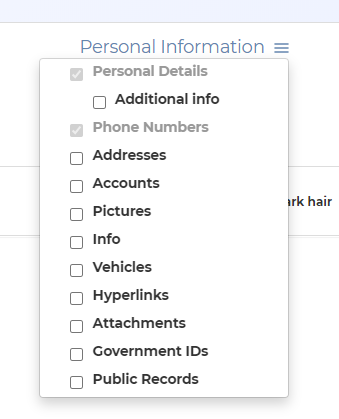 Add an address
You can add addresses either manually or select to add them automatically from public records. To add:
-
manually,
- If required, click , then select Addresses.
- Click
 to display the Addresses tab.
 - If the settings for entering a new address are not already displayed, then click New.
- You must complete Description and/or the Street address, and complete the optional settings as required, then click Save. The Addresses tab now displays the new address.
- If required, click
-
automatically from public records,
- If required, click , then select Public records. Note, the public records menu item is only displayed when you have at least one public record.
- Click
 to display the Public records tab.
 - Click for the address you want to add, then from the menu select Save to addresses. The Addresses tab opens with the new address listed.
- If required, click
Add an account
- If required, click , then select Accounts.
- Click
 to display the Accounts tab.
 - If the settings for entering a new account are not already displayed, then click New.
- You must complete Account, Account identifier, User/Vanity name and complete the optional settings as required, then click Save. The Accounts tab now displays the new account.
Add a picture
- Click
 to display the Pictures tab. Note, if is not displayed, click , then select Pictures.
 - If the settings for uploading a new picture are not already displayed, then click New.
- Click Upload file. Windows Explorer opens. Navigate to the folder and select the required files.
- If required enter a description for the picture and set it as the default, then click Save. The Pictures tab now displays the new picture.
Add info
- Click
 below the person's picture. A dialog opens.
 - Enter your notes and tag then, click Save.
Add a vehicle
- If required, click , then select Vehicles.
- Click
 to display the Vehicles tab.
 - If the settings for entering a new vehicle are not already displayed, then click New.
- You must complete License plate and complete the optional settings as required, then click Save. The Vehicles tab now displays the new vehicle.
If you want to conduct live location monitoring on the vehicle, click
, then from the menu select Smart Track.Add a hyperlink
- If required, click , then select Hyperlinks.
- Click
 to display the Hyperlinks tab.
 - If the setting for entering a new hyperlink is not already displayed, then click New.
- In URL enter the URL as required, then click Save. The Hyperlinks tab now displays the new hyperlink.
Add an attachment
- If required, click , then select Attachments.
- Click
 to display the Attachments tab.
 - If the settings for entering a new attachment are not already displayed, then click New.
- Click Upload files. Windows Explorer opens. Navigate to the folder and select the required files.
- If required enter a description for the attachment then click Save. The Attachments tab now displays the new attachment.
Add government IDs
- If required, click , then select Government IDs.
- Click
 to display the Government IDs.
 - If you want to edit them, click , then from the menu select Edit government IDs.
- Complete the optional settings as required, then click Save.
If you require a description of any settings refer to the People and devices screen.
-
-
Click Exit to return to the Manage case screen where the new person is displayed in the People and devices section.
NOTE: If you add a target phone number or a file to a case, and it already exists in another case then a notification is displayed at the top-right of the screen, and an email is also sent. Both the notification and email provide the names and links to the other cases providing you with additional leads.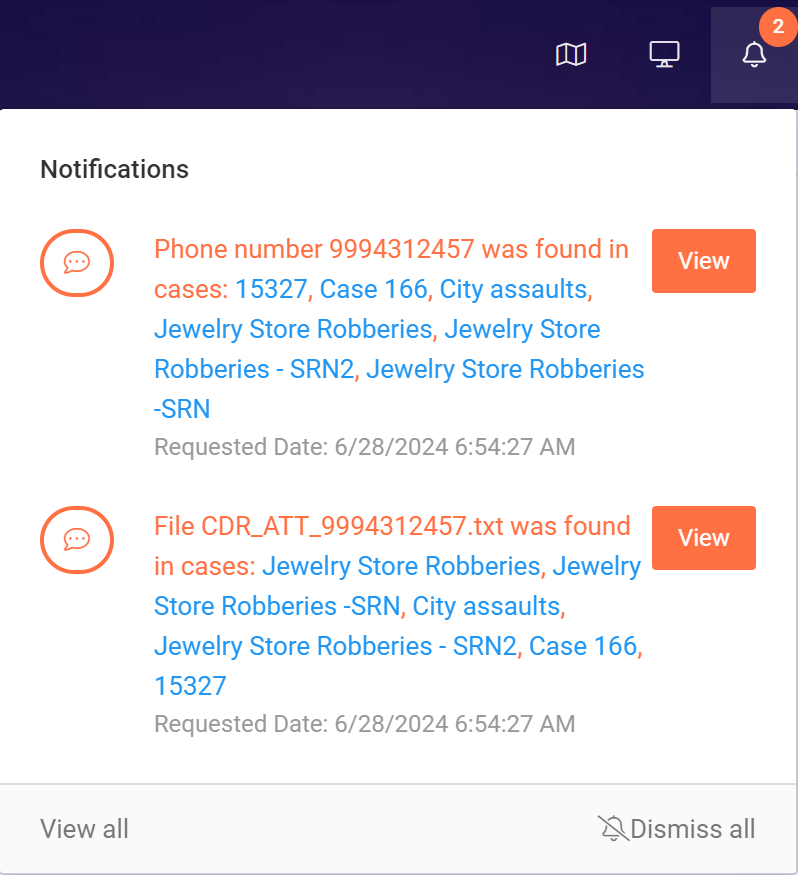

The person file you select to import must meet the requirements detailed in Import persons from file screen.
-
For the case you want to import persons to, open the Manage case screen.
Need help finding your case?
On the main menu click View cases. The screen that opens depends on your setting of View cases. If it is set to:
- Advanced view, then the Advanced view cases screen opens.
- If your case is listed on the Favorite & recent cases tab, click the case name to open the Manage case screen.
- If it is not listed on the Favorite & recent cases tab, then click the Cases tab. Use the search filters to help locate your case. You can also click to open the FILTERS group which allows you to set your own default filter defining what is displayed on this tab, for example you may wish to set it to cases that you created which are currently open.
For further information refer to Searching for a case.
- Grid view, then the View cases screen opens.
- If your case is listed under My recent cases click it to open the Manage case screen.
- If it is not listed under My recent cases then select your case from the table, using the search filters to help locate it if required. Note, by default the search is set to only display cases that you created; if you are not the original creator but an assignee then ensure you set Case filter to Assigned cases before clicking Search.
- Tree view, then the View i-cases screen opens.
- Click at the top-right of the screen to open either the View Cases or Advanced view cases screen and follow the above description.
- Click
- Advanced view, then the Advanced view cases screen opens.
-
On the Manage case screen, under the People and devices section, click Import from file.
The Import persons from file screen opens.
If you prefer to use the wizard to manage all your case details then on the Manage case screen, click Go to wizard, click the People and devices of interest screen then click Import from file.
-
Click Select file. Windows Explorer opens. Navigate to the folder and select the required file. Once the file name is displayed then the upload is complete.
-
Click Import.
-
When the Person file successfully imported message is displayed click Exit. The Manage case screen opens and all the persons from the imported file are now displayed in the People and devices section.
-
For the case you want to edit a person on, open the Manage case screen.
Need help finding your case?
On the main menu click View cases. The screen that opens depends on your setting of View cases. If it is set to:
- Advanced view, then the Advanced view cases screen opens.
- If your case is listed on the Favorite & recent cases tab, click the case name to open the Manage case screen.
- If it is not listed on the Favorite & recent cases tab, then click the Cases tab. Use the search filters to help locate your case. You can also click to open the FILTERS group which allows you to set your own default filter defining what is displayed on this tab, for example you may wish to set it to cases that you created which are currently open.
For further information refer to Searching for a case.
- Grid view, then the View cases screen opens.
- If your case is listed under My recent cases click it to open the Manage case screen.
- If it is not listed under My recent cases then select your case from the table, using the search filters to help locate it if required. Note, by default the search is set to only display cases that you created; if you are not the original creator but an assignee then ensure you set Case filter to Assigned cases before clicking Search.
- Tree view, then the View i-cases screen opens.
- Click at the top-right of the screen to open either the View Cases or Advanced view cases screen and follow the above description.
- Click
- Advanced view, then the Advanced view cases screen opens.
-
On the Manage case screen, in the People and devices section click the name of the person you want to edit.
The People and devices screen opens.
If you prefer to use the wizard to manage all your case details then on the Manage case screen, click Go to wizard, click the People and devices of interest screen then click Add/Edit persons' devices. The People and devices screen opens then click the person you want to edit.
-
Edit the person's settings as required. Note, if you want to add: Addresses tab, Accounts tab, Pictures tab, Info tab, Vehicles tab, Hyperlinks tab, Attachments tab, or Government IDs tab and these tabs are not displayed then click
and select which tabs you want displayed.If you want to:
Manage person details
-
Click
 to display the Personal details tab.
 - Click then from the menu select Edit person.
- Edit any settings that define or describe the person then click Save.
Manage phone numbers
To add an additional phone number
- Click to display the Phone numbers tab.
- Click New.
- Complete Phone and Operator and any optional settings as required then click Save. The Phone numbers tab now displays the new phone number.
Click
to the right of the phone number details, to display a menu which allows you to manage the phone details.-
If you are conducting live location monitoring on the phone number, then from the menu select Smart track, configure the Smart Track settings, then click Save. For further information refer to Using Smart Track for live location monitoring tracking and alerts.
-
If you are conducting intercept monitoring on the phone number, then from the menu select Intercept monitoring, click Create i-case, configure the i-case settings, then click Save. For further information refer to Using Smart Track for live location monitoring tracking and alerts.
-
If you also have CDR, phone data or geo-location files you want to upload whilst you are editing the phone number, then from the menu select Upload files for this phone, select the files, then click Upload files.
To edit a person's phone number
- Click to display the Phone numbers tab.
- Click for the phone number you want to edit, then from the menu select Edit phone.
- Edit the settings as required then click Save.
-
Click
to the right of the phone number details, to display a menu which allows you to manage the phone details.-
If you are conducting live location monitoring on the phone number, then from the menu select Smart track, configure the Smart Track settings, then click Save. For further information refer to Using Smart Track for live location monitoring tracking and alerts.
-
If you are conducting intercept monitoring on the phone number, then from the menu select Intercept monitoring, click Create i-case, configure the i-case settings, then click Save. For further information refer to Using Smart Track for live location monitoring tracking and alerts.
-
If you also have CDR, phone data or geo-location files you want to upload whilst you are editing the phone number, then from the menu select Upload files for this phone, select the files, then click Upload files.
-
To re-assign a phone number to another person
-
Click
to display the Phone numbers tab. - Click for the phone number you want to re-assign, then from the menu select Re-assign person.
- In Person name select the required name then click Re-assign.
To delete a person's phone number
-
Click
to display the Phone numbers tab. - Click then from the menu select Delete phone.
- Click OK on the confirmation dialog box. The phone number is deleted from the Phone numbers tab.
To add an associate as a target person
-
For the case you want to delete a person on, open the Manage case screen.
Need help finding your case?
On the main menu click View cases. The screen that opens depends on your setting of View cases. If it is set to:
- Advanced view, then the Advanced view cases screen opens.
- If your case is listed on the Favorite & recent cases tab, click the case name to open the Manage case screen.
- If it is not listed on the Favorite & recent cases tab, then click the Cases tab. Use the search filters to help locate your case. You can also click to open the FILTERS group which allows you to set your own default filter defining what is displayed on this tab, for example you may wish to set it to cases that you created which are currently open.
For further information refer to Searching for a case.
- Grid view, then the View cases screen opens.
- If your case is listed under My recent cases click it to open the Manage case screen.
- If it is not listed under My recent cases then select your case from the table, using the search filters to help locate it if required. Note, by default the search is set to only display cases that you created; if you are not the original creator but an assignee then ensure you set Case filter to Assigned cases before clicking Search.
- Tree view, then the View i-cases screen opens.
- Click at the top-right of the screen to open either the View Cases or Advanced view cases screen and follow the above description.
- Click
- Advanced view, then the Advanced view cases screen opens.
-
On the Manage case screen, click the title People and devices.
The People and devices screen opens.
-
In People click
 to display the associates.
 - Left-click the associate you want to add to the case as a target person. Their Personal details are displayed.
- Click then select Edit person.
- In Person Type, change from "Associate" to the required target type.
- Click Save. In People, the person is now listed in the "Targets" group.
To delete a person
NOTE: If you delete a phone number any CDR that you have previously imported for that phone number is also deleted.
-
For the case you want to delete a person on, open the Manage case screen.
Need help finding your case?
On the main menu click View cases. The screen that opens depends on your setting of View cases. If it is set to:
- Advanced view, then the Advanced view cases screen opens.
- If your case is listed on the Favorite & recent cases tab, click the case name to open the Manage case screen.
- If it is not listed on the Favorite & recent cases tab, then click the Cases tab. Use the search filters to help locate your case. You can also click to open the FILTERS group which allows you to set your own default filter defining what is displayed on this tab, for example you may wish to set it to cases that you created which are currently open.
For further information refer to Searching for a case.
- Grid view, then the View cases screen opens.
- If your case is listed under My recent cases click it to open the Manage case screen.
- If it is not listed under My recent cases then select your case from the table, using the search filters to help locate it if required. Note, by default the search is set to only display cases that you created; if you are not the original creator but an assignee then ensure you set Case filter to Assigned cases before clicking Search.
- Tree view, then the View i-cases screen opens.
- Click at the top-right of the screen to open either the View Cases or Advanced view cases screen and follow the above description.
- Click
- Advanced view, then the Advanced view cases screen opens.
-
On the Manage case screen, click the title People and devices.
The People and devices screen opens.
-
In People click
 . A dialog opens.
 - Select the check-box next to the people you want to delete then click Delete selected.
-
Click Yes on the confirmation dialog box.
The selected persons are deleted from the list.
- Click Exit to return to the Manage case screen.
-