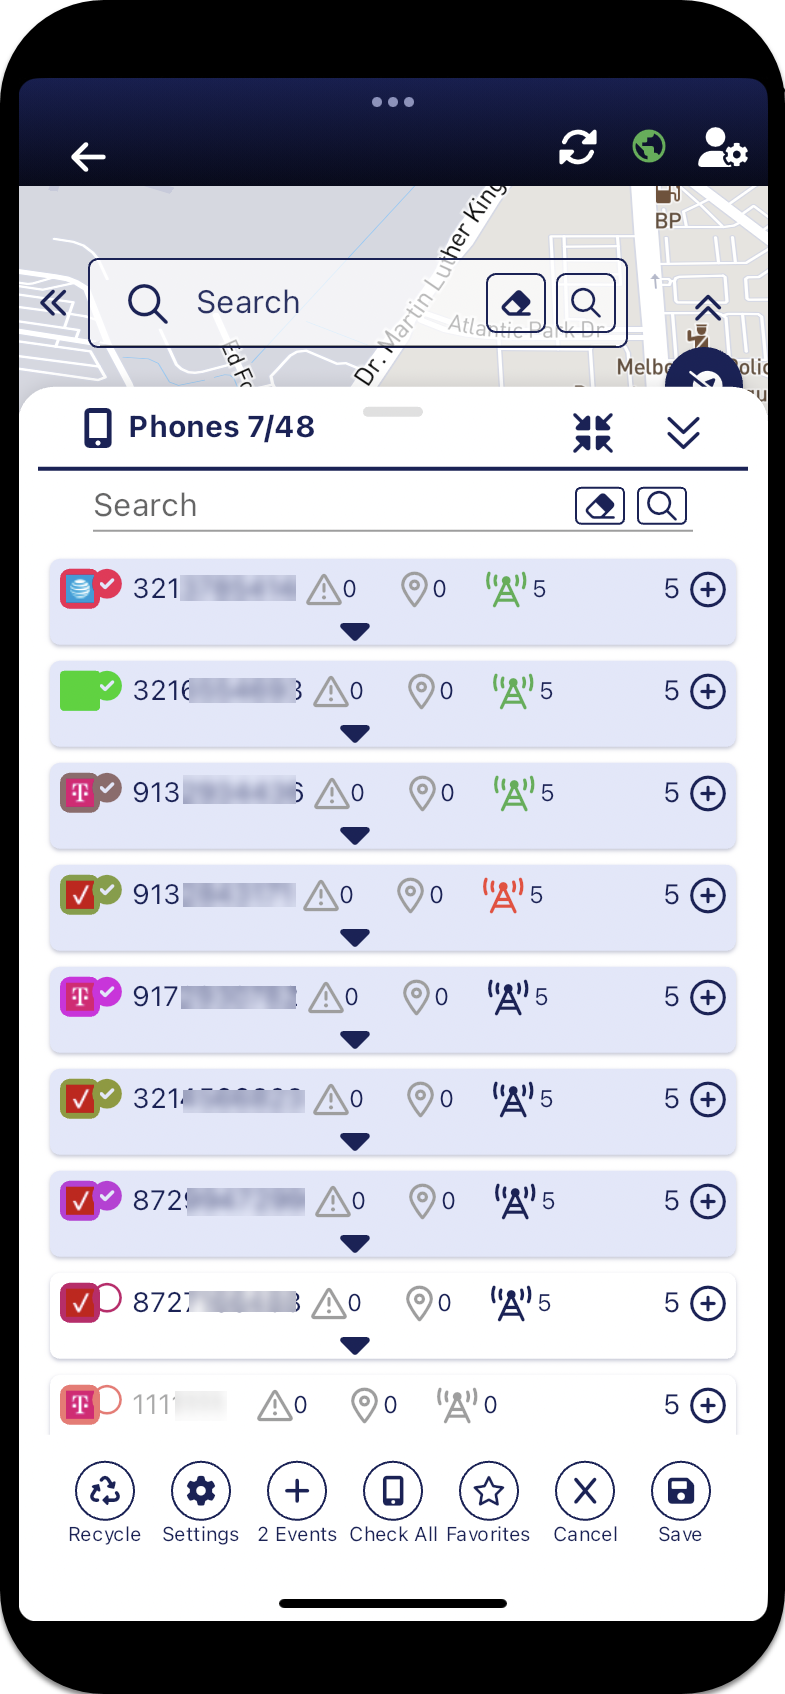
Phones panel
The Phones panel lists the phones you are monitoring with real-time updates of their location. Which phones are displayed depends on which map screen you opened. If you opened:
-
the Sentinel map screen by tapping Sentinel on the Home screen then all phones you are monitoring are listed
- the Analysis Center map screen from the Cases screen then only the phones related to your selected case are listed.
- the Sentinel mission map screen from the Missions screen then only the phones related to your selected mission are listed.
You can select which phone's data you want displayed on the map by selecting the check-box alongside the phone icon.
For each phone, three icons display showing the phone's activity in the selected time period. The color of the GPS ping, Smart Track and PRTT events icons (green, yellow, red or blue) indicate how recently the last event occurred as defined on the User preferences panel.
-
 opens the list of triggered alerts for the phone. The icon is only displayed when there are triggered alerts available.??? teamrev26.1
 -
 displays the number of GPS pings. If a number displays alongside the icon, you can tap the icon to zoom to the location on the map.
 -
 displays the number of PRTT events. If a number displays alongside the icon, you can tap the icon to zoom to the location on the map.

If any icons appear in grey, it indicates that there has been no activity of that type. If all icons, including the phone number appear in grey, it indicates there has been no phone activity at all.
Tap the name or phone number to zoom to the phone's last known location on the map. Tap  on a row to display a menu which allows you to:
-
 set the color used to display the phone's data on the map.
 -

 set the phone as a favorite so that you can quickly locate it by tapping
  on the bottom of the panel.
 -
 remove the phone's data from the map which includes removing its Smart Track alerts, GPS pings and PRTT events. Only the phone's current location is displayed and the number of hours of data or events, depending on your user preference setting, is set to 0.
 -
 create a navigation route to the most recent event.
 -
 set whether you want the phone identified using the phone number, target name or target alias.
 -
 display the events associated with the phone. This includes the towers (both the last used and most frequently used), the last GPS pings, and the associates the phone was in contact with (both the last contacted and the most frequently contacted). You can select the number of events for each that are displayed.
If you make any changes on the panel, for example selecting another phone, then when you close the panel using  the map data automatically reloads. Spinners are displayed alongside
There are a number of buttons along the bottom of the panel which allow you to manage what is displayed on the panel, these are described in more detail below.
To find a specific phone, name or alias. You can enter full or partial data.
Note: The search is only performed on the data currently displayed, that is if you are displaying a target's name you must search using the name and not the phone number.
 Recycle
Tap to remove all the location data for the selected phones. The number of hours of data or events, depending on your user preference setting, is set to 0.
 Settings
Tap to display Settings which allow you to set display options associated with the phones, this includes: whether the phone is displayed by default using the phone number, target name or target alias, whether only phones with events are displayed, and whether only phones you have marked as favorites are displayed. This allows you to select what is displayed for all phones, but you can also change whether the phone number, target name or target alias is displayed on an individual phone basis by tapping for a phone, then  . For a target alias name to display, there must be an alias name entered for the target on OSS-ESPA's Personal details panel, otherwise No Alias is displayed.
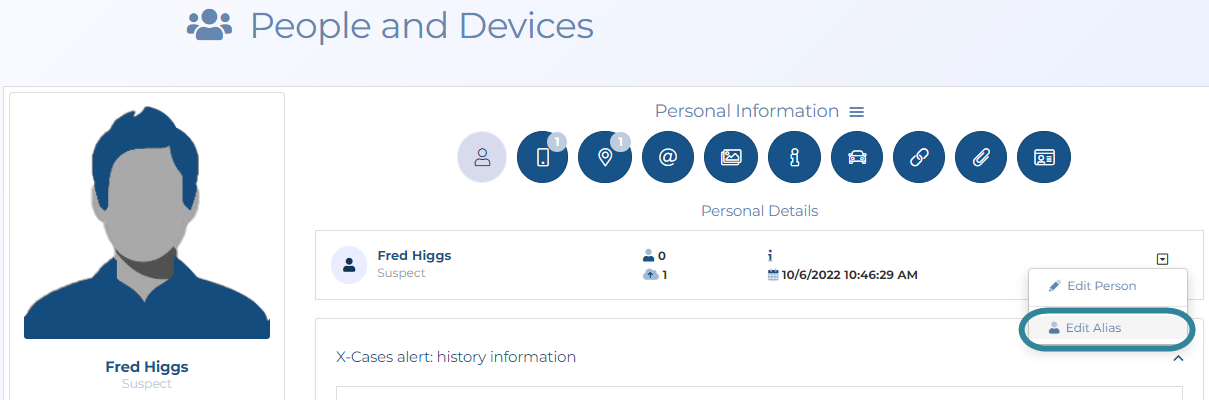
Display only phones with events allows you to choose whether or not to remove phones that do not have any data from the list.
Display only favorites allows you to choose to only display the phones that you have marked as favorites. This is the same as tapping at the bottom of the Phones panel.
NOTE: These settings are coupled with the settings on the Phones settings panel.

Tap to add additional location data to the map for all phones. You can also add additional data to an individual phone by tapping the phone's plus icon . You can select whether this button adds additional hours or events on the User preferences panel.
NOTE:To configure this setting refer to Set the amount of data loaded and the timing color codes while using the map.
 Check all
Tap to either select or clear all phones from being selected. Only those phones that are selected have their events displayed on the map.
Favorites
Tap to either display all the phones you are monitoring or just those that you have selected as favorites. For further information refer to Quickly view phones of interest by marking them a favorite.
 Save
Save
Tap to establish a connection with the server which then updates the Phones panel and map with any settings you have updated. Note, you only need to tap this if you plan to keep the Phones panel open as closing the panel using automatically updates the Phones panel and the map.