Filter panel
The Filter panel can be opened from both the Map screens and the Events panel. When opened from the:
-
map screens, it allows you to filter the data displayed on the Phones panel and the map by: data type, call direction, alert type, confidence level, date range, day of week and hour of day.
-
Events panel, it allows you to filter the data displayed on the Events panel by: data type, call direction, correlation, date range, day of week and hour of day. If you require a step-by-step procedure on using the filter on the Events panel, refer to the last step in Viewing a phone's last and most frequent events.
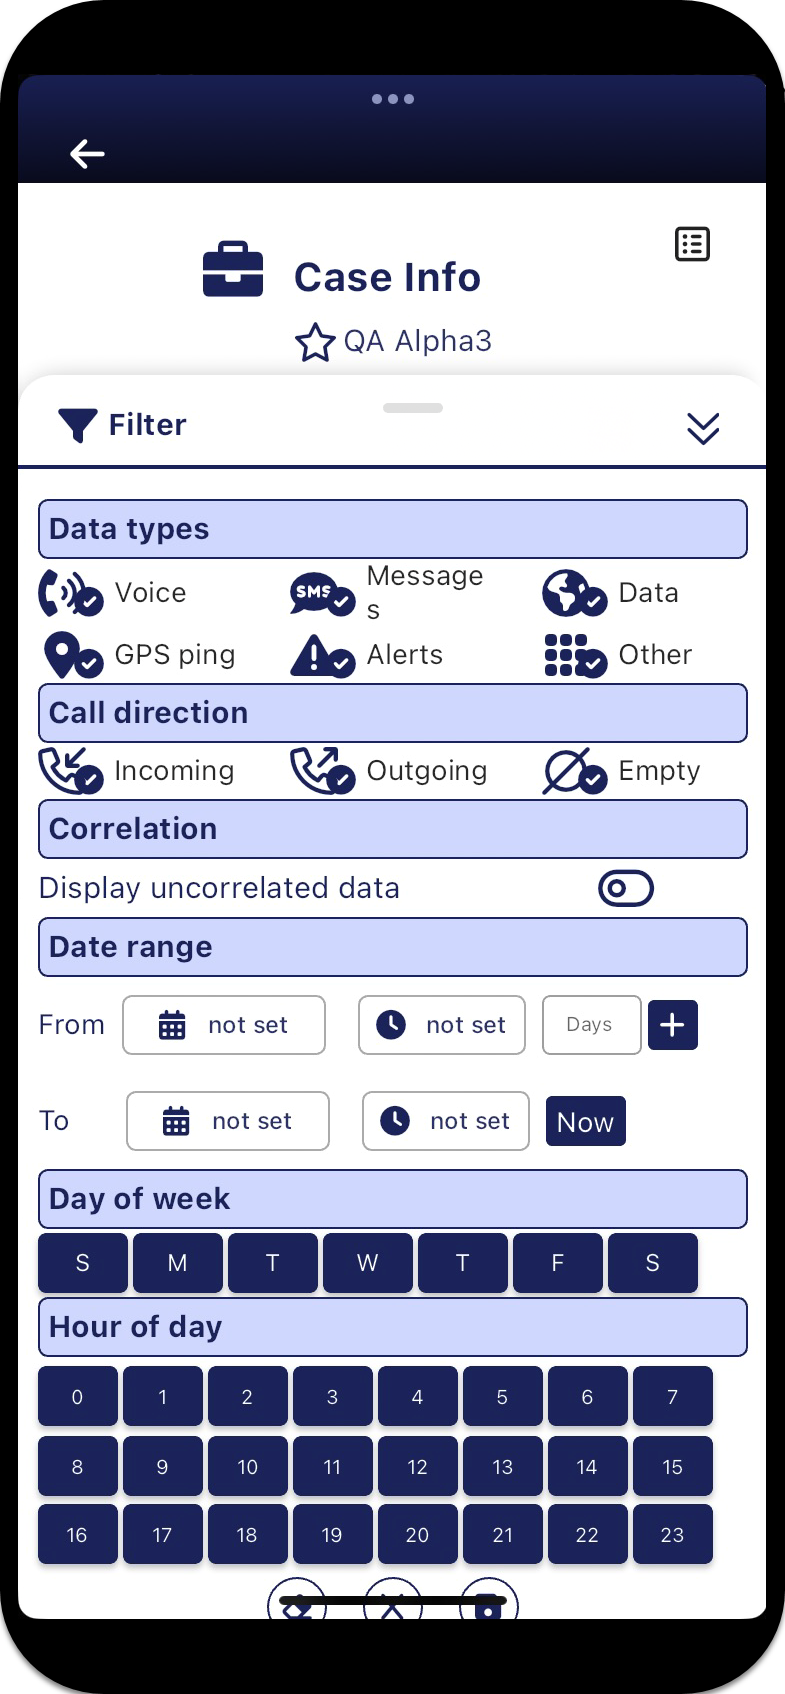
Tap to select what type of events you want to display. You can choose to filter data based on whether it is voice, message (SMS and MMS), data, GPS ping, Smart Track alert or other. For example, if you are only interested if the phones you are monitoring trigger an alert, then you can filter the events to only show Alerts.
Other includes all other communication signals from the operator which indicate the phone is actively communicating with the tower such as the phone registering with the tower. This type of data is included on the map as a PRTT event  .
.
Tap to select what you want displayed based on the call direction.
This setting is only displayed when you open the Filter panel from the Events panel; it is not displayed when you open the Filter panel directly from the map screens by tapping  .
.
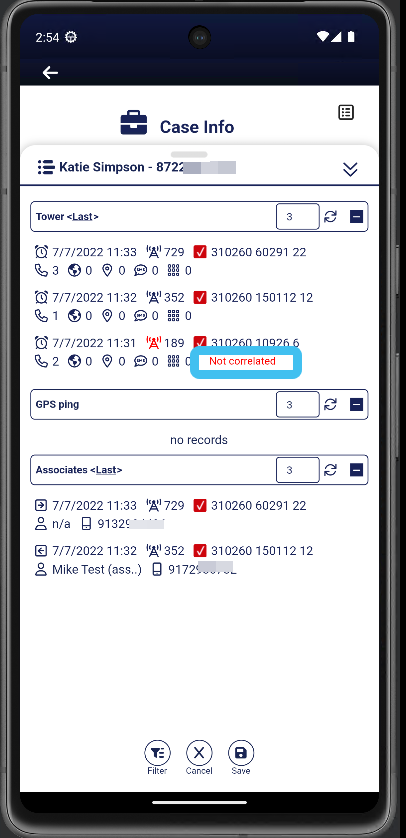
By default uncorrelated data is not displayed on the Events panel. Uncorrelated data is data from a tower that is not in the G-Scout App's tower database, resulting in the tower's location being unknown. If you want to view uncorrelated data on the Events panel for the purpose of providing you with the knowledge that the phone is active and communicating then you should enable this setting . Any events using uncorrelated towers are marked Not correlated as shown below.
??? teamrev26.1 new
This setting is only displayed when you open the Filter panel by tapping on the map screens; it is not displayed when you open the Filter panel from the Events panel.
Tap to select which alert types you want to monitor. The alert types are:
-
the geo-fence alert, which is based on the phone or vehicle being within a defined area. This allows you to monitor if a person is entering a specific location, perhaps the region around the home of a person they are legally not allowed to approach. This alert uses GPS ping, LPR and PRTT data.
-
the reverse geo-fence alert, which is based on the phone or vehicle being outside a defined area. This allows you to monitor if a person is leaving a specific location, perhaps the region around their home which they are legally not allowed to leave.
- the multi-phone proximity alert, which is based on a group of phone users or vehicles being within a specified distance of each other within a specified time period. This type of alert is useful for example, if you are monitoring gang meetings.
- the accuracy alert, which is based on the call location being of a high enough accuracy that it would allow you to physically locate the person, therefore it is useful if you are attempting to detain someone.
- the phone on/off alerts, which monitor when phones are switched on and off. This type of alert is useful as it may indicate the person did not want their phone location known as they were involved in a crime. This alert is only applicable to AT&T.
- the identifier changes alert is based on a phone which you are intercepting changing its subscriber information (IMSI, MSISDN, SUPI-IMSI, GPSI-MSISDN, SUCI, GUTI-5G) and the device information (IMEI, IMEISV, PEI-IMEI, PEI-IMEISV). This type of alert notifies you of pertinent changes related to the target device which may require you to reconfigure other equipment in order to accomplish your mission. This alert uses PRTT data.
-
the phone communication alert, which is based on:
-
a phone which you are intercepting communicating with either:
-
specific phones that you define. This type of alert is useful as it alerts you of communications between people that are specifically of interest to you.
-
all communications, either SMS, voice or both. This type of alert is useful as it alerts you to all of the person's communications.
-
-
communication between the selected target, and a number with either a specific: global identifier type, global identifier category, area code or country code.
This alert uses PRTT data.
-
- the new phone communication alert, which is based on a phone which you are intercepting communicating with a phone that it previously had no communication with. This type of alert is useful as it alerts you to new people who may be of interest to you. This alert uses PRTT data.
- the location change alert allows you to monitor when a device has moved by a distance you specify. This alert uses GPS ping and PRTT data.
- the no new data alert allows you to configure a notification to be sent when no new GPS ping or PRTT data is received within a defined period of time.
- the IP based alerts, which are based on monitoring specific IP addresses and monitoring if the target's IP address changes.
-
the Roaming Registration (In/Out Country) alert allows you to monitor when a target's device connects to a network outside of the US.
-
the WiFi network alert allows you to monitor when a target's device connects to a WiFi network.
Click here for a short video showing the different types of Smart Track alerts and notifications. Although this video is focused on configuring the alerts within OSS-ESPA it also provides an overview of each type of alert.
??? teamrev26.1 new
This setting is only displayed when you open the Filter panel by tapping on the map screens; it is not displayed when you open the Filter from the Events panel.
Tap and drag the sliders to set the confidence level, in meters, of the call location's minimum accuracy. This is applied to the accuracy, geo-fence, reverse geo-fence and multi-phone proximity alerts. The live location monitoring events provide both the latitude and longitude of the GPS ping along with an accuracy. If the accuracy of the GPS pings are not within the value you enter here then they are filtered out.
Tap to enter the date and time range. You can use  to increase the From date by a specific number of days. You can use Now to set To to the current date and time.
Tap to select which day of the week's data is displayed. This is useful if you want to look at a phone's historical data on a specific day or days.
Tap to select which hour of the day's data is displayed. This is useful if you want to look at a phone's historical data on a specific hour or hours.
Tap to clear any filters that you have applied. This resets the Phones panel, Alerts panel and the map to the settings you were using prior to applying the filters.
Tap to cancel any changes you have made. The Filter panel closes.
Tap to establish a connection with the server which then updates the Phones panel, Alerts panel and map with any settings you have updated.  automatically saves your changes and updates the Phones panel, Alerts panel and the map.