Selecting your drive area
This topic describes how to determine your drive area in your cases and how to visually highlight your drive area using a polygon. It then describes how to export your drive area details into GoogleEarth and MapPoint. It also describes how to remove, rename, and modify the boundaries or appearance of an existing polygon and how to set the default polygon appearance.
- To select your drive area open the ESPA analysis center screen and investigate the case data visually as described in Getting started with investigating case data visually.
- Determine your center point of interest, for example this may be the crime scene.
- Identify the cell tower that covers your point of interest, then identify the neighboring cell towers. Typically you also want to identify the cell towers neighboring these too. If you are also collecting WiFi coverage ensure these locations are identified too.
-
With your map displaying all the cell towers and WiFi network locations you've identified draw a polygon around all of them. To do this:
- Hover over
 on the top-right of the map.
 -
Click
 then select Polygon from the menu.
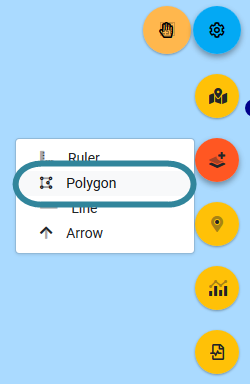
The map is now in the polygon drawing mode, and the
 icon turns from orange to white.
 -
Left-click on the map to start drawing your polygon. You can left-click to create another point on your polygon or double left-click to complete your polygon.
Once you've completed your polygon the map view returns to the normal map mode which is indicated by the hand icon returning to orange
.
- Hover over
-
Either click
 or right-click an area of the map outside a sector then from the menu select Save drawing layer.
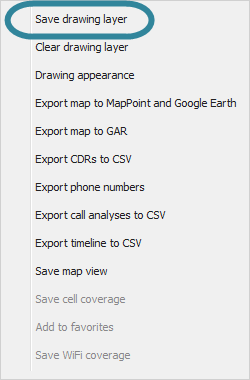
All the polygons on the map are saved and are now available each time you open the case in the ESPA analysis center.
-
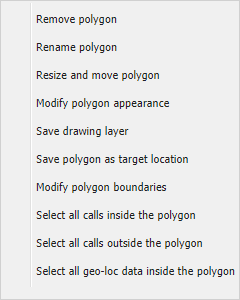
If you require to remove, rename, modify the boundaries or appearance of the polygon then right-click the polygon to display the following menu.
-
Once you have completed How to select your drive area either click
or right-click an area of the map outside a sector then from the menu select Export map to MapPoint and Google Earth. 
-
To allow you to use the exported file in MapPoint, you must install the MapPointUtility.exe application in your computer. For details of the location of this application contact your administrator or Gladiator Forensics.
-
Using the MapPoint utility tool click MapPointUtility.exe. The Import KML into MapPoint dialog box opens.
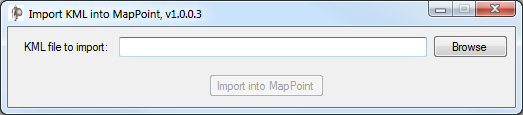
- Click Browse. Windows Explorer opens. Navigate to the folder and select the required .kmz file.
-
Click Import to MapPoint.
MapPoint opens and the contents of the .kmz file are loaded into it. This takes several minutes to complete.
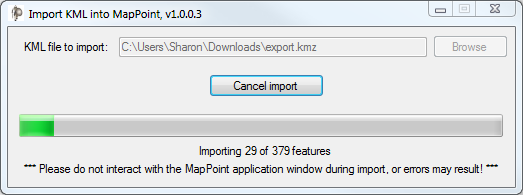
CAUTION: While the contents of the .kmz file are loading into MapPoint do not use MapPoint otherwise the contents may not load correctly.
- Once complete you can then use the details in MapPoint for planning your drive test.
The following procedure details how to export the map details on a per operator basis to your GAR unit to help you identify locations of interest during your drive. For further information refer to Export map to GAR dialog box.
-
Ensure the map layers for the details you want to export are selected on the layer selection settings located in the upper right corner of the map by clicking
 . For further information on which layers are exported refer to Export map to GAR.
 -
It is recommended that you do a separate export for each operator as this gives you the flexibility of selecting to view each or all operators on your GAR unit. Therefore select one operator network and unselect the others.
-
Click
or right-click an area of the map outside a sector then from the menu select Export map to GAR. 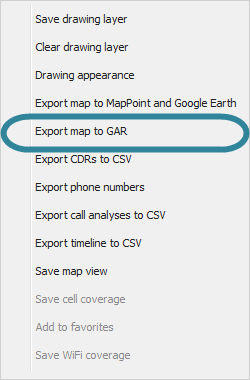
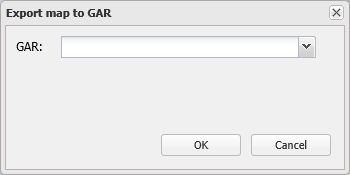
The Export map to GAR dialog box opens.
-
Select the GAR unit you will be using during the drive then click OK.
-
Repeat the previous steps for each operator you are interested in.
When your GAR unit is turned on it is automatically updated with any maps that you have exported to it.
-
Right-click the existing polygon you want to edit then select the appropriate item from the menu.

For further information on the settings in this menu refer to the description of this menu in Map view.
-
Either click
or right-click an area of the map outside a sector then from the menu select Drawing appearance.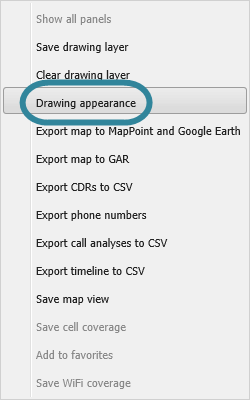
The Drawing options dialog box opens.
-
Edit the settings in the Drawing options dialog box as required then click OK.
For further information on the settings refer to Drawing options dialog box.