Narrative options dialog box
This topic describes the purpose of the Narrative options dialog box and all the settings and buttons on it.
This dialog box requires option E13 Narrative data. If you do not have this option you cannot access this dialog box.
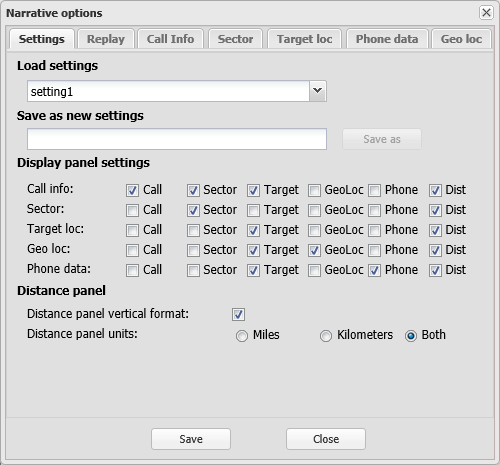
The Narrative options dialog box allows you to configure:
- Which narrative panels are displayed for each event type.
- How the narrative panels are displayed, for example their layout, content and header descriptions.
- How the narrative events are replayed.
- And save common narrative option configurations that you can apply to other narratives.
For further information on using narratives refer to Configuring how narratives are displayed and replayed.
If you have previously saved a narrative configuration it is available for you to use in all cases. Once selected the settings on the dialog box are updated. Select "Default" if you want to return to the OSS-ESPA default values.
Enter a name then click Save as to save the current configuration of the dialog box. This is useful if you have a number of narrative configurations you prefer to use as once saved they are then available for you to select in all cases.
Click to select what panels you want displayed when each type of event is played.
By default, a call info event shows the call info, sector, target location, and distance panels. As the narrative is played and different types of events are processed, the panels shown on screen will change according to these settings. However if a panel is empty, it is never shown.
The contents of each panel are populated when a narrative event of that type is played; the distance panel is populated on every event type, unless the event has no location, or no target locations have been played and the previous and next events do not have a location.
For example if a narrative had four event types in the following order: call info, sector, geo-location, and target location then the panels displayed would be as follows using the OSS-ESPA default settings:
- If the first event is a call info event, normally four panels would be displayed, but since a target location and a sector have not yet been played, those panels are not displayed and only the call info and distance panel are displayed.
-
When the second event, the sector, is played, the call info panel is removed by default since it is not selected in Display panel settings for sectors by default; the sector panel is displayed, and the distance panel updated.
-
When the third event, the geo-location, is played, the sector panel is removed, the geo-location is displayed, and the distance panel is updated. Normally you'd see the target location panel displayed, but since no target locations have been played, the panel is empty and therefore not displayed.
-
When the fourth event, the target location, is played, the geo-location panel is hidden, and the target location panel displayed, and the distance panel updated.
-
If you were to now return and play the first event which was the call info event, the call info panel would be displayed, and the sector and target location panels would now display because they were processed in the previous steps and now have contents. The display panel would also be updated.
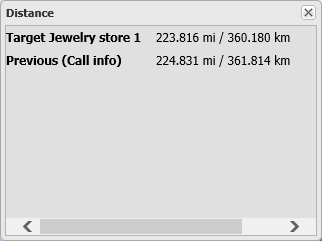
Select if you want the Distance panel to display results using the vertical format. The Distance panel displays the distance between the selected narrative event and: the next and previous events in the narrative, and any target locations in the narrative. If this setting is:
-
selected then the layout of the Distance panel is:
-
not selected then the of the Distance panel is:
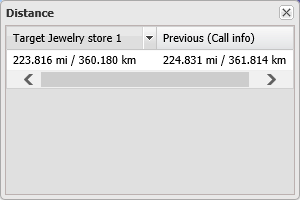
Select which units you want displayed in the Distance panel. The Distance panel displays the distance between the selected narrative event and: the next and previous events in the narrative, and any target locations in the narrative.
Click to close the dialog box without applying any changes you may have made.
Click to apply any changes you have made. The dialog box closes automatically.
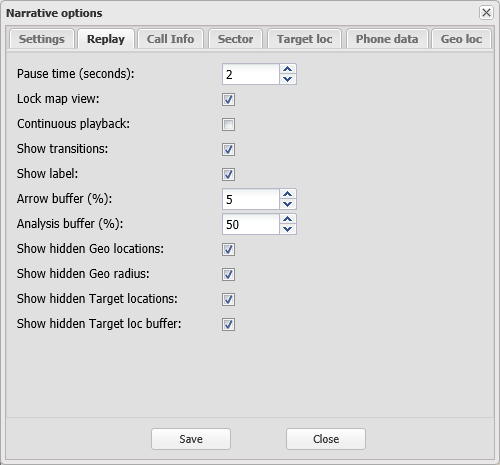
Enter the number of seconds that each event is displayed for.
By default this is selected which means the map location and zoom remains the same as you have them currently selected on the map throughout the replay. This is the normal setting, however if you want OSS-ESPA to determine the zoom setting you must clear this setting. This setting is coupled with 
 on the Narrative dialog box.
Select if you want the events in the Narrative dialog box to continuously play, that is when it replays the last event it then returns to replay the first and replays sequence again.
Select if you want to display arrows showing the transition from one event to the next. These arrows only display when you are playing the narrative and do not display if you select each event manually.
For example if you have a narrative consisting of only three target locations, and this setting is:
-
selected then playback will consist of these five scenes:
- Target location 1 highlighted
- Target location 1 with an arrow pointing to Target location 2 which is highlighted
- Target location 2 highlighted
- Target location 2 with an arrow pointing to Target location 3 which is highlighted
- Target location 3 highlighted
- not selected then playback will consist of only three scenes, one with each target location highlighted.
During the transition scenes, if the map view is not locked, the map zoom includes both endpoints of the arrow plus the buffer which is defined in Analysis buffer.
Select if you want the text you have entered in the Notes column of the Narrative dialog box to be displayed on the map when the event is replayed on the Narrative dialog box.
Use to define the length of the arrow that you want used to show the transitions between one event and the next. These arrows are only displayed if Show transitions is selected. The percentage value you enter here defines the distance away from each event that the arrow starts and ends. For example if you set the arrow buffer to 10%, the initial gap would be 10% of the total distance between the events, the line would be 80% of the total distance between the events, and the end gap would be 10% of the total distance between the events.
This setting is a zoom level control for the cell coverage analysis and the playback of the transitions when the map view is not locked. The map view is locked using either Lock map view on this dialog box or on the Narrative dialog box.
For cell coverage playback, this parameter adds a buffer area around the analysis geographic area when zooming to the analysis. The buffer area is a percentage of the area that the analysis result occupies. For example, if the Analysis buffer is set to 50%, and the cell coverage analysis occupies one square degree, then the buffer around the analysis for the zoom will be approximately half a degree on each side. If the Analysis buffer is set to 100%, then the buffer around the analysis for the zoom will be approximately a full degree on each side.
For the transition playback, it works using the same method, but rather than the base area being the cell coverage analysis, the base area is the area between the start and end points of the transition.
Select if you want the geo-location marker to be displayed on the map when a geo-location event is replayed on the Narrative dialog box. This is useful to select as otherwise if the geo-location is not selected on the Geo-loc data tab then it will not display on the map.
Select if you want the geo-location radius area to be displayed on the map when a geo-location event is replayed on the Narrative dialog box. This is useful to select as otherwise if the geo-location radius is not selected on the Geo-loc data tab then it will not display on the map.
Select if you want the target location marker to be displayed on the map when a target location event is replayed on the Narrative dialog box. This is useful to select as otherwise if the target location is not selected on the Target locations tab then it will not display on the map.
Select if you want the target location buffer area to be displayed on the map when a target location event is replayed on the Narrative dialog box. This is useful to select as otherwise if the target location buffer is not selected on the Target locations tab then it will not display on the map.
Click to close the dialog box without applying any changes you may have made.
Click to apply any changes you have made. The dialog box closes automatically.
These tabs allow you to configure what information is displayed when each type of event is replayed. Each tab allows you to select: the layout of the information; which headers are displayed; an alternative name for the header; and by dragging and dropping each row you can order how they are displayed on their respective panels.
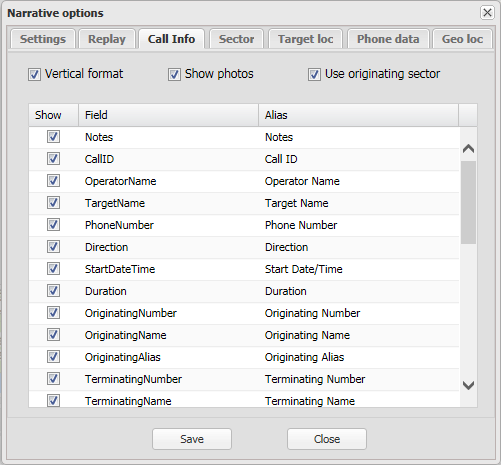
By default when the event is replayed the details of the event are displayed in a list. Clear this setting if you would prefer the events to be displayed in a table format with the headers listed as the column title.
This setting is only applicable to the Call Info tab. Select if you want the default pictures of the people involved in the call to be displayed on the Call info panel. These default pictures are uploaded and selected as the default using Default picture on the People and devices of interest screen.
This setting is only applicable to the Call Info tab. This setting allows you to control how the <sector_name> panel is populated. If this setting is:
- selected then the <sector_name> panel is populated with the details of the: originating sector when you play a call info event and the sector data when you play a sector event. Note, that sector's beamwidth value is not available for originating sectors.
- not selected then the <sector_name> panel is only populated with the details from the last sector event in the narrative.
This setting is only applicable to the Call Info tab. This setting allows you to exclude all the terminating sector headers when the event is replayed. The headers excluded are shown in the following graphic.
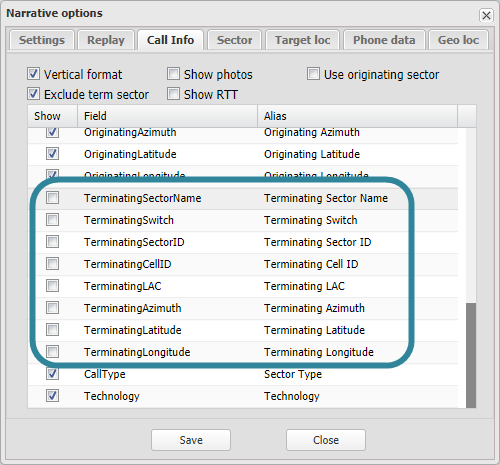
NOTE: If Exclude term sector is selected, then if you were to click the arrow beside Show and click Select all, it respects the
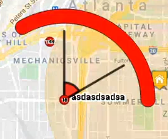
This setting is only applicable to the Call Info tab. This setting allows you to display the TA arc for calls on the map, from CDR formats that support TA data.
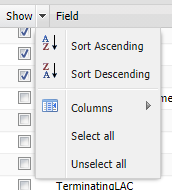
Select to display this header when the event is replayed. You can also click the arrow in the header column to display a menu that allows you to Select all and Unselect all of the check-boxes.
This displays all the headers that are associated with the type of event.
Click to enter a new name for a header that you want to use instead of the original header name when the information is displayed on its respective panel during the replay. This is useful if the header name does not match the one in the original file you uploaded, as displaying it using the original file's header may make it clearer when explaining the event to others if they are cross-referring to the original uploaded file.
Click to close the dialog box without applying any changes you may have made.
Click to apply any changes you have made. The dialog box closes automatically.