Managing intercept monitoring cases using the View i-cases screen
This topic describes how to manage intercept monitoring cases specifically using the View i-cases screen.
This feature requires option E14 Sentinel. If you do not have this option this feature is not available.
NOTE: Intercept monitoring cases can also be managed using the Manage case screen. These screens are coupled therefore any changes you make on one results in the same change on the others. If you prefer to use the Manage case then refer to Managing cases and Managing i-cases.
If you require detailed descriptions of the settings in these procedures refer to View i-cases screen.
NOTE: The following procedure only explains how to create a case it does not include the steps required to create i-cases, if you require that then refer to How to create a new intercept monitoring case using the View i-cases screen.
-
Click here to create a new case.
Alternatively open the View i-cases screen. It may be that your Home page is configured to open this screen but if not:
-
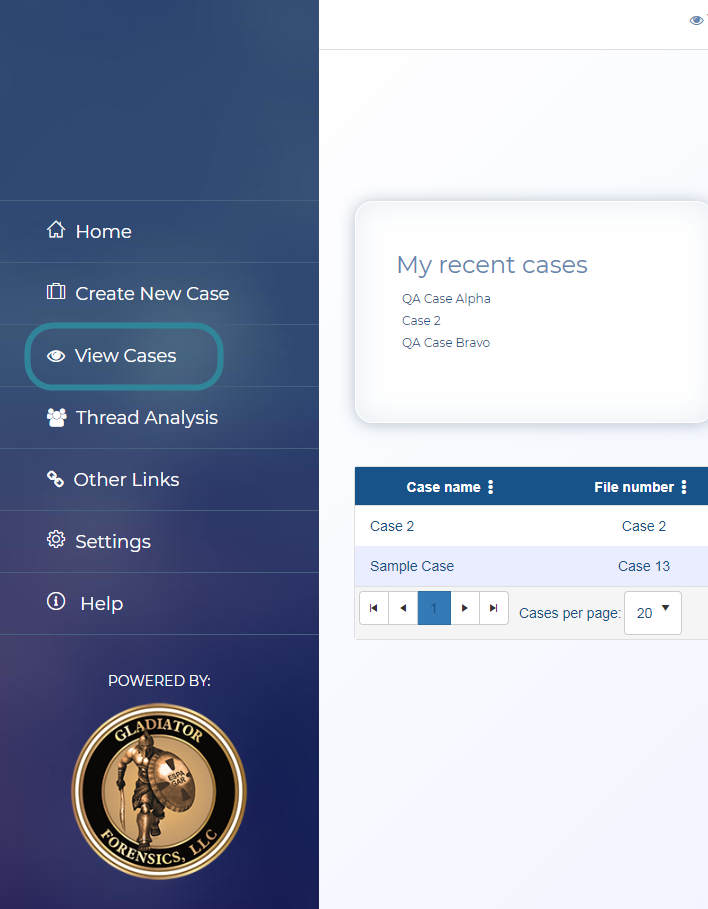
On the main menu click View Cases.
-
Either the Advanced view cases, View i-cases or the View Cases screen opens depending on your setting of View cases on the User settings screen. If the View Cases or Advanced view cases screens open then click
 at the top-right of the screen to open the View i-cases screen.
-
-
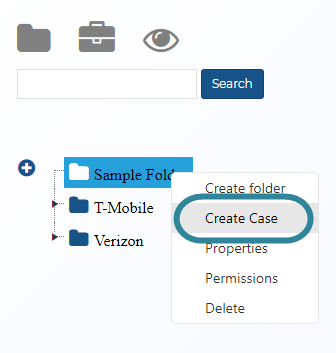
Right-click the folder you want to create your case in, then select Create Case.
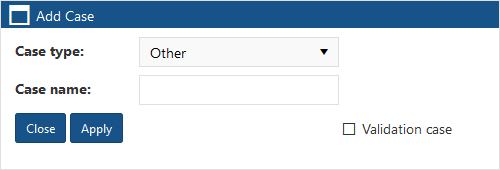
The Add Case dialog box opens.
- In Case type select the type of case. This selection simply helps you filter cases in the future on the View Cases screen making them easier to locate. It does not change any subsequent settings.
-
In Case name, although it is optional it is recommended that you enter a name for the case so that the name means something to you, for example "Jewelry Store Robberies". However if you don't, OSS-ESPA will automatically create one which is titled using the format "Case <n>", where <n> is a number which increments each time a user on your OSS-ESPA account selects to automatically generate a case name.
-
Click Apply.
The dialog box closes and the case is created within the folder you selected.
Once your case is created you can then add i-cases to it. For further information refer to To create an i-case.
-
Open the View i-cases screen. It may be that your Home page is configured to open this screen but if not:
-
On the main menu click View Cases.
-
Either the Advanced view cases, View i-cases or the View Cases screen opens depending on your setting of View cases on the User settings screen. If the View Cases or Advanced view cases screens open then click
 at the top-right of the screen to open the View i-cases screen.
-
-
Locate the case you want. To do this either:
- Manually navigate to the case by expanding the folders that the case is located in.
- Enter at least part of the case name then click Search. If the first case it finds is not the one you're wanting to edit then click Next until you reach the your case.
-
Right-click the case name and select Properties.
The Case properties dialog box opens.
-
Edit the case name or type as required then click Apply.
The dialog box closes and the case is updated with your changes.
-
Open the View i-cases screen. It may be that your Home page is configured to open this screen but if not:
-
On the main menu click View Cases.
-
Either the Advanced view cases, View i-cases or the View Cases screen opens depending on your setting of View cases on the User settings screen. If the View Cases or Advanced view cases screens open then click
 at the top-right of the screen to open the View i-cases screen.
-
-
Locate the case you want. To do this either:
- Manually navigate to the case by expanding the folders that the case is located in.
- Enter at least part of the case name then click Search. If the first case it finds is not the one you're wanting to edit then click Next until you reach the your case.
-
Right-click the case name and select Permissions.
The Permission for folder dialog box opens.
-
Use the dialog box to select who you want assigned to the case then click Apply.
The dialog box closes and the case is updated with your changes.
This procedure describes how to enable and disable all the i-cases for the selected case. It is also possible to enable/disable all i-cases for a selected person and phone using the same procedure but by right-clicking the person or phone within the case. Individual i-cases can also be enabled/disabled using the same procedure but by selecting the individual i-case as described in To enable and disable an individual i-case.
-
Open the View i-cases screen. It may be that your Home page is configured to open this screen but if not:
-
On the main menu click View Cases.
-
Either the Advanced view cases, View i-cases or the View Cases screen opens depending on your setting of View cases on the User settings screen. If the View Cases or Advanced view cases screens open then click
 at the top-right of the screen to open the View i-cases screen.
-
-
Locate the case you want. To do this either:
- Manually navigate to the case by expanding the folders that the case is located in.
- Enter at least part of the case name then click Search. If the first case it finds is not the one you're wanting to edit then click Next until you reach the your case.
-
Right-click the case name and select i-cases then click Enable i-cases or Disable i-cases.
When an i-case is enabled it displays
 and when it is disabled it displays
  beside the individual i-cases.
-
Open the View i-cases screen. It may be that your Home page is configured to open this screen but if not:
-
On the main menu click View Cases.
-
Either the Advanced view cases, View i-cases or the View Cases screen opens depending on your setting of View cases on the User settings screen. If the View Cases or Advanced view cases screens open then click
 at the top-right of the screen to open the View i-cases screen.
-
-
Locate the case you want. To do this either:
- Manually navigate to the case by expanding the folders that the case is located in.
- Enter at least part of the case name then click Search. If the first case it finds is not the one you're wanting to edit then click Next until you reach the your case.
-
Right-click the case name and select Delete.
Click OK on the confirmation dialog. Your case is deleted and no longer displayed on the screen.


