Setting the ESPA analysis center screen's appearance
This topic describes how define the ESPA analysis center screen's appearance.
This section describes how to select, create, edit, and delete themes which define the WNF analysis center screen's appearance. It also shows some examples of some theme configurations.
The WNF analysis center screen's appearance can be changed by selecting or creating a new theme. Gladiator Forensics provides a "Default" theme which has the appearance of the original WNF analysis center screen. However you can create your own themes which are only available to yourself, and your administrator can also create themes that are available to all users of your customer account.
NOTE: If your administrator has created a default account theme then that is the only one available for you to use, and you are unable to create your own personal theme or select any that you may have previously created.
Some examples of how you can set up your screen are shown below.
-
Using the Gladiator "Default" theme where: Theme, Style and Controls are all "Classic".

-
Using a theme where: Theme is "Blue"; Style is "Floating" and Controls is "Modern".

-
Using a theme where: Theme is "Grey"; Style is "Slideable" and Controls is "Classic".

-
Open your case on the WNF analysis center screen as described in Getting started with investigating case data visually.
-
In Theme options use Theme and select from the menu the theme you want to use.

Depending on which theme you select the screen may be updated immediately or it may require a refresh of the screen. If a refresh is required then a Change Theme dialog box opens allowing you to confirm that you definitely want to change the theme.
If you want to open the new analysis center, which allows you to open the views in separate windows then select ESPA Analysis Center.
Note: You cannot create or edit a personal theme if your administrator has set a default account scheme.
-
Open your case on the WNF analysis center screen as described in Getting started with investigating case data visually.
-
In Theme options click Manage themes.

The Edit themes dialog box opens.

-
In Name either enter a new name if you are creating a new theme or select an existing name if you are editing an existing theme.
- In Theme select the color scheme for your theme.
- In Style select the view layout for your theme. For further information refer to Style.
- If the Style you selected is either Floating or Slideable then in Panel opacity use the slider to set the transparency for your theme.
- In Controls select the type and layout of the map controls. For further information refer to Controls.
- For administrators only. In Type select who the theme is available to. For further information refer to Type.
- Click Save.
- Click Cancel to close the Edit themes dialog box.
Note: Unless you are an administrator you can only delete personal themes, which are those that are listed in the Theme drop-down list with an unchanged background. If you are an administrator you can also delete account themes which are those listed with a pink background. Only Gladiator Forensics can delete system themes which are those listed with a green background.
-
Open your case on the WNF analysis center screen as described in Getting started with investigating case data visually.
-
In Theme options click Manage themes.
The Edit themes dialog box opens.
-
In Name select the theme you want to delete.
-
Click Delete.
A Delete Theme dialog box opens to confirm that you want to delete the theme, click OK.
- Click Cancel to close the Edit themes dialog box.
This section describes how define the ESPA analysis center screen's theme and the map view's controls. It also shows some examples of some theme and control configurations.
-
Open your case on the ESPA analysis center screen as described in Getting started with investigating case data visually.
-
On the Input and settings view click the theme button, which is named with your current theme color, and select from the menu the theme color you want to use.

-
Light theme

-
Dark blue theme

-
Dark theme

Your screen will require a refresh, and a Change Theme dialog box opens allowing you to confirm that you definitely want to change the theme.
-
-
Open your case on the ESPA analysis center screen as described in Getting started with investigating case data visually.
-
On the Input and settings view click the control button, which is named with your current control selection.

Click to select the control layout you want to use:
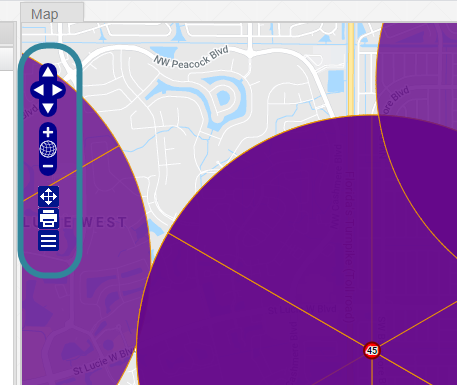
- Classic: This control layout is most similar to OSS-ESPA's original ESPA analysis center screen. It has all the same controls in approximately the same position as the original ESPA analysis center screen.
The classic control layout is highlighted in the following graphic:
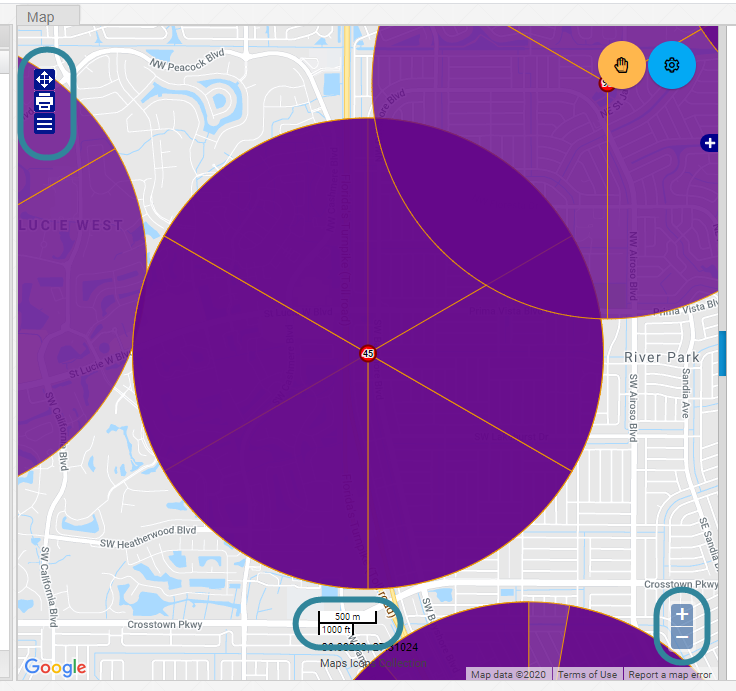
- Modern: With this control layout:
The zoom control is located at the lower right of the map. This zoom control only zooms in and out.
There is no map pan control available in this layout.
The map scale and the latitude/longitude of your mouse position is located at the bottom center of the map.
The modern control layout is highlighted in the following graphic:
-
ESPA analysis center: Select to open the traditional analysis center.
- Classic: This control layout is most similar to OSS-ESPA's original ESPA analysis center screen. It has all the same controls in approximately the same position as the original ESPA analysis center screen.
If your workspace is large, possibly you have multiple monitors then you may prefer to open the views in individual screens, for example you may want to open the Analyses results view on a separate window. To do this, click  at the top-right of each view.
NOTE: You can only perform this prior to clicking Refresh. Therefore you should configure your screen layout prior to investigating your case on the ESPA analysis center screen.
Once a view is open in a new window it can easily be returned to its previous position on the main screen. To do this, click  at the bottom-right of the window you want to return to the main screen.
NOTE: You can only perform this prior to clicking Refresh. Therefore you should configure your screen layout prior to investigating your case on the ESPA analysis center screen.
To move a view to a new location click on the title bar of the view and drag it to the required location within the browser window.

Setting the colors of the views' banner for a case is useful if you are analyzing multiple cases and you are opening views in new windows. It means you can easily identify which views are for which case based on their color. To set the color, on the Input and settings view click  , select your color then click Apply. The following example shows the banners set to red.

To resize a view click any edge or corner and then drag to resize it as required.

To reset all the views to their original position and size click  on the Input and settings view.
You can expand the Case management view, so that it displays the full width of content on the currently selected tab, using the arrow button on the top-right of the view.
