New location data dialog box
This topic provides an overview of the New location data dialog box and all the settings and buttons on it.
The New location data dialog box, which opens from both the ESPA analysis center screen and the Sentinel screen, allows you to quickly add location data for GPS pings and timing advance arcs. This is useful if you've contacted the service provider for the latest location data and rather than wait for them to send it to you, it allows you to enter it manually.
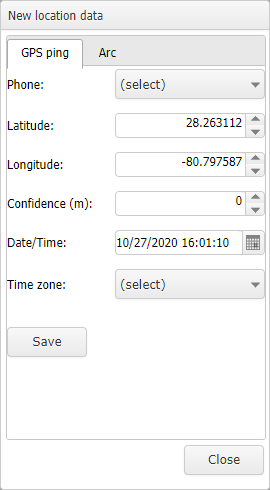
Select which phone the location data is for.
The latitude is automatically populated using the map position you clicked on to open this dialog box. However you can edit it if required.
The longitude is automatically populated using the map position you clicked on to open this dialog box. However you can edit it if required.
Enter the confidence level of the estimated call location as provided by the service provider in meters.
This setting is only applicable on the Sentinel screen.
Select if you want to enter a custom date and time. If this setting is not selected OSS-ESPA uses the current date/time, allowing the location to be treated and delivered as real time.
The date and time are automatically populated using the time you clicked to open this dialog box. However you can edit it if required.
On the Sentinel screen, this setting is only applicable if Use custom date/time is selected.
Select which timezone you are in. If you are in a different timezone from the location, this allows OSS-ESPA to calculate and display the Adjusted time for the data.
On the Sentinel screen, this setting is only applicable if Use custom date/time is selected.
Select which phone the location data is for.
The latitude is automatically populated using the map position you clicked on to open this dialog box. However you can edit it if required.
The longitude is automatically populated using the map position you clicked on to open this dialog box. However you can edit it if required.
Select a value for how the arc's azimuth is displayed on the map. The azimuth is the direction of the arc's beam. For example an azimuth of 0 degrees means the beam's center is directly North; and an azimuth of 90 degrees means the beam's center is directly East. The available range is 0 to 359 degrees.
If you do not know the azimuth, it is recommended that you leave it at the default of 0 degrees and set the beamwidth to 360 degrees, then the arc is displayed on the map as a complete circle.
Select a value for how the arc's beam is displayed on the map. The available range is 1 to 360 degrees.
The default beam width value used for each arc is 120 degrees.
If you do not know the azimuth, it is recommended that you leave it at the default of 0 degrees and set the beamwidth to 360 degrees, then the arc is displayed on the map as a complete circle.
Enter the distance from the latitude/longitude that the arc covers. You can also select the measurement units.
Enter the thickness of the arc in meters.
The date and time are automatically populated using the time you clicked to open this dialog box. However you can edit it if required.
Select which timezone you are in. If you are in a different timezone from the location, this allows OSS-ESPA to calculate and display the Adjusted time for the data.