Viewing different map layers on the Sentinel screen
This topic describes how to view the different map layers on the Sentinel screen.
This feature requires option E14 Sentinel. If you do not have this option this feature is not available.
You can select to hide or show each map layer using the layer selection settings located in the upper right corner of the map by clicking  . The following graphic provides an example of the layer selection window.

The base layers available to select are: Google Physical, Google Streets, Google Hybrid (a combination of both satellite and street maps) and Google Satellite.
The overlays that are available to select are dependent on what you currently have displayed on your Sentinel screen. For example, if you do not have target locations in your case then the target locations layer is not available to select. The possible selections are:
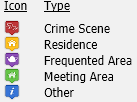
Select Target locations to display the target locations which you have added to the selected case. All the target locations listed on the Locations of interest screen (Case management), which have longitude and latitude information entered are displayed. Each type of target location is displayed using a different default icon or alternatively you can customize the icons using Marker icon, Marker label and Icons on the Locations of interest screen (Case management). For example, the default icons are;
Select Target locations buffer to display the selected target location buffers. All the target locations which have a location buffer set can now be displayed on the map. To display them you must select the target location's location buffer on the Location of interest view.
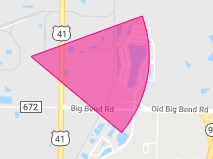
Select Sectors to display the sectors that have been identified as being used by one of the events currently displayed on the Location events view. For example;
Select Tower reference to display a tower reference on the map which allows you to cross reference the geographic location of calls with the time of calls. Each tower location is given a reference number. A tower location is defined by its latitude and longitude, therefore each sector in the tower has the same tower reference number. This tower reference number can also be displayed on the Location events view using the Settings dialog box irrespective of whether you have selected to display the tower reference on the map.

Select Geo-location to display the geo-location events that are selected on the Location events view.

Select Geo-location confidence to display the geo-location confidence circles that are selected on the Location events view. To select geo-location confidence circles use the check-boxes on the view.
Select Last known layer to display the last known events for GPS pings, sms, data and voice calls.
Select Current active layer to display:
- a call or data session in progress. Note, that the map displays all the sectors that have been used during the call, not just the call's latest sector. The sector that is currently being used is displayed like this
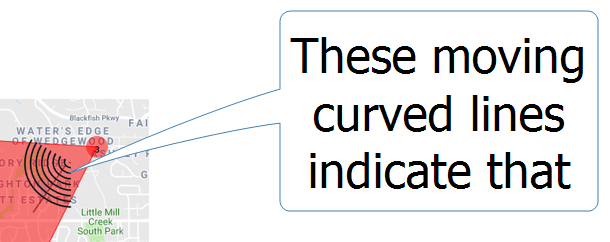 , whereas the previous sectors show no moving curved lines.
 - an SMS that occurred in the previous 60 seconds.
- GPS pings that occurred in the previous 60 seconds.
If you exported a Precision location analysis from the ESPA analysis center using Export map to Sentinel, and displayed the analysis using the Case data dialog box then the precision layers from the export are displayed for selection.